
Reading Time: 7 minutesAlthough Sony XQD cards have been overshadowed by the newer CFexpress cards, they are still used by many photographers and videographers thanks to their impressive reliability and satisfactory performance. However, just like any other storage device, Sony XQD cards are not immune to data loss.
If you’ve accidentally deleted your photos, formatted your card, or encountered any other issue that resulted in XQD-related data loss, don’t worry. This article will guide you through the process of XQD data recovery.
Common Reasons of Data Loss from XQD Cards
XQD cards are designed to be more robust and durable than most modern memory cards, especially microSD cards. They are shockproof, magnet-proof, anti-static, and resistant to breakage. They also offer full performance even in extreme temperatures, under exposure to intense UV light, and airport X-ray machines. As a result, data loss caused by physical damage is rare (here’s how to address it if you encounter it).
What isn’t rare is the so-called logical damage, which refers to any non-physical issues that prevent you from accessing your data.
One of the most common reasons for data loss from XQD cards and the main example of logical damage is accidental deletion. This can happen when you accidentally press the delete button on your camera or computer, or when you format the card without realizing that it still contains important files.
The good news is that it’s possible to recover deleted photos from an XQD card as long as the lost data has not been overwritten by new data. Jump to a solution.
Another common cause of logical damage and data loss from XQD cards is corruption. This can occur due to various reasons, such as power loss during data transfer, using the card on incompatible devices, or exceeding the card’s lifespan, which causes too many faulty data storage blocks to accumulate.
When data corruption occurs, recovery is often possible, but some images and videos may be visibly damaged. Jump to a solution.
We also shouldn’t forget about malware. Ransomware, for example, can encrypt files stored on XQD cards, making them inaccessible. Other types of malware can hide files by changing their file attributes or even delete them altogether.
Recovery chances depend on the specific malware in question. Some ransomware is impossible to recover from, but, on the other hand, revealing hidden files is often straightforward. Jump to a solution.
How to Recover Data from an XQD Card
In this part of the article, we will provide you with step-by-step solutions to help you with Sony XQD data recovery. Whether you have accidentally deleted your photos, formatted your card, or encountered data corruption or malware, we have got you covered.
Recover Accidentally Deleted Data from a Sony XQD Card
If you have accidentally deleted data from your Sony XQD card, the first thing you should do is to stop using the card immediately. This is because any new data that you save onto the card can potentially overwrite the deleted data, making it impossible to recover.
However, as long as the deleted data is still physically present on the card, it is possible to recover it. The best way to do this is by using capable data recovery software.
We recommend using Disk Drill as the best option for Sony XQD data recovery because it supports over 400+ file formats, including RAW photos and videos, such as Sony Alpha RAW files. It’s also compatible with all popular file systems, and it even handles XQD cards that don’t have a functioning file system.
To perform XQD data recovery using Disk Drill:
- Visit the official Disk Drill website and download the software (Disk Drill is available for Windows and macOS, and the two versions are nearly identical). Then, open the installer file and install the software by following the on-screen instructions.
- Use a compatible card reader to connect your XQD card to your computer. The card must be recognized by your operating system to be recoverable using Disk Drill. In other words, it must be listed in the Disk Management tool on Windows or Disk Utility on macOS.
- Launch Disk Drill and click on your XQD card from the list of devices. Then, click the search for lost data button to begin the scanning process. Disk Drill will start scanning your XQD card for deleted files.

- Once the scan is complete, Disk Drill will display a list of recoverable files. You can filter the results by file type to find the specific files you want to recover. For example, if you want to recover RAW photos, you can use the Pictures filter.
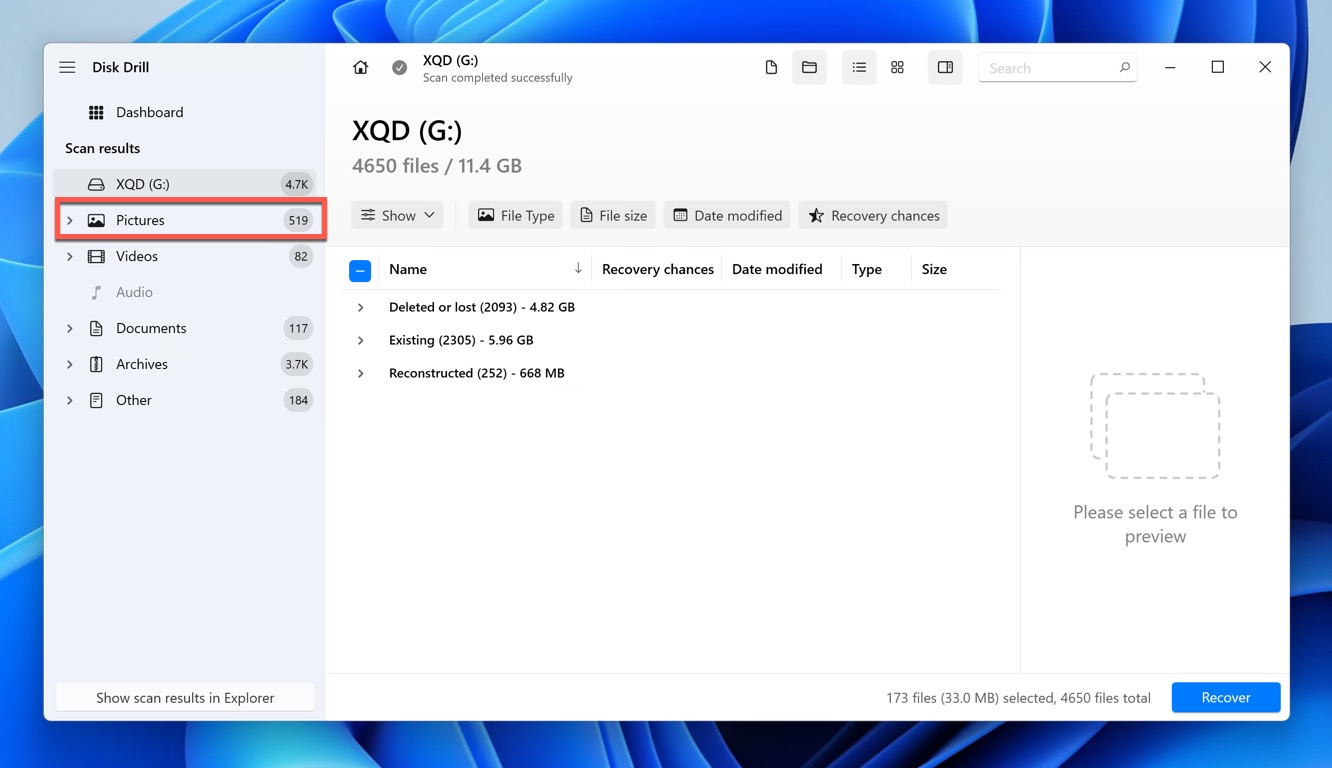
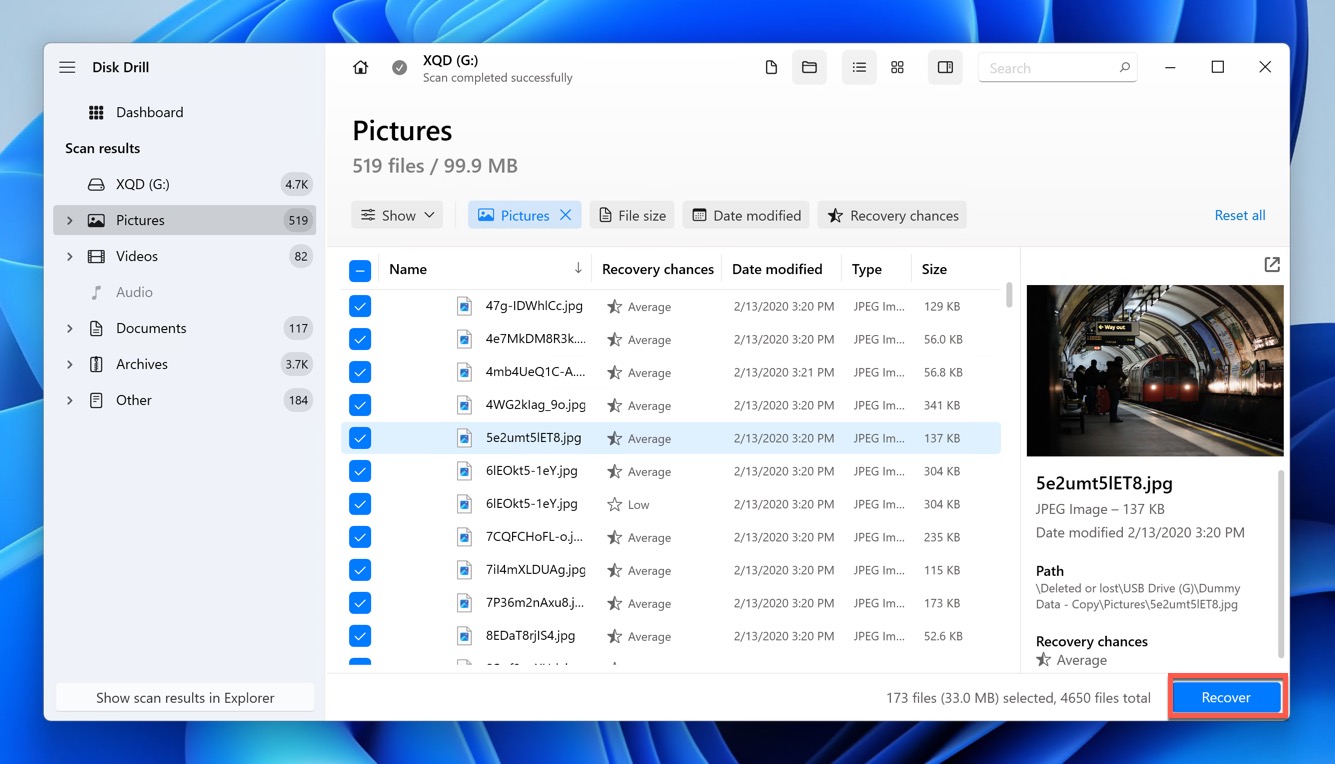
- Select the files that you want to recover. Use the preview function to check the files before recovery to verify that you’re recovering the correct files.
- Finally, click the Recover button and choose a safe destination on your computer to save the recovered files.


The Windows version allows you to recover up to 500 MB of data for free, which might be sufficient depending on the amount of data you’ve lost.
Recover Corrupted Data from a Sony XQD Card
When XQD card corruption occurs, your files might become inaccessible. To restore access to them, you need to repair the corruption, and you can do just that using built-in tools like CHKDSK on Windows and Disk Utility on macOS.
CHKDSK (Check Disk) is a command-line utility in Windows that can scan and repair file system errors on your XQD card. Here’s how it works:
- Connect your Sony XQD card to your computer.
- Launch File Explorer and remember the drive letter assigned to it.
- Press Win + X and launch Windows Terminal (Admin).
- In the Command Prompt window, type the following command and press Enter: chkdsk X: /f (replace X: with the drive letter of your XQD card)
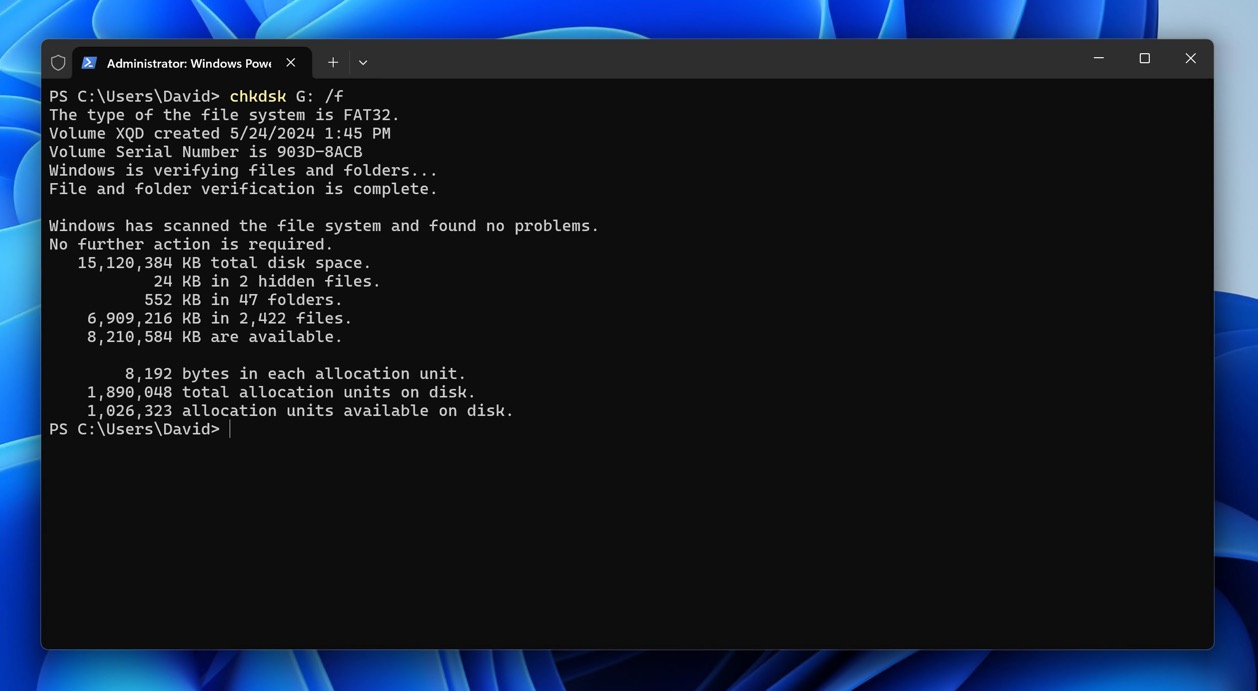
- Wait for CHKDSK to scan the card for file system errors and attempt to fix any issues it finds.

Mac users have it even easier because they can use Disk Utility instead and benefit from its graphical user interface:
- Connect your Sony XQD card to your Mac.
- Open Disk Utility. To do this, type “Disk Utility” into the Spotlight search bar and select the app.
- Select your Sony XQD card from the list of storage devices in the left-hand sidebar.
- Click the First Aid button in the top-right corner of the window.
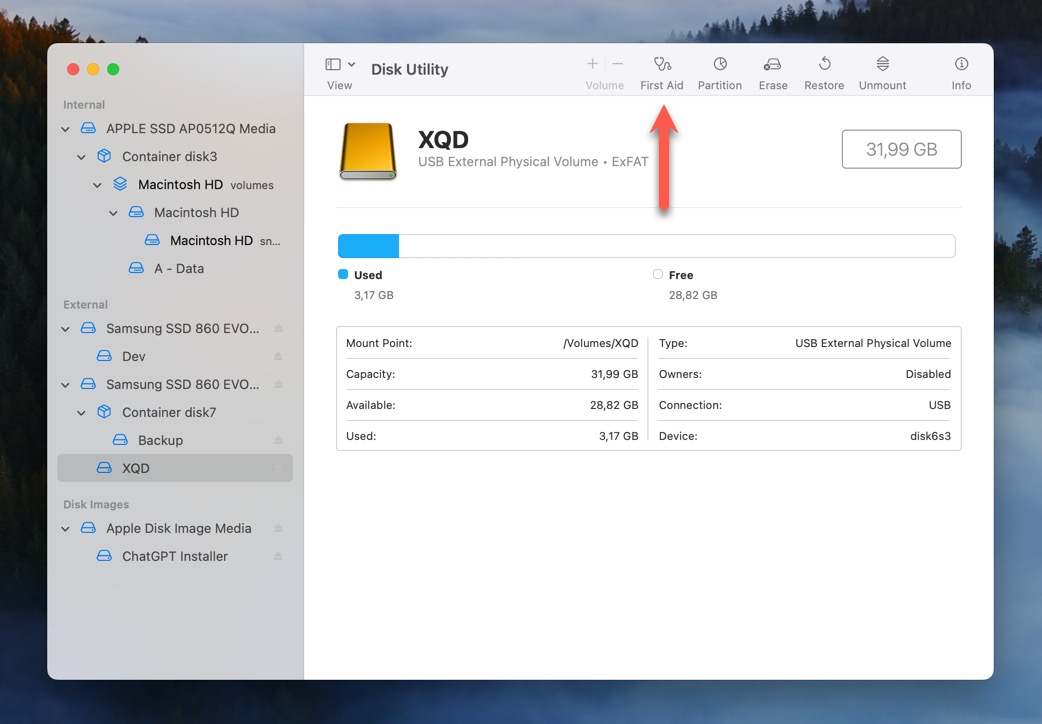
- Give the tool the time it needs to fix your memory card.

Recover Data from a Malware-Infected Sony XQD Card
If you have reason to believe that your Sony XQD card has been infected with malware, it’s important to take action right away. Malware can spread quickly and cause further damage to your files and system.
The first step is to remove the malware infection from your Sony XQD card. For Windows users, you can use Windows Security to scan and remove malware from your XQD card. Here’s how:
- Connect your Sony XQD card to your computer.
- Open the Start menu and search for Windows Security.

- Click on Virus & Threat Protection and then Scan Options.
- Select Full Scan and then click Scan Now.
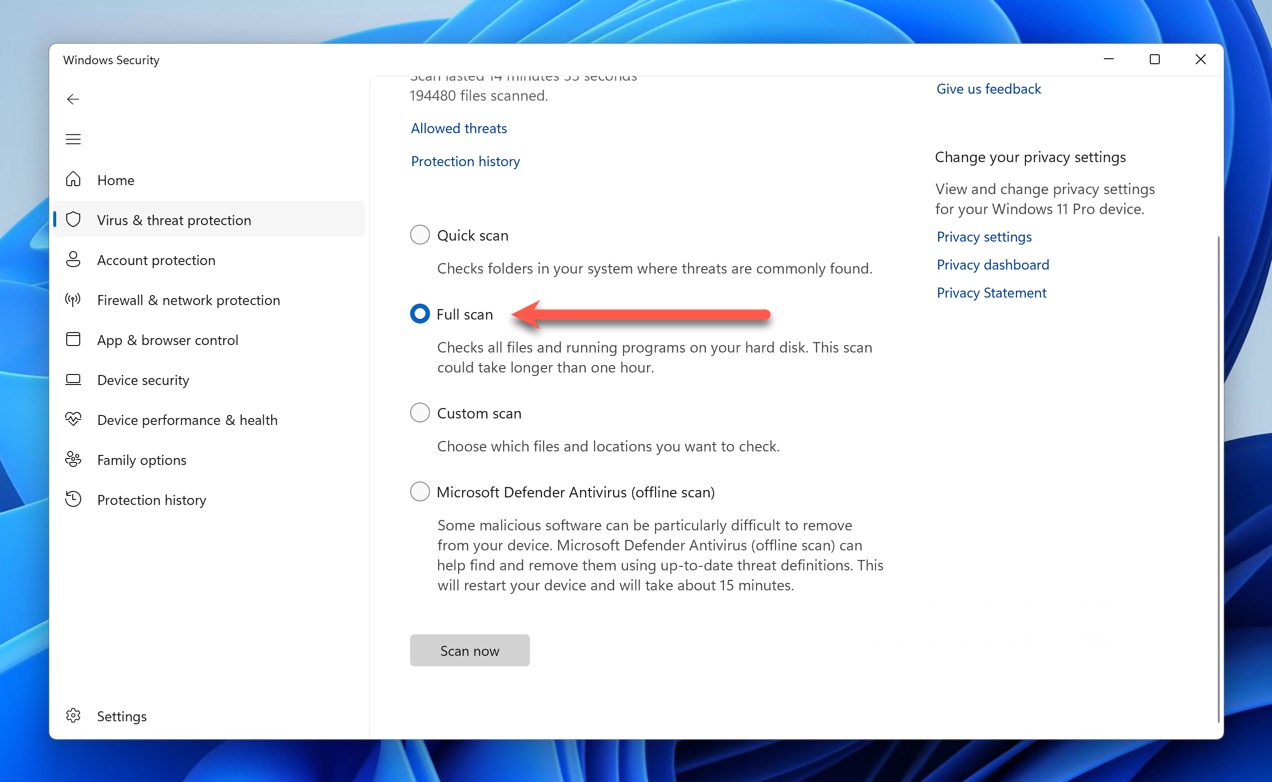
- If any threats are detected, Microsoft Defender will automatically quarantine and remove them.


Unfortunately, Macs don’t come with a built-in antivirus program on par with Microsoft Defender, so we recommend using a third-party antivirus solution specifically designed for Mac, such as Bitdefender Antivirus for Mac or Malwarebytes for Mac.
Once you’ve successfully removed the malware infection from your Sony XQD card, you can proceed with Sony XQD data recovery using data recovery software like Disk Drill, as described in the section above. Disk Drill can find and recover even files whose attributes have been changed by malware to become invisible.
That said, you can also unhide hidden files using the following terminal commands:
- Windows: attrib -h -r -s /s /d X:*.* (replace X: with the drive letter of your XQD card)
- macOS: chflags nohidden /Volumes/XQD-Card/* (replace /Volumes/XQD-Card/ with the actual path to your XQD card)
Recover Data from a Physically Damaged Sony XQD Card
While Sony XQD cards are designed to be robust and durable, physical damage can still occur under certain conditions. If your XQD card has suffered physical damage, DIY data recovery attempts are generally discouraged. Instead, we recommend you seek professional help right away.
Professional data recovery services have the tools and expertise necessary to safely and effectively recover data from physically damaged XQD cards. They can repair any physical damage to the card and then use specialized software to recover your files.
Conclusion
This guide has equipped you with the knowledge and steps to tackle various data loss scenarios. We’ve covered how to recover deleted photos from XQD cards and other files using data recovery software like Disk Drill, as well as how to address common issues like data corruption and malware infection using built-in and third-party tools alike. Good luck with your XQD card recovery attempts!