
Reading Time: 10 minutesCF cards are typically more durable than their smaller counterparts, the SD and microSD cards. But, you may still face read/write errors, and logical corruption on your CF card. It’s possible your CF card is not recognized by your PC, leaving all its contents inaccessible. So, how do you fix CF card errors? We’re here to help you out—the sections below describe 9 ways to resolve the problems on your CF card and keep your data intact.
Fix 1: Check the Card Reader, and Connection
Before trying anything else, ensure your CF card is properly connected to your device. A low-quality, or improperly connected CF card reader prevents your PC from detecting, and subsequently reading or writing to the CF card. Even if it detects your CF card, you may face read/write, and initialization (“The drive is not initialized”) errors on the CF card.
To rule out all possible connection issues, do the following:
- Make sure the CF card is securely connected to the card reader.
- Use another CF card reader to connect your CF card to the computer.
- Connect the CF card reader to a USB port that’s directly attached to your motherboard (behind the PC case).
- Ensure the USB ports are functional, and not broken.
Fix 2: Connect the CF Card to Another Device
Don’t rule out a faulty, or incompatible parent device as a culprit behind CF card errors.
Often, your PC may not recognize the CF card because it has an unrecognized file system. In this case, there’s nothing wrong with the PC, or the CF card—it’s just a case of incompatibility. You can double-check the compatibility by connecting the CF card to your camera and checking if it shows up. If it does, it’s likely that your computer doesn’t recognize the CF card’s file system. If the CF card remains undetectable, then there’s likely an issue with the CF card itself.
File system compatibility varies across different operating systems. For Windows computer users, try slotting your CF card into a Mac, or Linux PC, and vice versa.
Sometimes, your PC may recognize the certain file systems, but the functionality will be limited to read-only, i.e., you can’t write any data to the CF card. However, read-only CF cards can also result from write-protection switches, and attribute settings.
Fix 3: Update Drivers and Firmware
Hardware devices use software drivers, and firmware to communicate and work with the operating system. Drivers are installed on your PC, and firmware is programmed onto the hardware device itself. If any of these—drivers, or firmware—are outdated, or malfunctioning, the concerned hardware device won’t work properly.
A CF card reader with outdated drivers and firmware can result in compact flash card errors since your PC can’t communicate properly with the card reader itself.
To fix this, update the CF card reader’s drivers, and firmware. Here’s how:
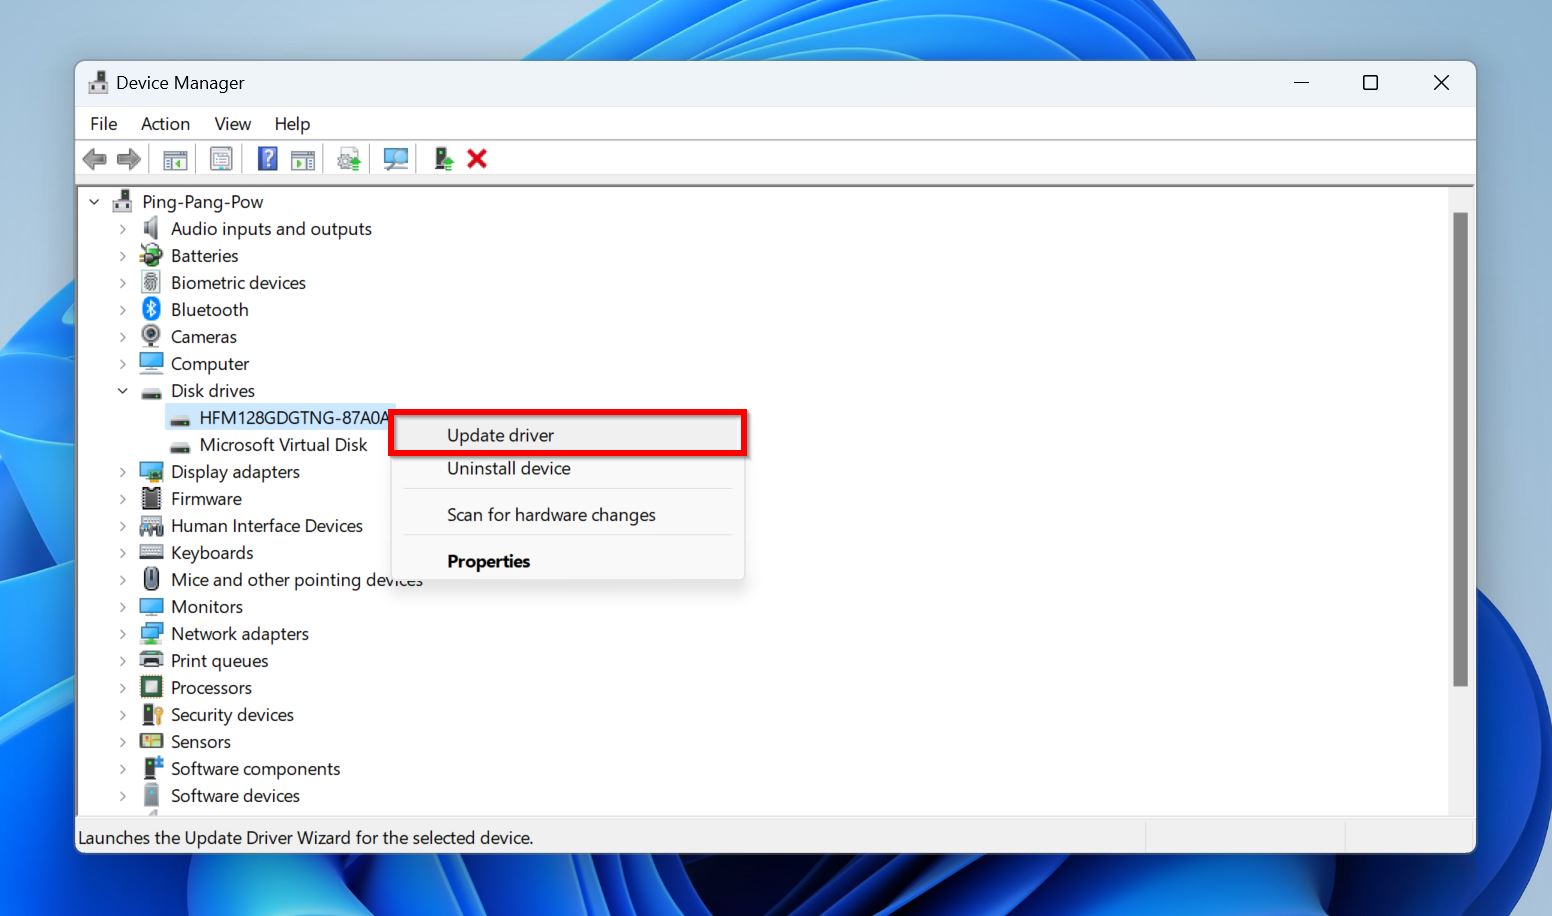
Part 1: Update CF Card Reader Drivers
- Connect the CF card reader to your PC.
- Search for “device manager” in Windows Search (Windows Key + S). Open Device Manager from the search results.
- Find the CF card reader from the device list—it’s typically located in the Disk Drives, or Universal Serial Bus Controllers section. Right-click on the CF card reader, and click on Update Driver.
- Click on Search automatically for drivers, or Browse my computer for drivers if you have downloaded the latest drivers to your PC.
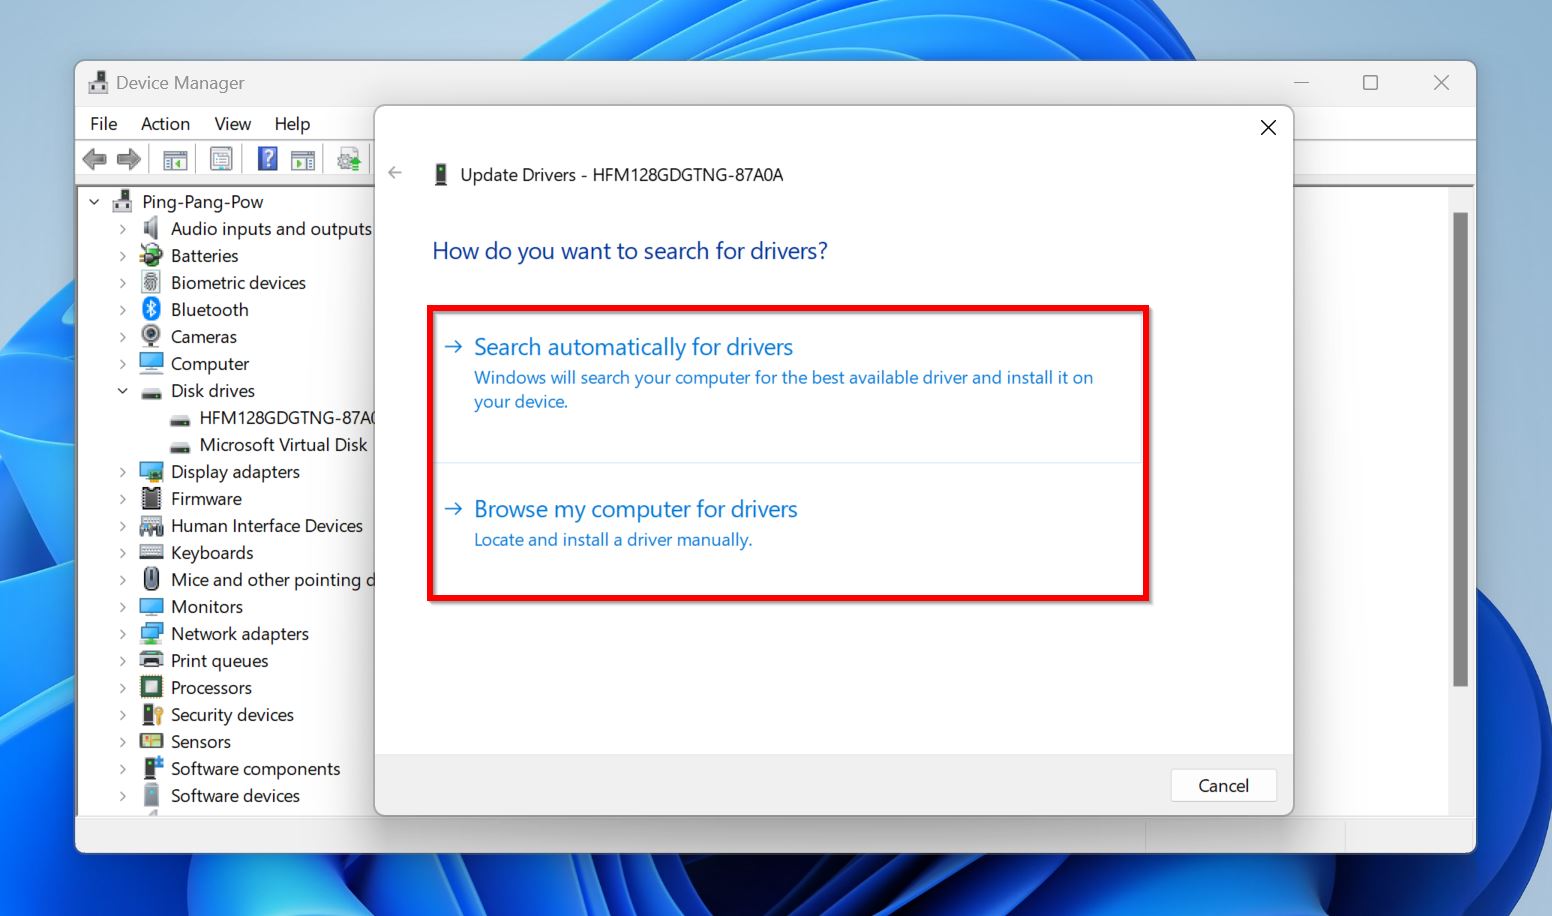
- Windows install the latest drivers for your CF card.
Note: If Windows says that the best drivers for your CF card reader are already installed, it’s a good idea to double-check. To do this, visit the CF card reader manufacturer’s website, and go to the support or downloads section. Locate the latest drivers for the specific CF card reader model, download them, and run the installation file.
Part 2: Update CF Card Reader Firmware
- Connect your CF card reader to the PC.
- Visit the CF card reader manufacturer’s website and open the downloads or support section.
- Type in your CF card reader’s model number and look for the latest firmware.
- Download the firmware package, usually a .ZIP, or .RAR file.
- Extract the firmware package’s contents and run the firmware installation file, which usually has a .EXE extension.
- Restart your PC after the firmware update completes.
Fix 4: Use Data Recovery Software
CF card errors can be the result of underlying corruption, which, in turn, can cause data loss. Before attempting to fix this corruption, it’s best to recover all your existing data from the drive. Why? Because it’s difficult to predict when exactly a CF card will give up, making your data irrecoverable. Additionally, numerous methods that fix corruption—like formatting, and running disk checking tools—can also exacerbate data loss.
But, how do you recover data from a CF card that’s corrupted and unreadable? Your best bet is using a good data recovery program.
There are plenty of data recovery programs to choose from. We decided to go with Disk Drill, mainly because of its ease-of-use, combined with an excellent data recovery algorithm. As long as your CF card is visible with its correct capacity in Disk Management, Disk Drill can scan and recover deleted, and existing data from it.
Note: Windows users can recover up to 500 MB of data for free as part of Disk Drill’s trial. Further data recovery requires a paid license.
Here’s how to recover data from your CF card using Disk Drill:
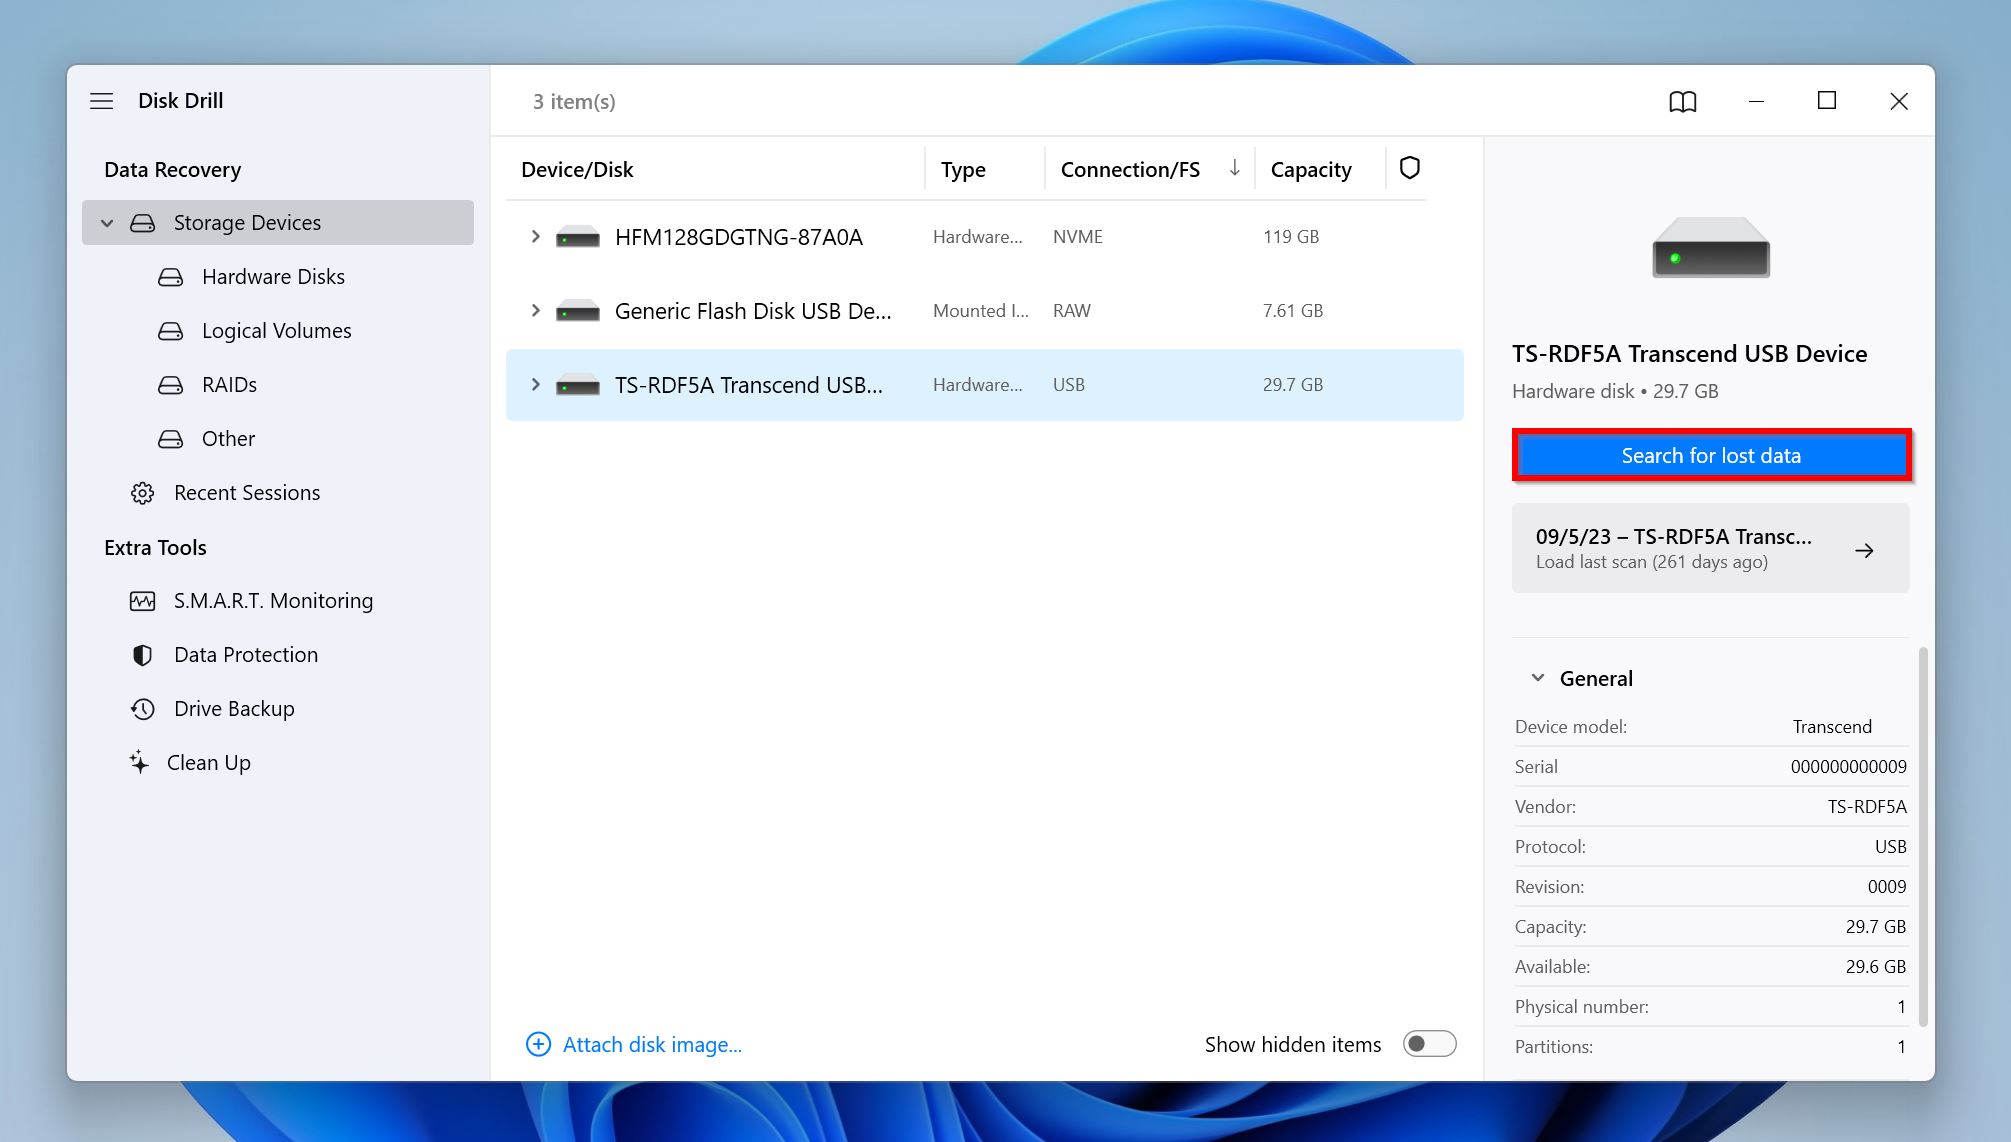
- Connect your CF card to your PC.
- Download Disk Drill and install it.
- Open Disk Drill, select the CF card, and click on Search for lost data.
- Click on Review found items once the scan completes. If you only wish to see a particular file type, click on the relevant file type tile instead (Pictures, Videos, Audio, Documents, Archives, and Other).
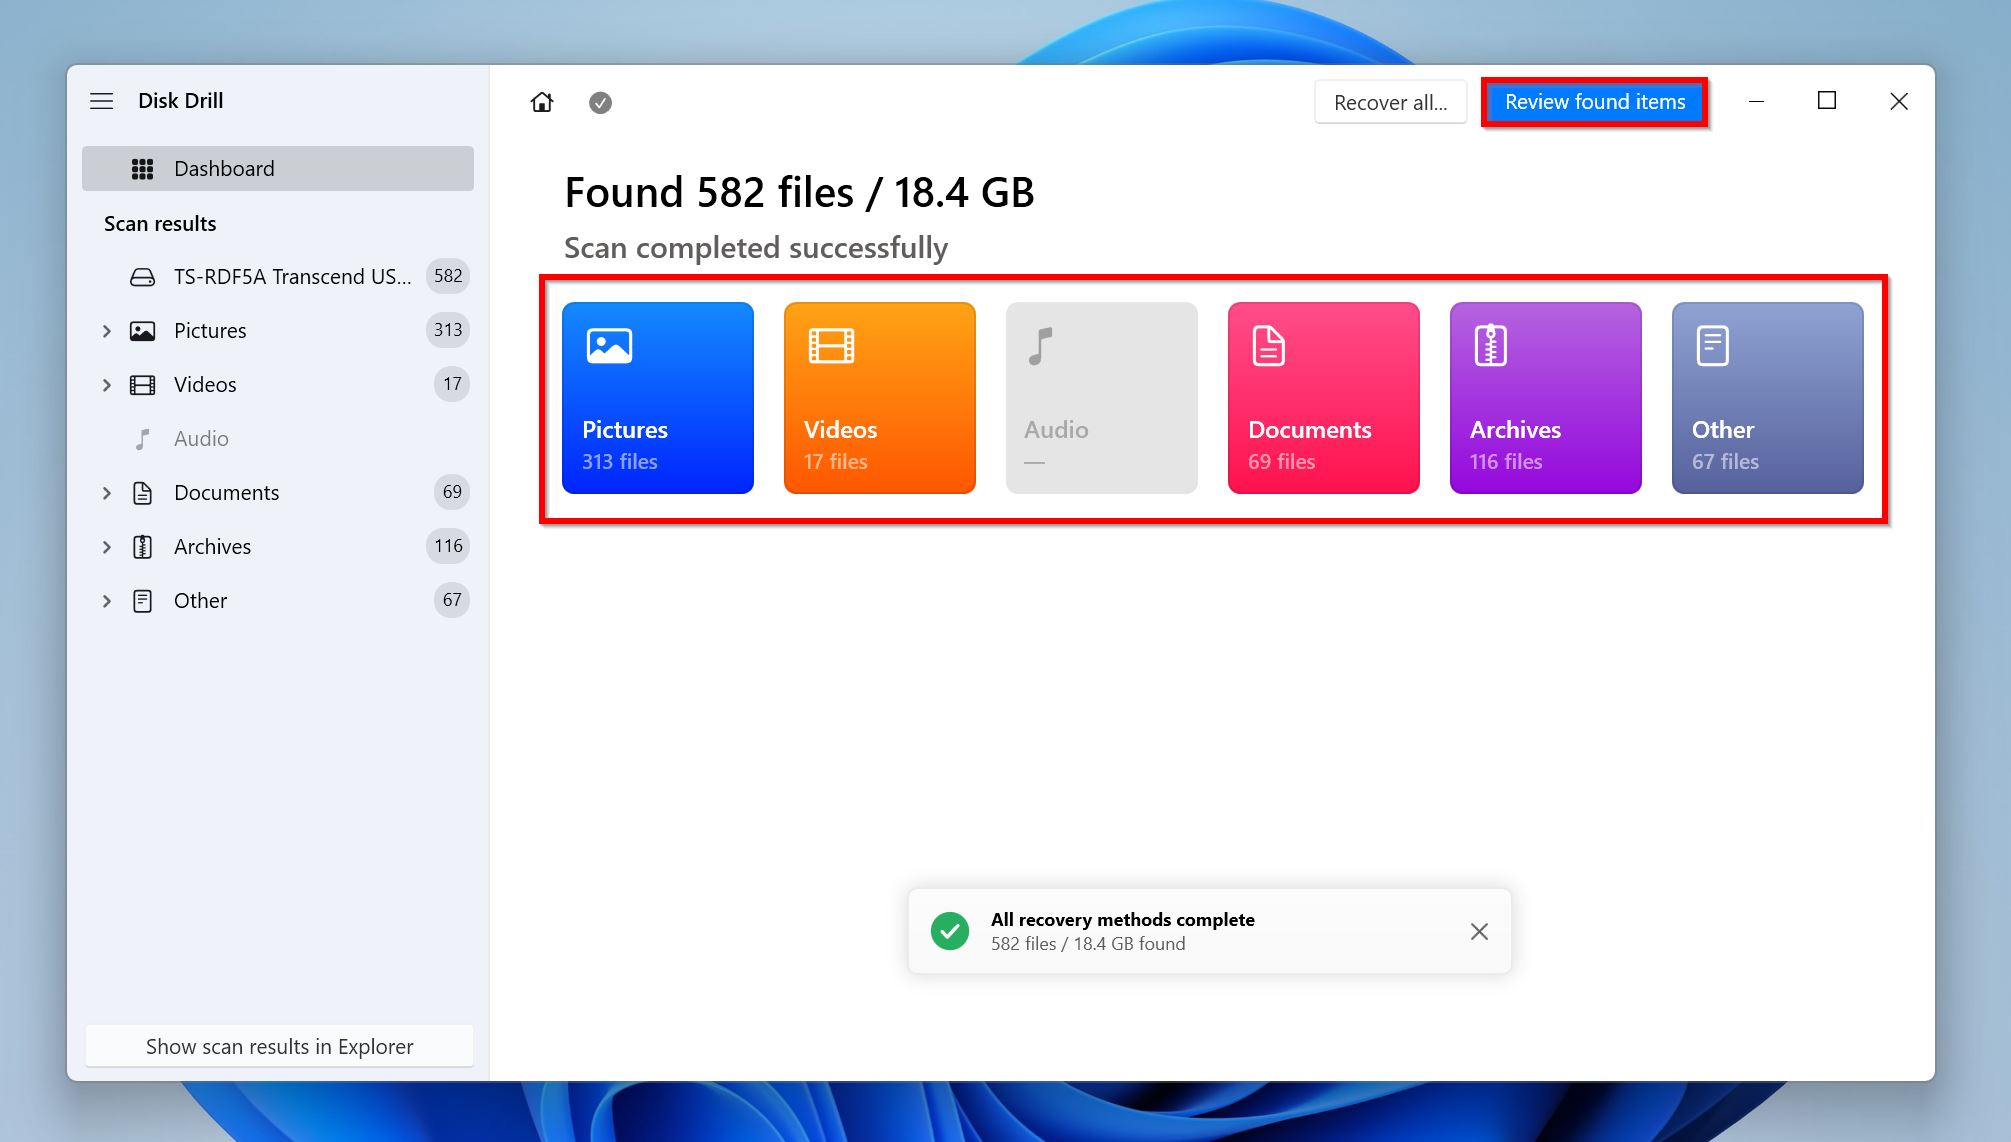
- Expand the Delete or lost and Reconstructed sections to view deleted files that are recoverable. If you wish to see existing files that can be recovered, expand the Existing section.
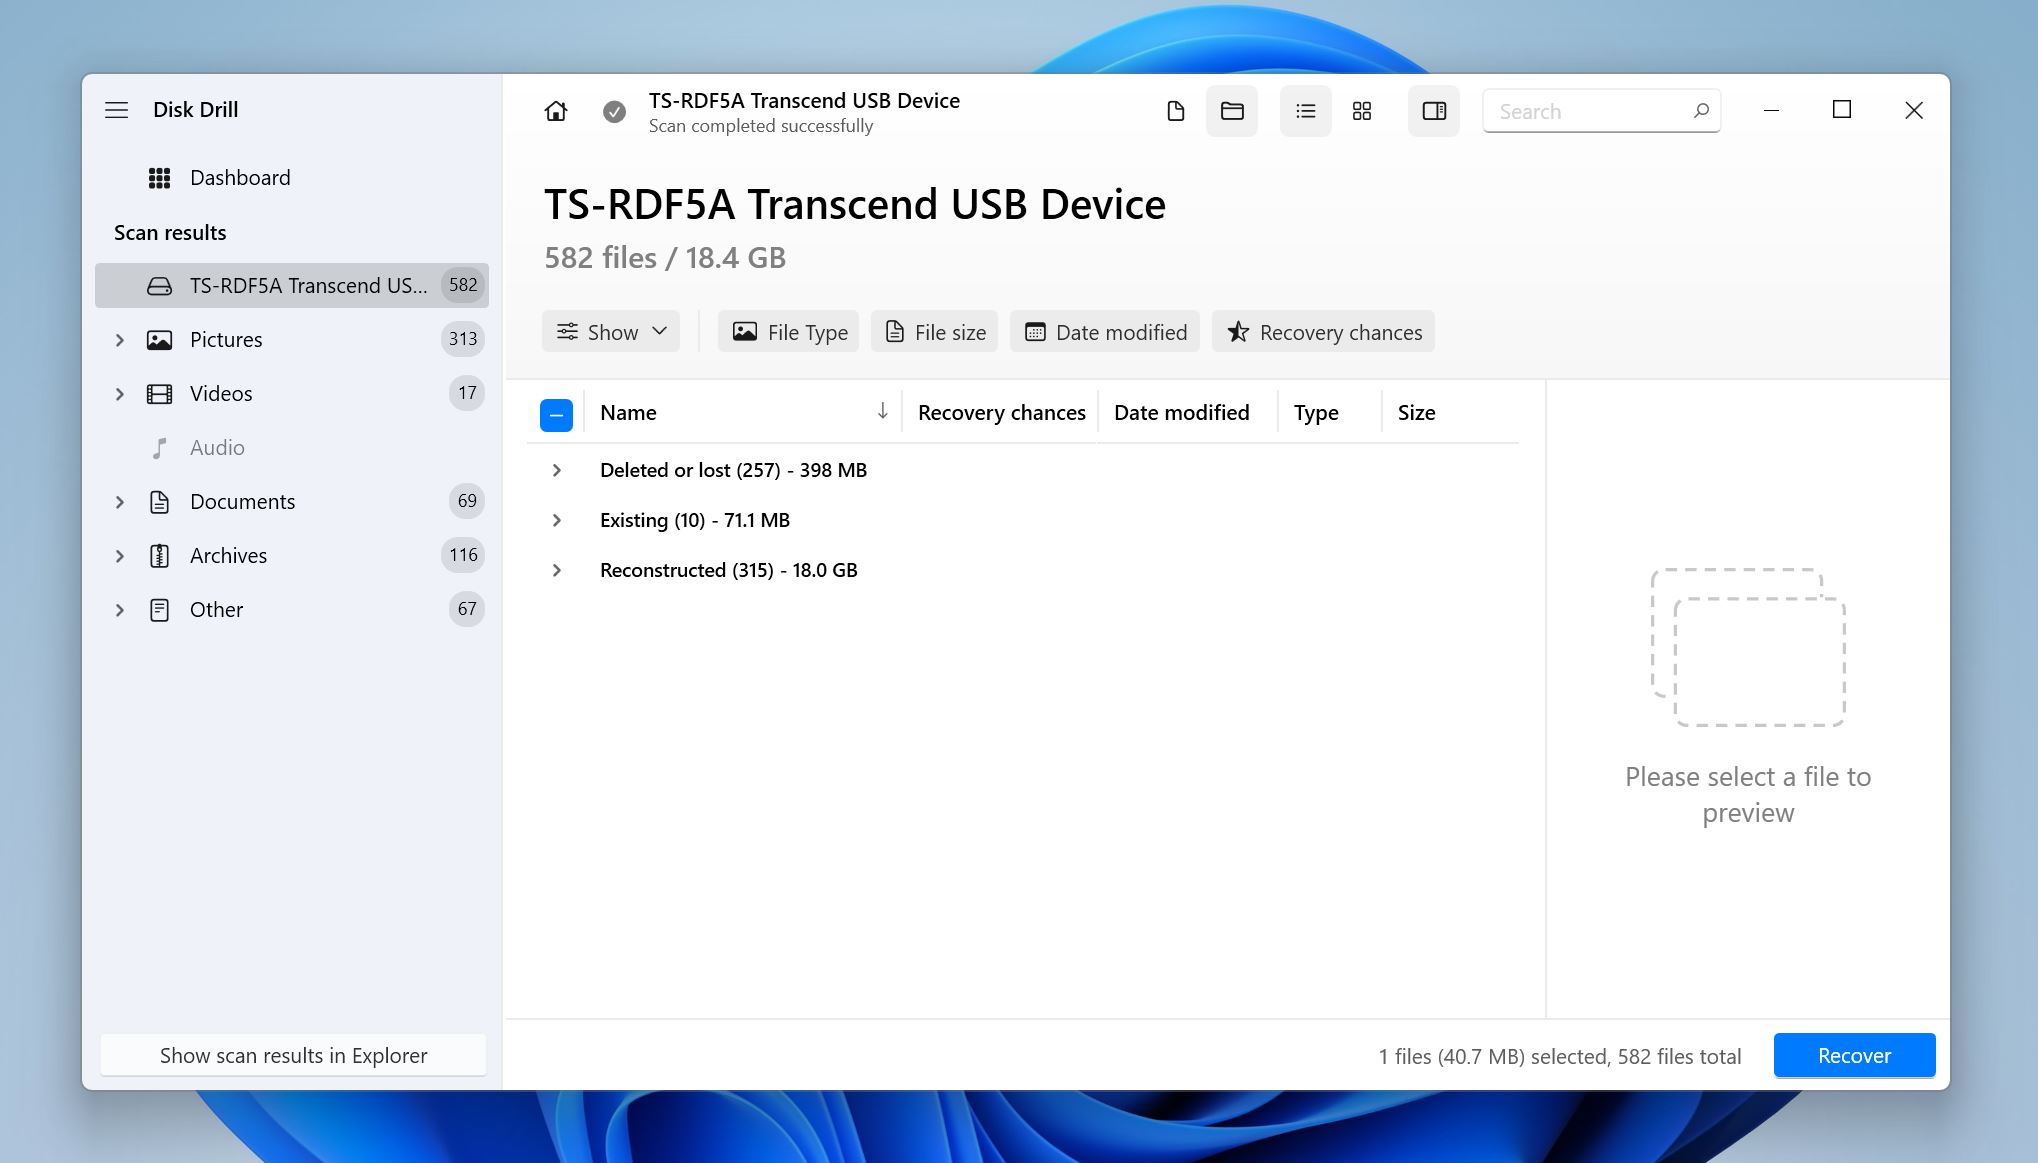
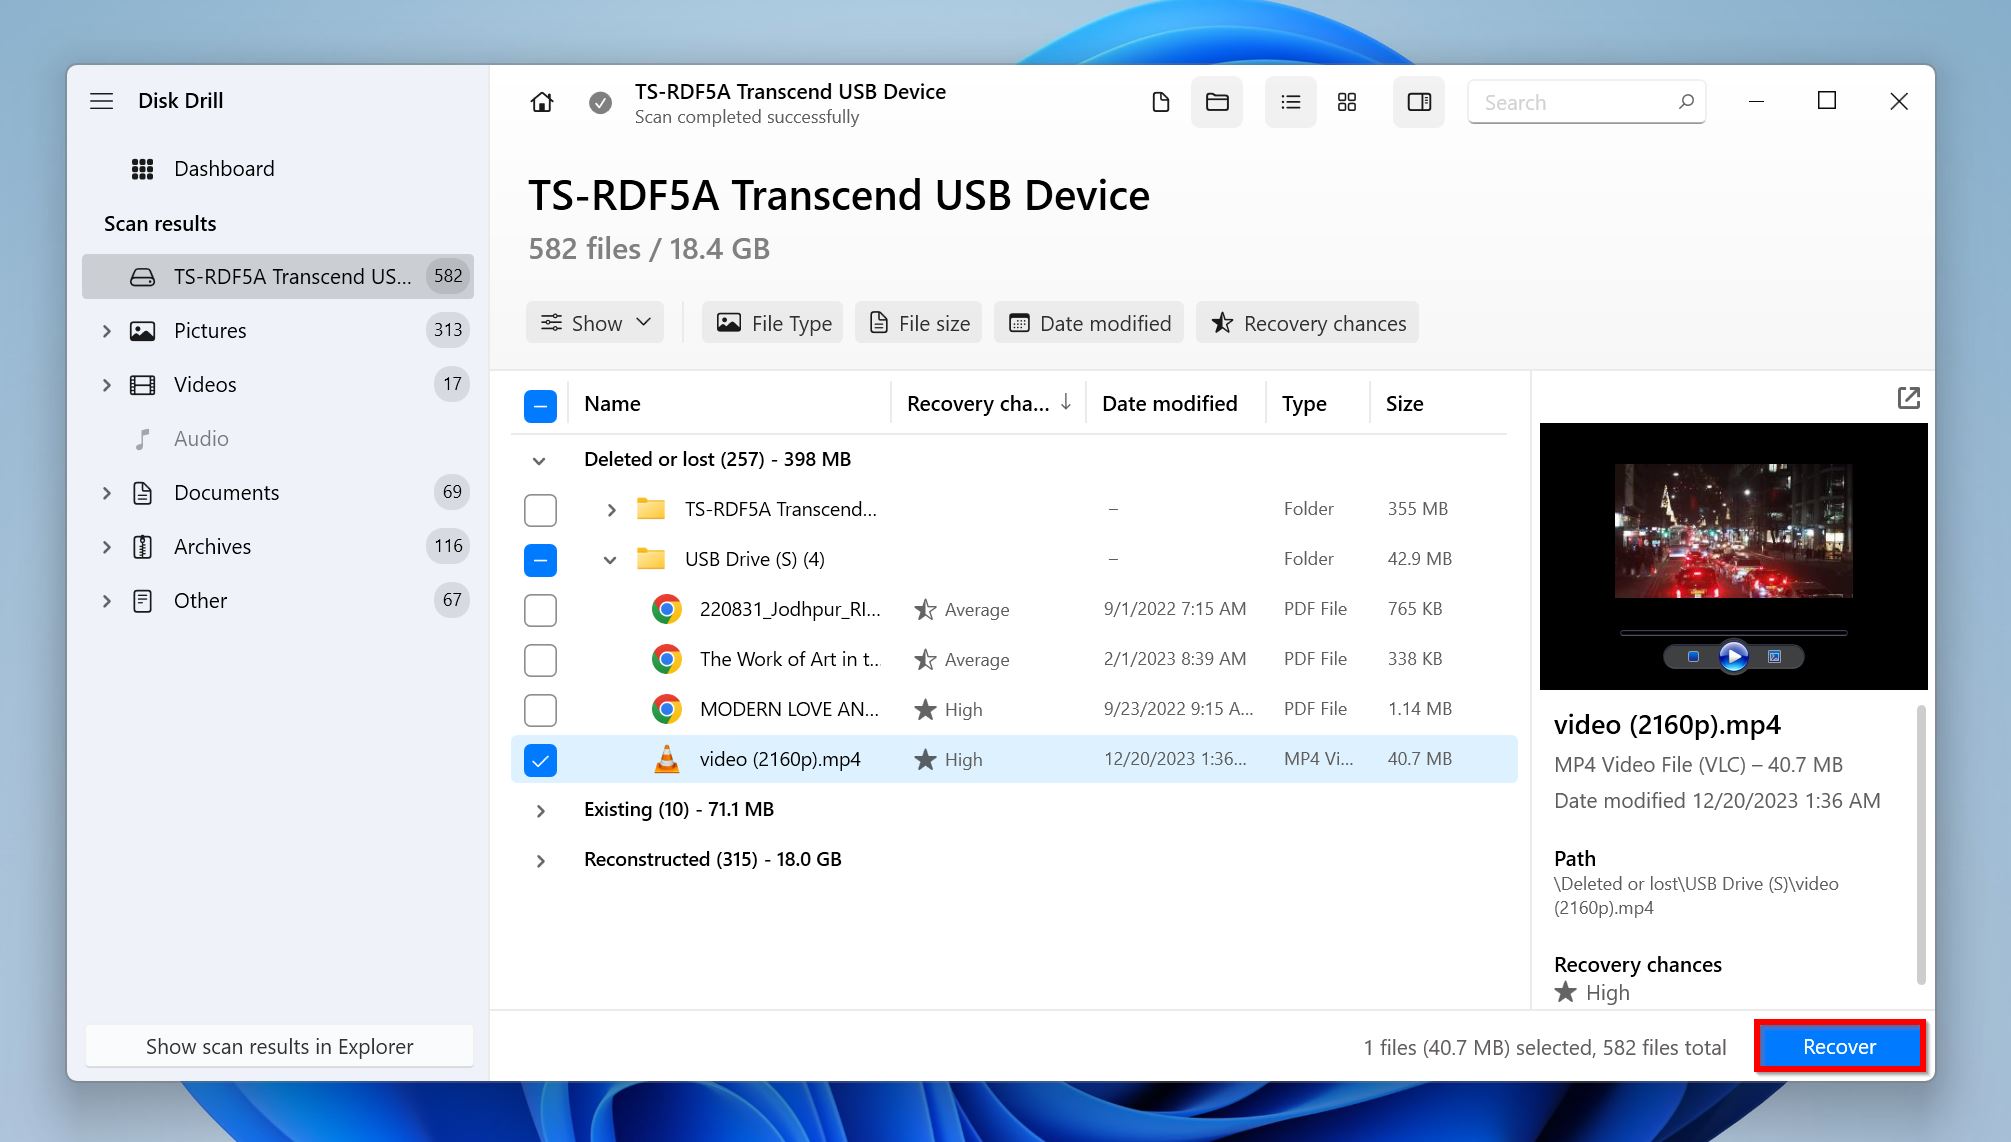
- Select the files you want to recover. Disk Drill displays a preview of the currently selected file, but you can manually preview any file by hovering your cursor on it, and clicking the eye icon next to its filename. Click Recover, after confirming your selection.
- Choose a recovery destination for the files. We recommend saving these files on your local hard drive, or a drive other than the CF card. Click Next.
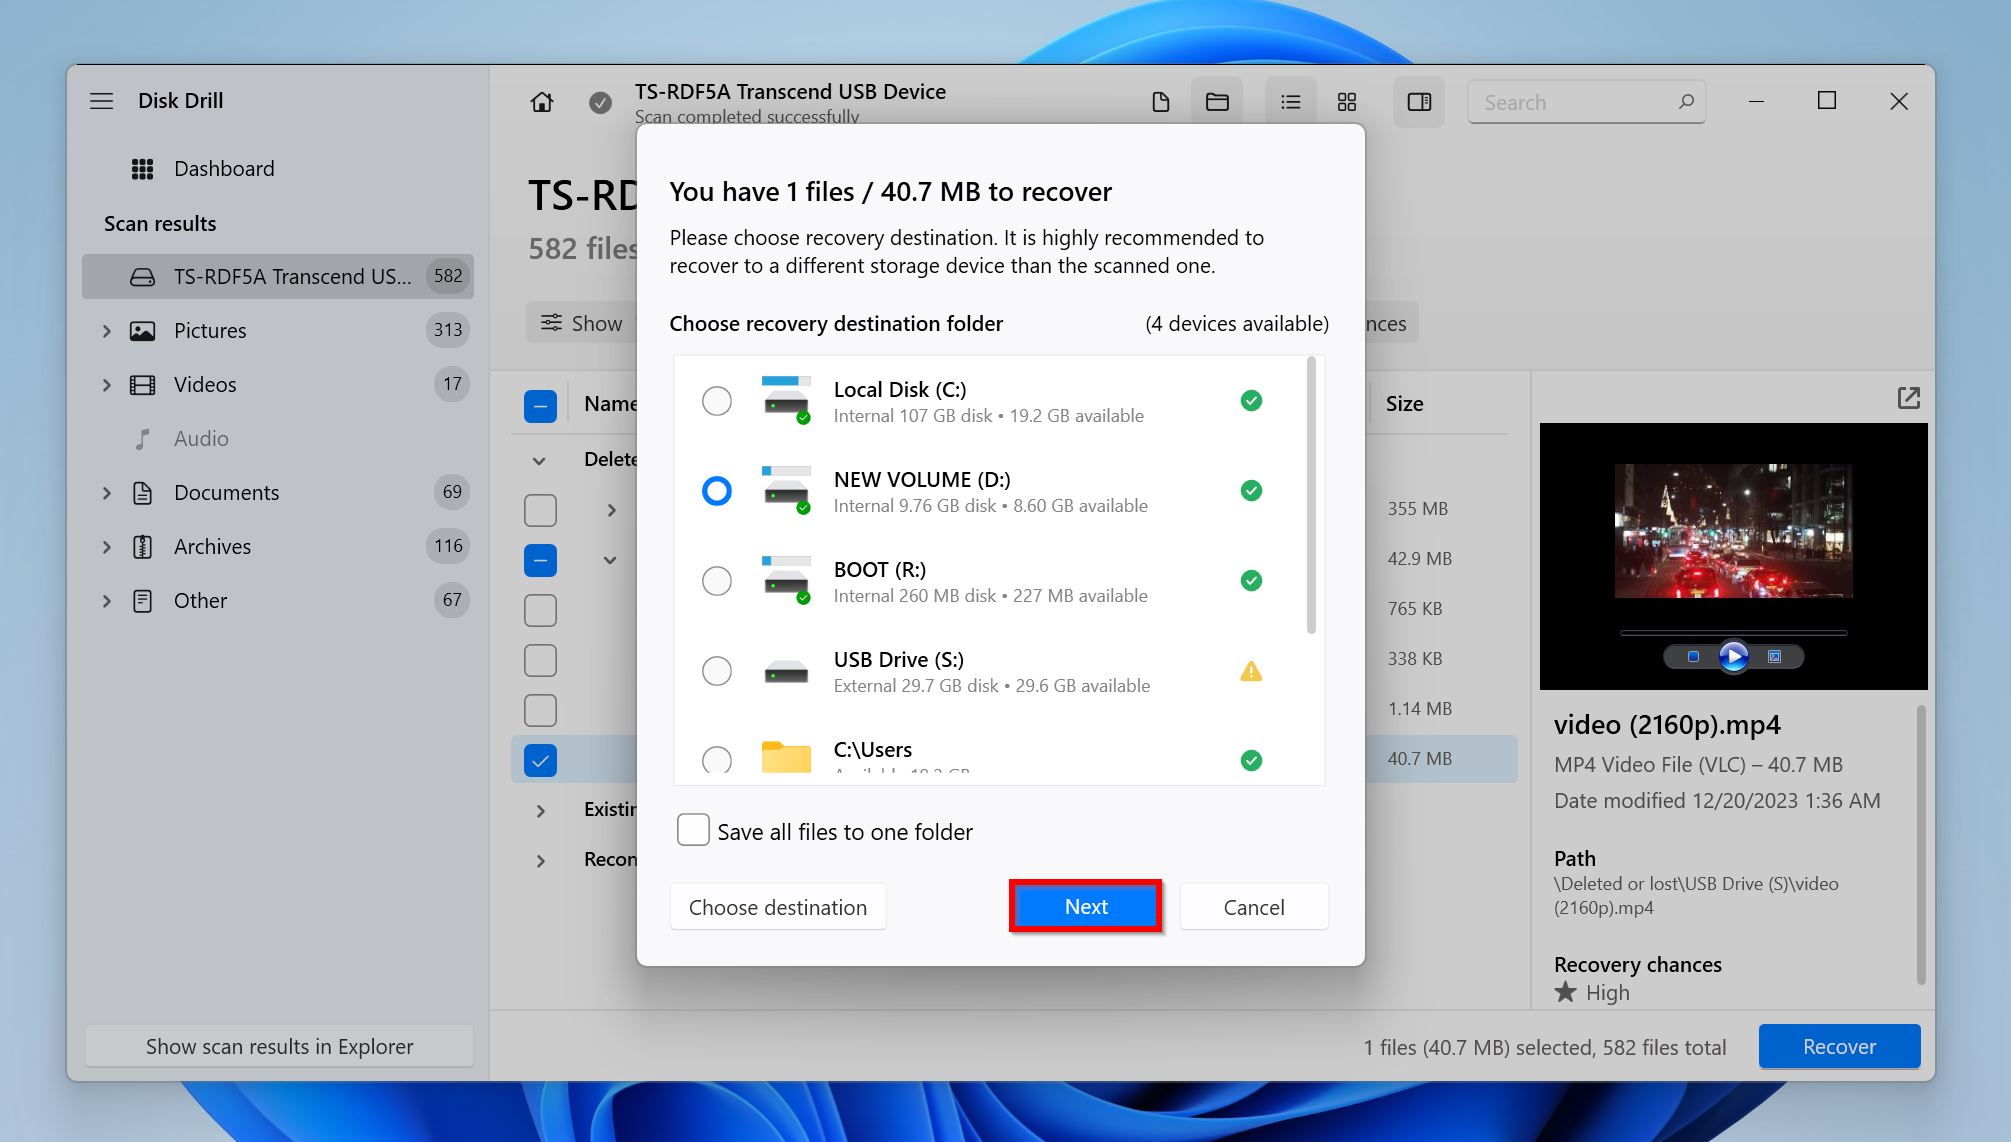
- Disk Drill will recover the selected files.
Fix 5: Use Disk Management
No two storage drives can have the same drive letter on Windows. While drive letter assignment is usually done automatically, Windows occasionally messes up and assigns the same drive letter to two storage drives. This can lead to a CF card that’s not recognized, or accessible.
Well, how do you fix this? By manually assigning a unique drive letter to your CF card using Windows Disk Management. The utility can also help you out when the CF card is inaccessible because of initialization errors.
Here’s how to fix CF card errors using Windows Disk Management:
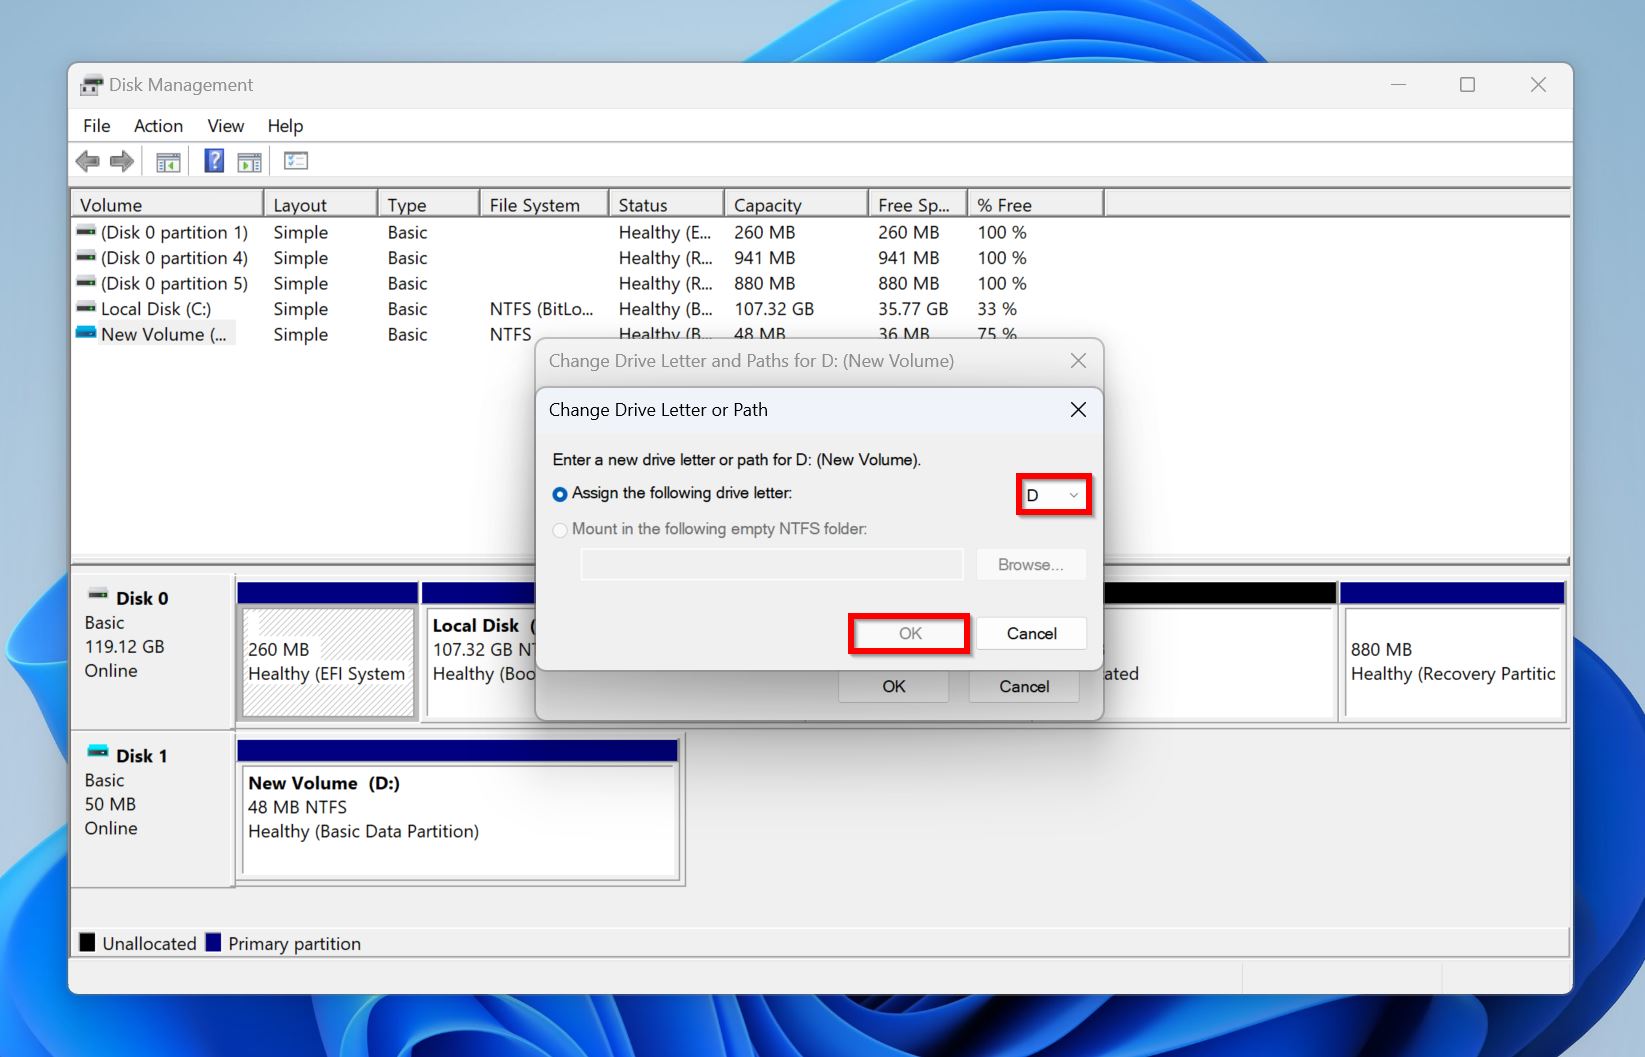
Part 1: Change the Drive Letter
- Connect the CF card to your PC.
- Press Windows Key + R to open the Run app. Type in diskmgmt.msc in the text box and press Enter.
- Look for your CF card in the Disk Management window, right-click on it, and choose Change Drive Letter and Paths….
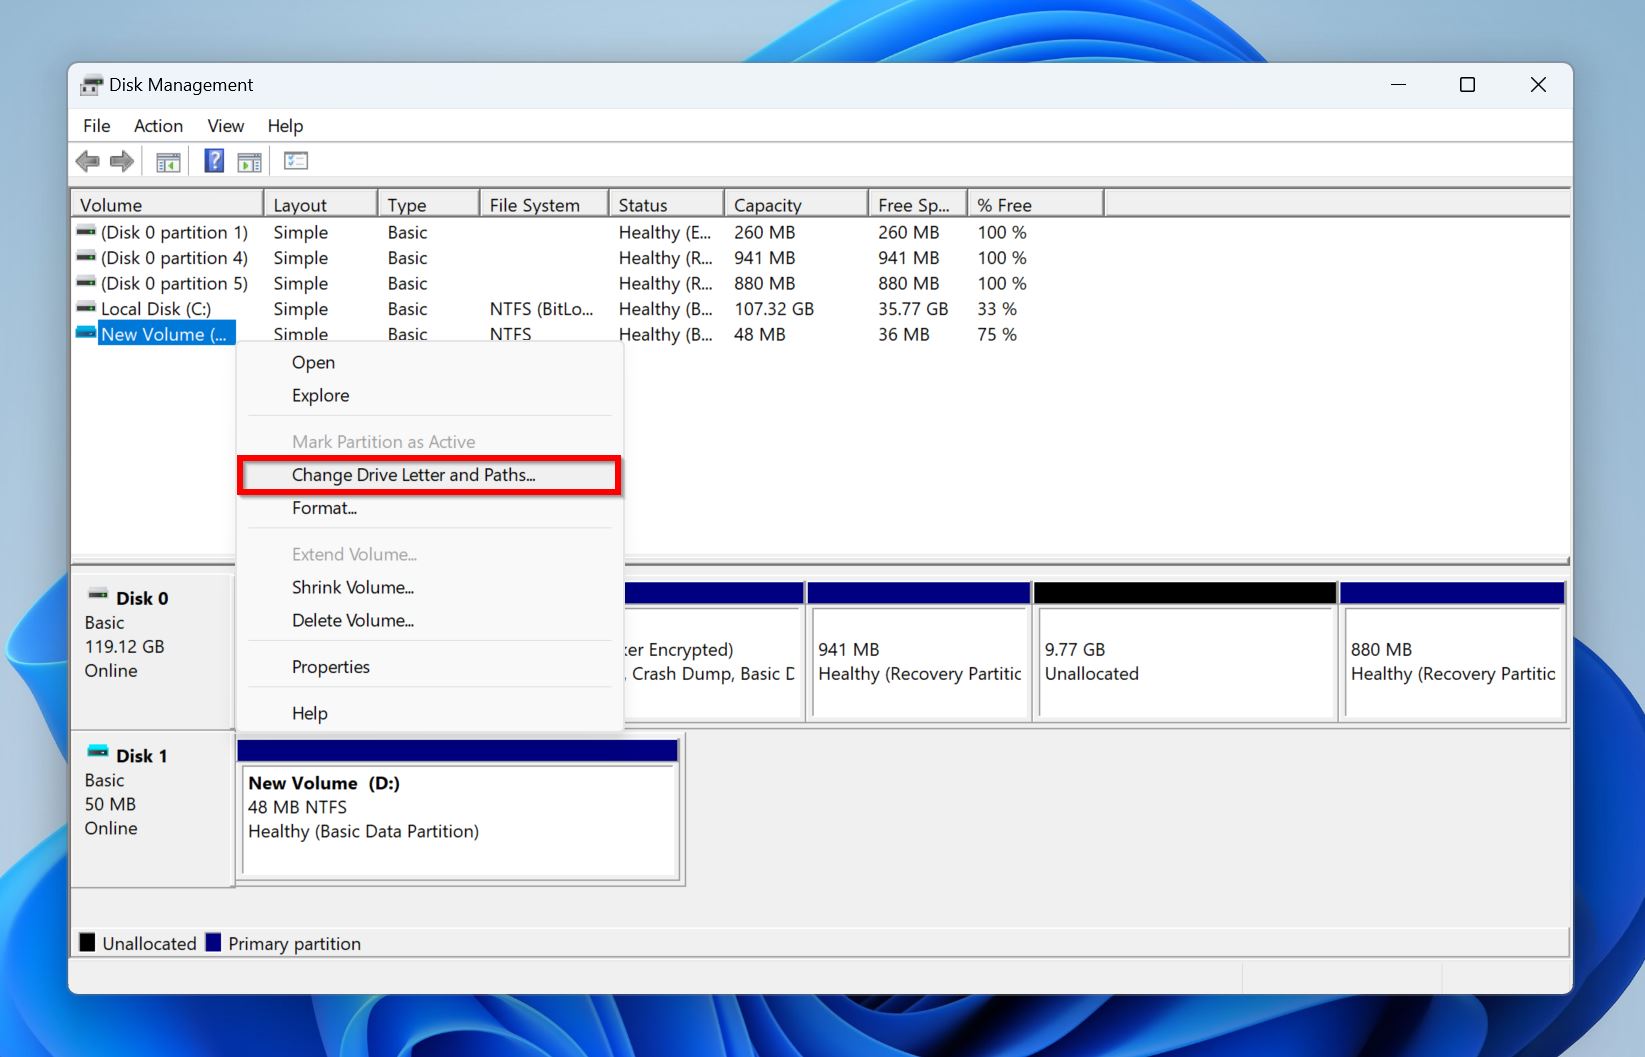
- Click on Change in the next widow.
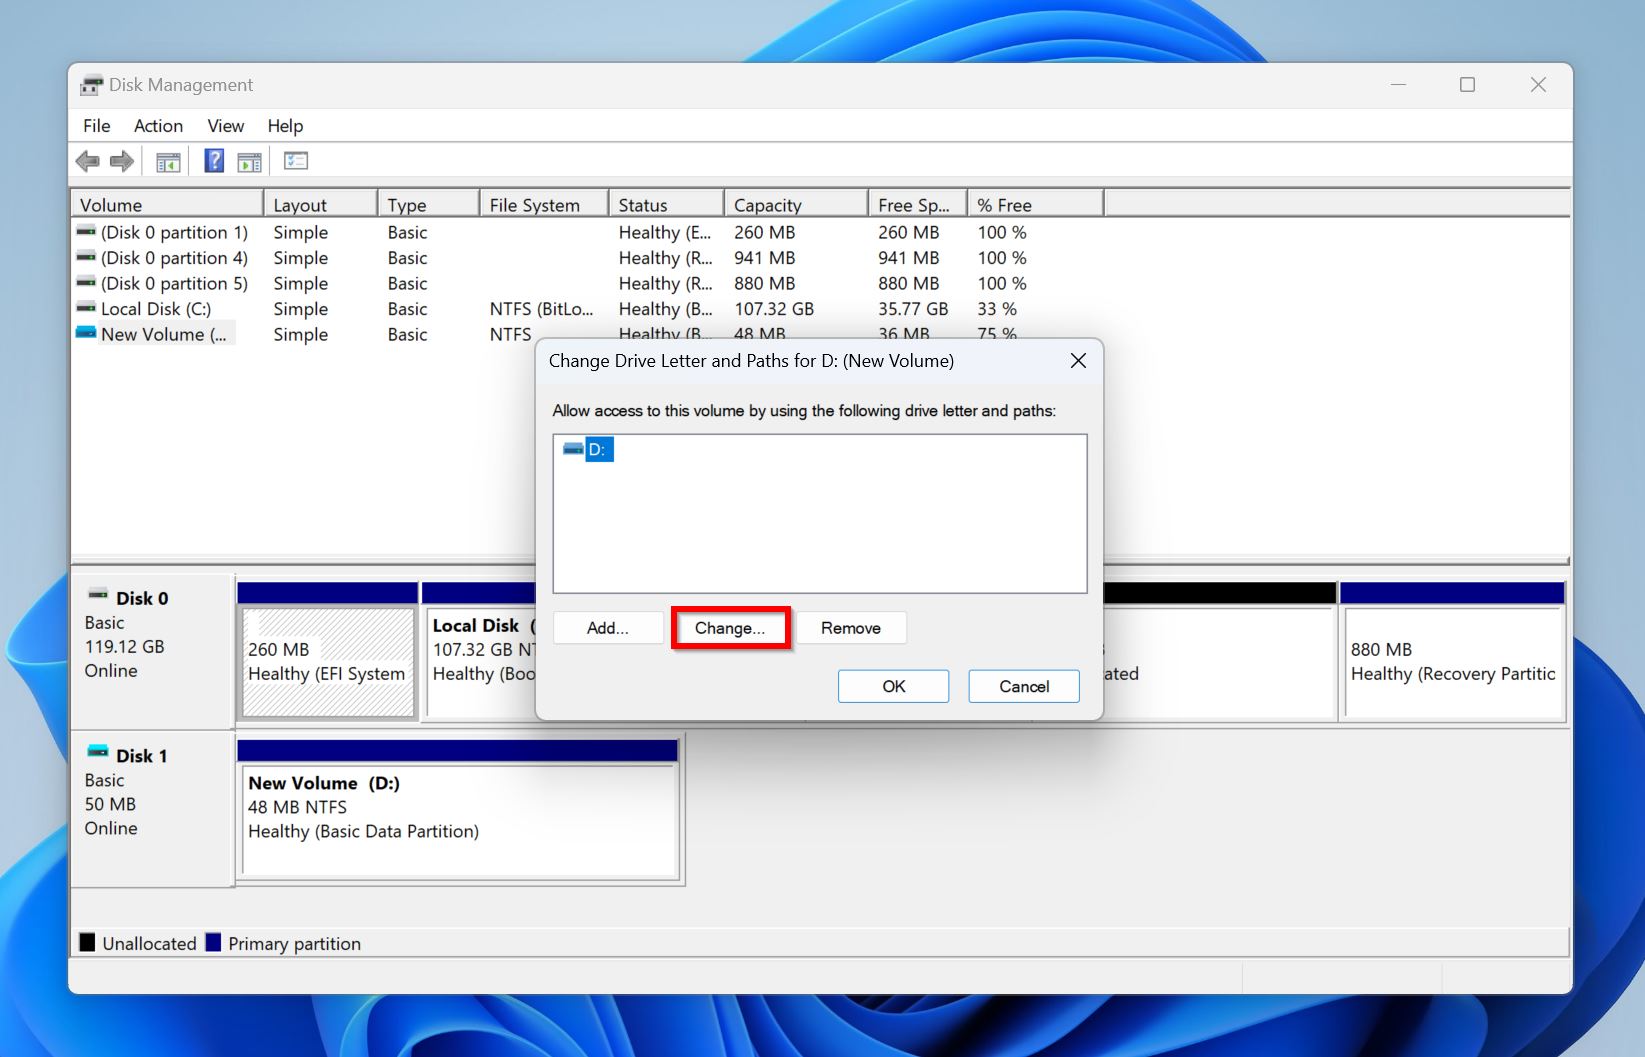
- Choose a drive letter from the drop-down menu next to Assign the following drive letter. Click OK.
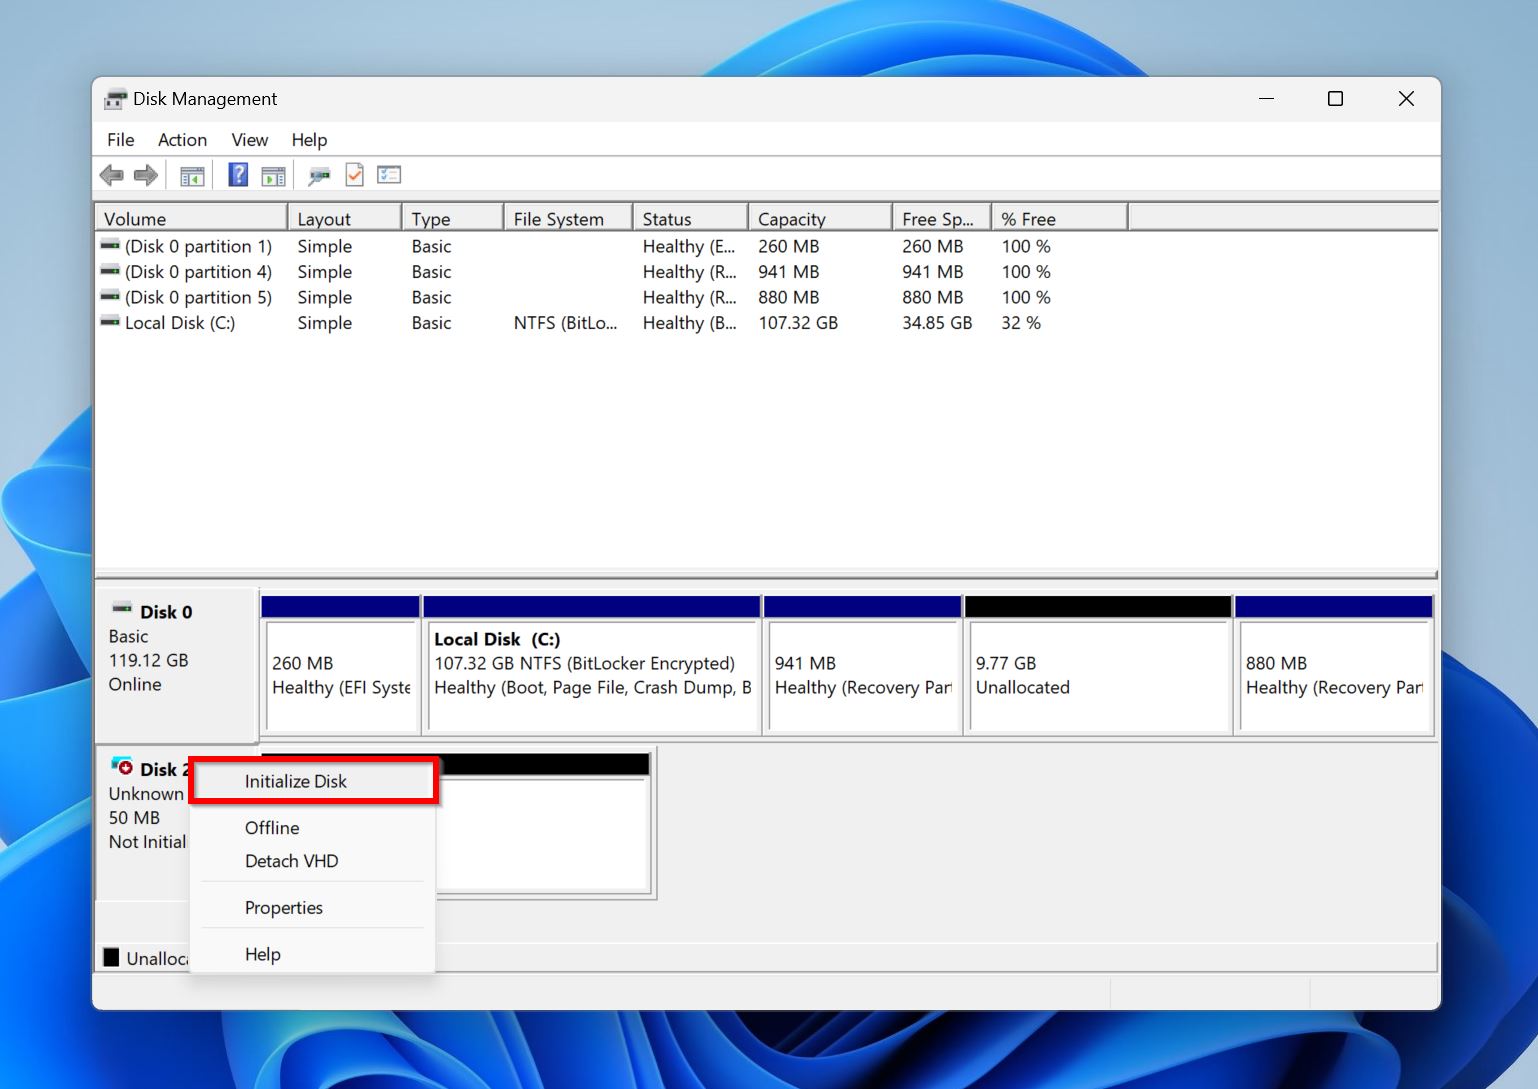
Part 2: Initialize the CF Card
It’s rare for CF cards to require initialization, unless the CF card is brand new. If your CF card requires repeated initialization, it’s faulty, and should be replaced.
Here’s how to initialize a CF card using Disk Management:
- Connect your CF card to the PC.
- Press Windows Key + R to launch the Run app, type diskmgmt.msc in the text box, and press Enter.
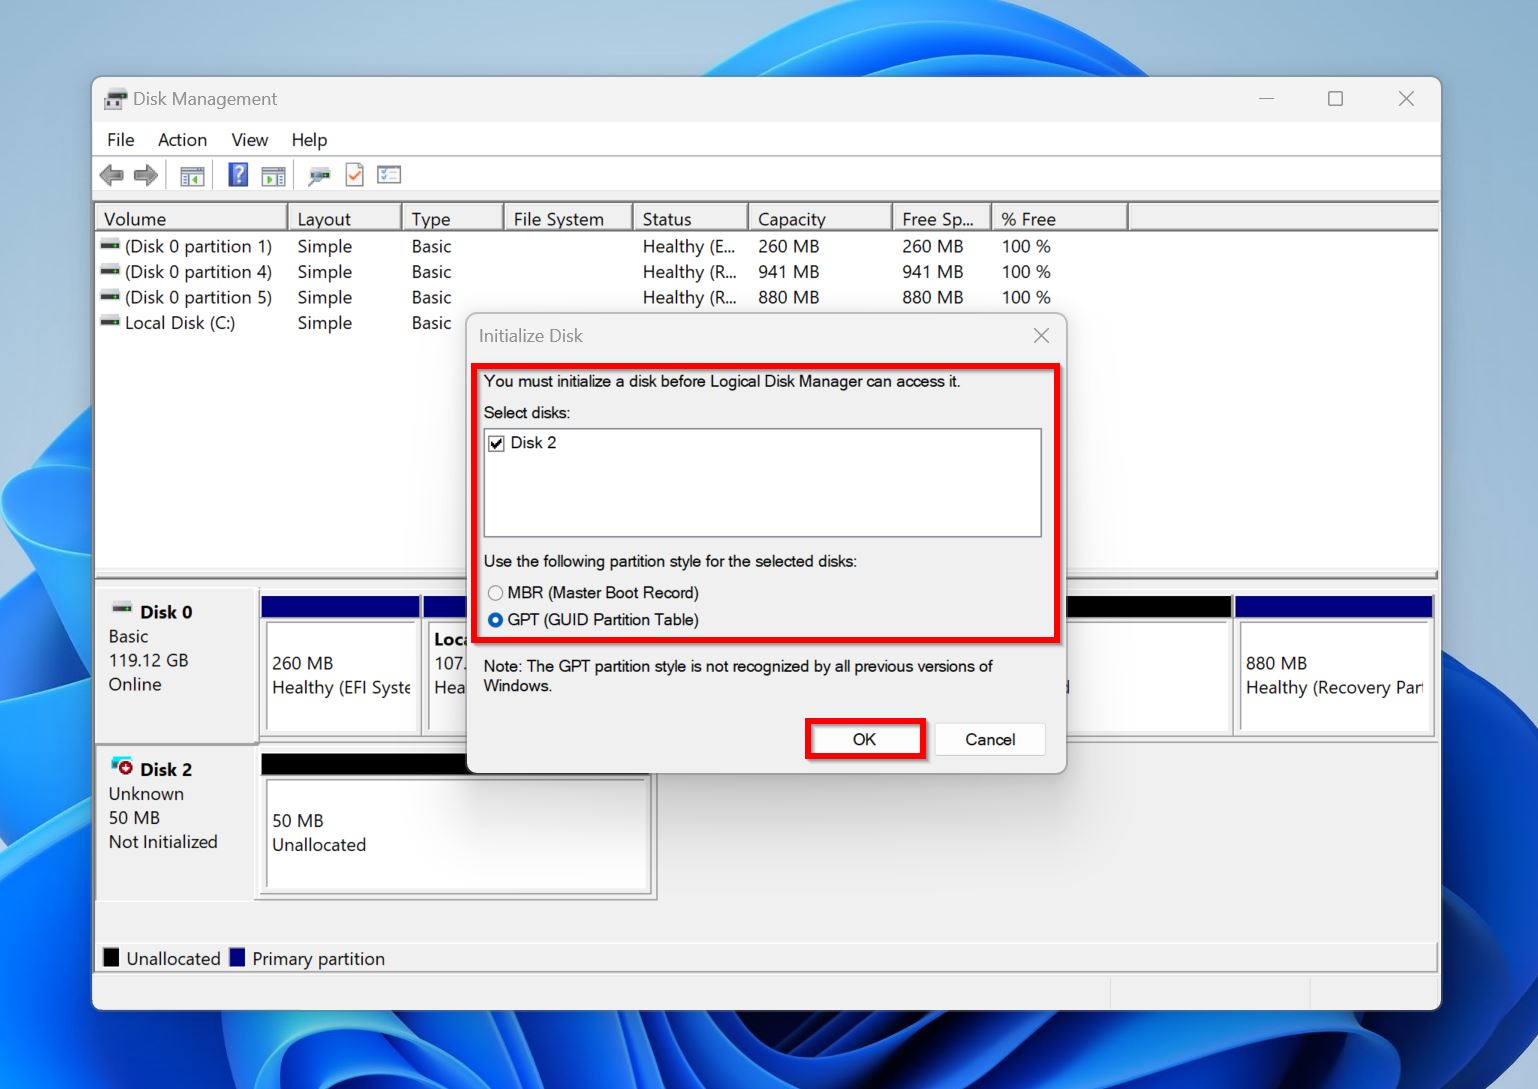
- If uninitialized, your CF card will show up as Not initialized in the bottom half of the Disk Management window. Right-click on it, and click Initialize Disk.
- Click OK on the next screen.
Fix 6: Run Diagnostic Tools
Windows has an in-built disk checking utility, CHKDSK, that checks storage drives for file system and metadata integrity, bad sectors, and other logical and physical errors. It’s a hassle-free way to fix CF card errors, as you don’t have to do any of the heavy lifting—simply run the CHKDSK command, and it’ll automatically detect and fix any errors on your CF card.
Here’s how to run CHKDSK:
- Type cmd in Windows Search (Windows Key + S). Right-click on Command Prompt, and choose Run as administrator.
- In the Command Prompt console, type chkdsk X: /r, replacing X with the CF card’s drive letter. You can find the drive letter via Disk Management.
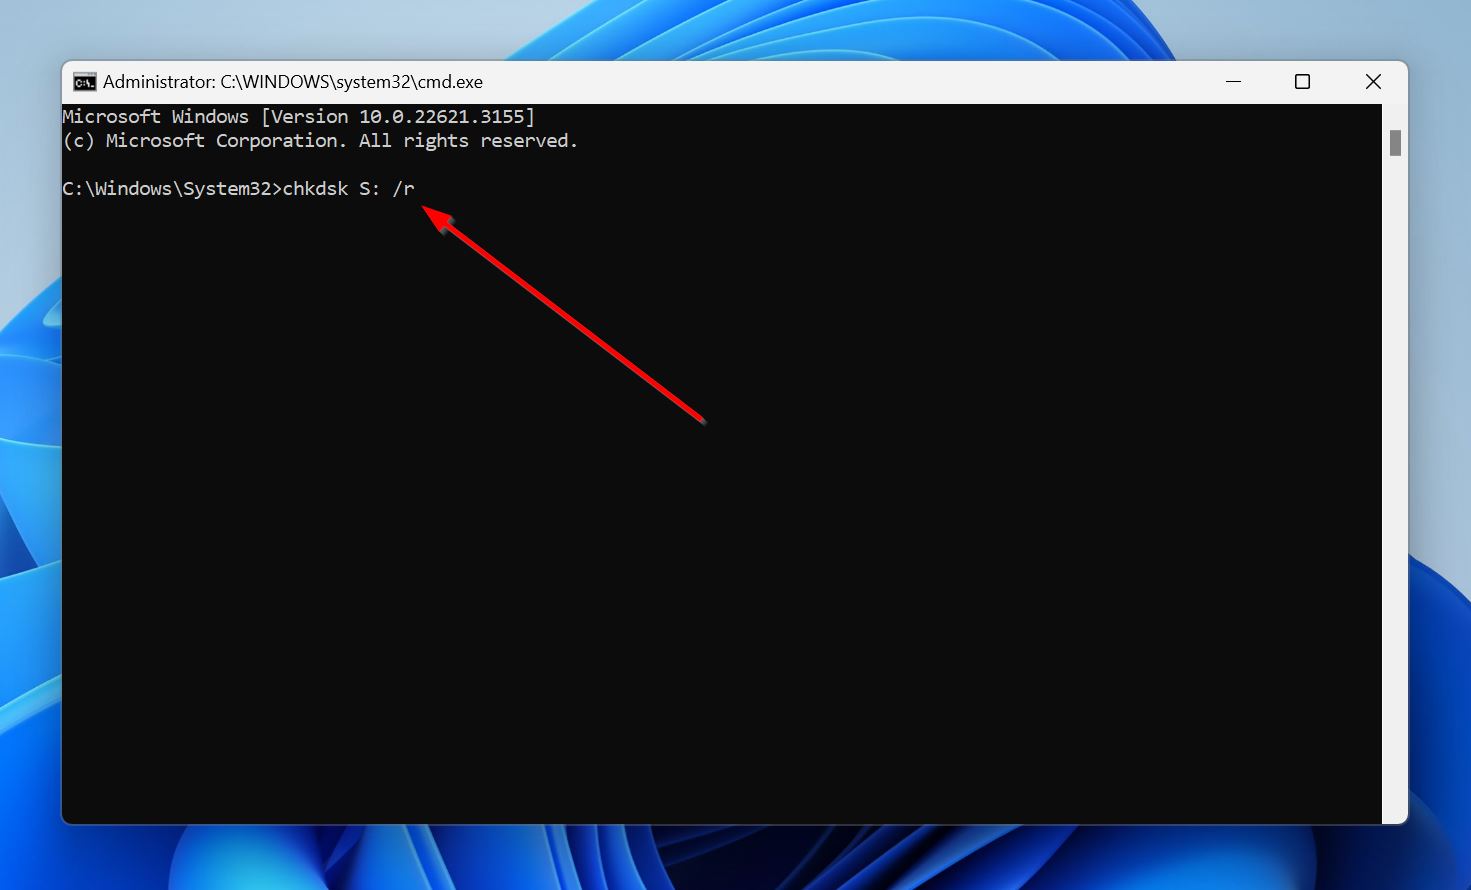
- Let the CHKDSK scan complete, then reboot your PC.
Note: CHKDSK has two major shortcomings—it can’t scan volumes that have an unrecognized, or missing file system, i.e., drives that show up as RAW, and it may cause minor data loss because of the way it works and how it repairs the file system. Think of it as collateral damage. To avoid this, recover your data beforehand.
To overcome CHKDSK’s limitations, you can use third-party, vendor-specific disk checking tools. Visit the CF card manufacturer’s website and see if they have any disk-checking software for their products.
Fix 7: Format the CF Card
Formatting is an excellent way to fix a CF card that’s not recognized, or is experiencing logical errors. You can either opt for a quick format, or a full format. There are two key differences between the two.
During a quick format, the CF card’s existing data is marked as deleted, the previous file system is deleted, and Windows writes a new file system to the card. Data recovery is possible after a quick format, although it’s best to be safe and recover data beforehand, if possible.
A full format deletes your existing data, overwriting it with zeroes. This is a crucial difference as it makes data recovery impossible. Additionally, a full format checks your CF card for bad sectors and marks them as unavailable for use. The overwriting and bad sector checking significantly increases the time taken for formatting.
Here’s how to format your CF card:
- Press Windows Key + R to launch the Run program. Type diskmgmt.msc in the text box, and press Enter to launch Disk Management.
- Right-click on your CF card in the Disk Management window and choose Format.
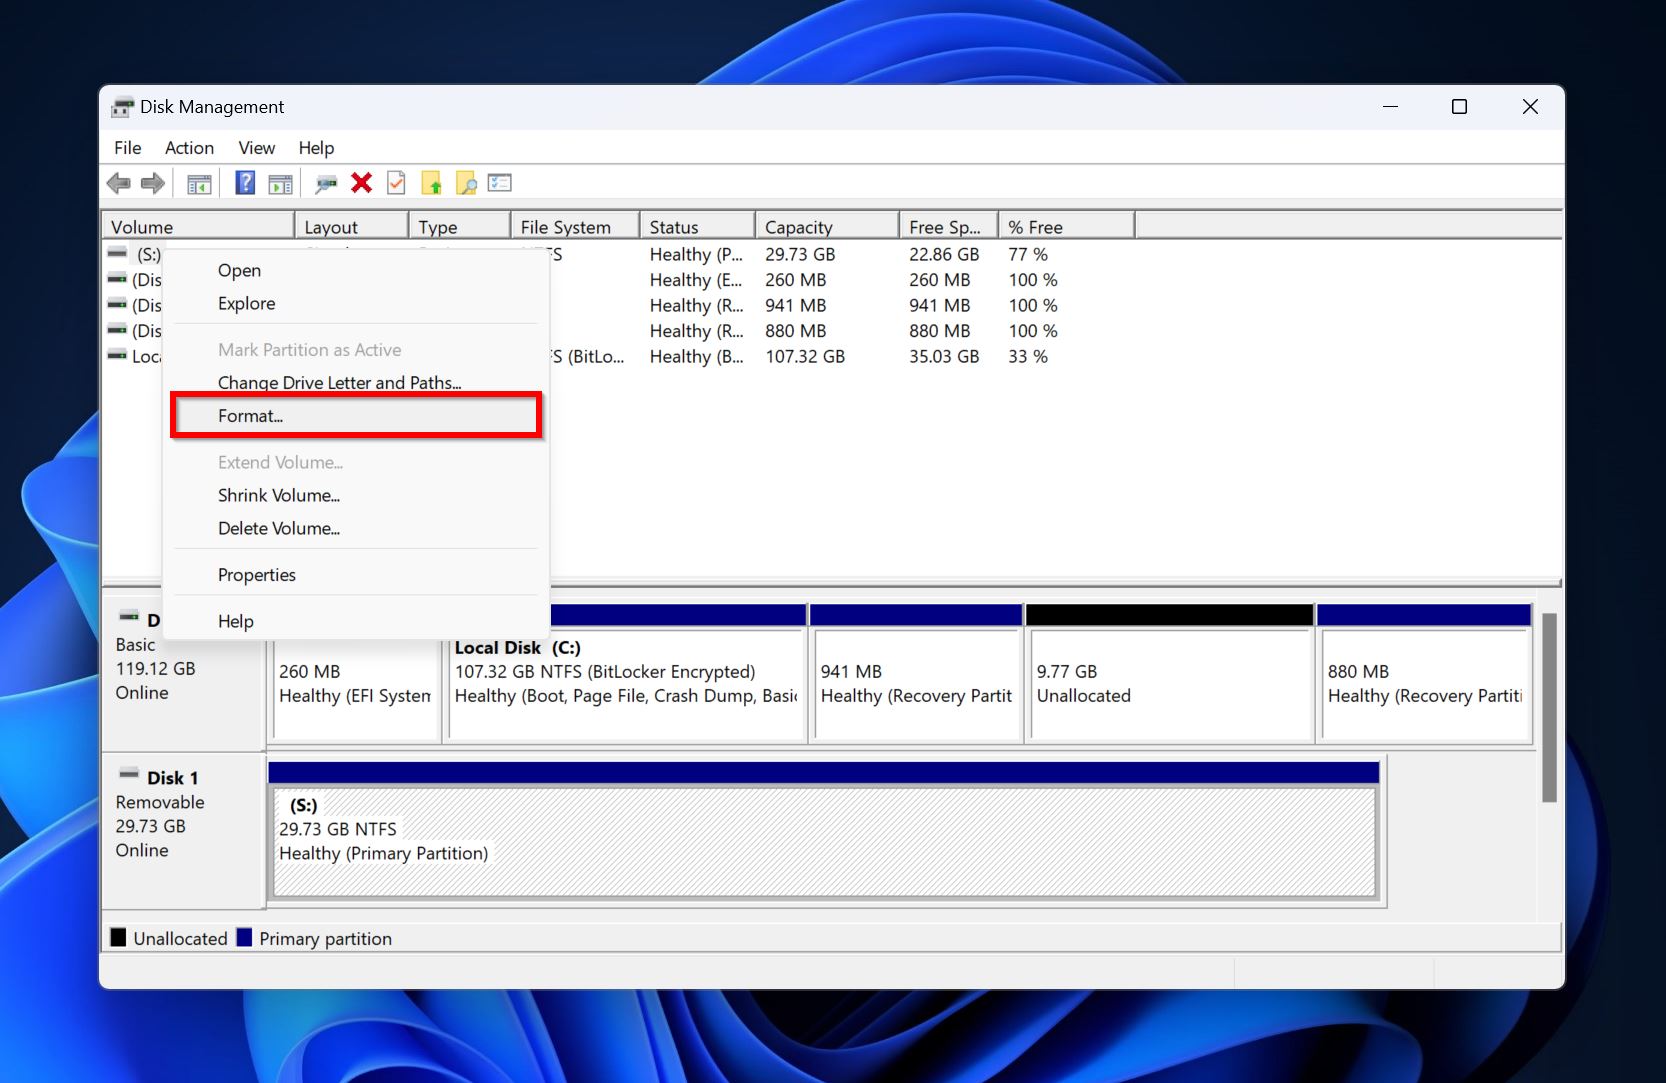
- Uncheck the Perform a quick format checkbox if you wish to full format the CF card. Leave the option ticked if you wish to quick format the drive. Type in a name for the CF card in the Volume label field, or leave it as it is. You can also pick a different file system using the drop-down menu next to File system. Click OK.
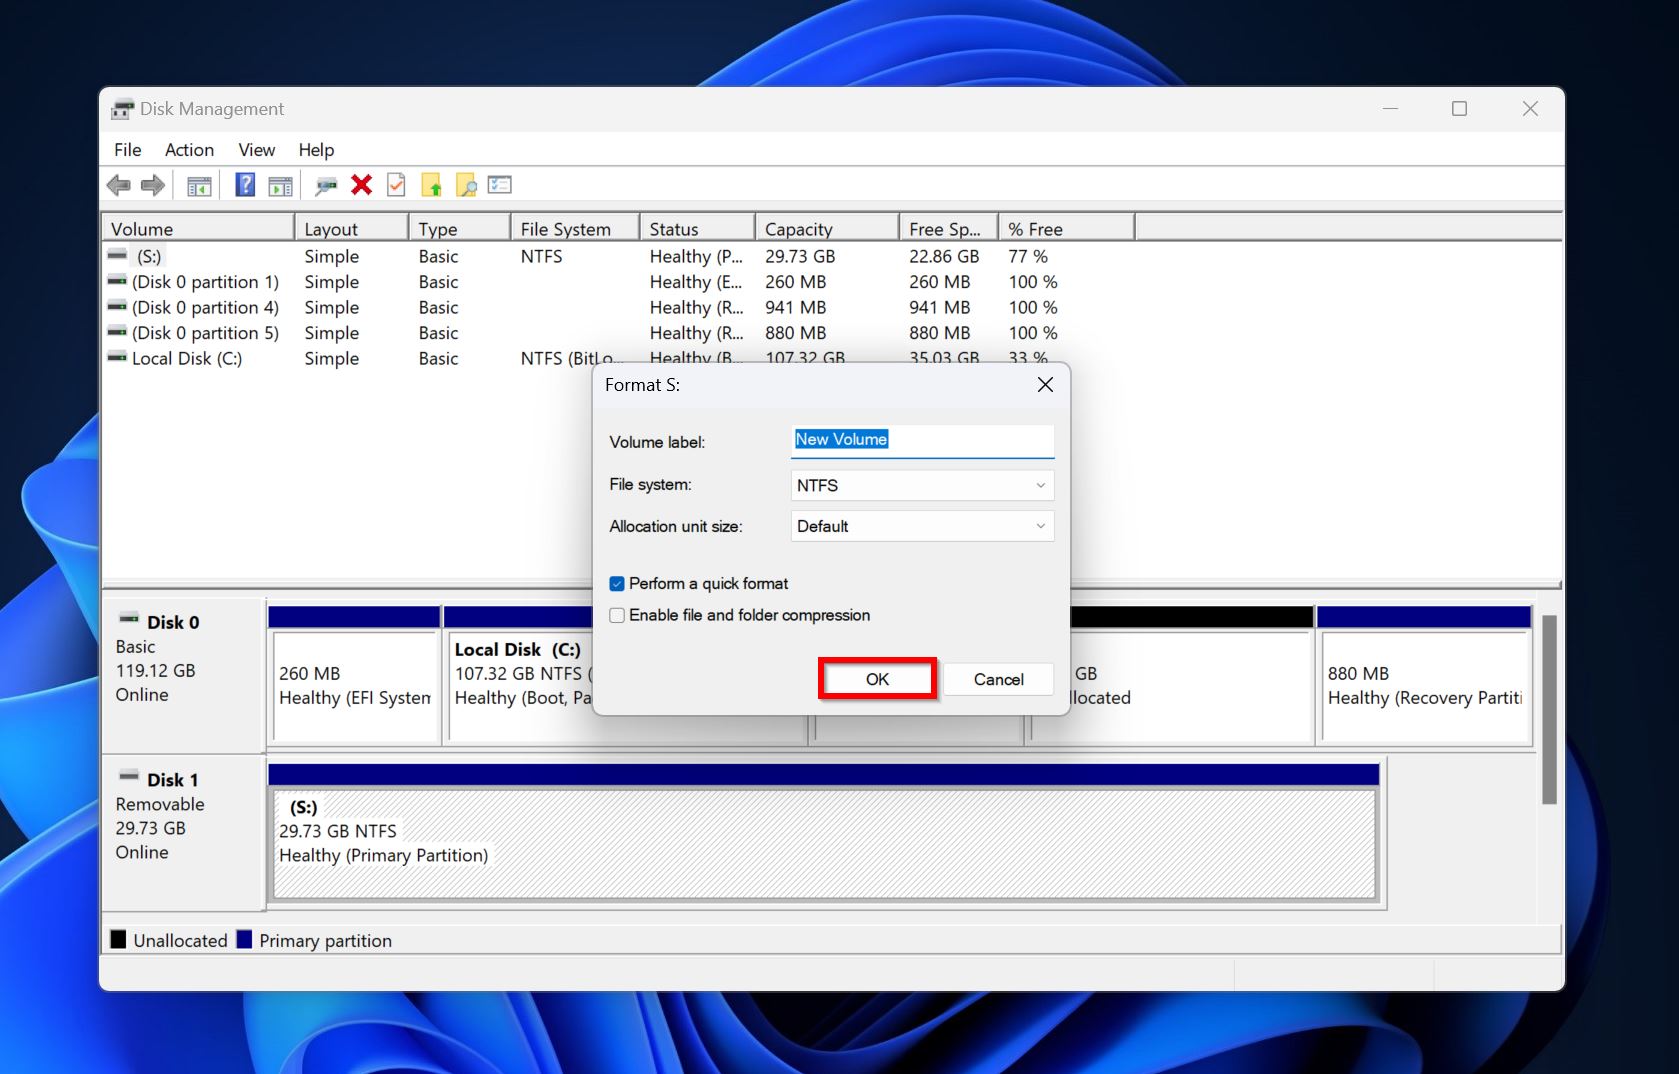
- Windows will format the CF card.
Fix 8: Remove Write Protection from the CF Card
Unable to create, or copy new files to the CF card? Some CF cards have a physical write-protection switch. Set it to the OFF position. Usually, Windows displays the, “This drive is write-protected” message when you attempt to copy or create files on a write-protected CF card.
A physical write-protect switch isn’t the only way to enable write-protection on your CF card. It can be done by changing the read/write attributes as well. To disable this kind of write-protection, use the diskpart utility in Windows Command Prompt.
Here’s how to disable write-protection on your CF card on Windows:
- Type cmd in Windows Search (Windows Key + S), right-click on Command Prompt and click Run as administrator.
- Type diskpart in the console and press Enter.
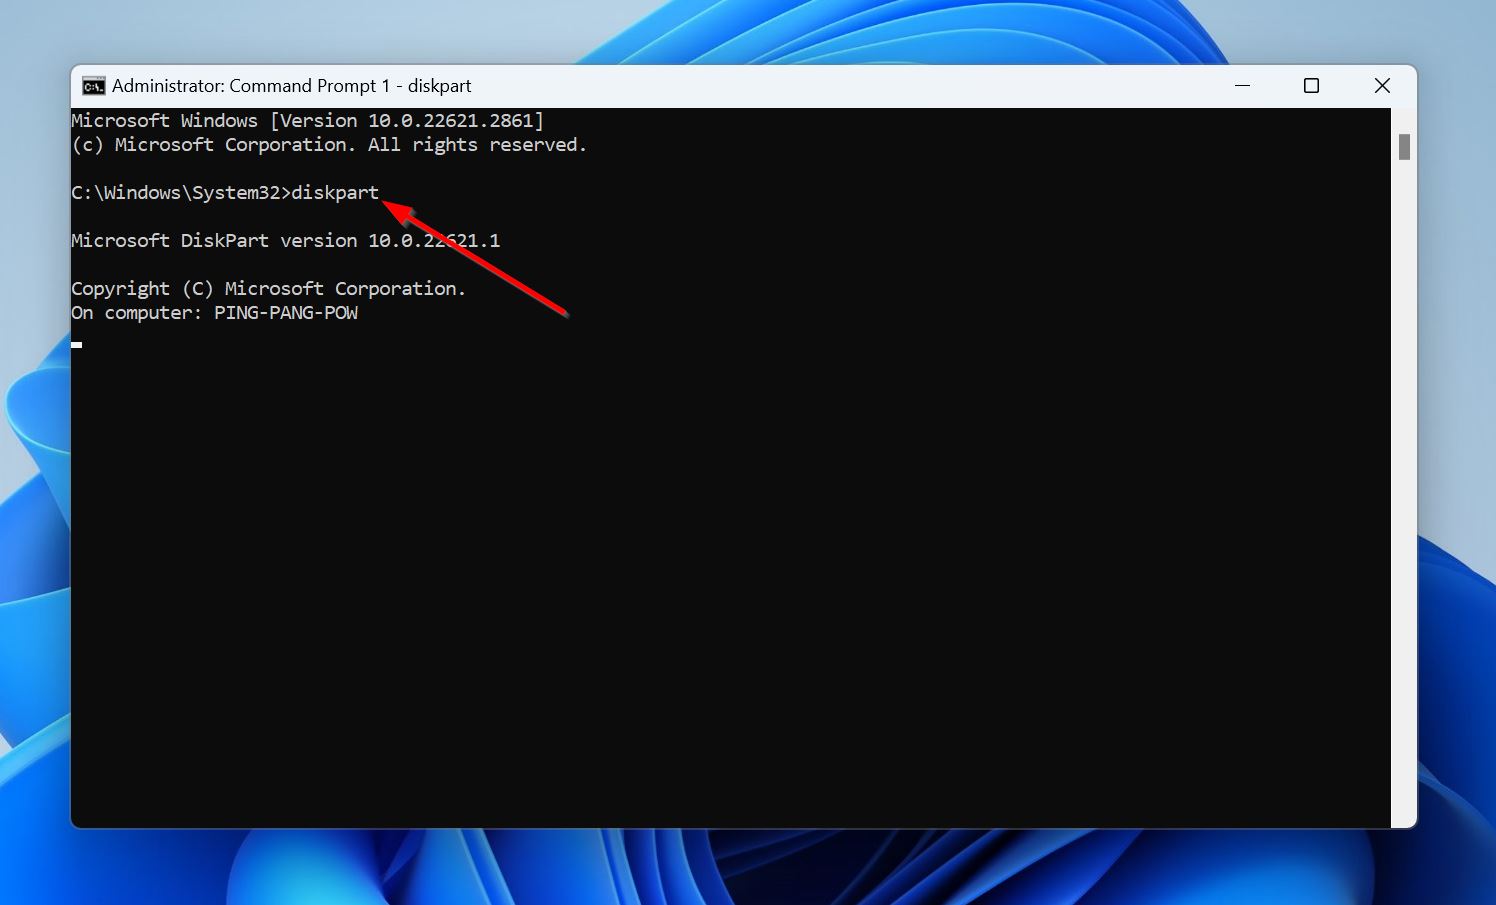
- Type list disk and press Enter.
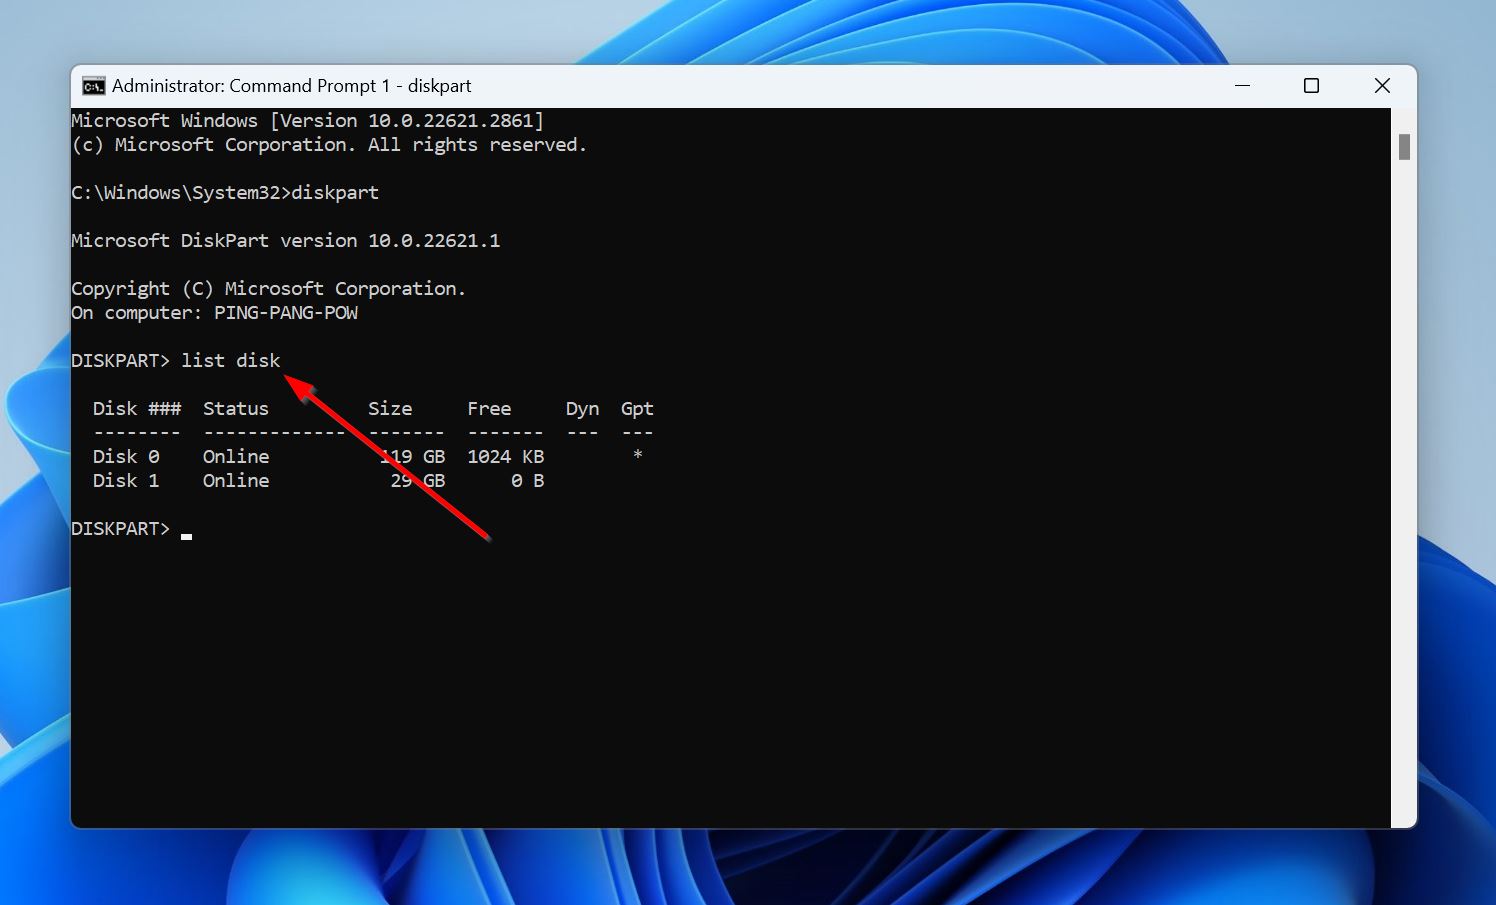
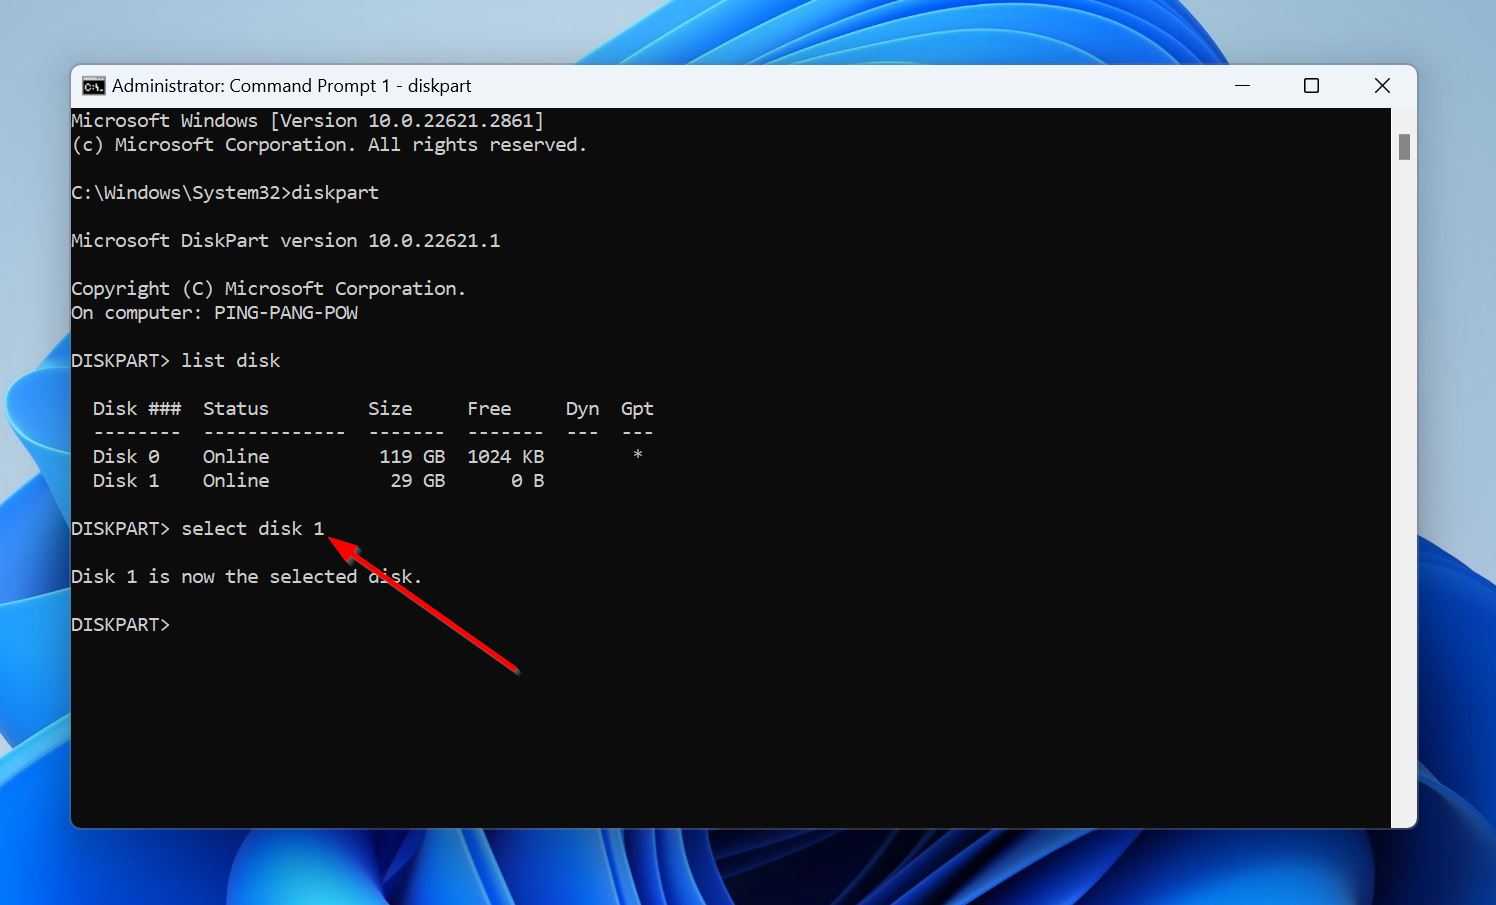
- Look for your CF card in the listed drives, and note down the disk number (Disk 1, Disk 2, Disk 3, etc.). Type select disk x and press Enter, replacing x with the CF card’s disk number.
- Type attributes disk clear readonly and press Enter.
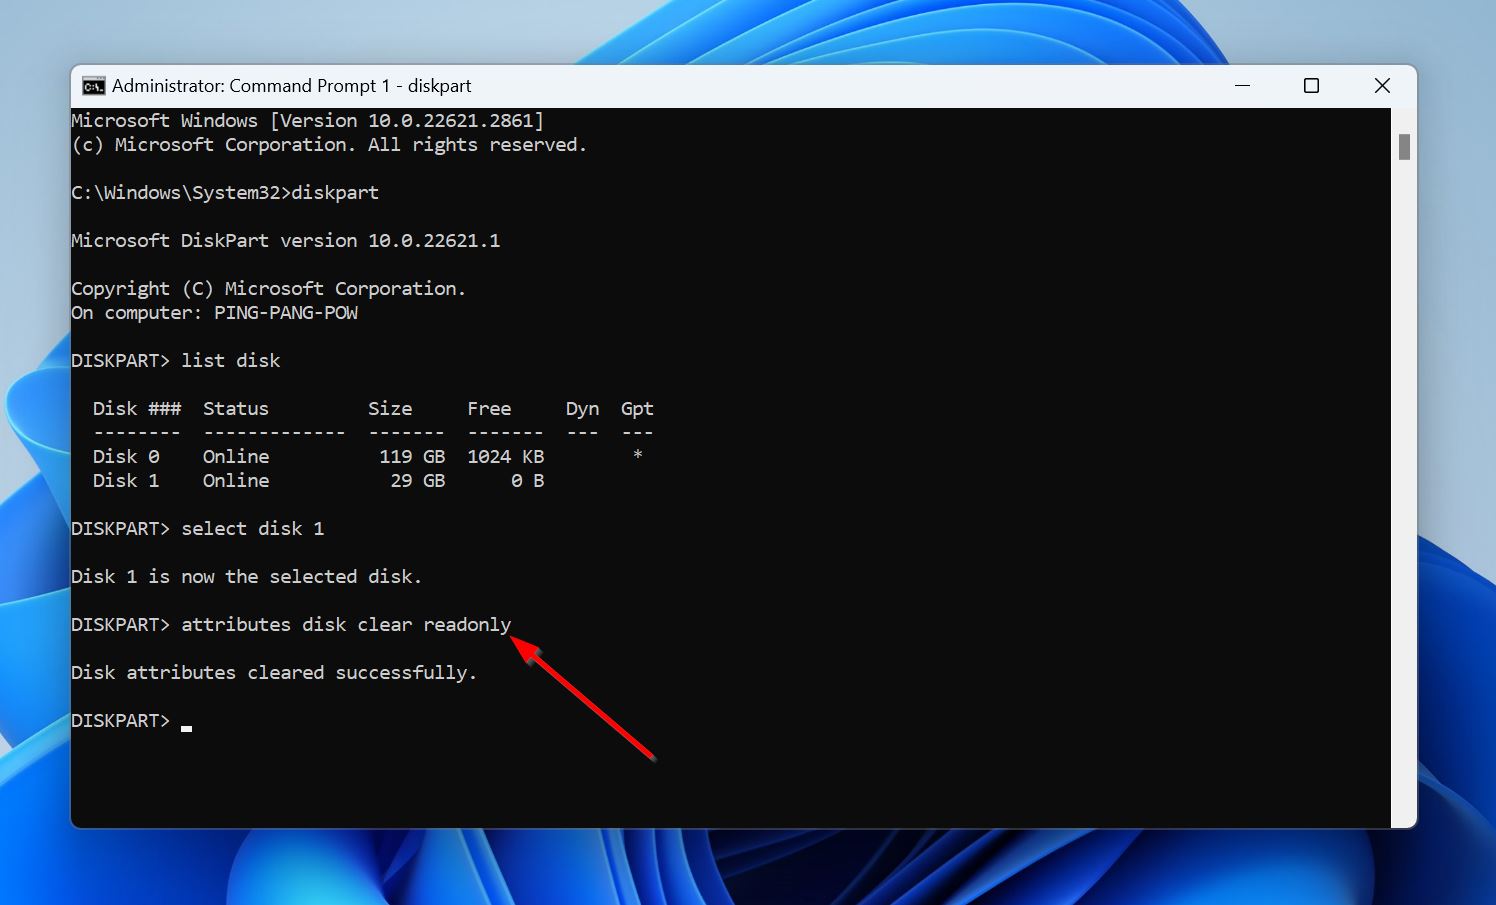
- Windows will remove write-protection from the CF card.
Fix 9: Replace the CF Card
Although CF cards are known for their robustness and reliability, they have limited read/write cycles. If you’re using an old CF card that repeatedly faces issues, it’s best to replace it. You can’t predict when the CF card will fail, and take your data along with it. We suggest recovering your data from such CF cards and then discarding them.
Alternatively, you can shield yourself against further data loss by creating a disk image of the CF card using specialized software like Disk Drill. A disk image is a soft copy of your entire CF card at the time of creation—you can scan it for recoverable data as well as access existing data.
Conclusion
When fixing CF card errors, it’s best to first ensure that you’re using a high-quality card reader that’s properly connected to your PC. Connecting the CF card to another device is a good way to ensure that the problem lies with the CF card, and not the parent device. Once you’ve ensured this, we recommend recovering your data from the CF card before moving to fix it.
Updating the card reader’s drivers and firmware, removing drive letter conflicts and write-protection, and running diagnostic tools are some ways you can use to restore your CF card’s functionality. However, if you repeatedly face problems on your CF card, and none of the methods seem to help, it’s best to replace the CF card.