Reading Time: 8 minutesUnless your hard drive is brand new, it should not be “uninitialized.” If it is, you can’t access its data using Windows Explorer. The good news is, in most cases, your data is recoverable—as long as you follow the correct data recovery etiquette. The sections below will show you how to recover data from an uninitialized disk without further damaging it.
Why Does a Drive Become Uninitialized?
There are several culprits behind an old drive becoming uninitialized. Broadly speaking, it happens due to logical damage, or physical damage. Brand-new drives come uninitialized from the factory, and initialization is just something you have to do before you can use the drive to store data.
Here are some factors that can cause older drives to become uninitialized:
- Corrupted Partition Table: Malware, improper ejection, bad sectors, and software errors can corrupt your drive’s partition table. This, in turn, results in Windows not recognizing the drive and detecting it as an uninitialized drive.
- Faulty, or Outdated Drivers: A problem with your drive’s software driver prevents Windows from detecting, reading, and writing to your drive properly. Usually, this is caused by outdated drivers, but sometimes the culprit could be a new driver that’s faulty.
- Power Surges and Power Loss: Hard drives, and particularly SSDs, are sensitive to power fluctuations. Sudden power surges, and abrupt power loss can potentially harm the drive, resulting in it showing up as uninitialized.
- File System Damage: Your drive’s file system determines how data is stored and accessed on your drive. A drive with a damaged file system can display several symptoms, ranging from minor data loss, to more serious issues like the drive becoming uninitialized.
How to Recover Data from an Uninitialized Drive
In simple cases of accidental deletion, or malware-induced data loss, you can download a data recovery program and scan your drive for lost data. However, when a drive suddenly becomes uninitialized, it usually indicates deeper issues. I recommend ruling out hardware issues and creating a disk image before proceeding to actually recover your data.
Here’s what data recovery from an uninitialized disk looks like:
Step 1: Rule Out Hardware and Connection Issues
Physically damaged drives rarely fare well in DIY data recovery. In fact, you may inadvertently worsen the data loss. Detecting physical damage in hard drives is relatively easy—keep an ear out for any weird clicking, whirring, and beeping sounds. Since SSDs don’t have any moving parts, there’s no accurate way of detecting physical damage, except by checking if your PC detects the drive.
Improperly connected, and physically damaged drives won’t show up in Windows Disk Management. To be doubly sure, connect your drive to another PC using a different SATA cable. If the drive remains undetected, it’s likely physically damaged. Avoid DIY data recovery, and let an expert handle it,
If it does show up in Disk Management, you can proceed with DIY data recovery.
(Optional) Step 2: Create a Disk Image of the Uninitialized Drive
Creating a disk image is a crucial step to prevent further damage to your storage drive. Data recovery scans are stressful, and directly scanning an already damaged drive can wear it out even further. In addition, a disk image shields you against further data loss by capturing the present state of the drive.
To avoid potential compatibility issues, I suggest using the built-in disk imaging feature of a data recovery program of your choice. Most decent data recovery apps do come with this feature.
Note: A disk image is a soft copy of your entire drive. To store it, you’ll need another drive with enough storage capacity—more than or equal to the total storage capacity of the uninitialized drive.
In this tutorial, I’ll use Disk Drill, and TestDisk to recover data from an uninitialized drive. Use the same program to create a disk image, and recover data from it.
To create a disk image using Disk Drill, follow these steps:
- Download Disk Drill and install it.
- Ensure the uninitialized drive is connected to your PC.
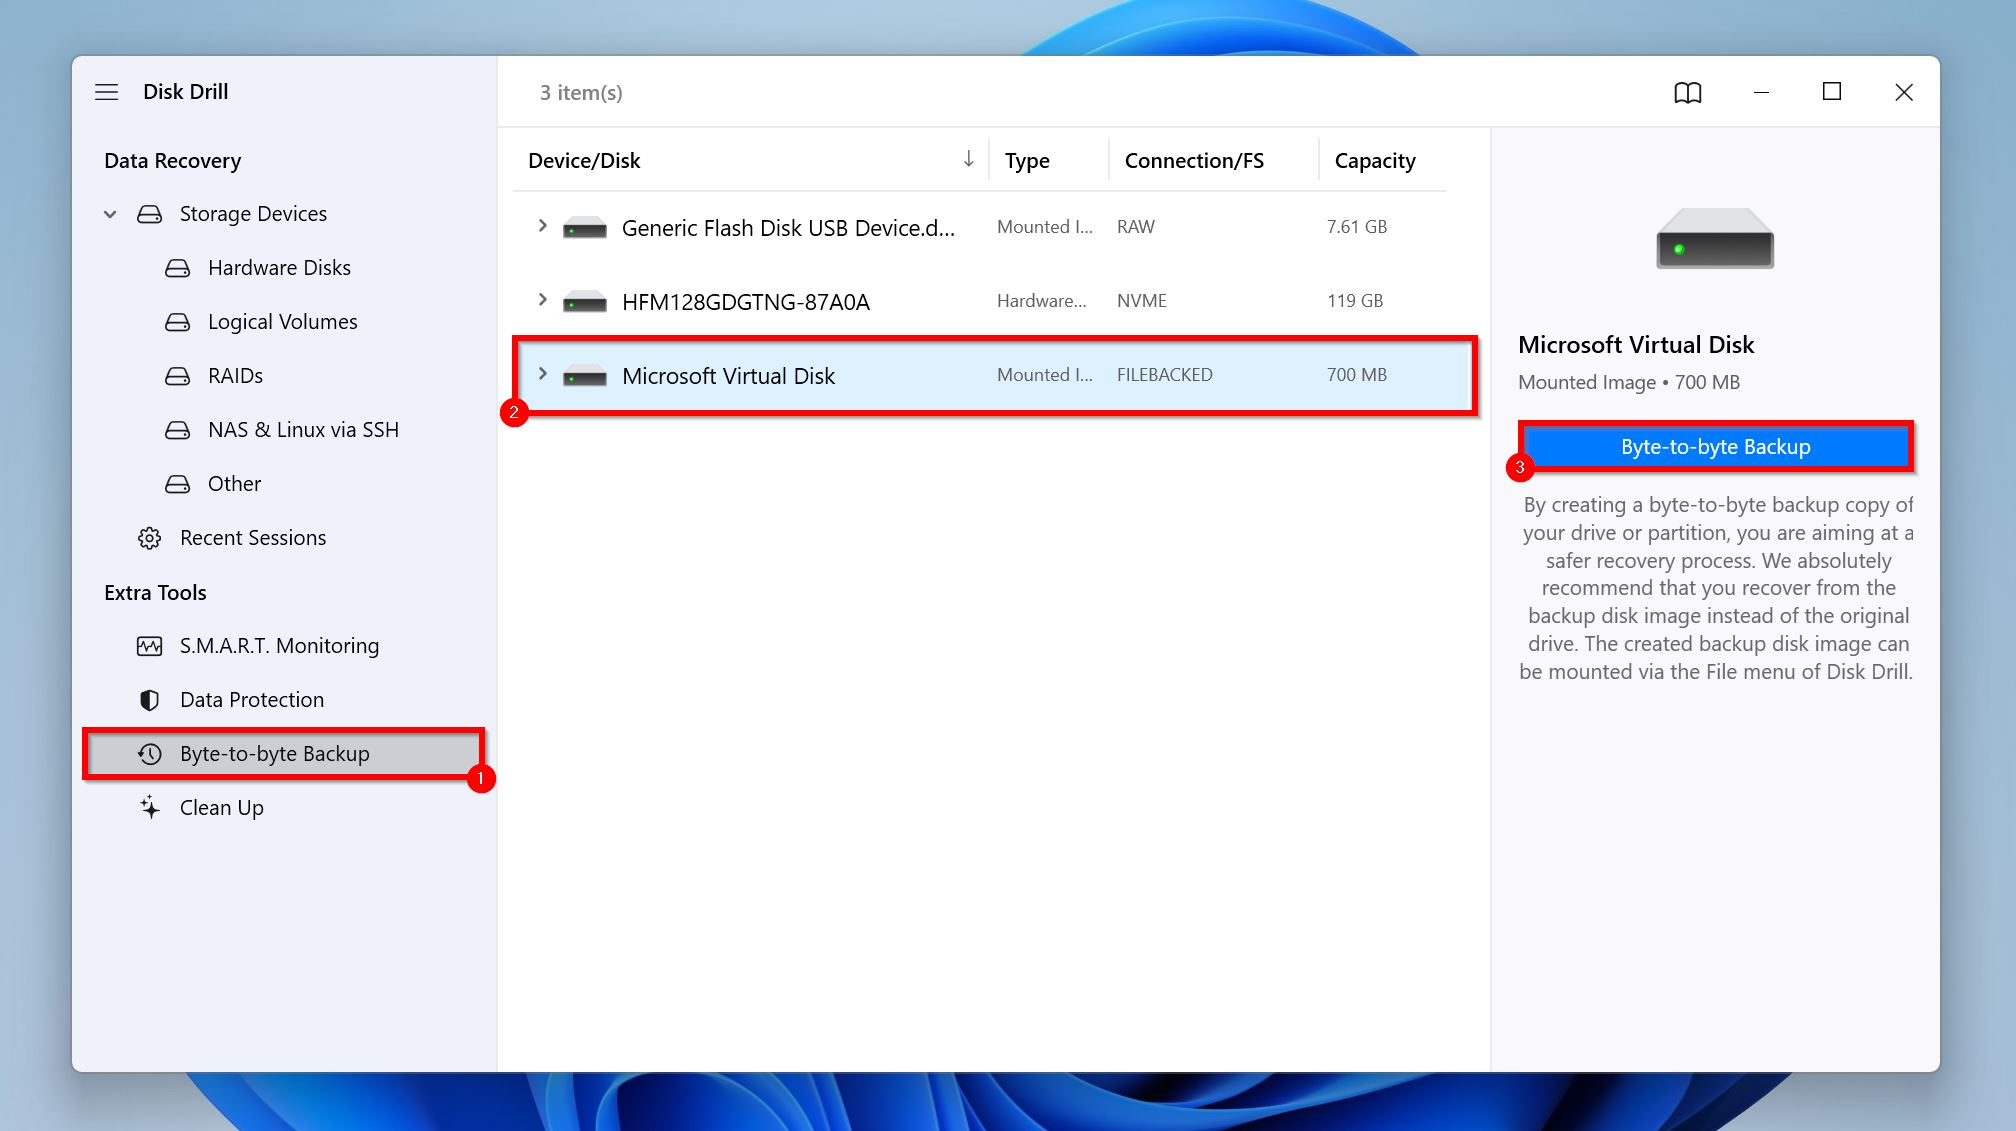
- Open Disk Drill, and click on Byte-to-byte Backup, under Extra Tools.
- Select the uninitialized drive, and click the Byte-to-Byte Backup button.
- Choose where to save the disk image from the Path drop-down menu.
- Click on OK.
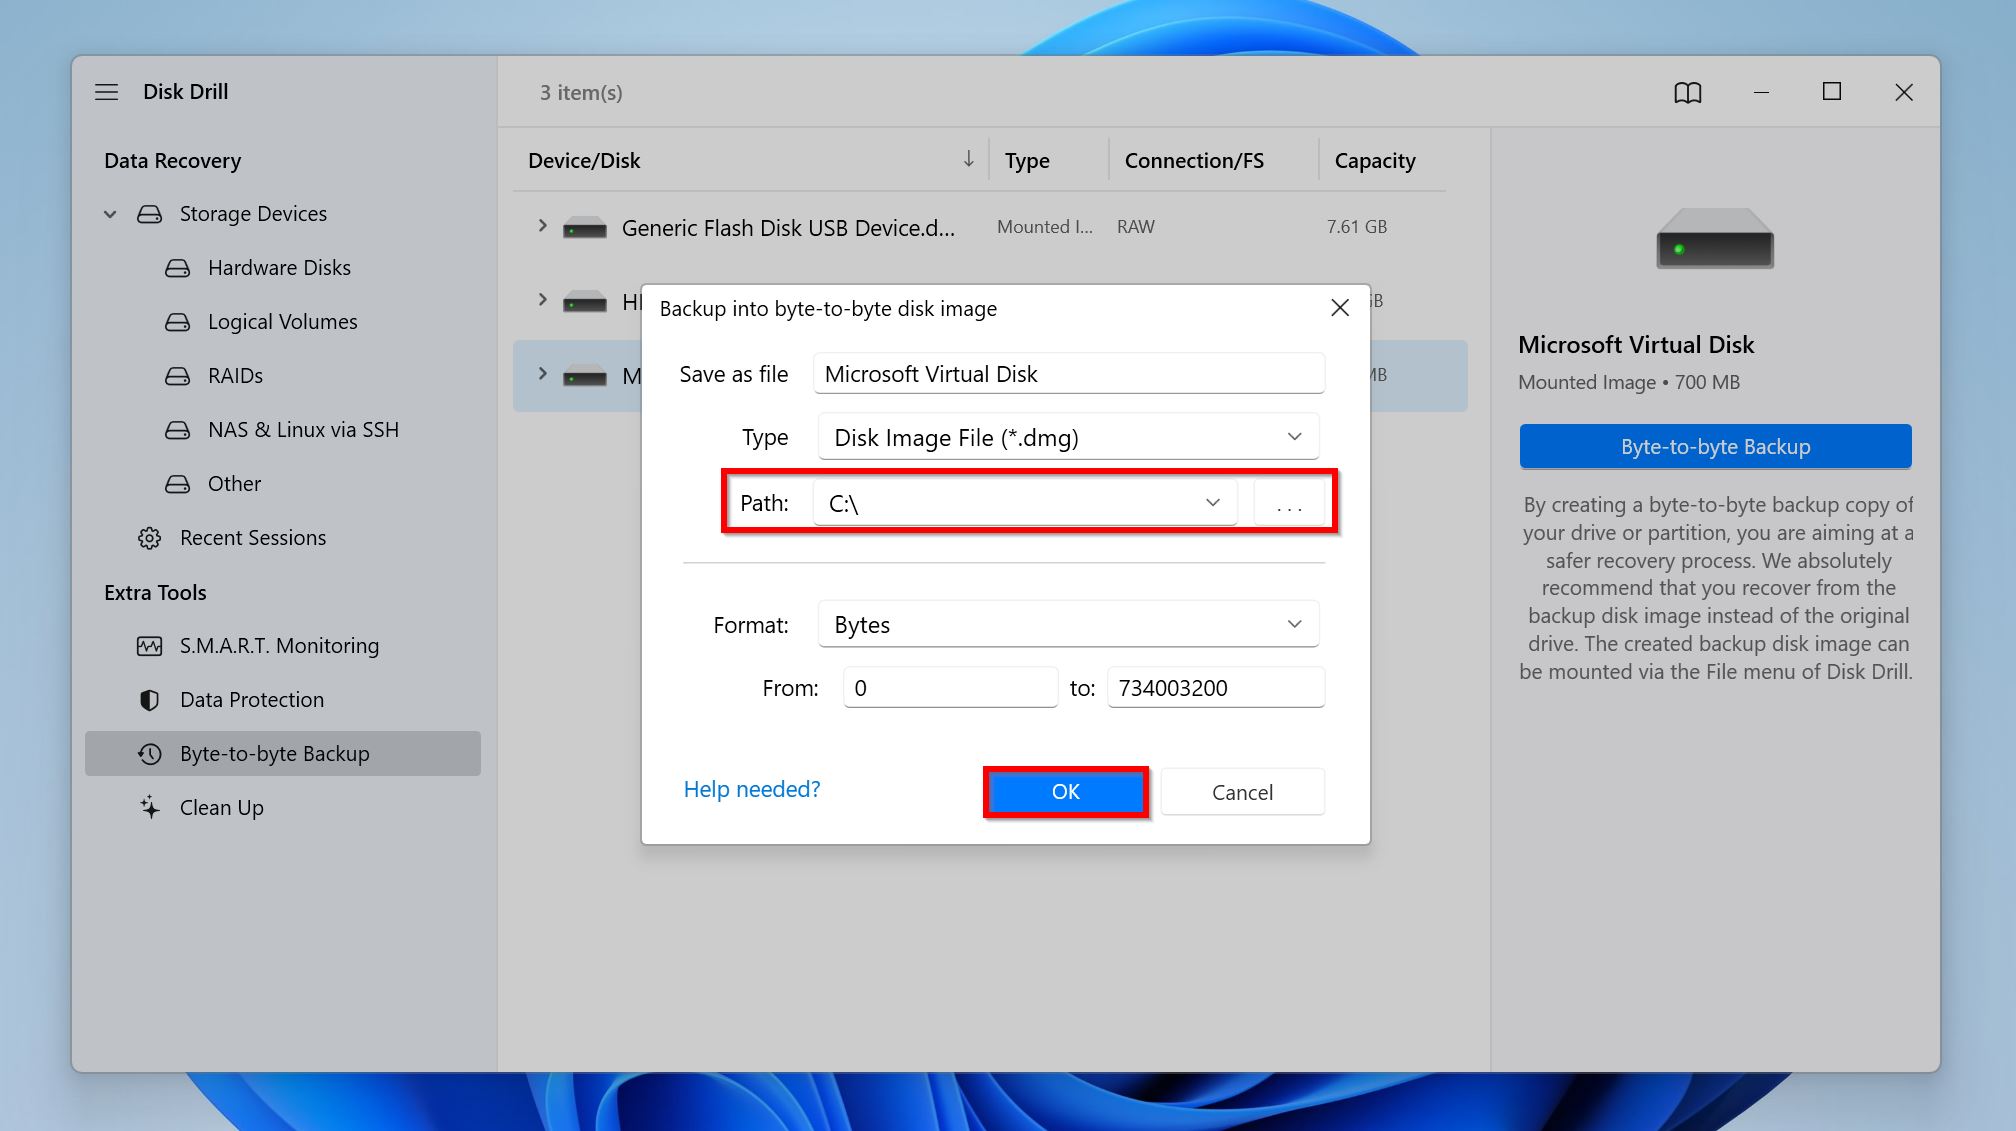
- Disk Drill will create the disk image. It may take a while, depending on the drive’s size.


If you opt for TestDisk, use this disk image creation guide from the developer.
Step 3: Recover Data from the Uninitialized Drive
I’ve been on both ends of the spectrum—an everyday PC user, and now, a writer who tests data recovery programs and writes about data recovery for a living.
For regular users looking to recover data in a user-friendly and convenient way, there’s no better option than Disk Drill. For more advanced users, TestDisk is an added option that is equally competent, albeit difficult to use.
Option 1: Disk Drill
There are numerous capable data recovery programs, but few make data recovery as accessible as Disk Drill does. The program can recover over 400 file types, supports all major file systems and storage drive types, and can recover data from RAW drives as well. Additionally, Disk Drill comes with plenty of quality-of-life features that simplify data recovery. These include file preview, file filtering, and in-built tutorials. Due to its combination of usability and functionality, Disk Drill appears on numerous lists of the best data recovery programs as well.
Here’s how to recover your files from an uninitialized disk using Disk Drill:
- Download and install Disk Drill if you haven’t already.
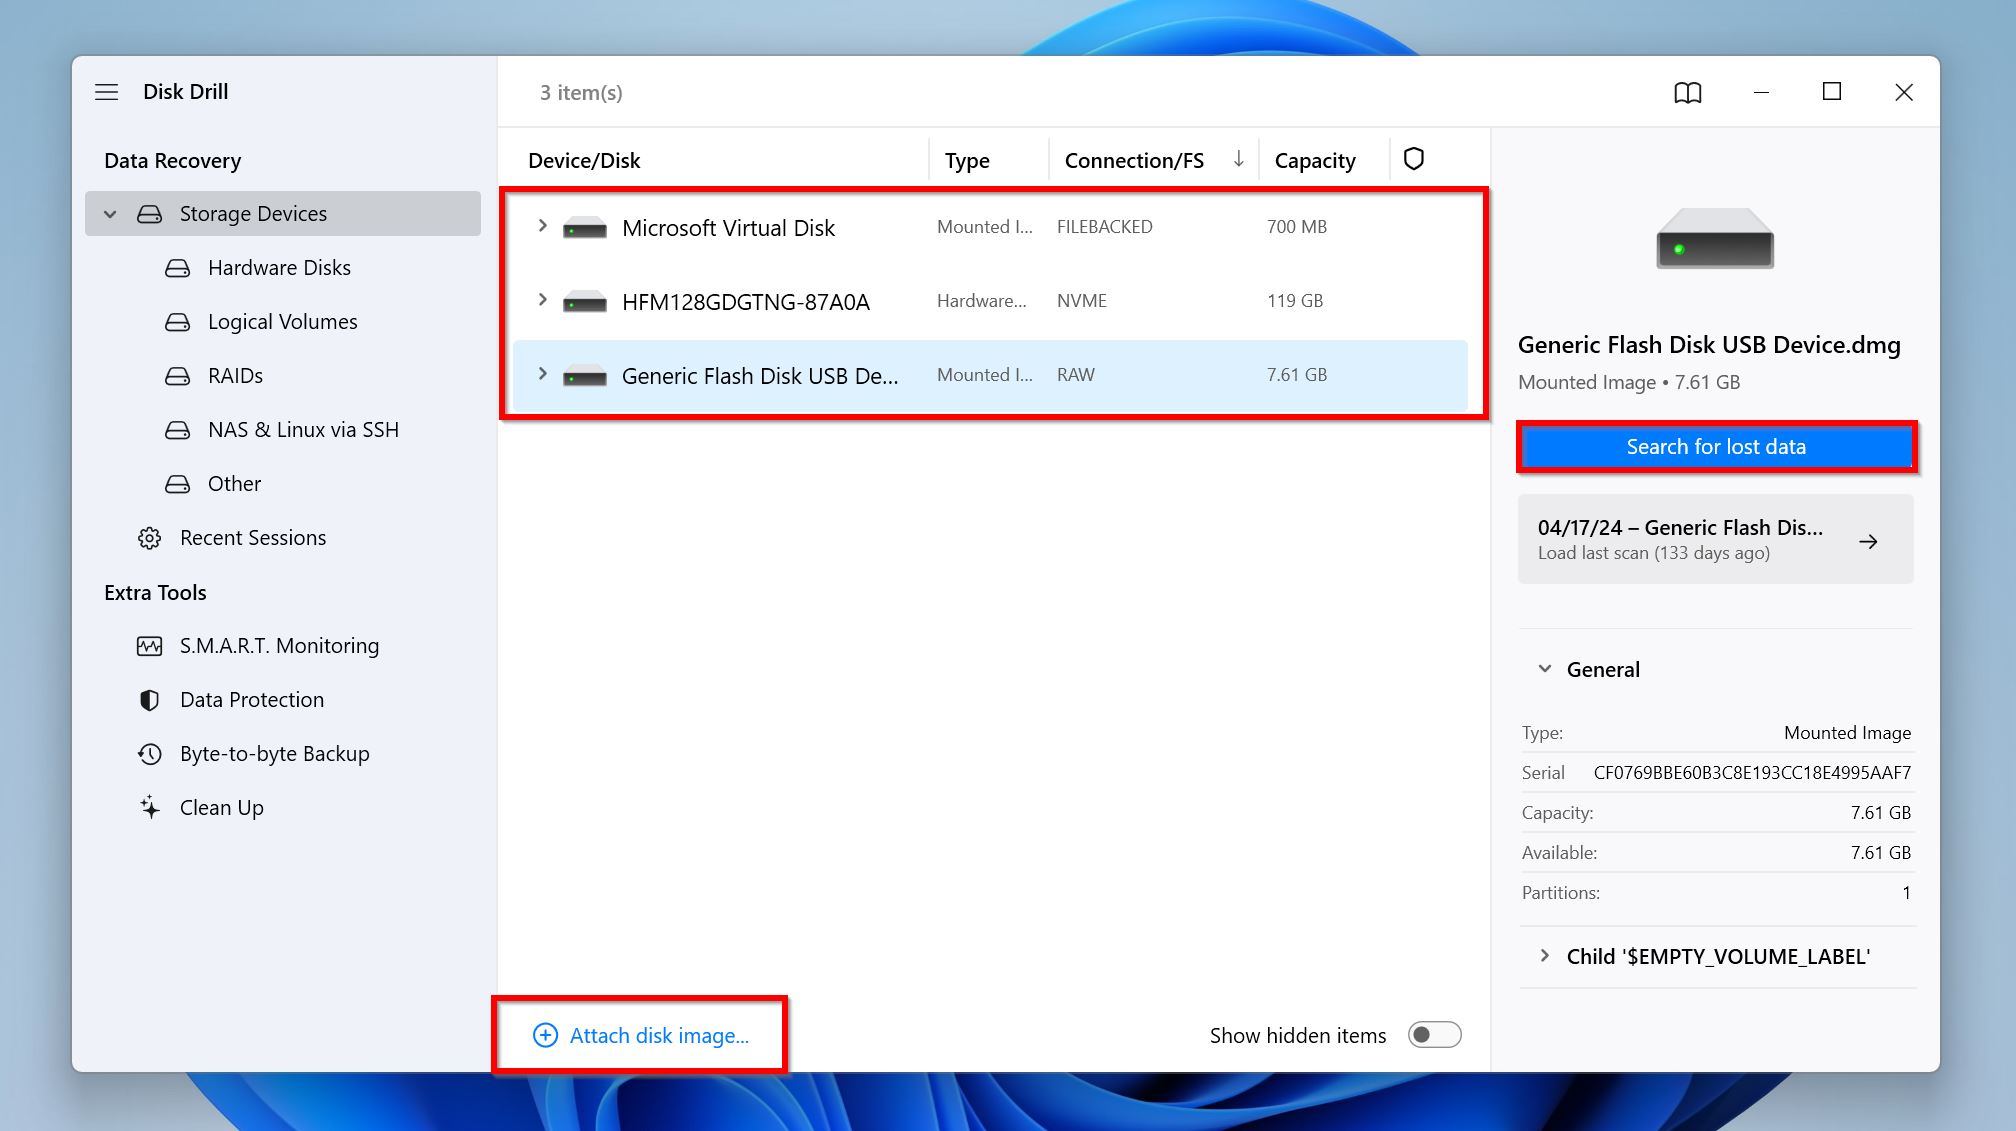
- Open Disk Drill, and ensure you’re on the Storage Devices tab.
- If you created a disk image—click on Attach disk image, navigate to the disk image, and double-click on it. Disk Drill will mount it, and display it in the list of storage drives. Once mounted, click on the uninitialized drive’s disk image, and select Search for lost data.
- If you didn’t create a disk image—select the uninitialized drive, and click on Search for lost data.
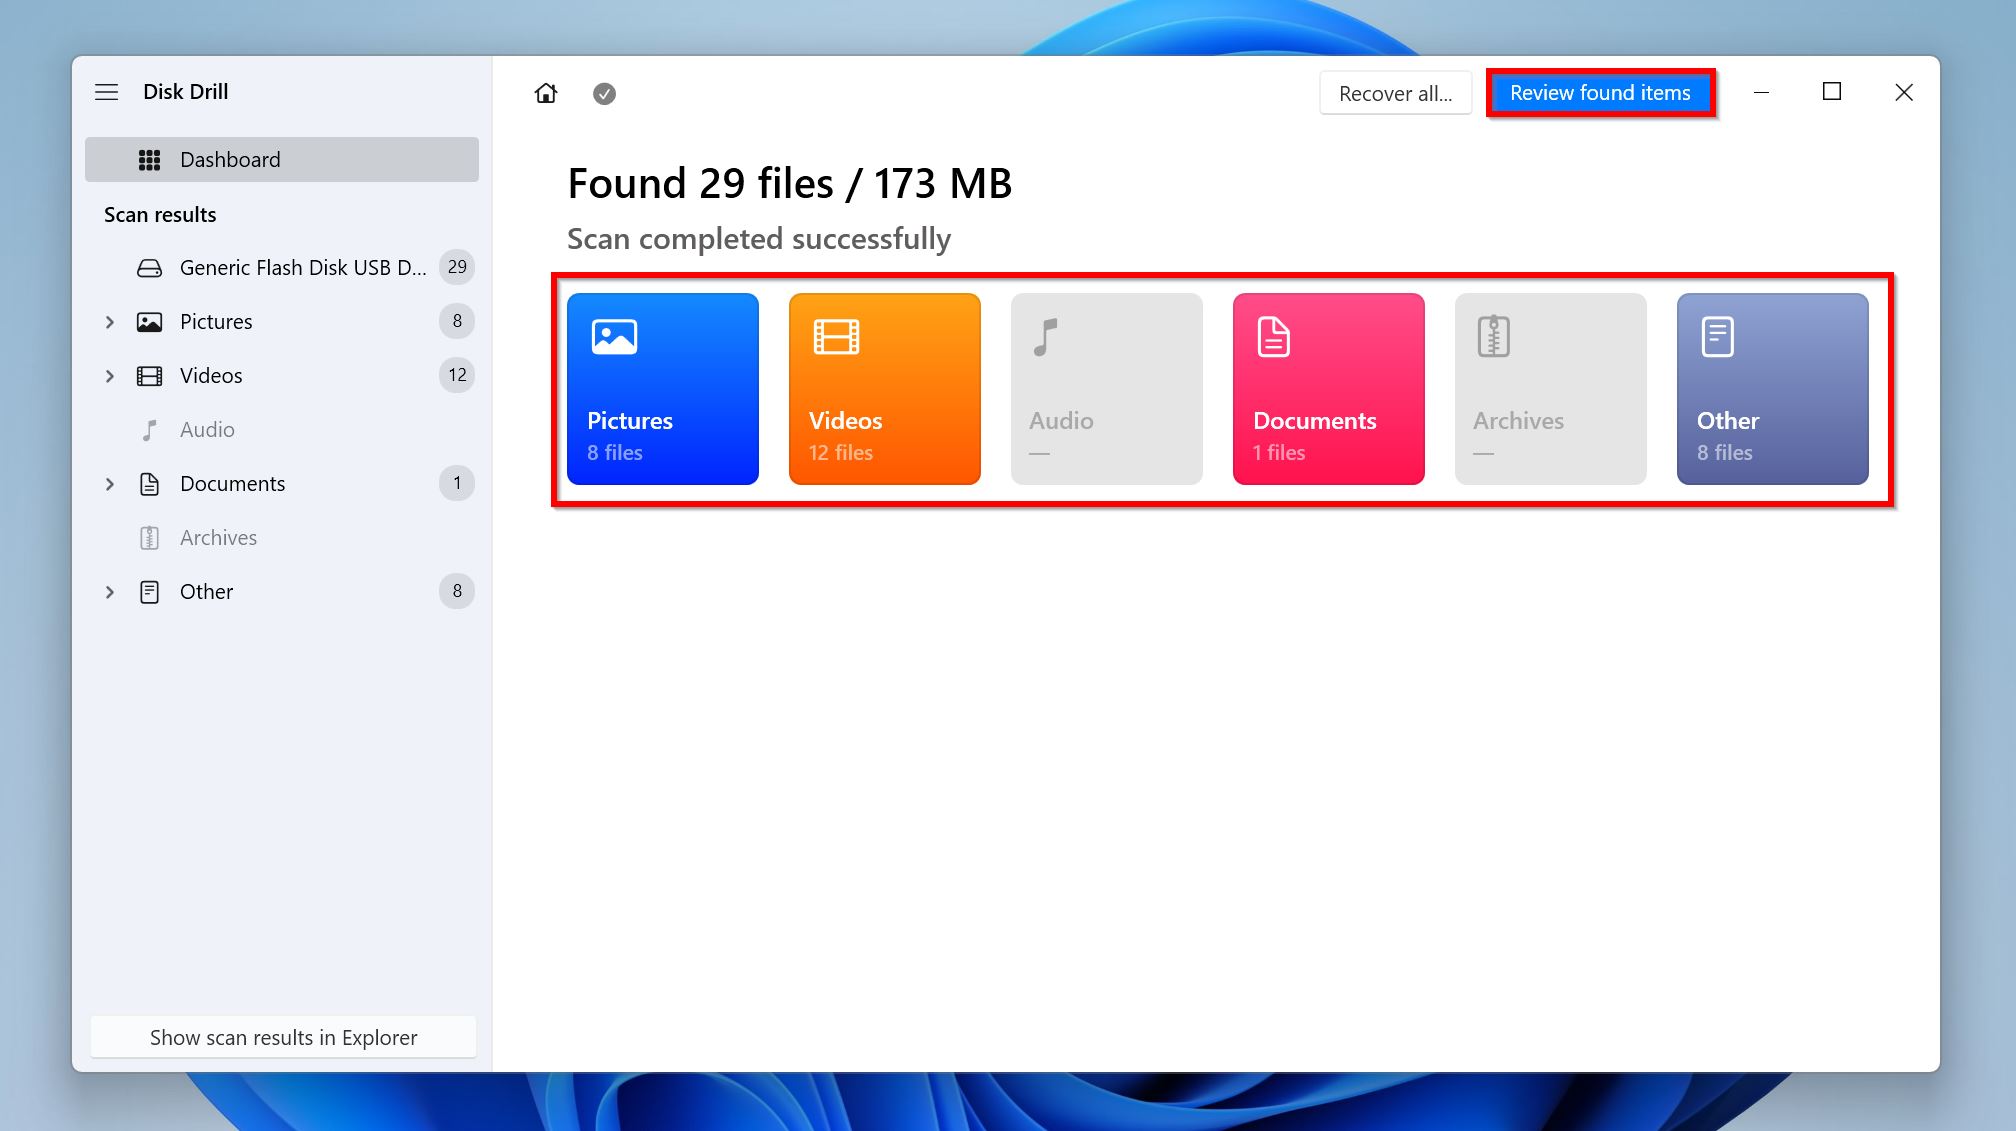
- Click on Review found items to view all recoverable files on the drive. Only looking for specific file types? Click on the relevant file type tile instead—Picures, Videos, Audio, Documents, Archives, and Other.
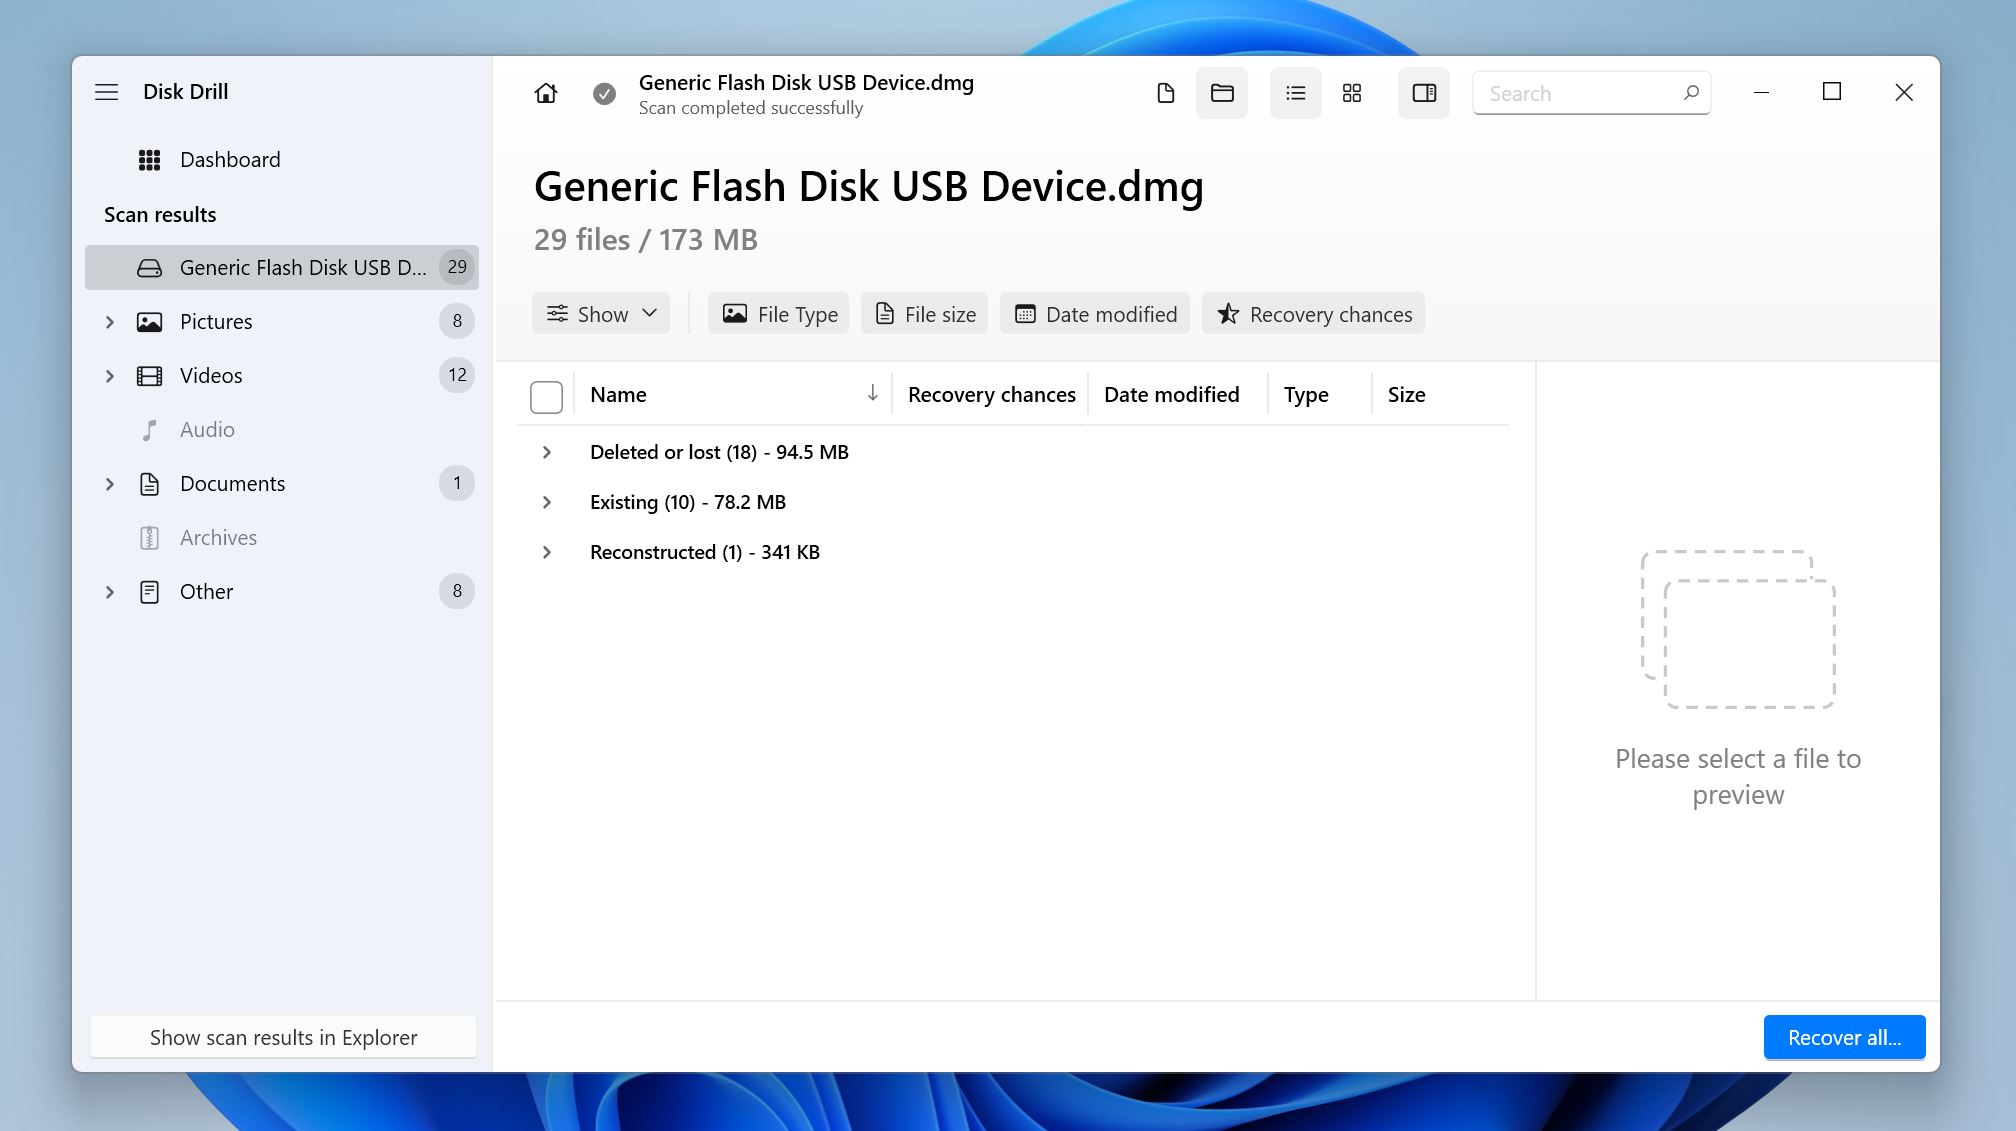
- Expand the Existing, Deleted or lost, and Reconstructed sections.
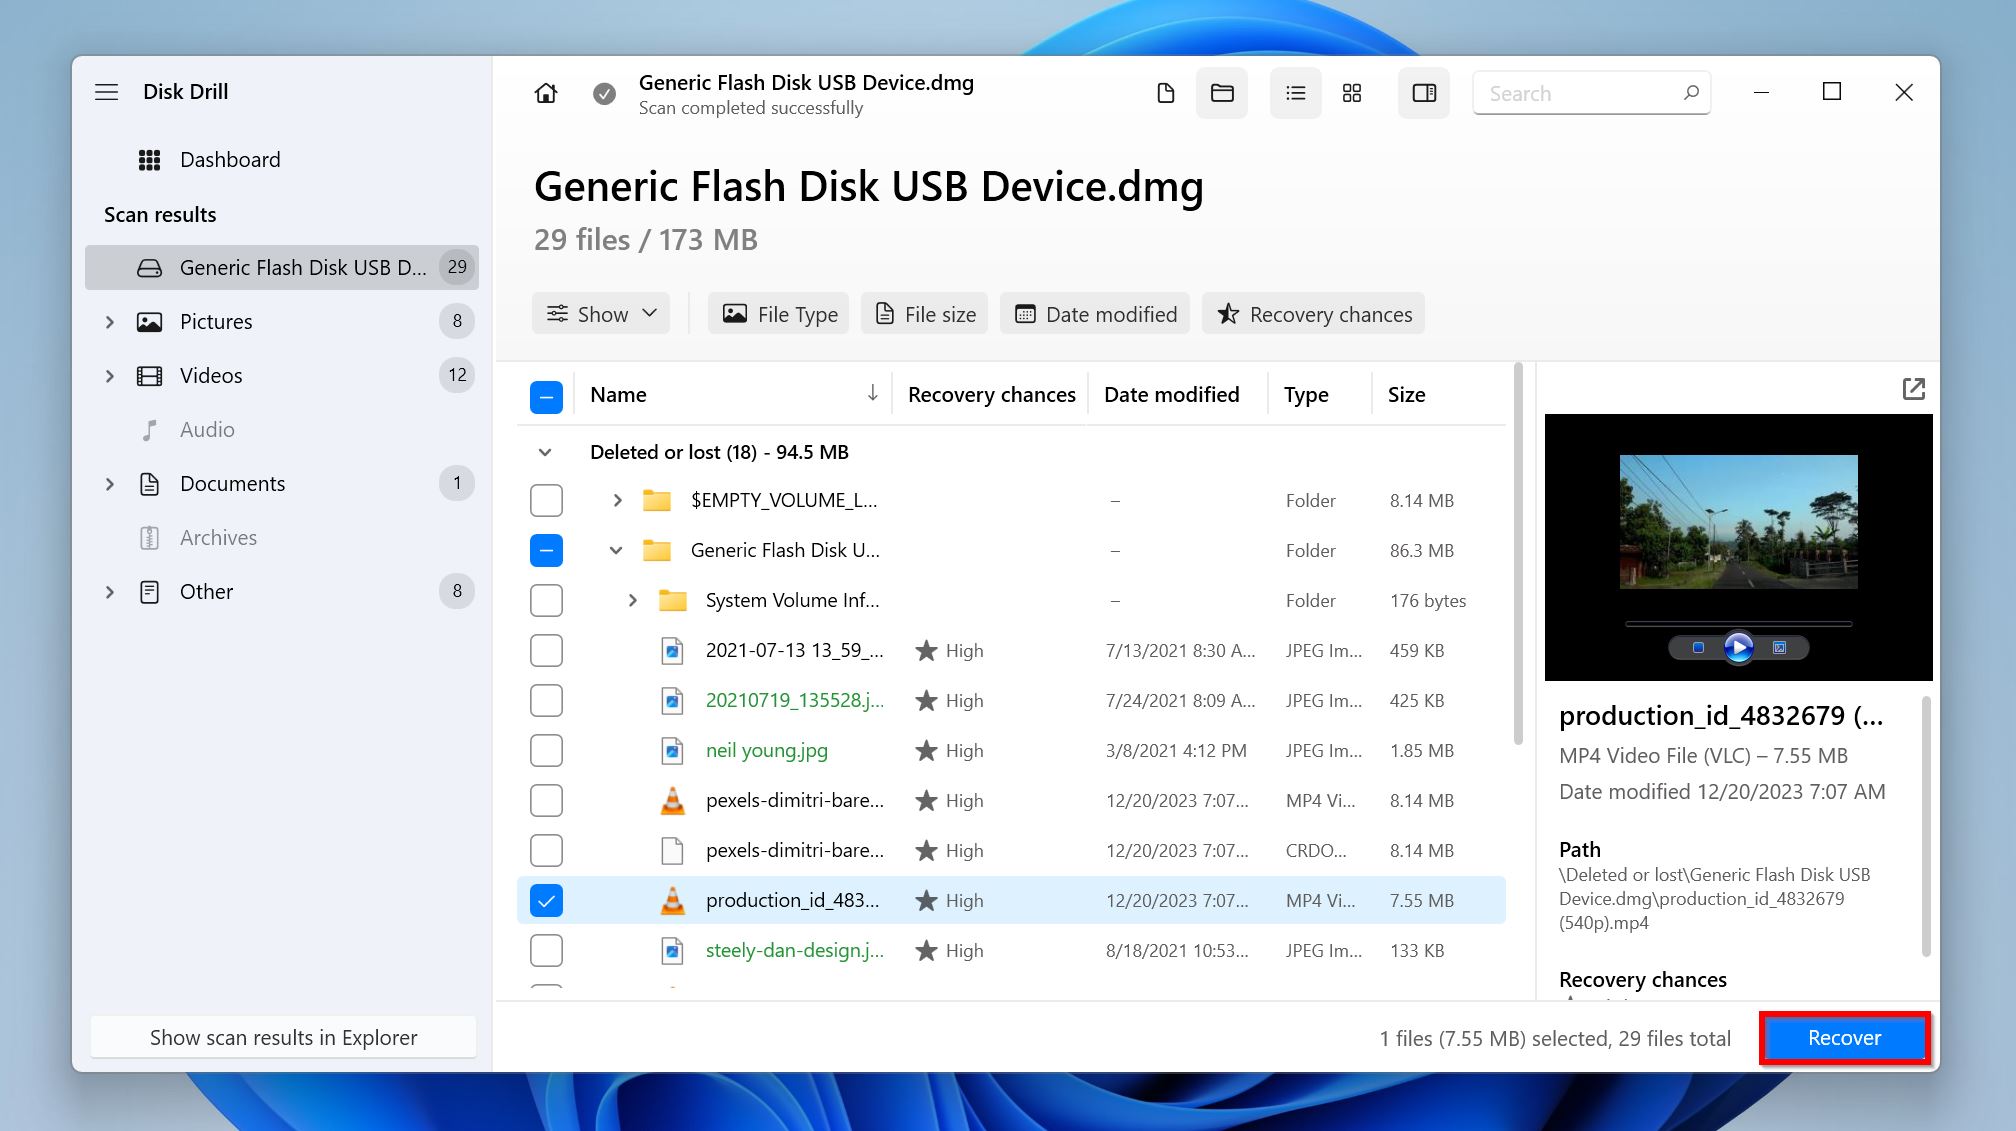
- Select the files you wish to recover. Disk Drill automatically displays a preview of the currently selected file, but you can manually preview most files by clicking the eye icon next to the filename. Click on Recover after selecting your files.
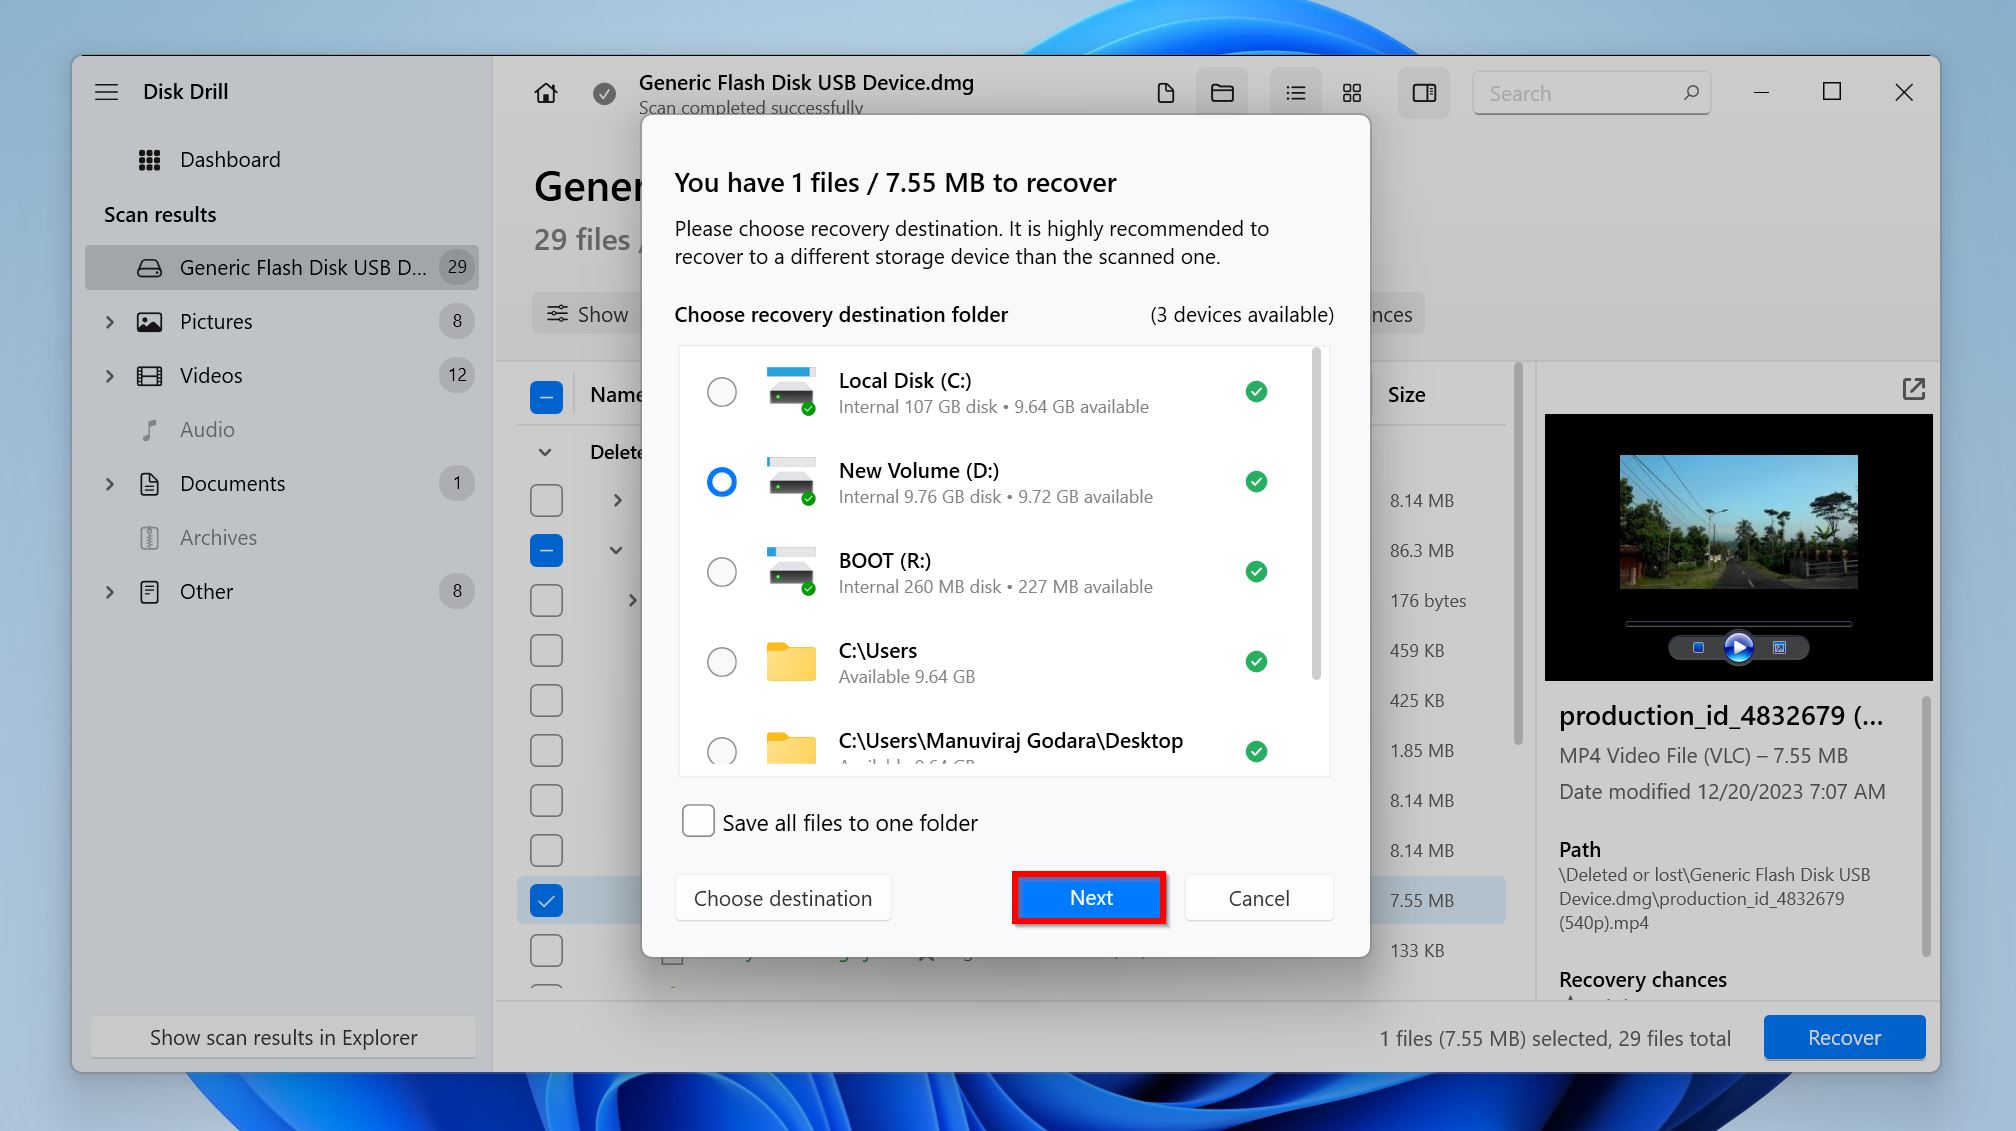
- Choose a recovery destination for the files and click Next. You can recover up to 500 MB of files as part of Disk Drill’s free trial. Further data recovery requires a paid license.
 Disk Drill will recover the selected files.


 Disk Drill will recover the selected files.
Option 2: TestDisk
TestDisk is a capable data recovery tool many users swear by, and for good reason. It’s free, open-source, and lightweight. You can recover lost partitions, repair damaged partition tables, recover files, and more, with TestDisk. However, it’s not user-friendly at all—there’s no GUI, and there’s no way to preview your files before recover. That’s why I only recommend it to more seasoned PC users.
Note: When working with a disk image, open it using TestDisk by using the Open with option, then follow the guide below. Alternatively, mount the disk image in Windows by double-clicking it, and then selecting it in the TestDisk drive selection menu. However, Windows is unlikely to mount a disk image of a drive that shows up as uninitialized.
Here’s how to recover data from an uninitialized drive using TestDisk:
- Download TestDisk, and extract the downloaded package.
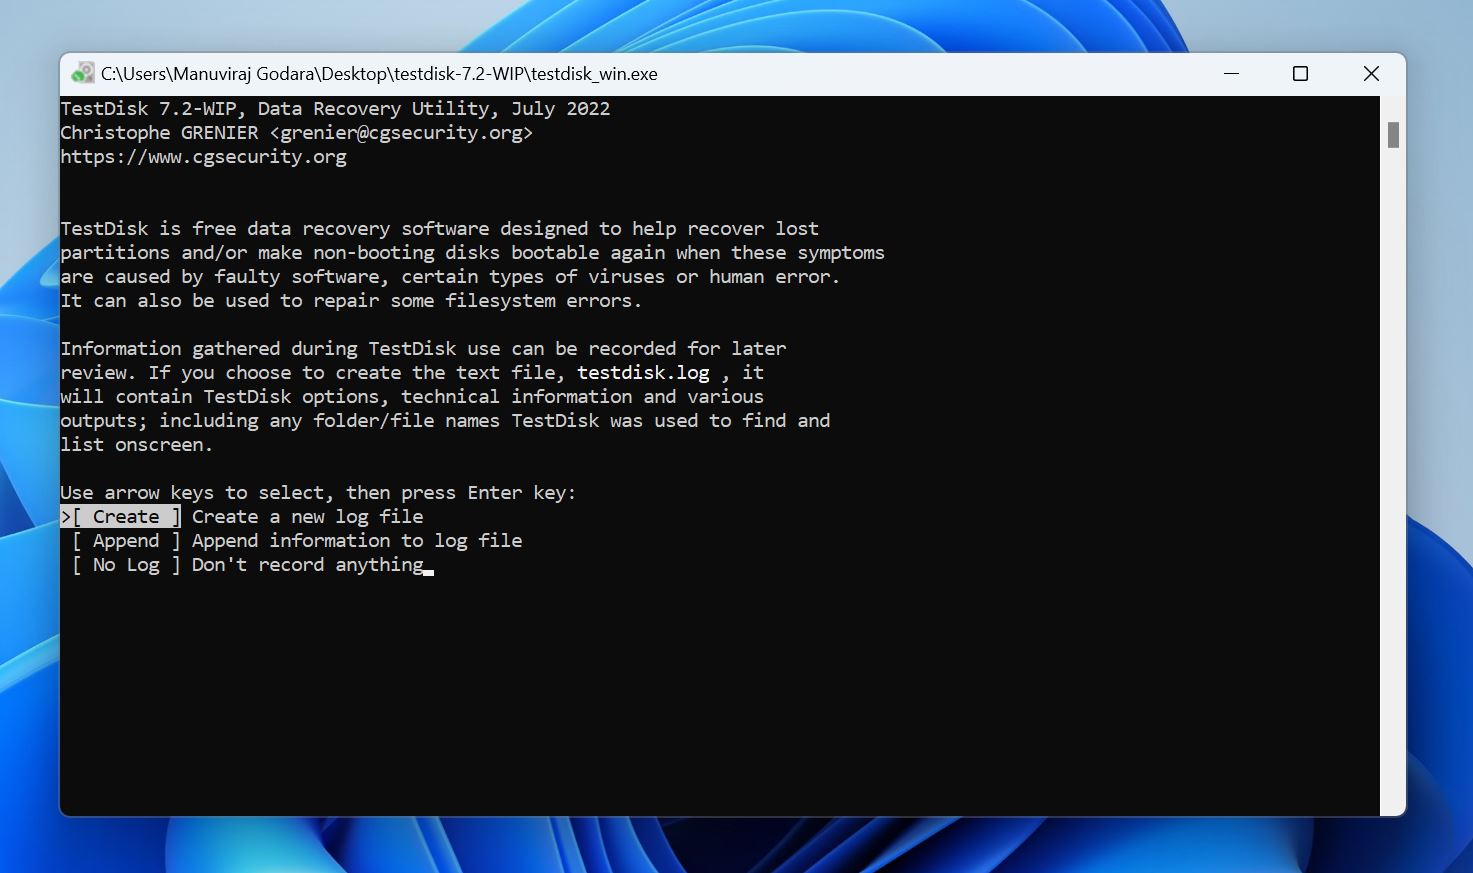
- Open the TestDisk folder, and run testdisk_win.exe. In TestDisk, use the Arrow keys to navigate through the UI, and press Enter to confirm your selection.
- Choose whether you want to create a log file or not, and press Enter. This doesn’t affect the data recovery process in any way.
 Select the uninitialized drive and press Enter.
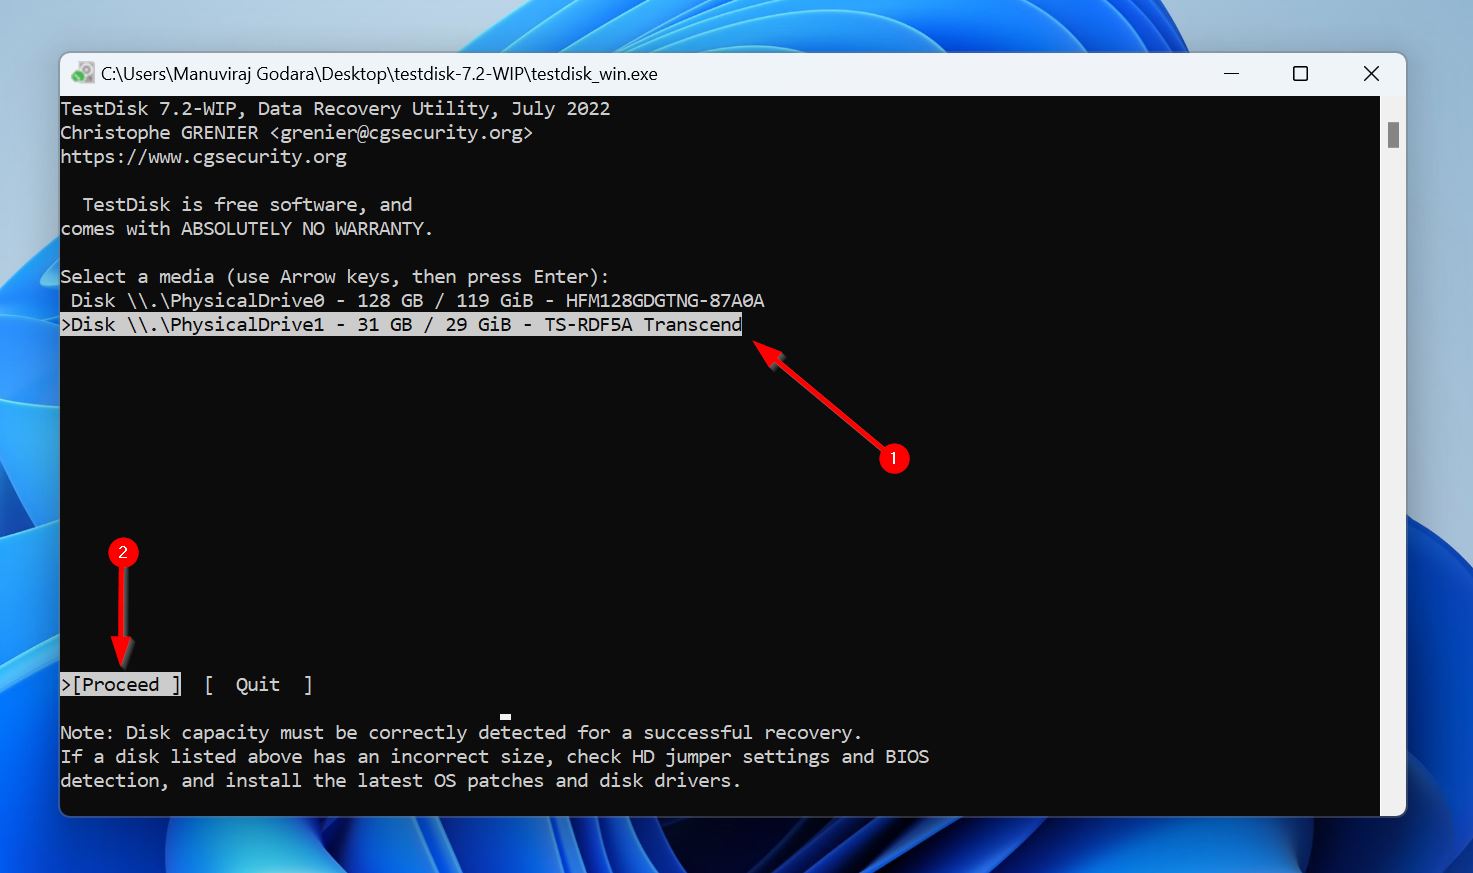
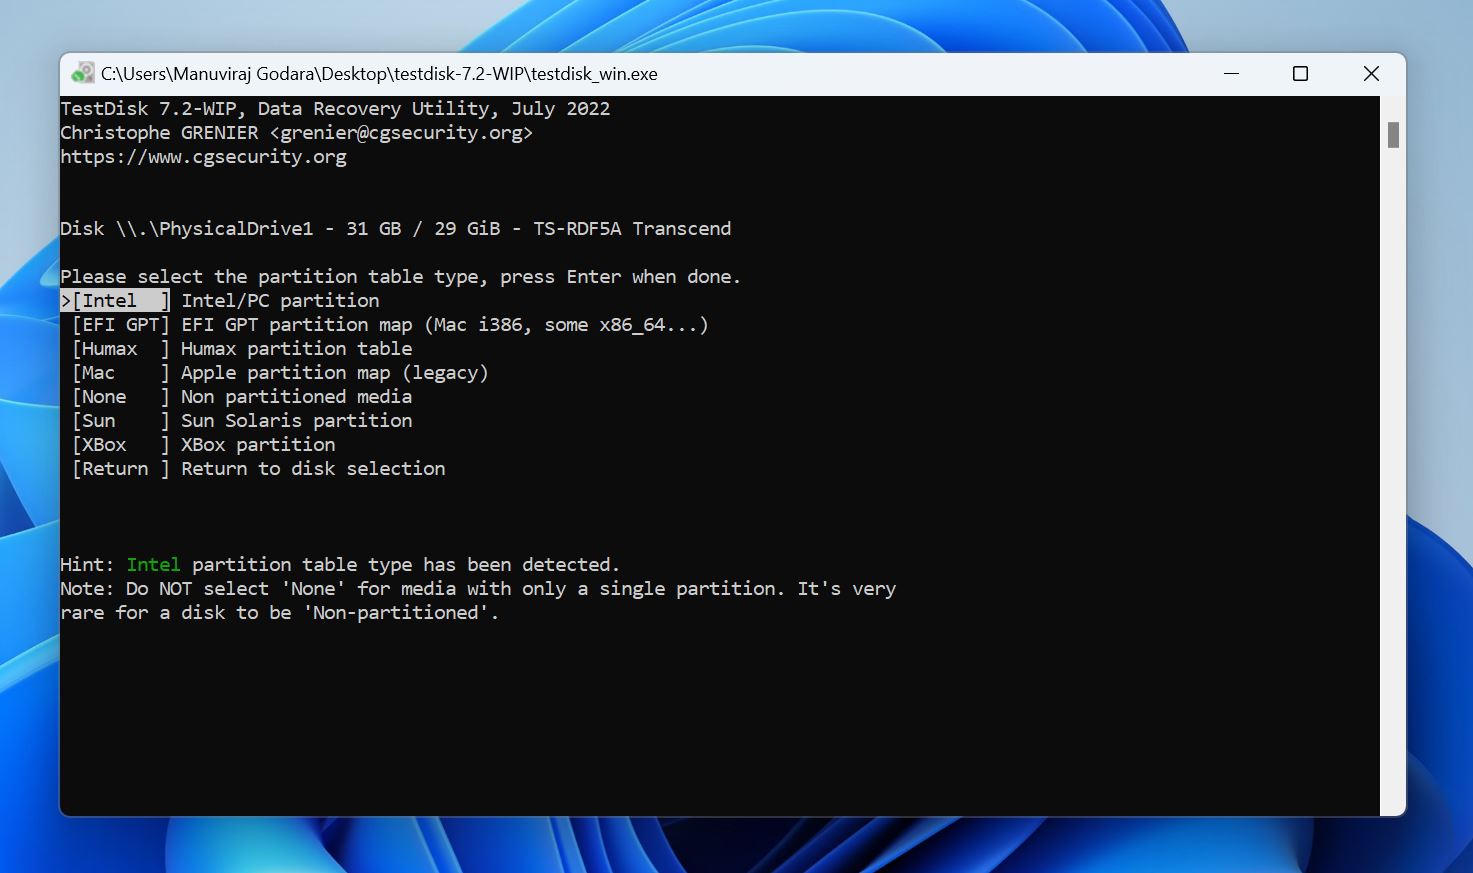
- TestDisk auto-detects the partition table, so simply press Enter on the partition table selection screen. Only modify the selection if you’re sure the disk uses some other partition table.
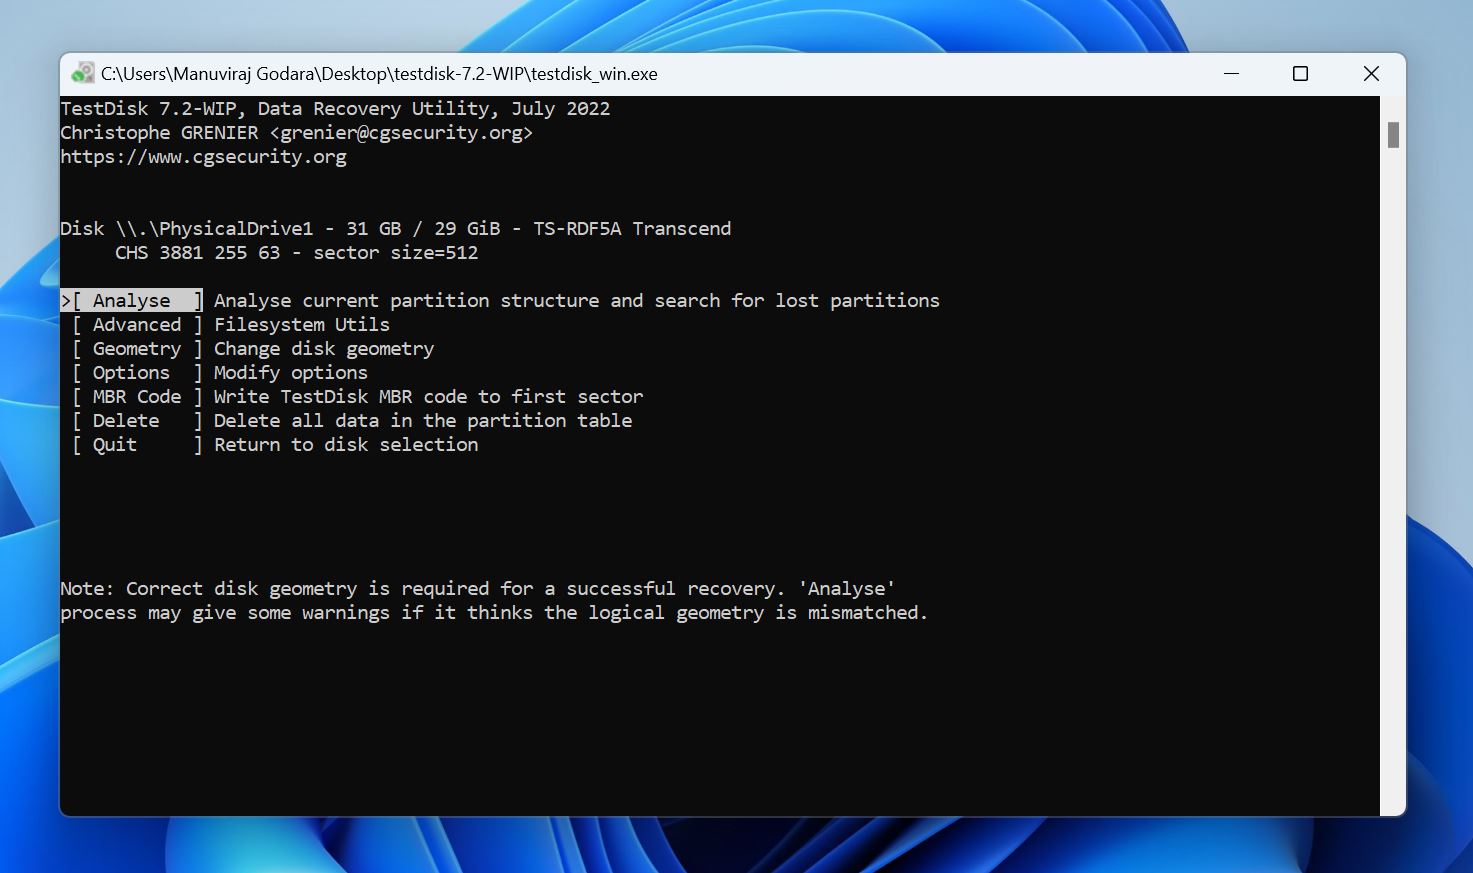
- Select Analyse and press Enter.
- Select Quick Search and press Enter.
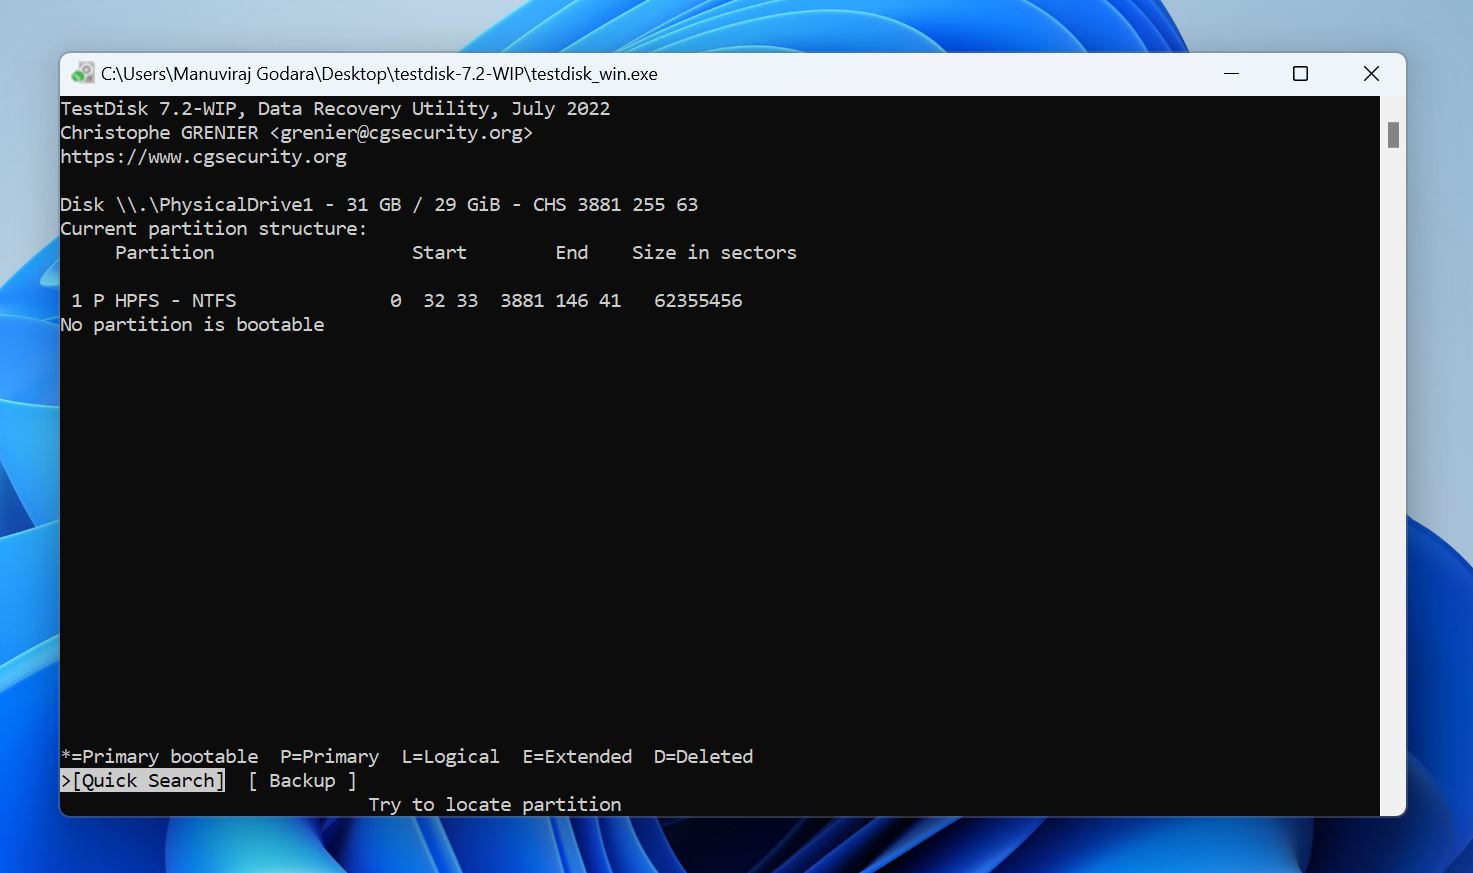
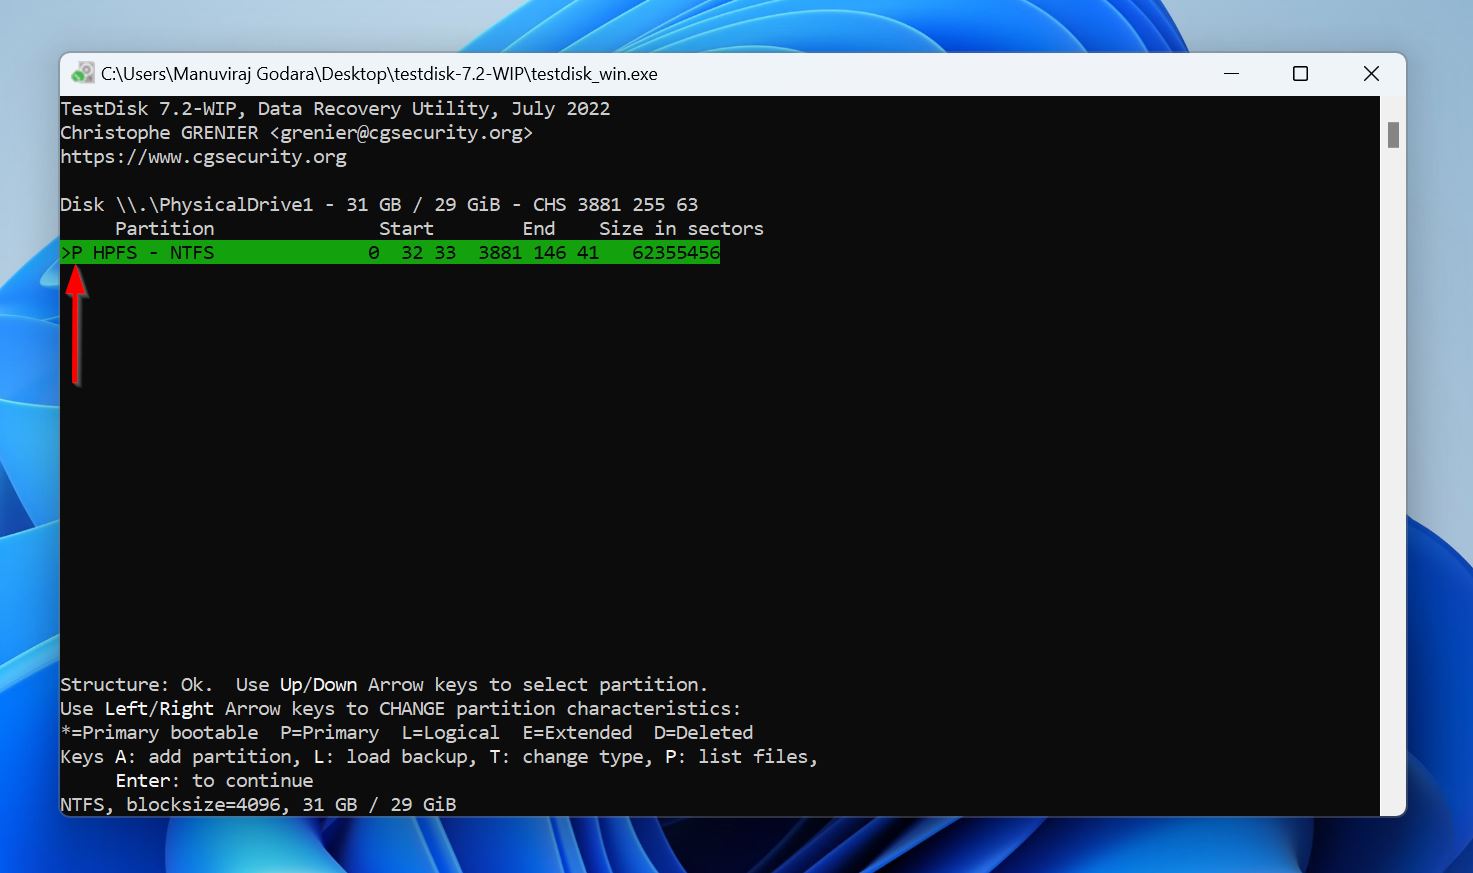
- TestDisk will list the partitions it discovers on the uninitialized drive. Highlight a partition, and press P on your keyboard to view its files.
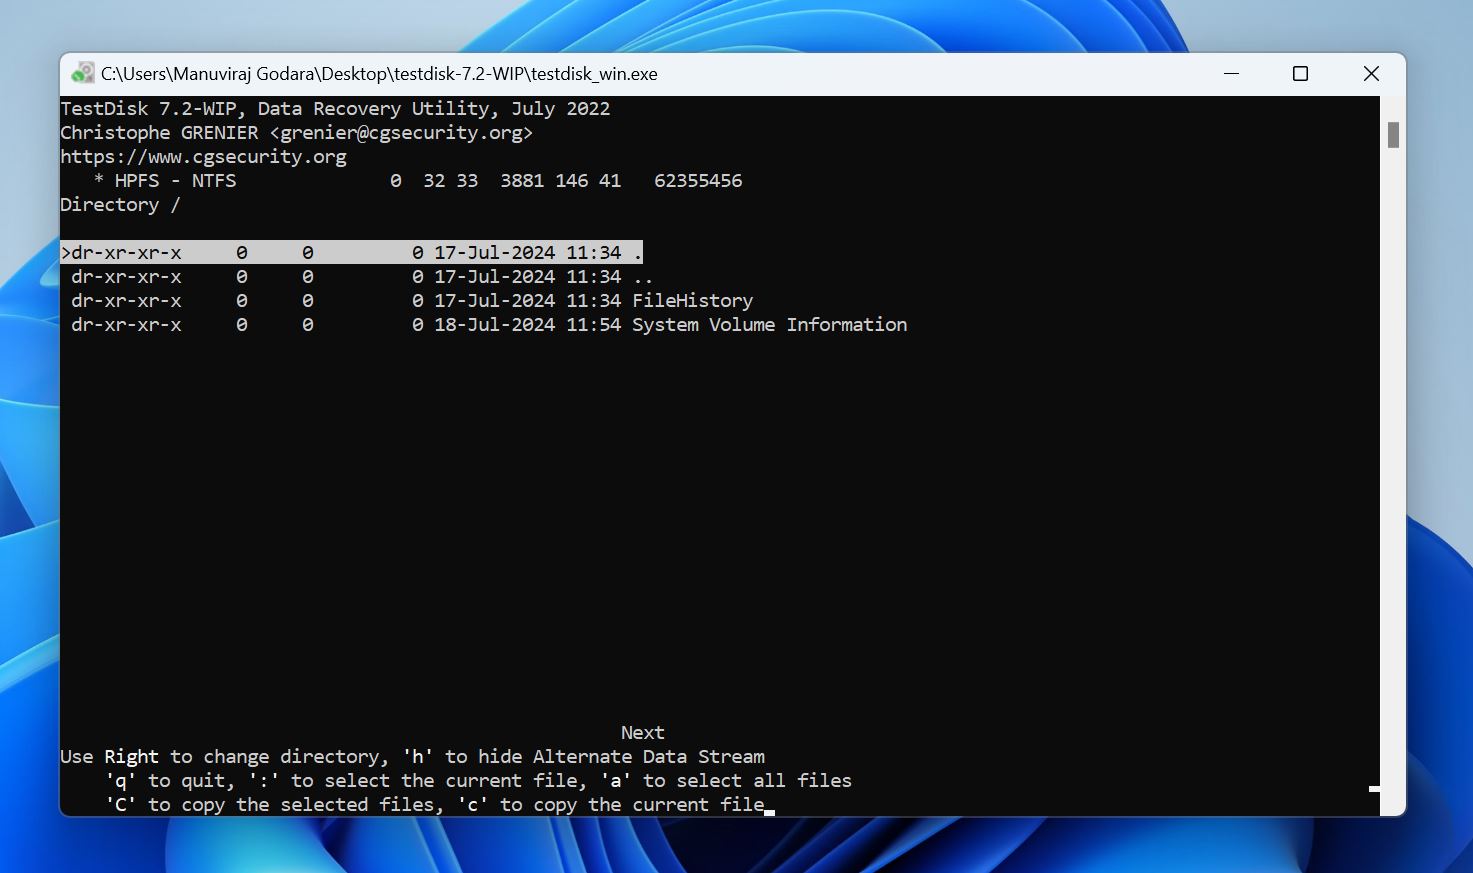
- Open a directory by navigating to it and press Enter. Select the files/folders you wish to copy by pressing the Shift + : (Colon) key combo after navigating to them. Then press Shift + C to begin the copying process. Navigate to the folder you wish to copy the files to, and press Shift + C again. TestDisk will copy the selected files.
 You can now close TestDisk.
 Select the uninitialized drive and press Enter.


 You can now close TestDisk.
What Not to Do When Recovering Data from an Uninitialized Drive
There’s a lot of useless, and often, harmful advice on the internet about data recovery from an uninitialized drive.
Avoid doing these things to maximize your data recovery chances:
- Don’t initialize the drive before data recovery.
- Don’t format the drive.
- Don’t run CHKDSK on an uninitialized drive. Why? Because you can’t. Any article claiming you can “fix” an uninitialized drive using CHKDSK is lying.
- Don’t use the diskpart utility in CMD to create new partitions, or clean the uninitialized drive.
Once you’ve recovered your data, you can attempt the potential fixes mentioned above.
Conclusion
Recovering data from an uninitialized drive involves careful physical examination of the drive, creating a disk image, or a clone of the drive, and then scanning it with a data recovery tool. Additionally, avoid fixing the drive by initializing, formatting, or running CHKDSK scans before data recovery. You can fix it after you’ve recovered your files.
FAQ
- Open Disk Management.
- Right-click on the uninitialized disk and click Initialize.
- Choose a partition table type, and press OK.
- Ensure the drive is properly connected to your PC. If possible, connect it to another PC and see if it remains uninitialized.
- Initialize the drive using Disk Management.
- Update the disk’s drivers using Disk Management, and reboot your PC.
- Contact a professional if you suspect the drive is physically damaged.