
Reading Time: 7 minutesEven though mainstream support for Windows 7 ended on January 14, 2020, many people still rely on the venerable operating system every single day. If you’re among them and are wondering how to recover deleted files in Windows 7, then this article is for you.
Not only do we provide multiple methods to undelete files in Windows 7, but we also explain how the operating system deletes files so that you understand what’s going on under the hood and can use this knowledge to take the best approach possible.
How Does File Deletion in Windows 7 Work?

It’s been more than a decade since the release of Windows 7, but the latest version of Microsoft’s operating system still uses the same file deletion process. Here’s what happens when you delete a file in Windows 7:
- Delete key: When you select a file and press the Delete key, the file is moved to the Recycle Bin, a special folder for recently deleted files. It then stays in the Recycle Bin until the user decides to delete it permanently or retrieve it back.
- Shift + Delete key: When you select a file and press Shift + Delete, the file is deleted permanently without going to the Recycle Bin.
In neither case does the deleted file disappear from the storage device on which it’s stored. Instead, Windows 7 simply marks the storage space occupied by it as empty, making it possible for new data to be stored there.
To recover permanently deleted files in Windows 7, you must act quickly and use reliable data recovery software capable of identifying such files regardless of their extensions. But before you do that, you should rule out that the files are still present somewhere on your computer and recoverable without third-party software.
How to Recover Deleted Files in Windows 7
There are several places where you should look whenever you need to restore deleted files in Windows 7.
Method 1: Recycle Bin
The Recycle Bin is sort of like a graveyard for deleted files. The only difference is that it doesn’t contain corpses but fully functional files that can be retrieved with a few simple clicks. You can find the Recycle Bin icon on your desktop, but it’s also possible to open the Recycle Bin from the Command Line, by typing the following command:
start shell:RecycleBinFolder
Regardless of how you open the Recycle Bin, you need to carefully go through its content and look for your files. If you spot them, select them just like you would regular files in Windows Explorer and move them to your desktop or any other suitable folder. Alternatively, you can right-click any selected file and choose the Restore option to move them all to their original locations.
Method 2: Data Recovery Software
No luck so far? Don’t worry: there’s a good chance that you’ll be able to easily recover your files using a data recovery software tool. One of the best Windows 7 file recovery tools that’s suitable for users with no previous data recovery experience is Disk Drill, whose free version allows you to undelete up to 500 MB and preview all recoverable files.
Disk Drill is an excellent choice because it’s one of the most user-friendly data recovery software tools around, especially given how powerful it is. It can intelligently and automatically run all supported recovery methods in the optimal order to find lost files based on available file system information and on their unique signatures.
- Make sure you have SP1 and hotfix #KB3033929 by Microsoft installed (32-bit or 64-bit). These updates are necessary for Disk Drill to run on Windows 7.
- You can then download Disk Drill 4 and install it on your Windows 7 computer. To avoid overwriting the very same files you’re trying to undelete, make sure to install it on a different storage device.

- Launch Disk Drill by double-clicking the icon that was automatically created on your desktop during installation. Disk Drill will ask you for admin permissions, which it needs to run its sophisticated data recovery algorithms in order to discover deleted files that are not in the Recycle Bin anymore.
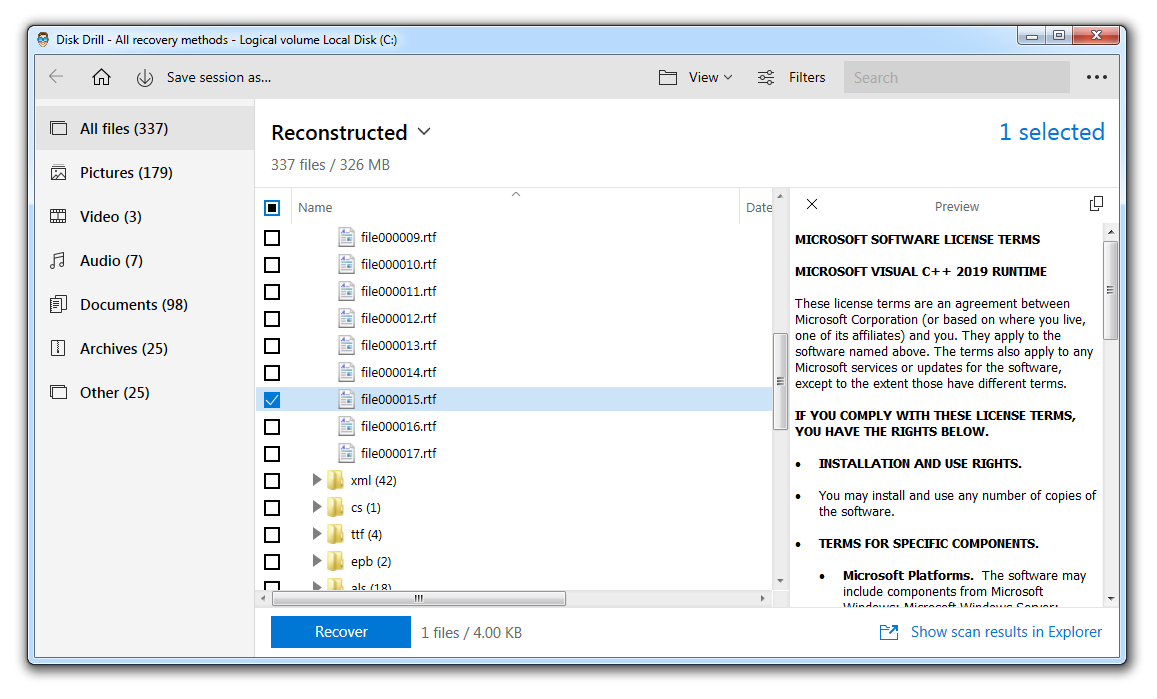
- Select the storage device on which the deleted files were stored and click the Search for lost data button. Disk Drill will begin scanning your drive, looking for all deleted files that can still be recovered.
 Scanning may take some time depending on the size and speed of your storage device. You can choose to see the results right away, with scanning continuing in the background, or you can let it finish completely—it’s up to you.
- Select each file that you want to get back. You can preview files inside Disk Drill, and you can also apply various filters to quickly find, for example, specific file formats. With all files selected, you can click the Recover button.
- Finally, specify where you want to restore the deleted files (again, select a different storage device than the one you’ve scanned) and confirm. Disk Drill will display a confirmation message, telling you that the recovery was successful and allowing you to see the content of the recovery folder with a single click.

 Scanning may take some time depending on the size and speed of your storage device. You can choose to see the results right away, with scanning continuing in the background, or you can let it finish completely—it’s up to you.
Method 3: Prevision Versions
Windows 7 comes with a useful backup feature, called Previous Versions, and it goes way beyond the fairly limited capabilities of the Recycle Bin. With this feature, it’s possible to go back in time to where deleted files were still available.
However, it’s important to note that in Windows 7, previous versions come primarily from the Backup and Restore feature, which must be manually set up to work. If it isn’t configured, then recovery using this method wouldn’t be possible.
You can check if the Backup and Restore feature is currently active by opening the Control Panel and navigating to System and Security and then Backup and Restore. If you see the “Set up backup” link, then the feature isn’t active. If it is active, you should see an overview of your backup drive.
Here’s what you need to do to get back deleted files on Windows 7 from a previous version:
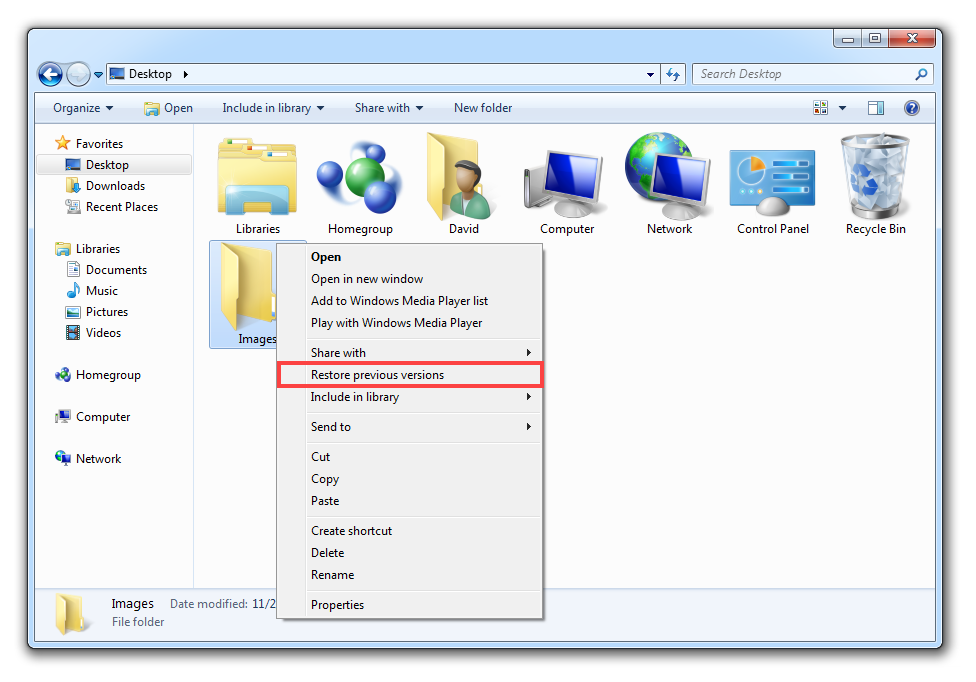
- Open Windows Explorer and navigate to the folder where the deleted files were located.
- Navigate to the parent folder of the folder where the deleted files were located so that you can right-click on it and choose the Restore previous versions option.
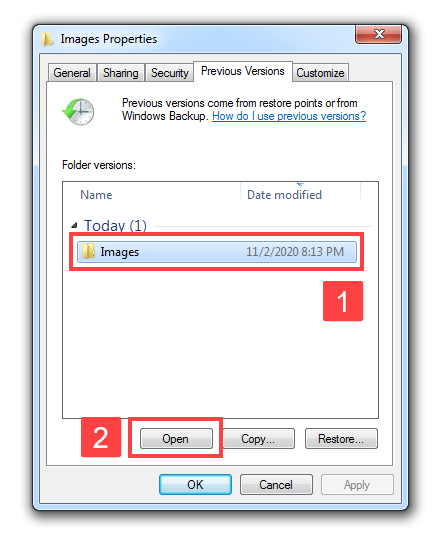
- Select the most recent previous version (or the one that contains the deleted files).
- Click the Open button to view the contents of the snapshot.
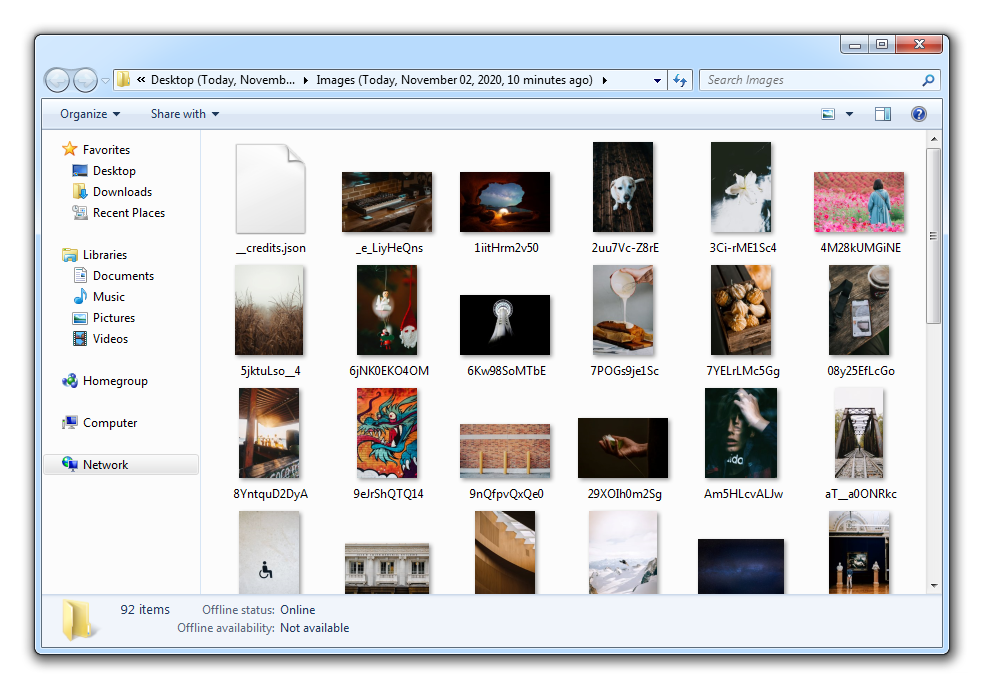
- Recover all deleted items to any location on your Windows 7 computer.


Method 4: Local or Cloud Backup
Automatic backup features such as Previous Versions are great because they allow you to forget about data backups and still enjoy robust data protection. Unfortunately, they’re not 100% reliable, which is why many users create additional backups and store them either locally or in the cloud. If you’re among them, then you’re in luck because there’s a good chance that one of your backups contains the deleted files.
It would be beyond the scope of this article to describe how to recover files using local backup applications like Macrium Reflect, Clonezilla, and Rollback Rx or cloud backup services like Dropbox, Google Drive, and Microsoft OneDrive, but you shouldn’t have any trouble finding many detailed tutorials online.
Is It Possible to Recover Deleted Folders in Windows 7?
Yes, it’s possible to recover deleted folders in Windows 7, and there are multiple methods that you can try. Since we’ve already described several of them in this article, here’s just a quick overview:
- Recycle Bin: Always start by checking the Recycle Bin. If you discover that it contains the folder you’re looking for, then you can simply drag it back to its original location.
- Previous Versions: If you can’t find a folder inside the Recycle Bin, then you can try to restore it from a previous version, which is a copy created automatically as part of a restore point.
- Backup: There’s a good reason why backups are the most effective protection against data loss. Even if you don’t manage to recover the most recent version of the deleted folder, it’s still better to get back at least some data than nothing at all.
- Third-party software: Last but certainly not least, you can recover a deleted folder in Windows 7 using special third-party software like Disk Drill, which can recover deleted files and folders that Windows 7 can’t see anymore.
Regardless of which method you choose, make sure to begin the recovery process as soon as you can because permanently deleted files can become overwritten at any moment.
Conclusion
Just because Windows 7 is no longer supported by Microsoft, it doesn’t mean that effective data recovery methods are not available. Not only can you use all recovery features that are present in the operating system, but you can also rely on Windows 7-compatible data recovery software tools made by third-party developers. Armed with the right knowledge and recovery tools, you have a good chance of getting back even permanently deleted files.