Reading Time: 8 minutesSATA hard drive data recovery is a delicate task. Its fragile and moving parts (a.k.a. mechanical and electrical components) mean that there are extra factors to consider when diagnosing a SATA drive and deciding which method of recovery is most suitable.
Use this article as your guide. We wrote in-depth instructions on different ways to recover data from a SATA hard drive safely, depending on what caused the data loss – which we also briefly explain in the sections below. Read on!
What Exactly Causes Data Loss on SATA Drives (Important!)
Because of their physical design, SATA hard drives may suffer data loss from different angles. On top of your files possibly getting deleted or corrupted, issues with a SATA drive’s mechanical and electrical components may also prevent access by cutting off power or scrambling communication between devices.
This article covers all those scenarios. We suggest familiarizing yourself with the common types of SATA drive failure that lead to data loss so you know which of the methods we cover in the next section may suit you best.
1. Logical Failure
Logical issues or failure is the most common thread among all types of storage devices. Accidental deletion or formatting, file system corruption, partition loss, virus or malware attacks, and bad sectors fall under logical failure.
It’s usually caused by human error, software bugs, or interruptions during read/write processes. It can also be a symptom of mechanical and electronic failure.
2. Mechanical failure
SATA hard drives have a lot of moving parts, making them particularly susceptible to mechanical issues that can cause different types of data loss. For example, the read and write heads may become misaligned, which prevents data access because the drive can’t accurately locate where your data starts and ends.
If the spindle motor fails, the drive’s platter can’t spin and won’t be operable. If the platter itself gets scratched or contaminated, the data stored magnetically on the disk might get damaged. A common mechanical issue most users are familiar with is the infamous SATA hard drive clicking.
3. Electronic failure
Electronic failure causes data loss by disrupting communication between your SATA drive and your computer; this prevents access to your files because your PC can’t detect or recognize your drive. Examples of electronic failure include PCB damage (stops the drive from spinning), firmware corruption (interferes with machine communication), and power supply issues (fails to provide enough resources for the drive’s operation).
4 Ways to Recover Data from a SATA Hard Drive
This is the guide section, where we feature our 4 methods to recover data from a SATA hard drive. They realistically cover every single data loss scenario SATA disks commonly suffer from.
We can safely address logical failure with DIY solutions, which make up Methods 1-3. However, in case of mechanical failure and electronic failure, skip Methods 1-3 and jump straight to Method 4.
Method 1: Restore a Local Backup of your SATA Drive
If you created a backup of your SATA hard drive, you are pretty much guaranteed to get 100% of your data back (if you have the backup drive available).
We’ll demonstrate how to restore backups using two built-in Windows tools:
- File History
- Backup and Restore (Windows 7) – also works with 10 and Windows 11
It’s also possible that you or another user created a backup with a third-party app – you can refer to that app’s official website for instructions.
However, make sure you have a separate disk or partition to store the backup files in. Don’t save the restored files to your SATA drive in case you need to use data recovery software or hire data recovery services down the line.
You may even want to use a completely different computer for this task. Just make sure to back up that computer’s files and choose the appropriate options to ensure that your backup files don’t overwrite that computer’s existing data.
Option A: File History
File History saves incremental copies of your pre-selected files and folders every time you modify them.
As long as File History has been enabled, you should have access to the latest versions of your libraries, Contacts, Favorites, and Desktop folders. You also have the option to restore specific versions of those files and folders.
For example, you may want to restore an earlier version of a specific folder where a file it contained hasn’t been deleted or modified in a way you don’t want.
- Connect your File History backup drive to your PC.
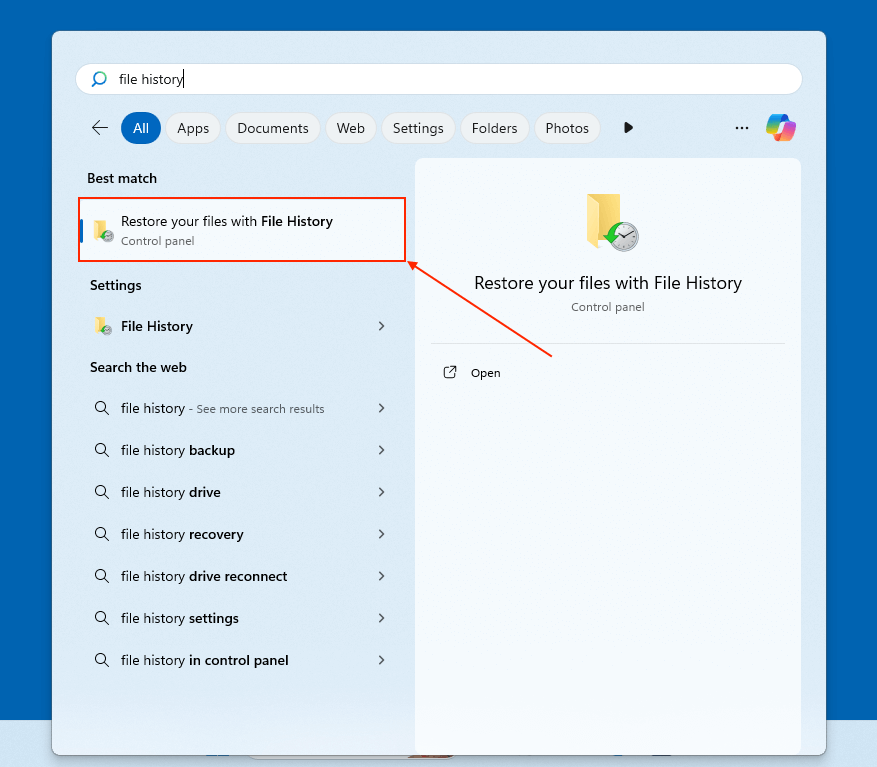
- Open the Start menu. Then, search for Restore your files with File History.
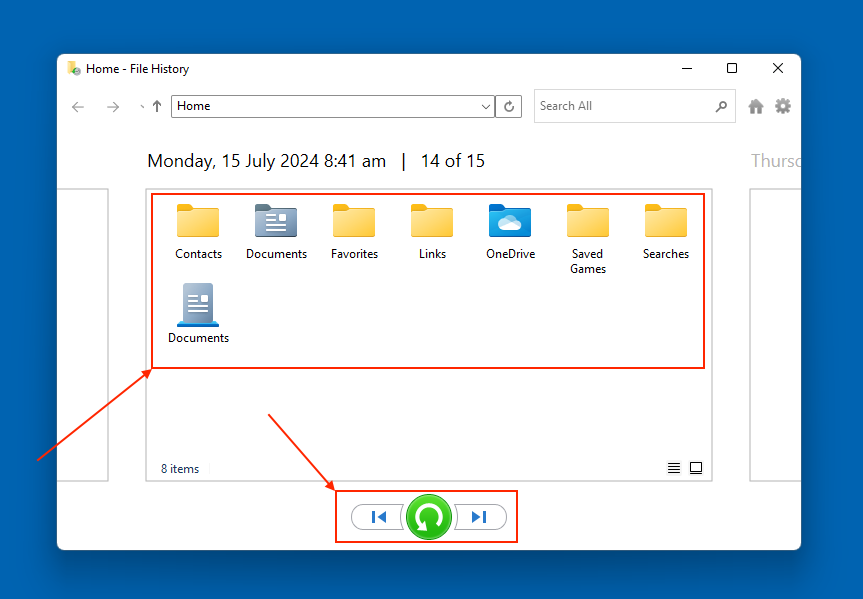
- Click the files and folders you want to restore. Then, click the green restore button at the bottom of the window to recover your files.


Option B: Backup and Restore (Windows 7)
Backup and Restore (Windows 7) is a more traditional backup tool. It only contains whatever files and folders you chose to include when you created the backup (they will also remain in the same exact state).
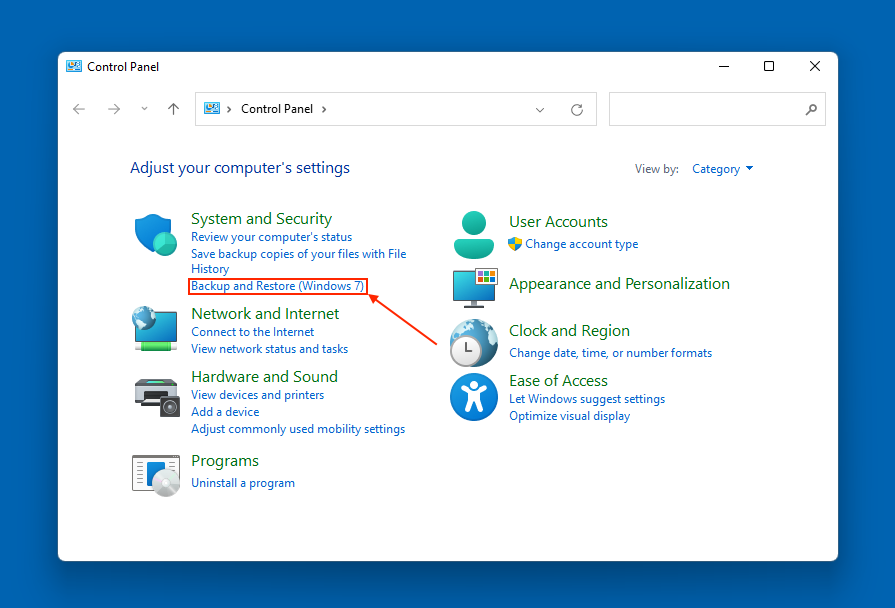
- Connect your backup drive to your PC and open Control Panel.
- In the System and Security section, click Backup and Restore (Windows 7).
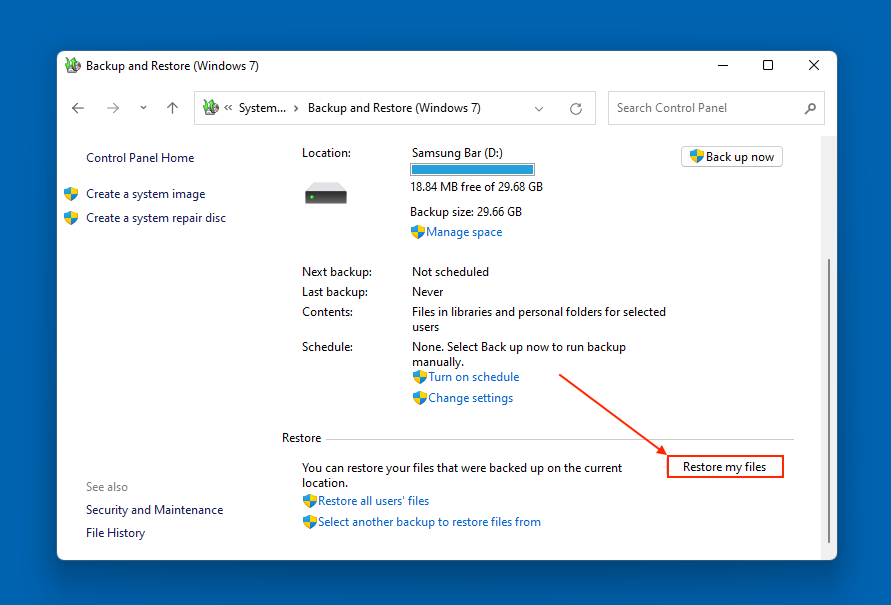
- Click Restore my files.
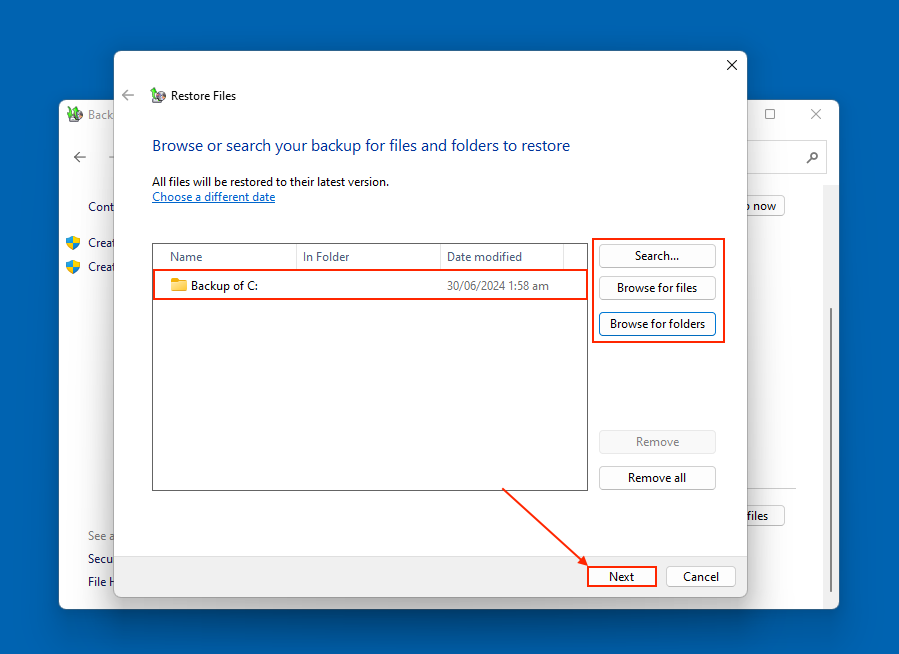
- Fill up the list with the data you want to recover. Search, Browse for files, and Browse for folders will help you select the specific files and folders you want to extract from the backup. Once you’ve added the files and folders you want to restore, click Next.
- Select In the following location option. Then, click Browse and select the destination you want Windows to restore the files to. You can opt to restore their original subfolders as well. Then, click Restore.
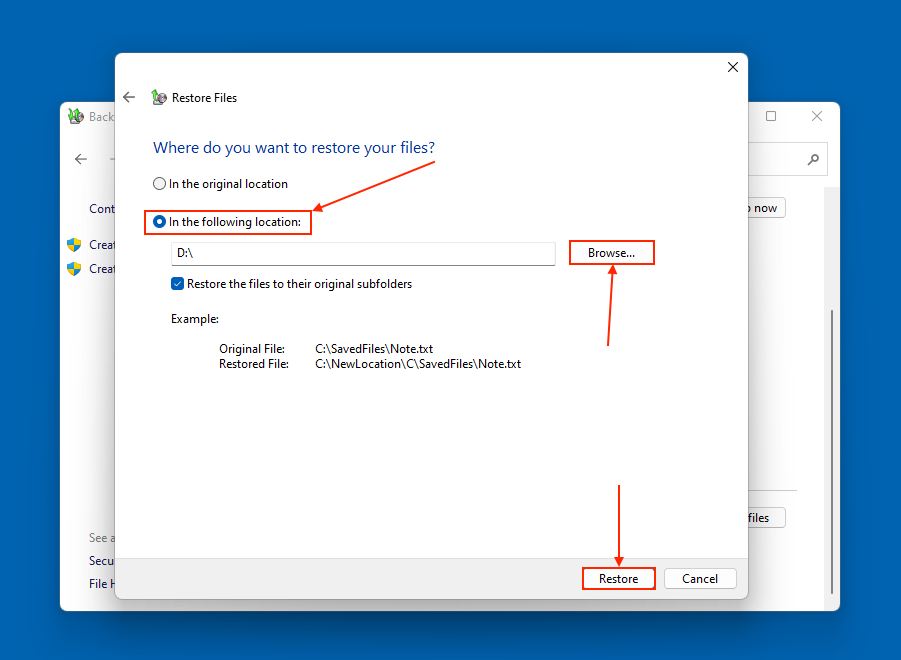


Your files should appear in the folder you specified in step 6.
Method 2: Restore Backup files from Cloud Storage
Since SATA hard drives are typically used as system disks, it’s possible that any cloud storage services installed on your PC backed up at least some of your libraries.
Modern Windows installations typically come with Microsoft OneDrive pre-installed. It’s also possible that other users of your PC installed other cloud services like Google Drive or iCloud – whatever the case, it’s worth a shot.
We’ll briefly demonstrate how to download files from OneDrive. You can use any computer for this task (you can even download the app on a mobile device and check your files there).
Cloud storage services need to be installed and enabled beforehand for it to work for data recovery purposes. The files you can expect to find are the cloud app’s default selection along with your own. For example, OneDive automatically backs up only your Desktop, Documents, and Pictures folders, unless you change the settings.
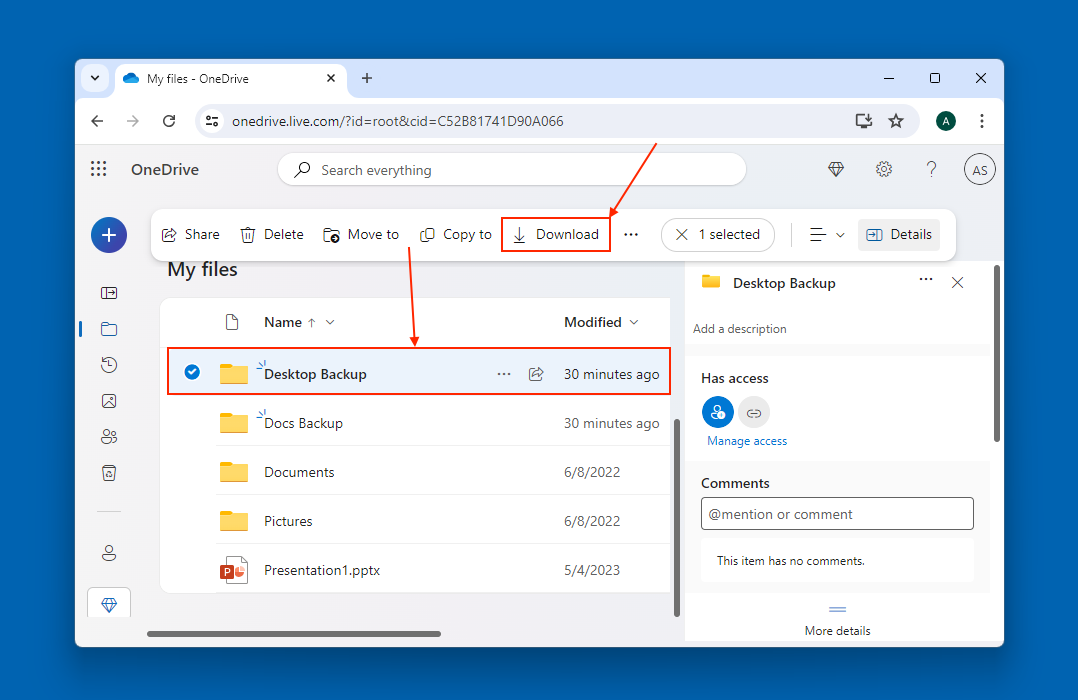
- Log in to onedrive.live.com.
- Click the spheres beside the files and folders you want to download. Then, click Download.

Method 3: Scan Your SATA HDD With Data Recovery Software
If your cables aren’t the problem and you were unable to back up your SATA drive, the final possible DIY solution is the use of data recovery software. Data recovery software is a tool that you can install on your computer that can directly recover files from your SATA hard drive.
The use of data recovery software is only appropriate in case of purely logical damage, such as accidental deletion or formatting, file system corruption, or virus or malware infection.
Below, we demonstrate the recovery process using a tool called Disk Drill. Disk Drill is a well-known data recovery software that’s easy to learn for beginners while having the ability to address different data loss scenarios caused by logical damage. It can even recover data from a failed SATA hard drive.
It’s also good at scanning all major file system formats commonly used by Windows SATA drives, which are NTFS and exFAT. You can Disk Drill’s free trial to restore up to 500 MB worth of data for no cost so you can test the app’s recovery success rate (relative to your SATA drive) with no strings attached.
- Download and install Disk Drill on a completely different disk. We suggest using an external storage device that also has enough space for the recovered data.
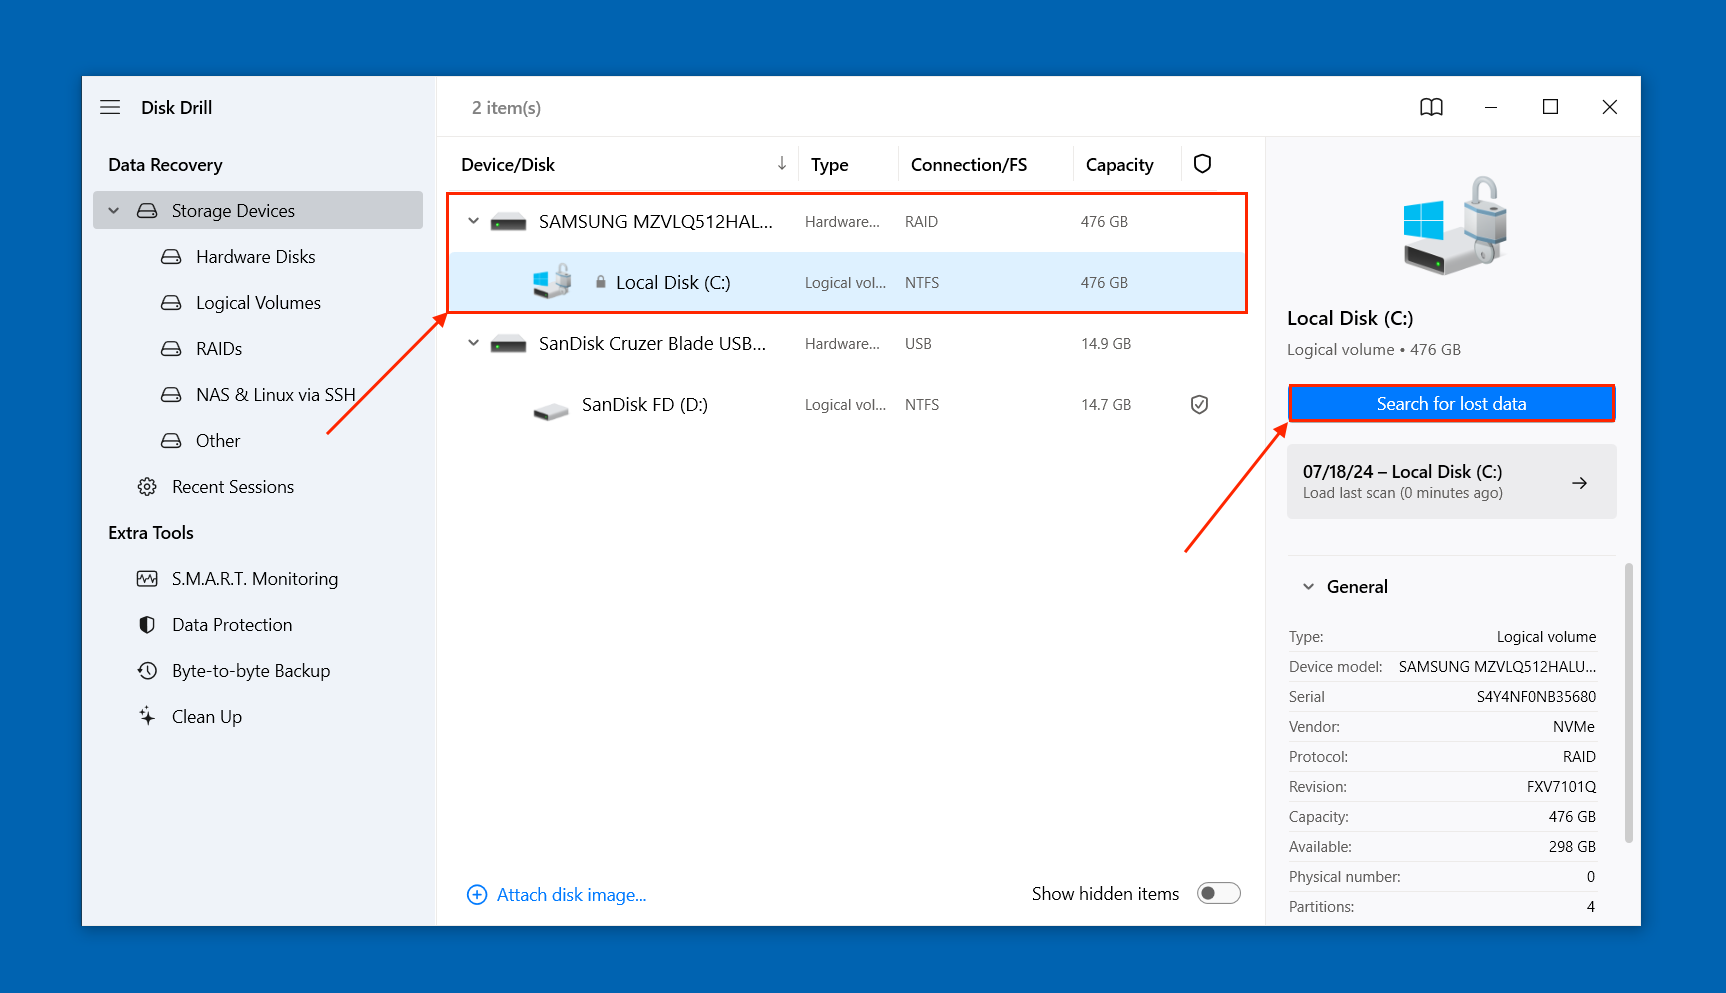
- With the external storage device and your SATA drive connected to your PC, launch Disk Drill.
- Select your SATA drive from the source selection menu and click Search for lost data.
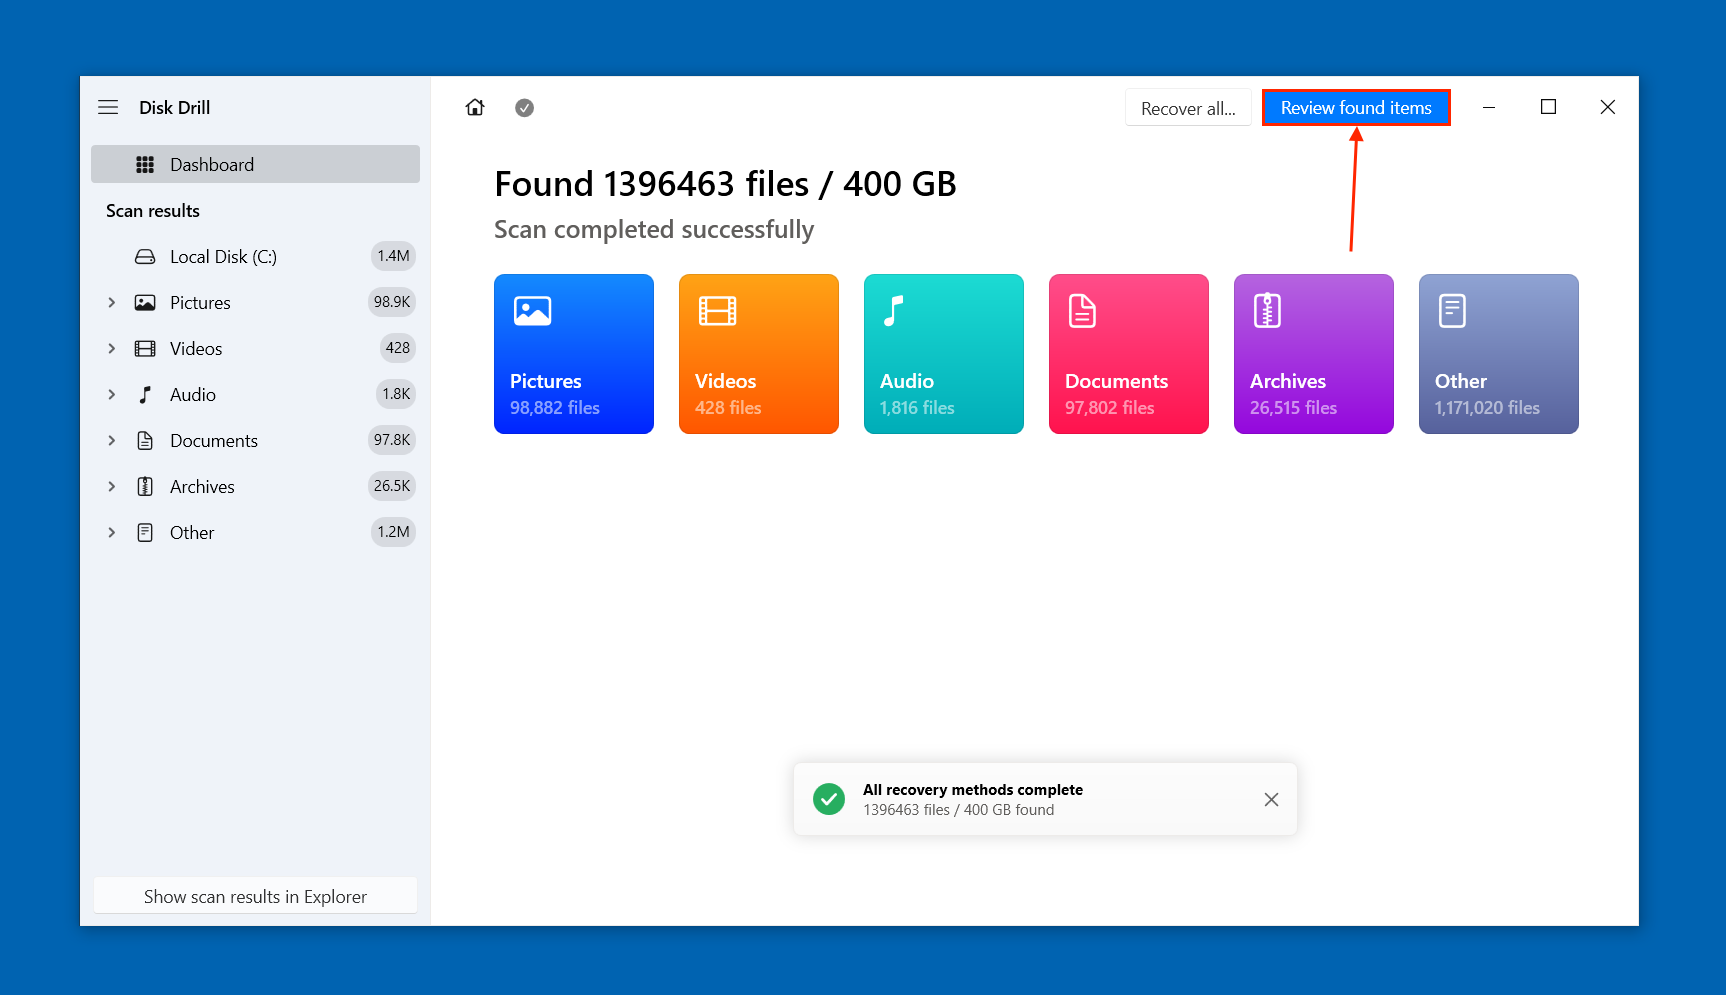
- Once Disk Drill is done scanning your drive, you should see a small pop-up box at the bottom. Click Review found items.
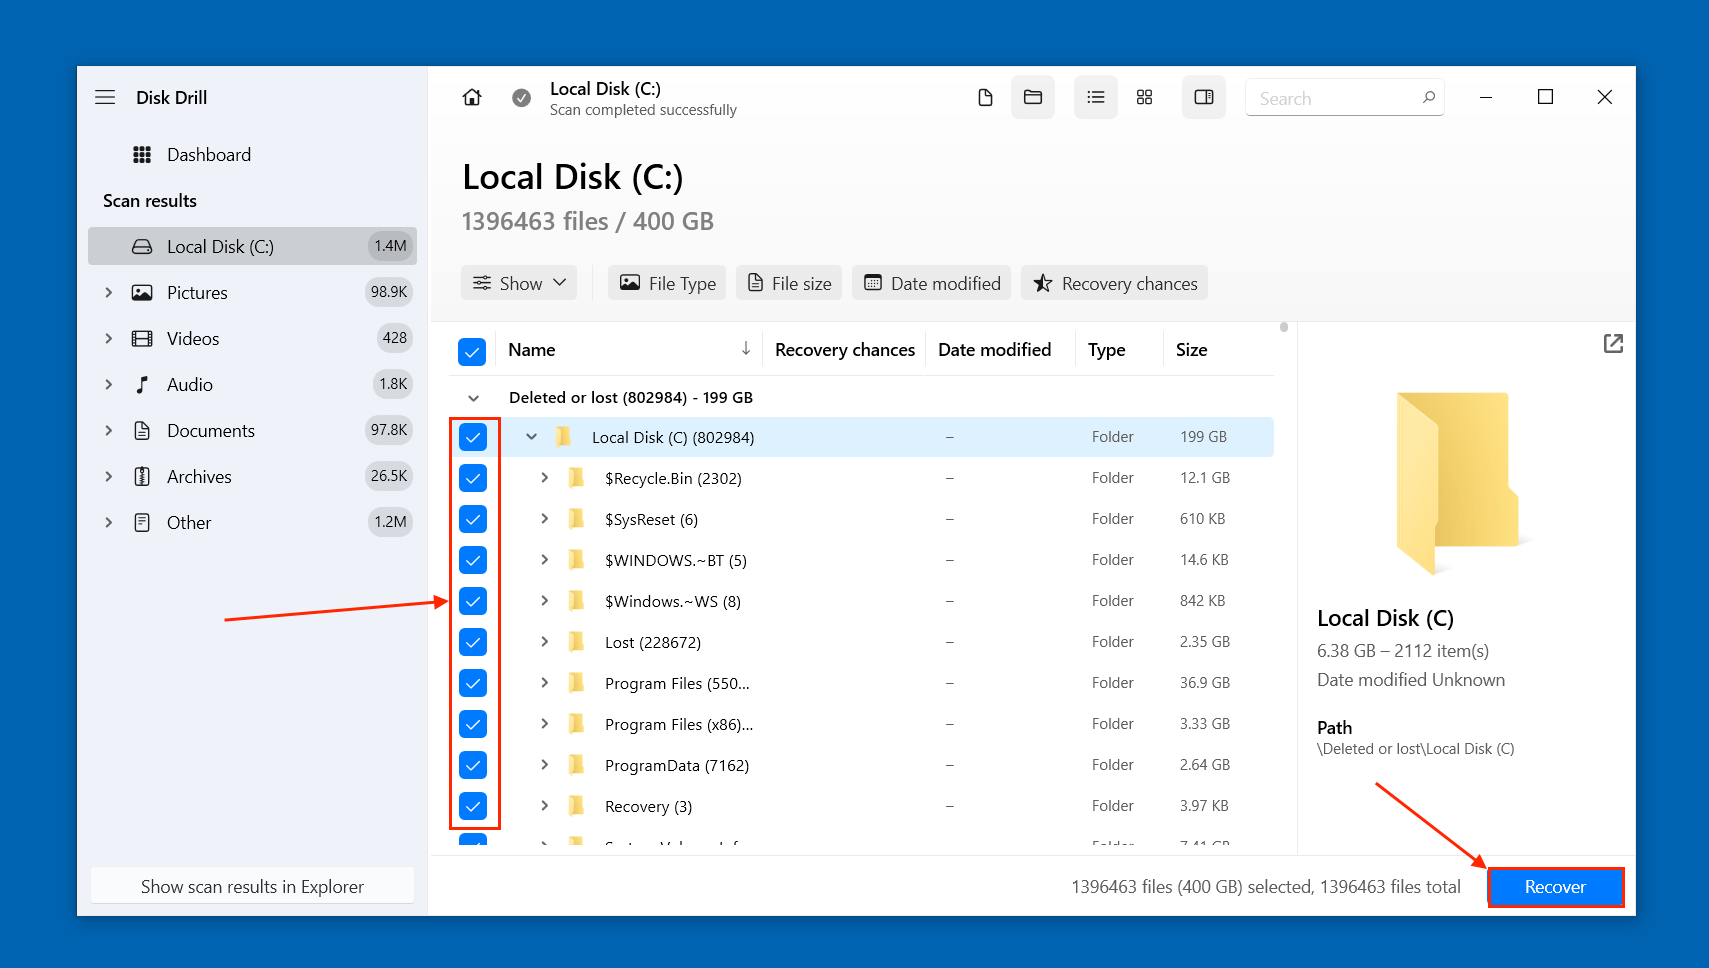
- If you only want to restore specific files, you can use the filter tool in the left sidebar to refine the file list and can type specific file names, file extensions, or folder names in the search bar. Mark the boxes beside the data you want to restore and click Recover (alternatively, you can leave all the boxes blank and click Recover All to restore everything from your SATA drive).
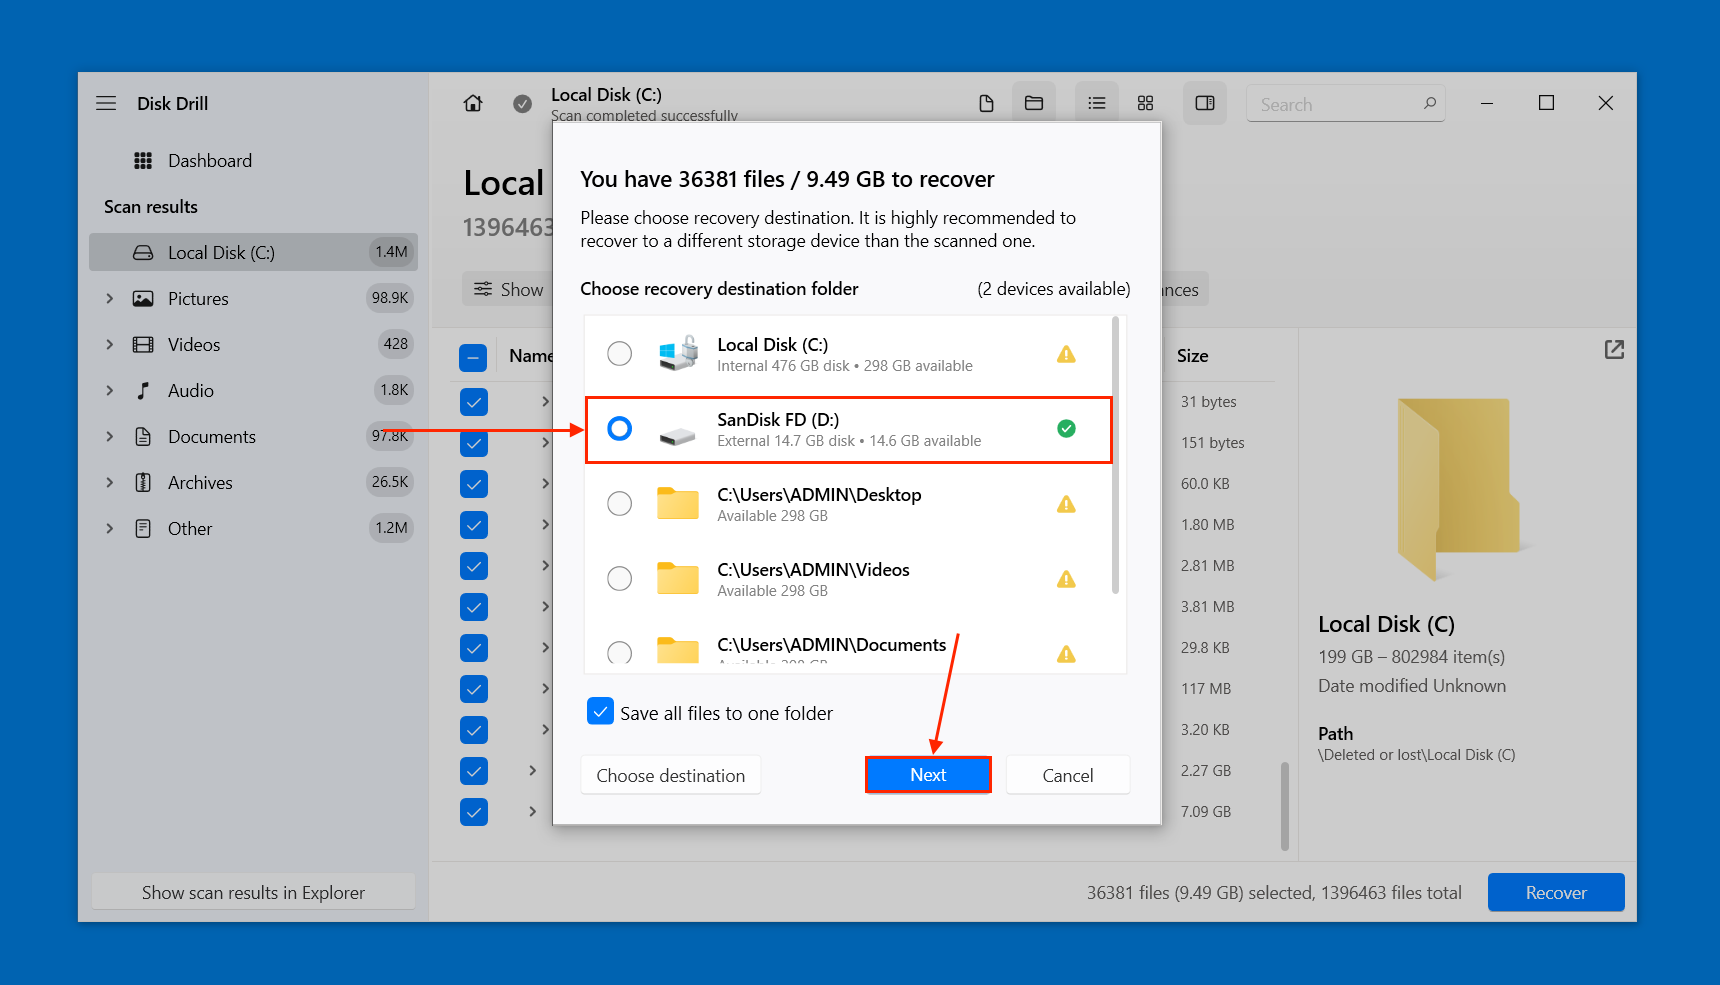
- Select the external drive you connected in step 1 as the destination for the recovered files. Finally, click Next to recover your SATA hard drive.


Method 4: Apply to Professional Data Recovery Service
If your SATA hard drive has suffered a mechanical or electrical failure, or you simply want to skip DIY solutions and enlist expert support, you can hire professional data recovery services.
Professional data recovery services are companies that recover files for a fee. Not only are they equipped to handle complex data recovery tasks, but they also increase the baseline success rate of simple recovery operations. They usually succeed when DIY SATA hard drive recovery is not working.
Expect to pay at least $300 for quality data recovery services. There are very few cases where a repair shop can restore previously obstructed access to a hard drive – which can technically restore access to its data – for much less. However, using a good data recovery service ensures you’ll be relying on skill and industry standard procedures rather than luck or ideal conditions.
If it’s your first time hiring this type of service, here are offers and guarantees that indicate a good company.
- No Data – No Charge – Most top data recovery services offer a no data – no charge guarantee, which means that you only pay if they successfully restore the data you specifically wanted. This means you won’t be paying for a bunch of defunct system files and miscellaneous data you don’t need.
- Reasonable shipping charges – Depending on the company, you may encounter free shipping offers (usually inbound shipping), a choice of branches, or partnered drop-off locations close to you.
- Free evaluation – Many data recovery centers offer a free evaluation over the phone and after they analyze the device in the lab. You should get the exact (or close to the exact) price you’ll need to pay, no strings attached.
- Cleanroom – A Class 100 cleanroom is a special facility that filters out tiny particles in the air that can scratch the sensitive internal components of SATA drives. While a cleanroom isn’t necessary for every single data recovery task, it’s a must if your SATA drive suffered severe mechanical or electrical failure.
Make sure to read recent user reviews of the data recovery service you’re considering on platforms like Google Reviews, Trustpilot, Yelp!, etc.
Once you’re done recovering your data…
If you lost your data from your SATA hard drive due to logical-based corruption (not severe mechanical or electrical failure), you can also try to repair it yourself using the fixes in our guide on how to recover data from a corrupted hard drive on Windows.
However, note that all repair methods can delete one, multiple, or all files from your SATA hard drive. Make sure that you’ve successfully completed SATA drive recovery (or you don’t need the files left on your drive).