Reading Time: 8 minutesYou might want to convert a FAT32 hard drive to exFAT for several reasons; exFAT supports larger files, it can handle bigger volumes, and it’s far more compatible with modern devices, such as recent game consoles.
However, the process of converting a hard drive’s file system naturally wipes its partitions of data. If you want to preserve the files on your FAT32 partition, there are two extra steps you need to add to the process.
This article is a breakdown of the entire conversion process, including those extra steps. Using simple and beginner-friendly tools, we’ll show you how to convert FAT32 to exFAT WITHOUT losing data using both Mac and Windows computers. Read on!
It’s also possible to convert FAT32 to exFAT on an Android device. Most modern devices will convert a new SD card to exFAT automatically upon connection, while others can use certain third-party apps to accomplish this. However, the former doesn’t always work and the latter requires a rooted device (and doesn’t always work either). We strongly encourage you to invest in a USB card reader instead.
Can You Convert a Hard Drive’s File System Without Data Loss?
Yes! “Converting” your FAT32 partition to exFAT consists of two tasks:
- Formatting your FAT32 partition to erase its file system and data
- Creating a new exFAT partition in its place
The problem is that formatting a drive completely wipes all of its data.
If you have important files on your FAT32 partition, you need to back them up first. There are different ways to back up your data, like copying them to your computer. We’ll show you how to create an image backup, which is a complete byte-to-byte copy of your entire drive. This method ensures complete data preservation and integrity.
In other words, you won’t miss any hidden files, system files, or specific directory structures that may be essential to certain applications you use.
How to Back Up Your Drive Before Converting It
For this demo, we’ll use a tool called Disk Drill. Disk Drill is primarily a data recovery tool, but you can use it to create an image backup. Once the FAT32 partition has been successfully “converted”, you can then use the recovery tool to restore the files from the backup.
Technically, you don’t have to use Disk Drill to back up your files. You can use any backup tool you want as long as you know how to extract your data from the backup after formatting. But we like having Disk Drill in our toolbox in case one of our storage devices – especially hard drives – suffers data loss.
Disk Drill has Mac and Windows versions you can download for free from the CleverFiles website. It supports the latest versions of both operating systems and it recognizes over 400 file signatures of various data types (images, videos, audio files, etc.).
The backup feature is free. The recovery feature is also free for up to 500 MB worth of data on the Windows version.
- Download and install Disk Drill.
- If you want to back up an external hard drive, connect it to your computer. Then, launch Disk Drill.
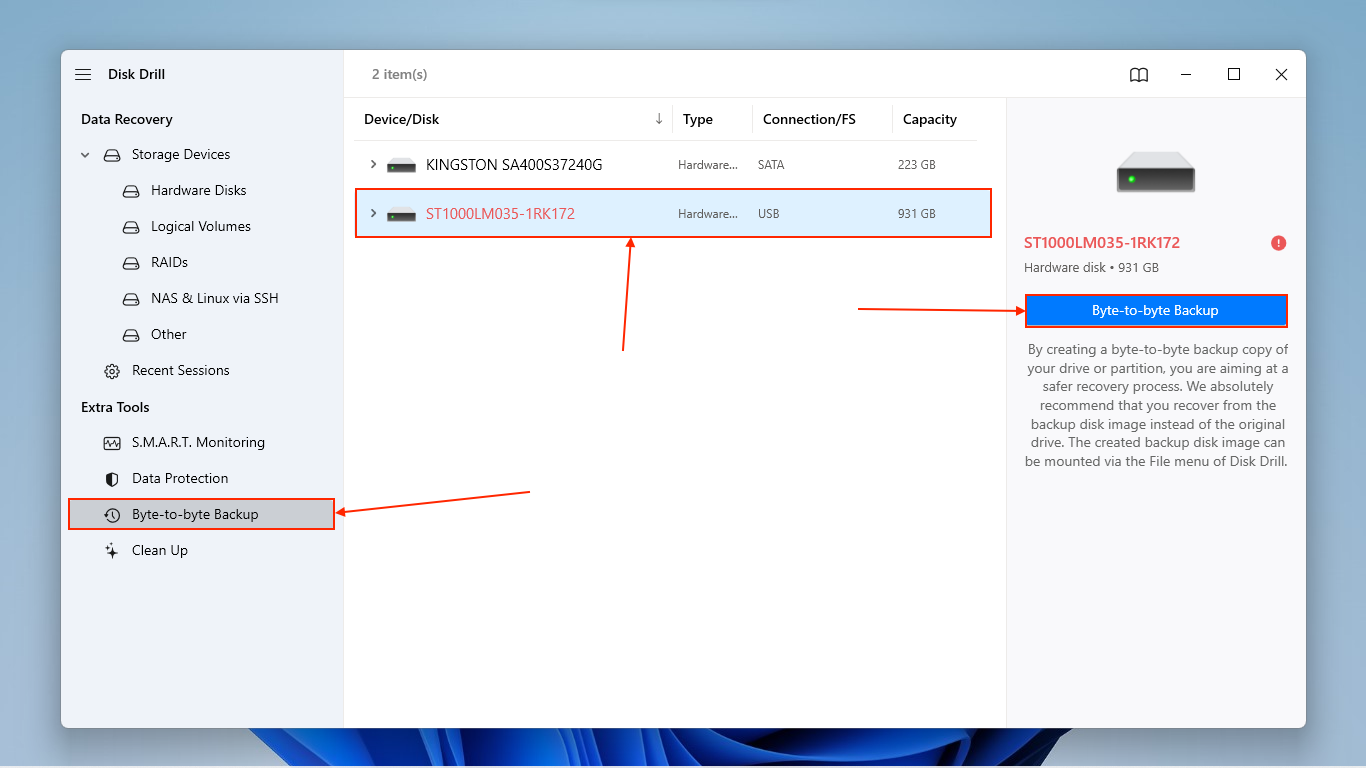
- On the left panel, click Byte-to-byte backup. Then, select your drive and click Byte-to-byte Backup.
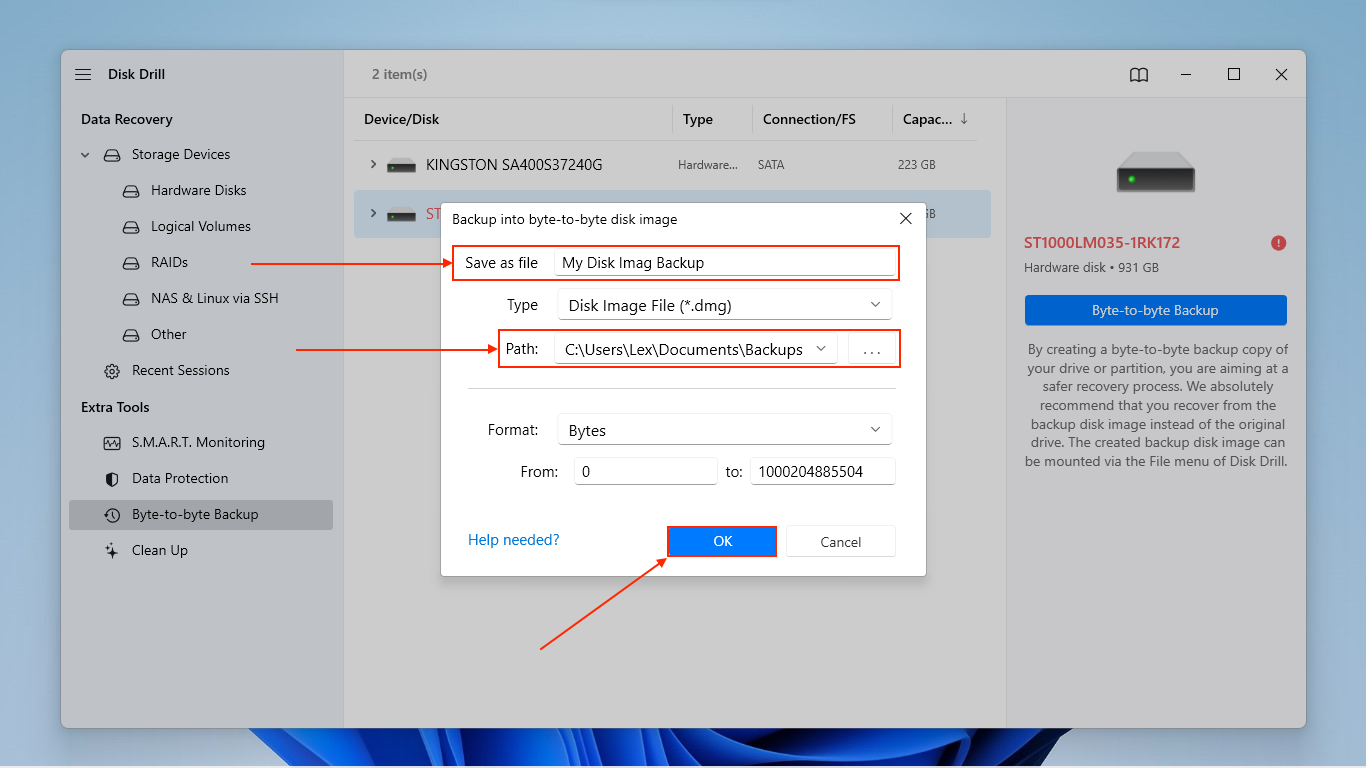
- Choose a name or label and destination for the image backup file. Then, click OK.


How to Restore Your Backup
After successfully “converting” your FAT32 partition to exFAT, it should be completely empty. At this point, the next step is to store your backup data on the new exFAT partition. If you used Disk Drill to create an image backup of your partition, we’ll show you how to use its recovery tool to extract its data to a location of your choosing.
- Open Disk Drill.
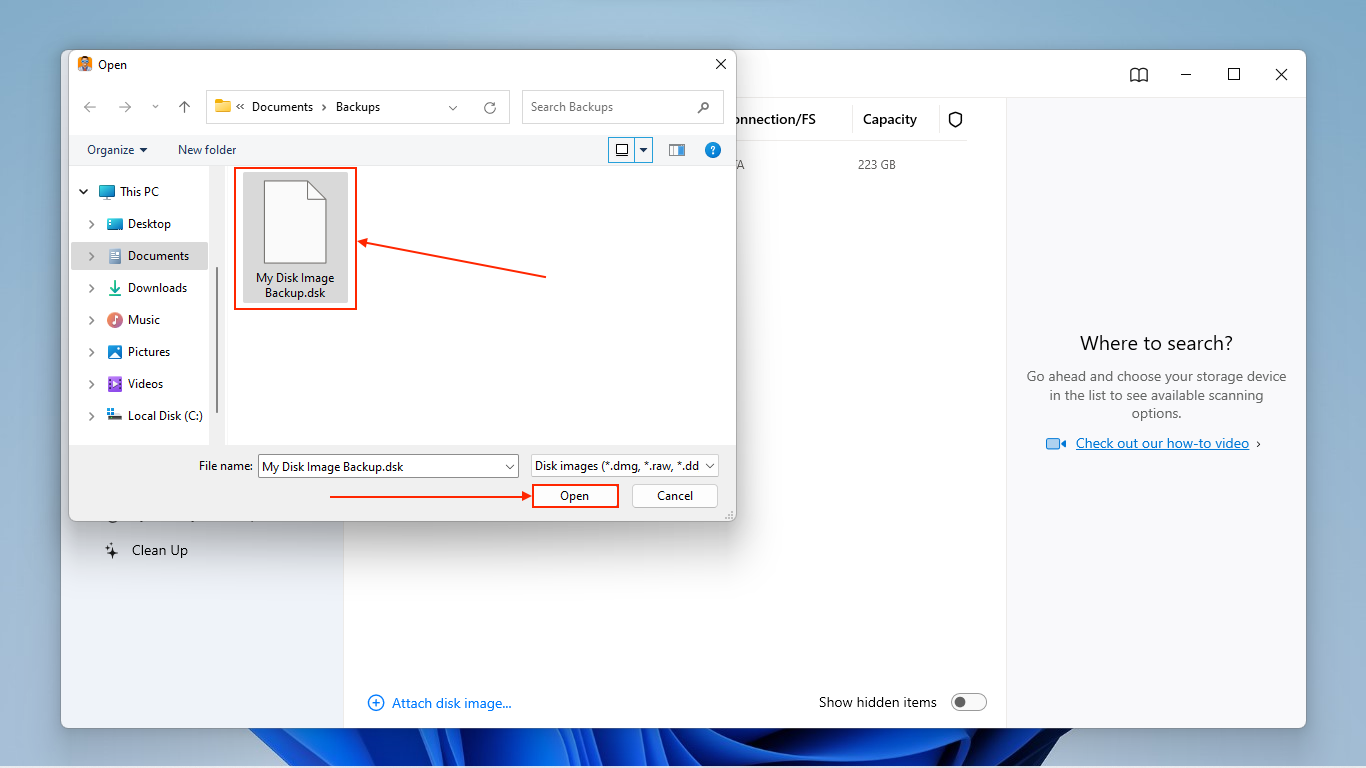
- At the bottom of the window, click Attach disk image…

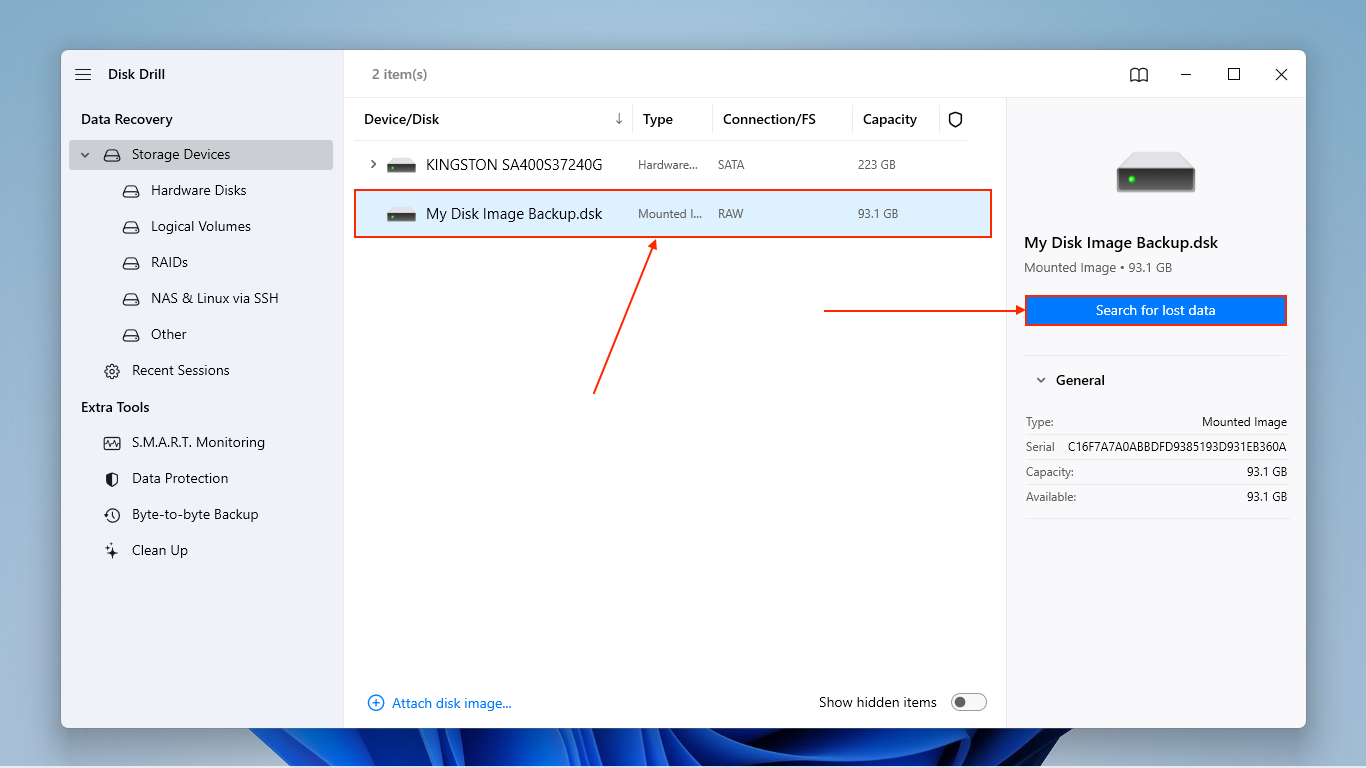
- In the menu that appears, navigate to the location where you saved the backup file you created with Disk Drill. Click it, then click Open.
- In the drives list, select the image backup you attached in step 3. Then, click Search for lost data.
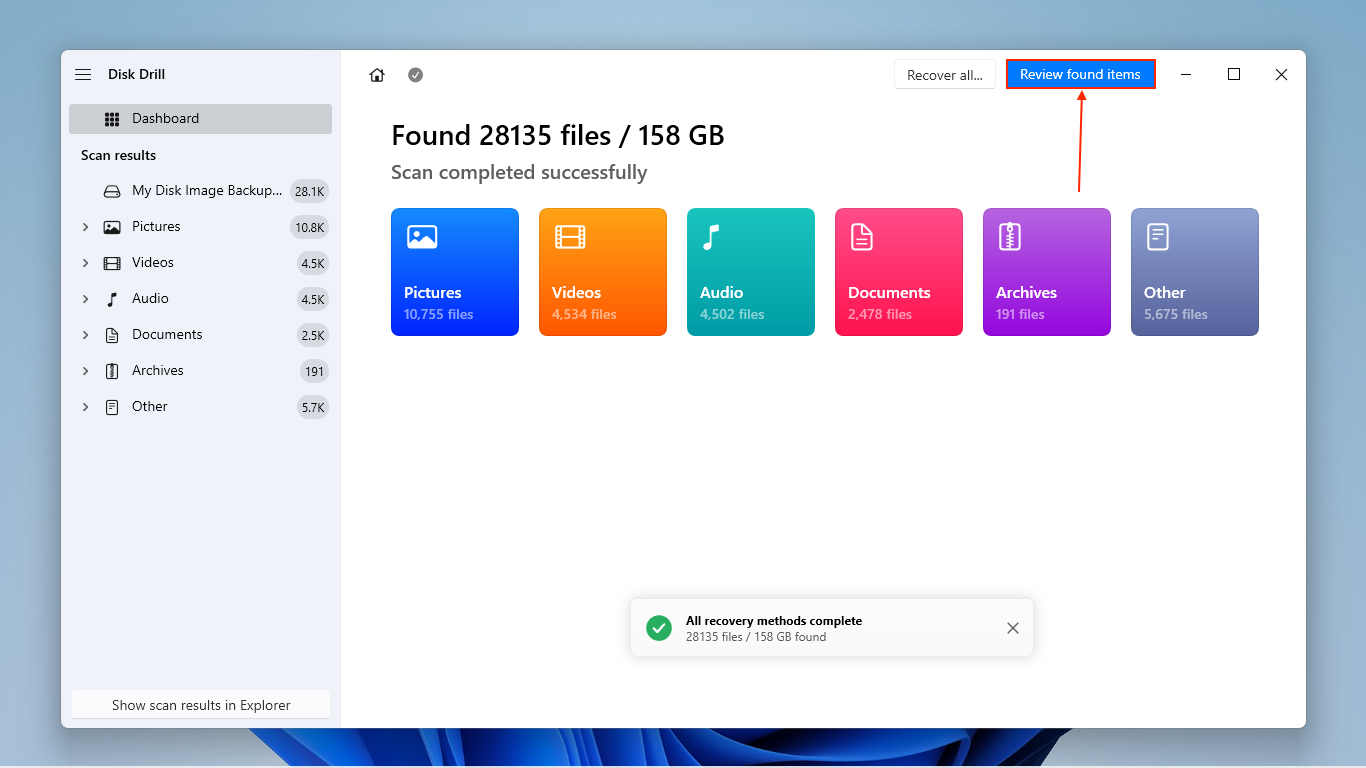
- Once Disk Drill is done scanning your hard drive, click Review found items.
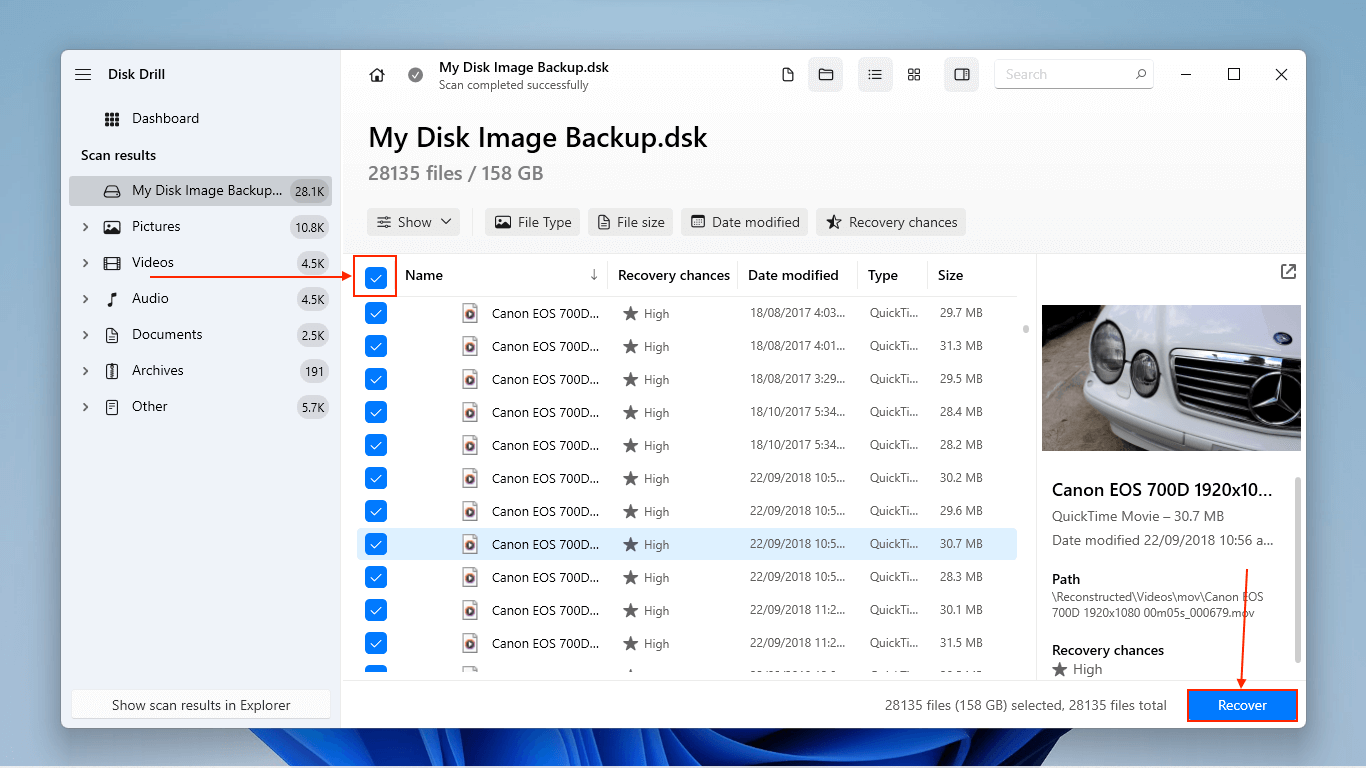
- To view the files saved by the image backup, expand the Existing section. You may also expand the other sections if you’re curious about old files that Disk Drill may have found. Mark the box at the top of the selection column to select all existing files at once. Then, click Recover.
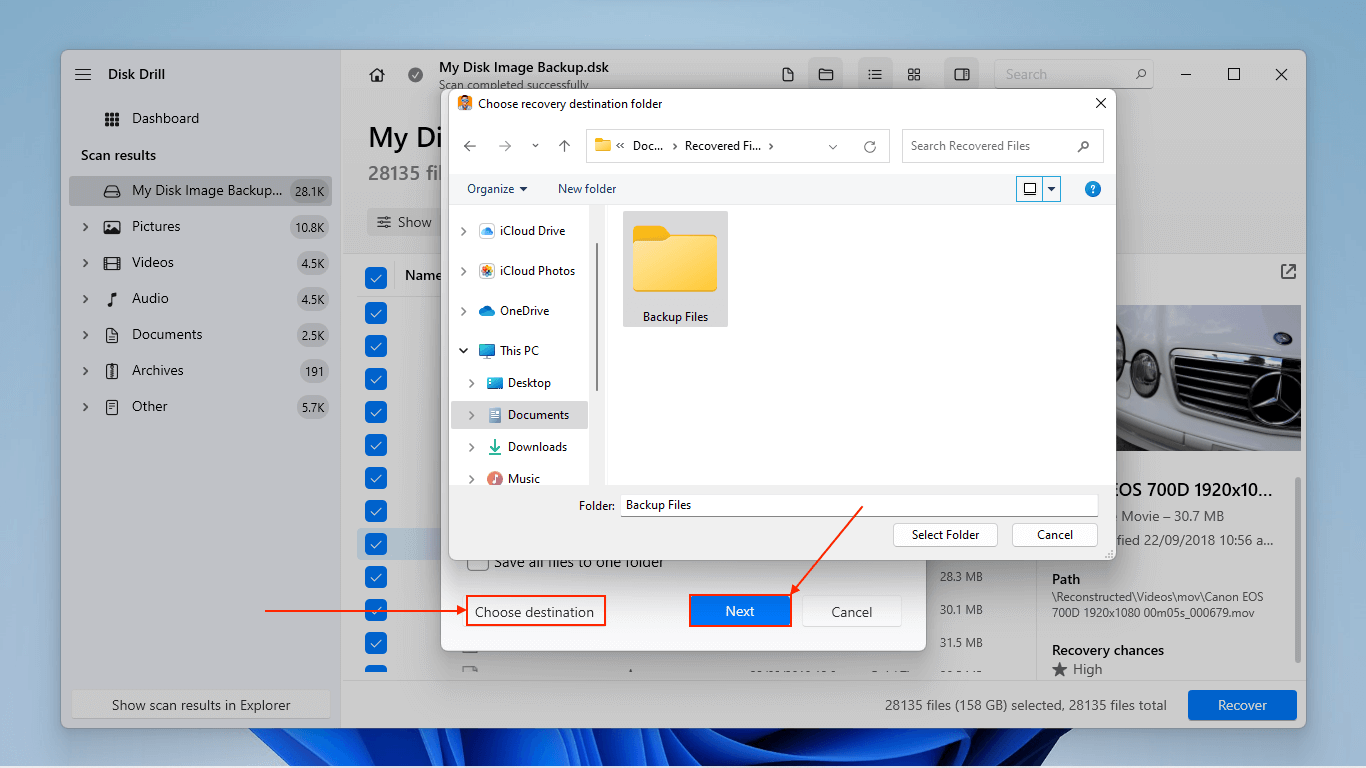
- Select your newly converted hard drive as the destination for the recovered files or you can save them to your computer and transfer them later – the Choose destination button will allow you to choose an exact location. Once you’re satisfied with your selection, click Next to start the recovery process.


How to Convert Fat32 to exFAT on Mac
To convert FAT32 to exFAT on a Mac computer, you can use Disk Utility. Disk Utility is a native Mac tool that you can use to perform simple operations on your drives and volumes. It can help you add new volumes, fix simple errors, create partitions, format drives and partitions, and more.
We’ll guide you through using Disk Utility to format a USB from FAT32 to exFAT on Mac.
- Connect your hard drive to your Mac using the appropriate USB cable. Then, launch Disk Utility.
- Click View > Show All Devices.
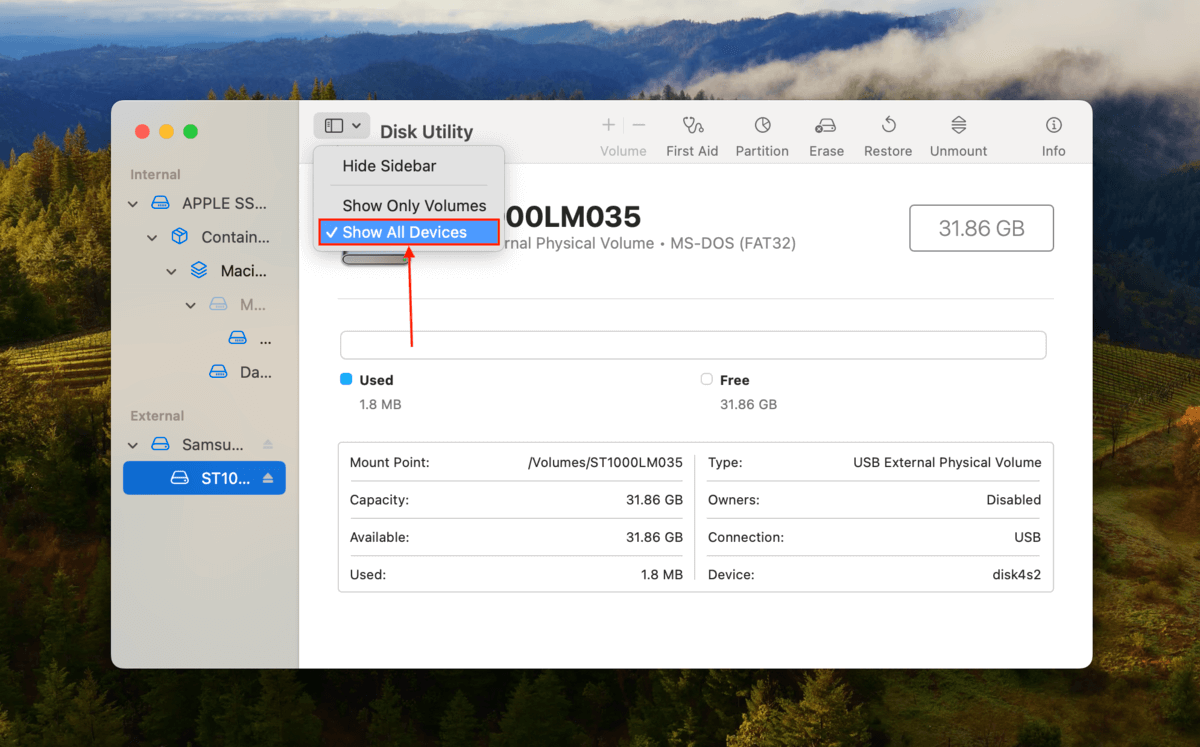
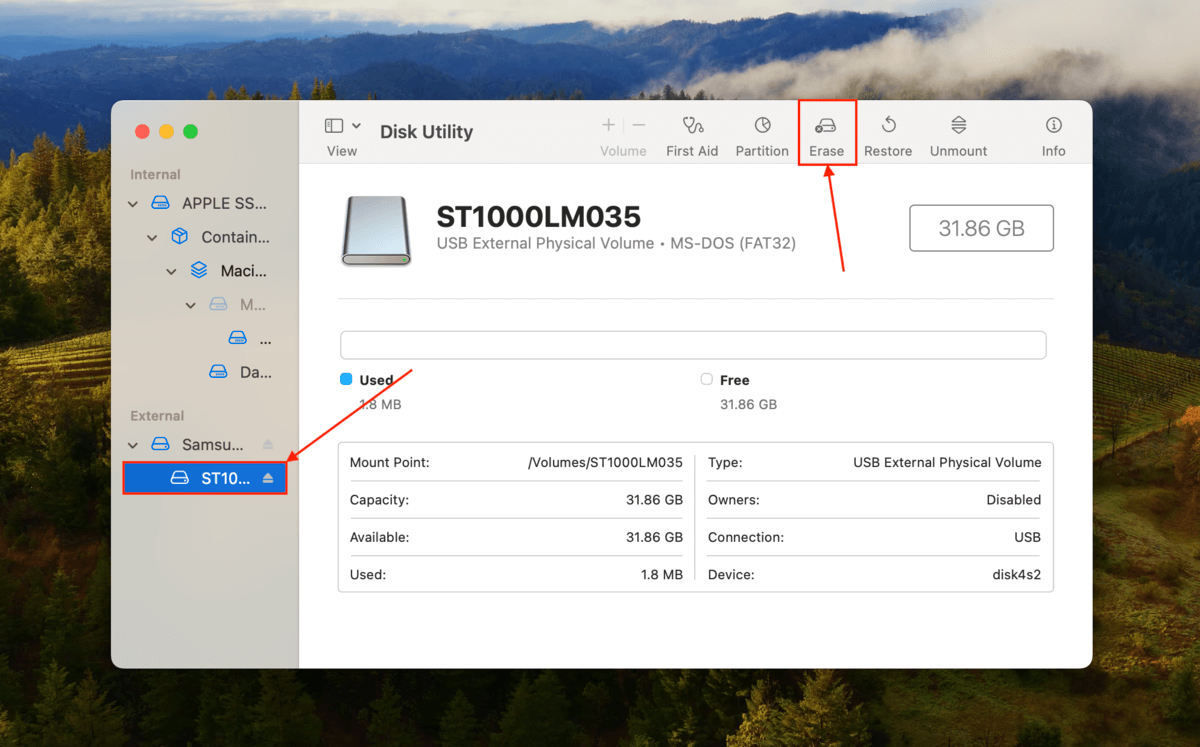
- In the left panel, select your hard drive or partition. Then, click the Erase button.
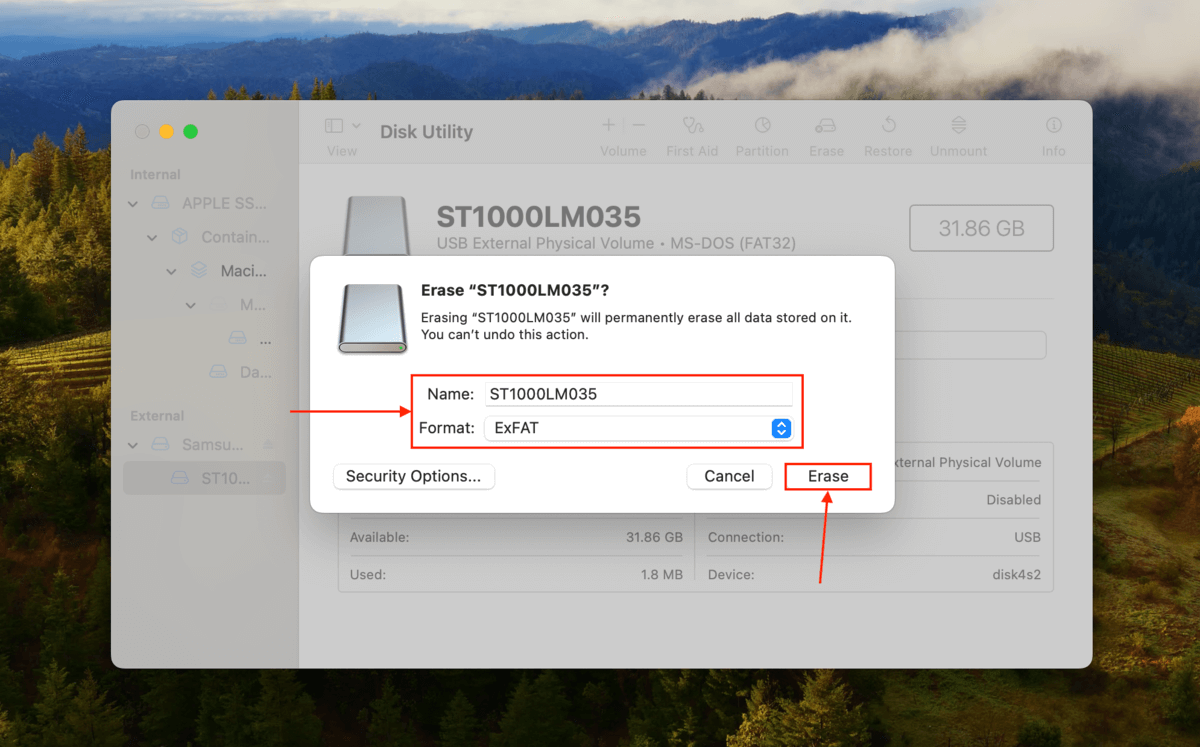
- Choose a name for your drive and set Format to “ExFAT”. Once the process is done, Disk Utility will immediately reflect whether you were able to change FAT32 to exFAT on your Mac.


How to Convert FAT32 to exFAT on Windows
Windows OS comes with a preinstalled tool called Disk Management, which lets you format, initialize, and modify volumes using a simple click interface. We’ll show you how to use Disk Management to format your FAT 32 partition and set up the new partition with the exFAT file system.
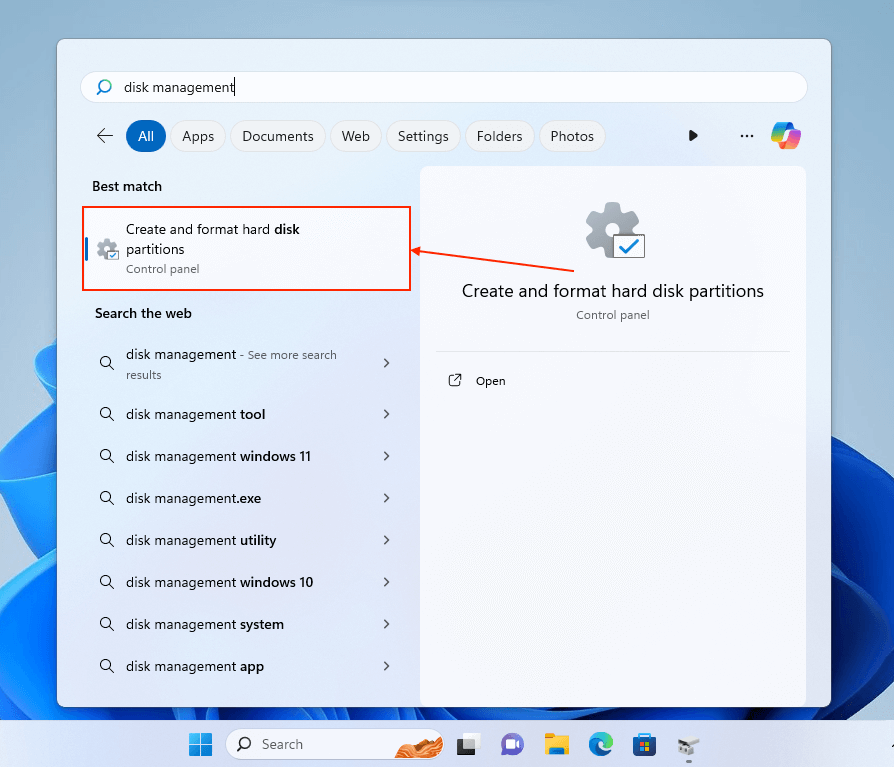
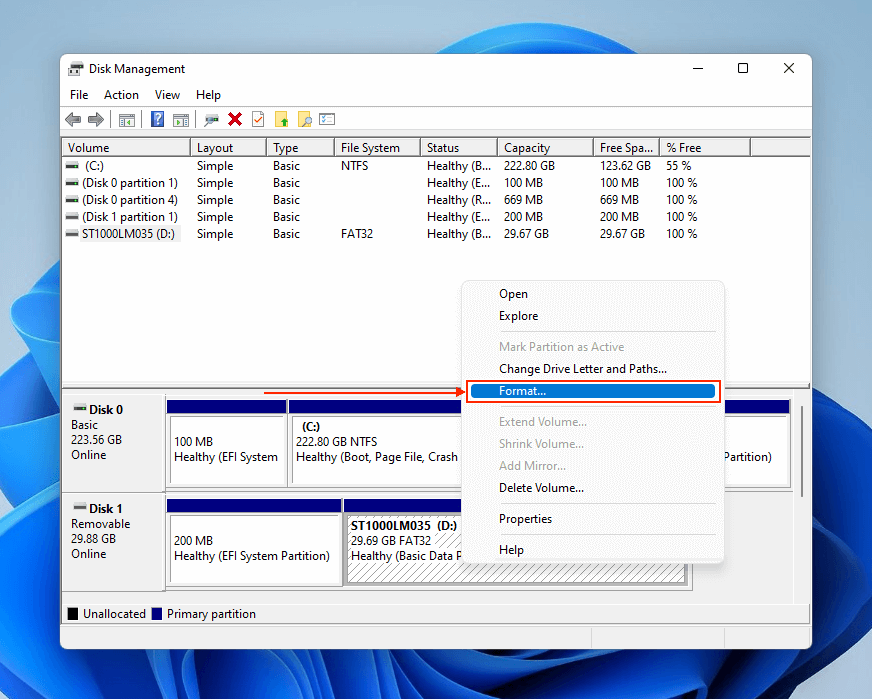
- Open Disk Management using the Start menu.
- Locate your hard drive and right-click the partition you want to format. In the right-click menu, select Format.
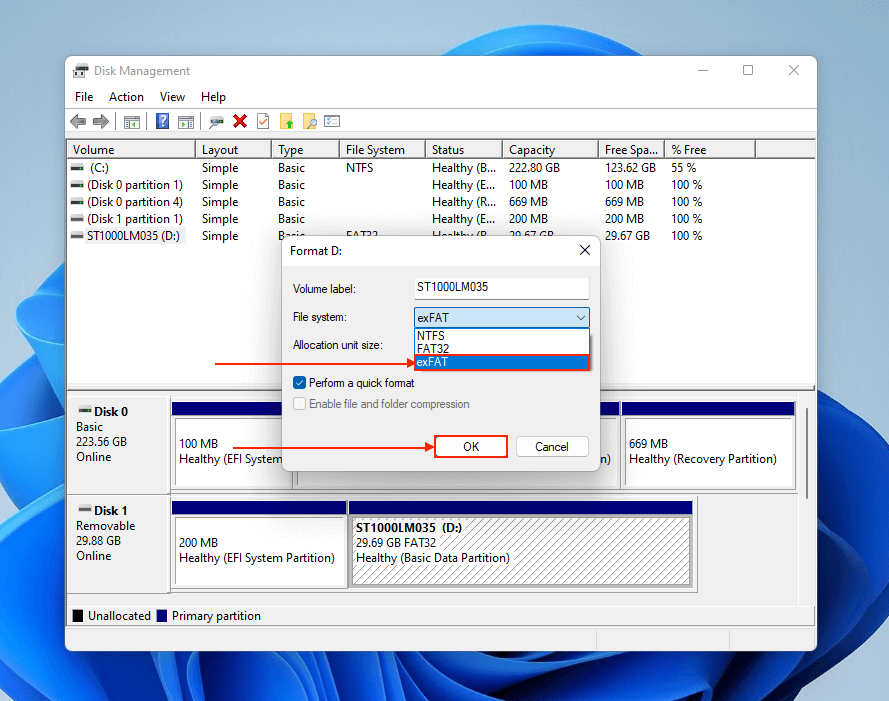
- Type a new Volume label for your partition and set File system to “exFAT.” Then, click OK to start the formatting process.


How to Convert FAT32 to exFat Without Formatting
If you prefer to avoid formatting your FAT32 partition or drive for some reason, there’s a way around it if you have enough free space on your drive. Using a partitioning tool, you can shrink your FAT32 partition so it takes up less space on your disk – however, it should still be large enough to store your files.
Once you’ve shrunk the partition, you may have enough newly unallocated space to create a new partition that you can format with an exFAT file system.
Unfortunately, Disk Management (Windows) and Disk Utility (Mac) aren’t equipped to manipulate FAT32 partitions this way. Instead, you can choose one of the many third-party disk partitioning tools available online.
For this article, we’ll demonstrate this process with the free version of AOMEI Partition Assistant for Windows, which you can download here.
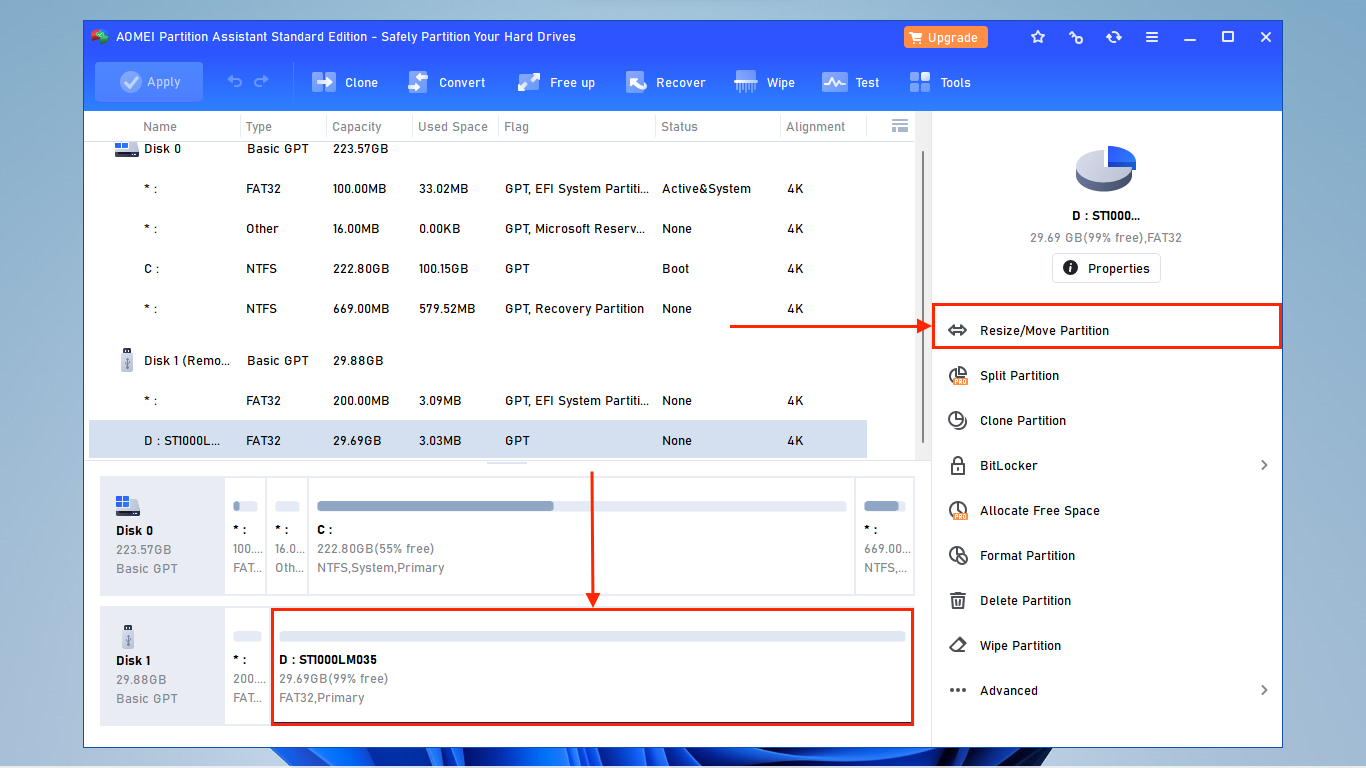
- Download and launch AOMEI Partition Assistant. Select your FAT32 partition and click Resize/Move Partition.
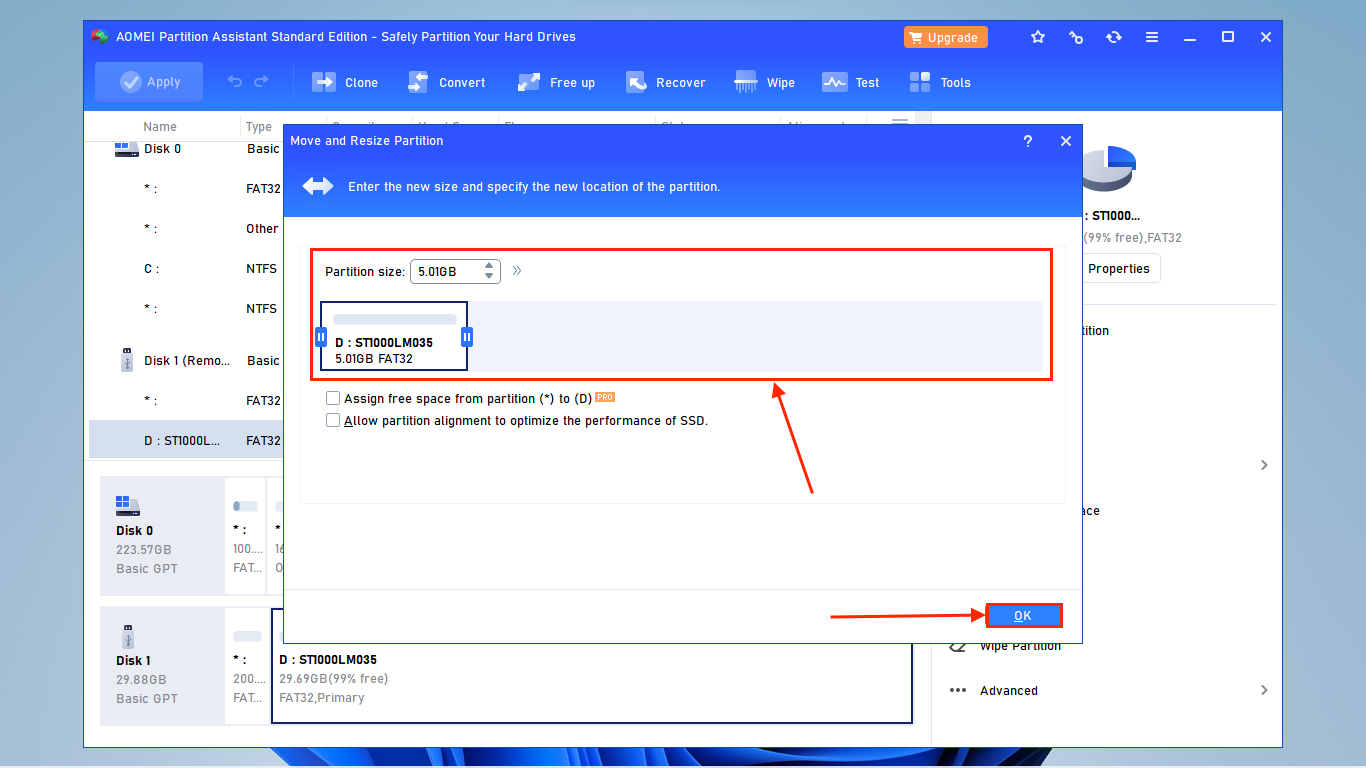
- Shrink your FAT32 partition by dragging the bar or by typing a size value in the Partition size parameter. Then, click OK.
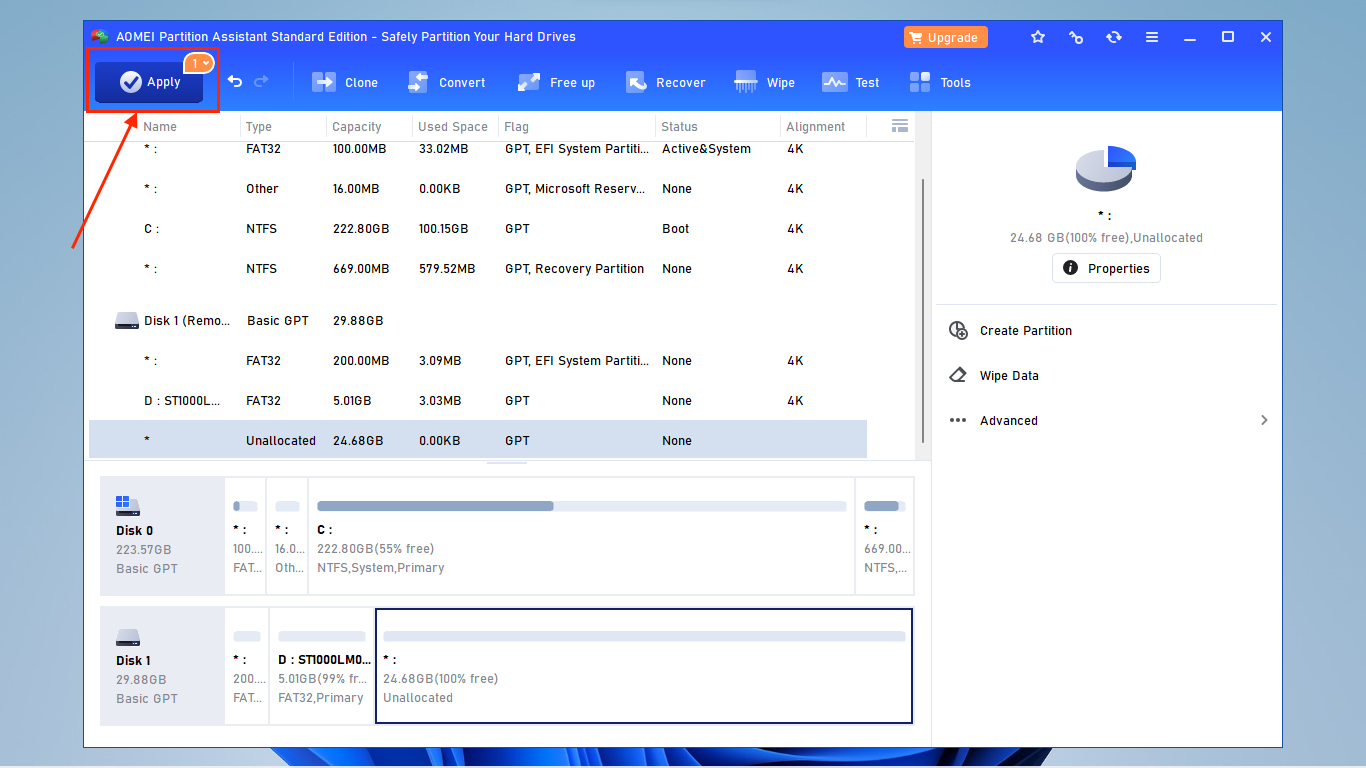
- Click Apply in the top-left corner of the window to proceed with the resizing operation. At this point, you still have a chance to make any last-minute changes to your settings.
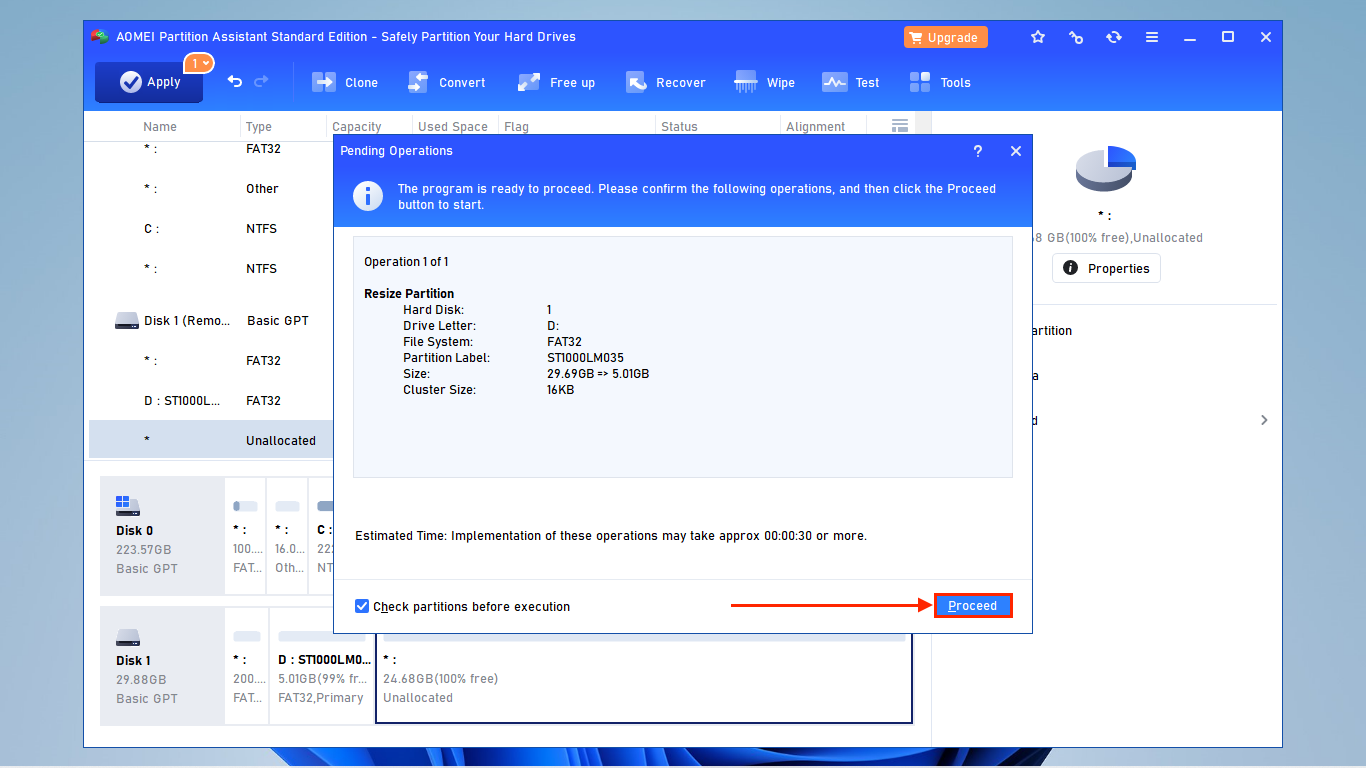
- Review the operation and click Proceed.
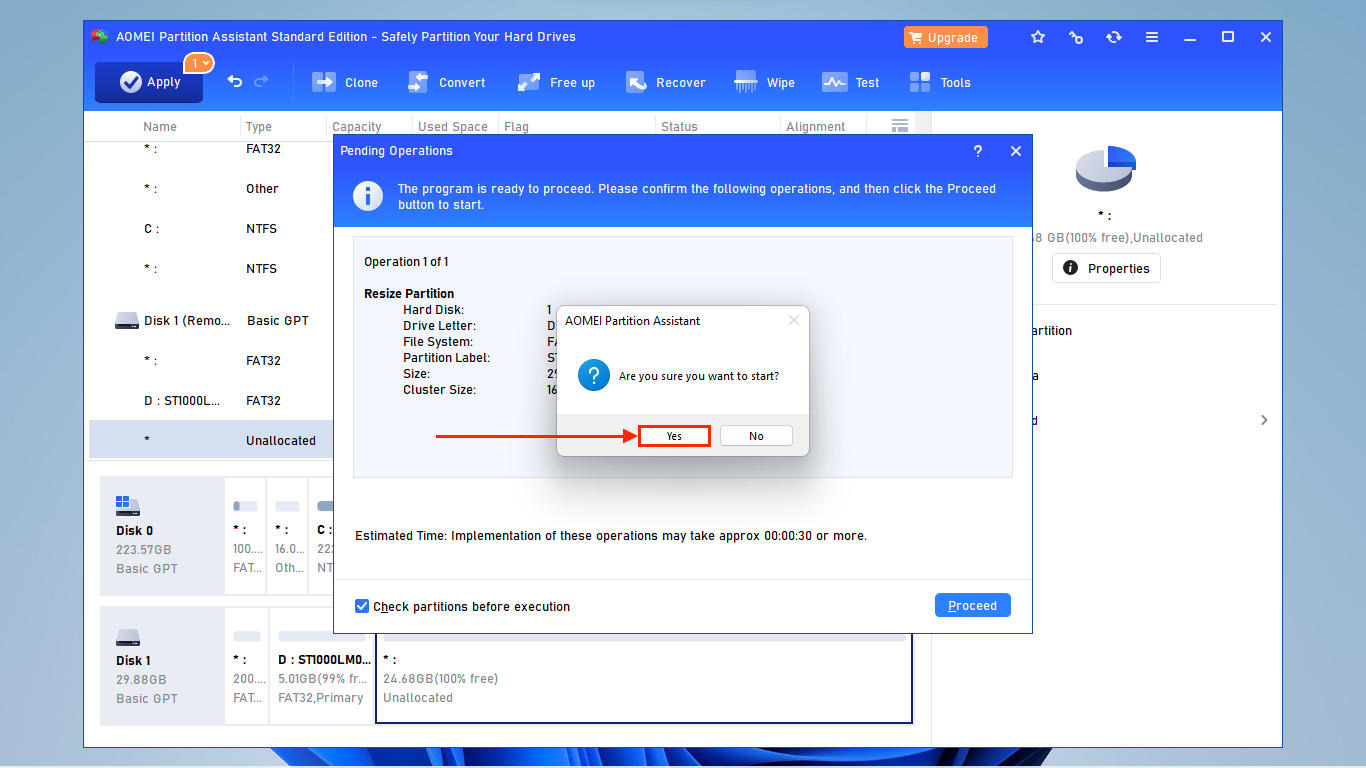
- When asked to confirm the operation, click Yes.
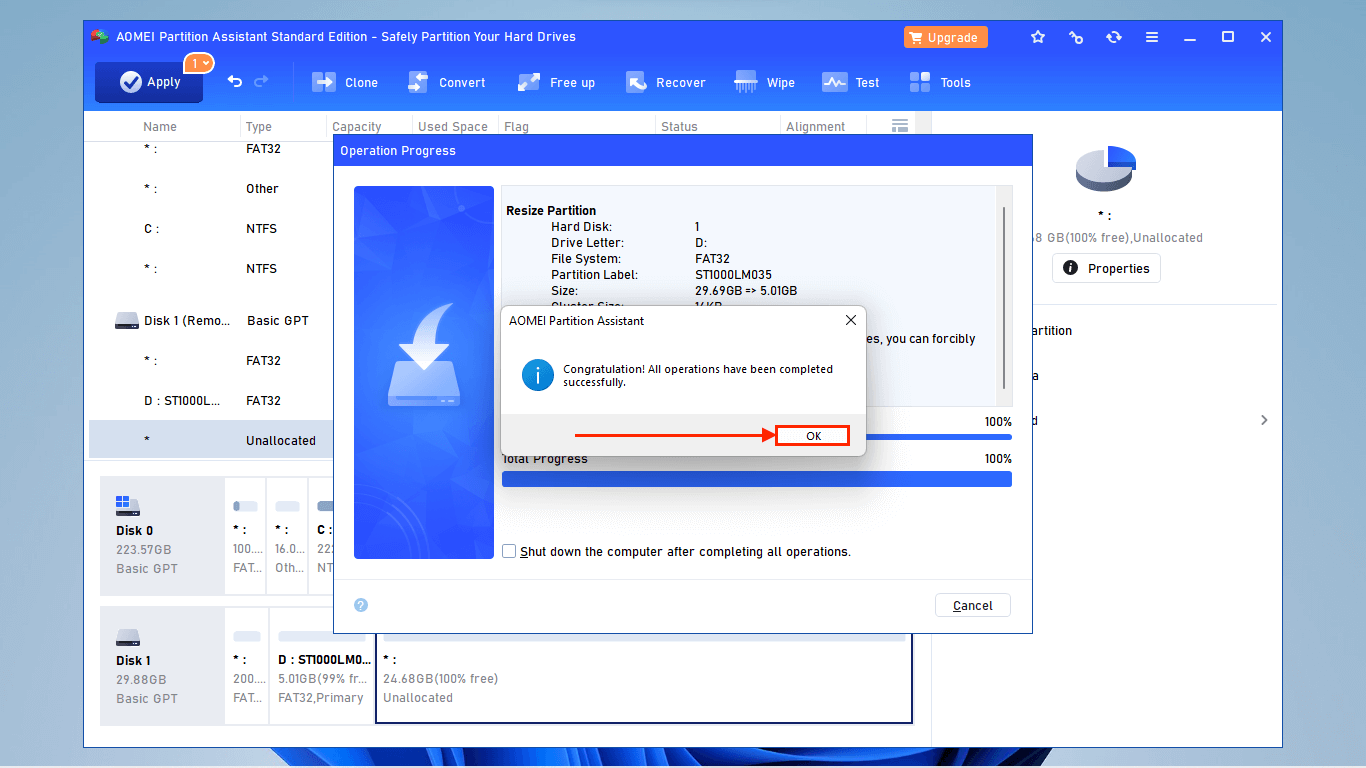
- Once AOMEI Partition Assistant is done resizing your FAT32 partition, click OK.
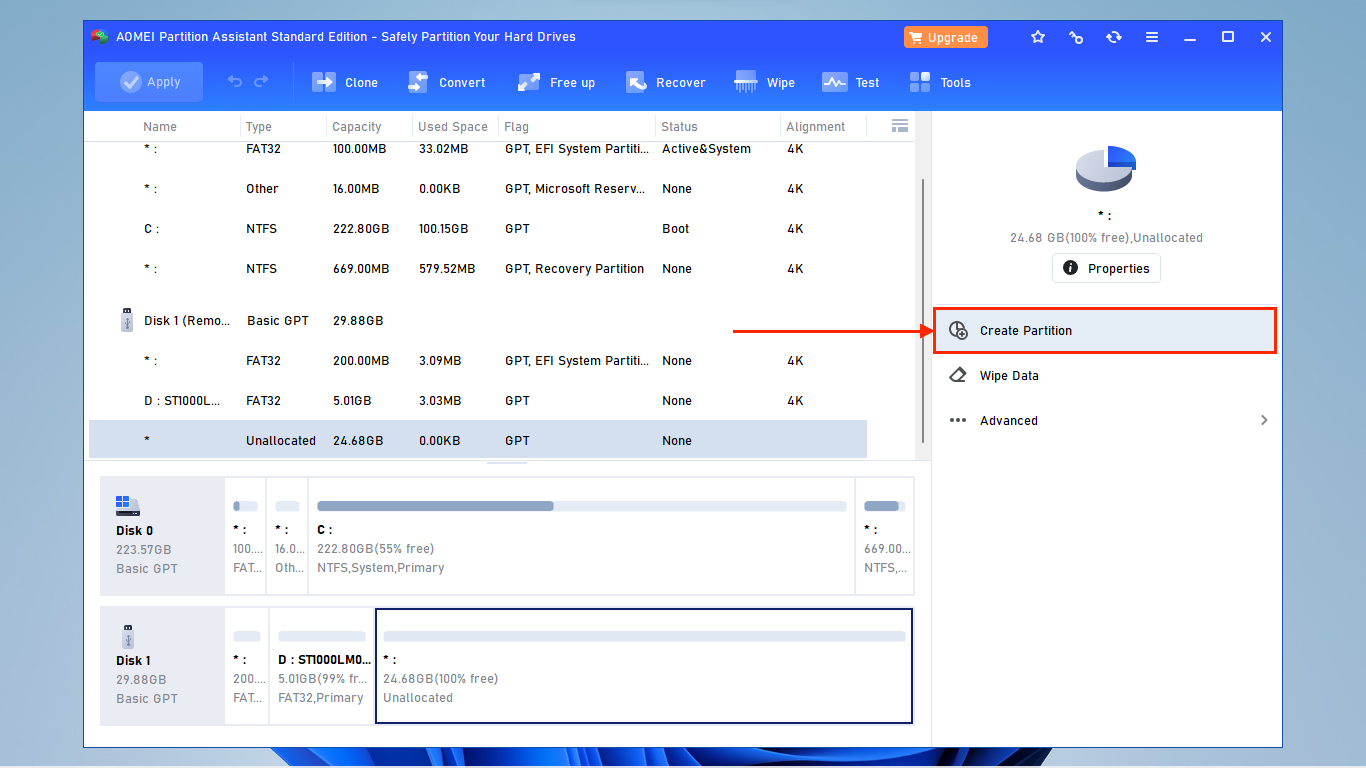
- You should notice a new section of Unallocated space, which was freed up after shrinking the FAT32 partition. Select the Unallocated space and click Create Partition.
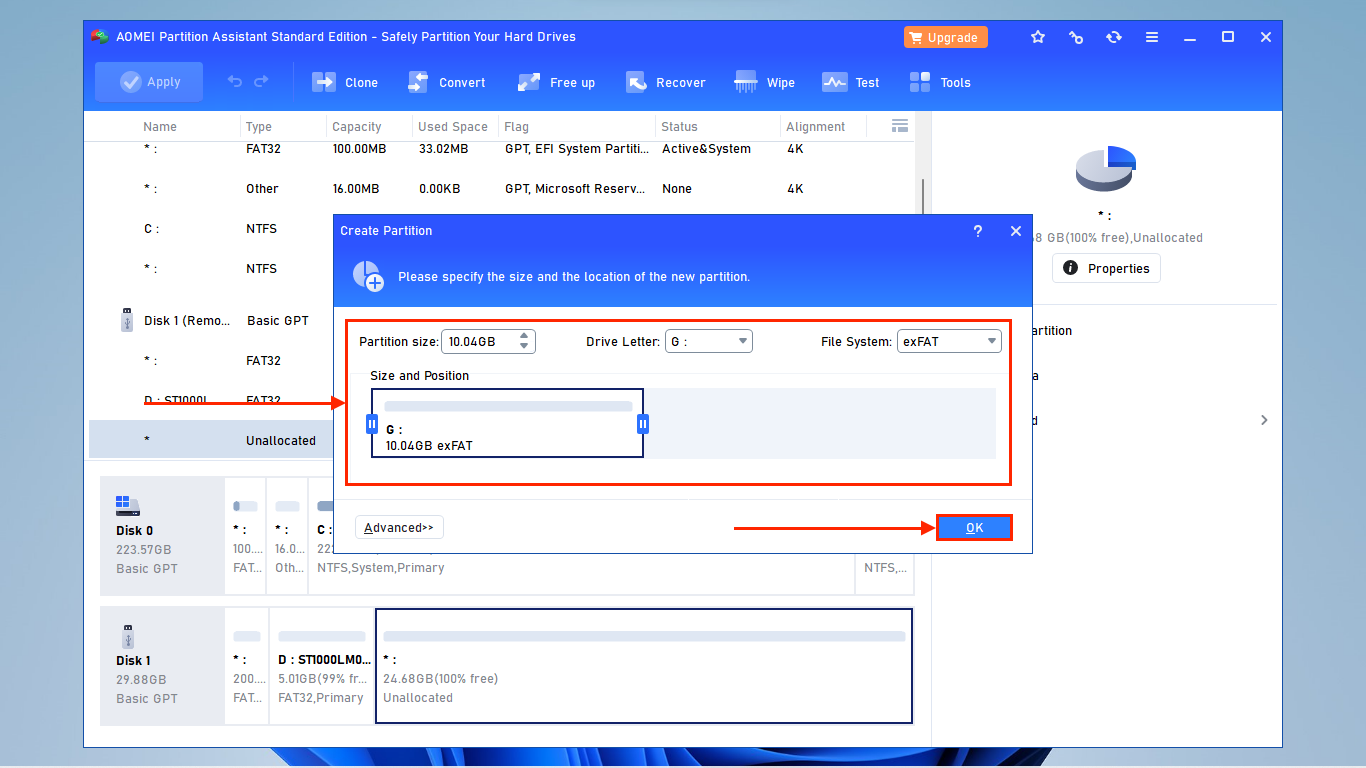
- Set the size of the new partition by dragging the edges of the bar or changing the Partition size parameter. Then, choose a drive letter and set File System to “exFAT.” Once you’re satisfied with your settings, click OK. You’ll go through steps 3-6 again (including having to click the Apply button) – diligently review any operations you apply and keep confirming when prompted.
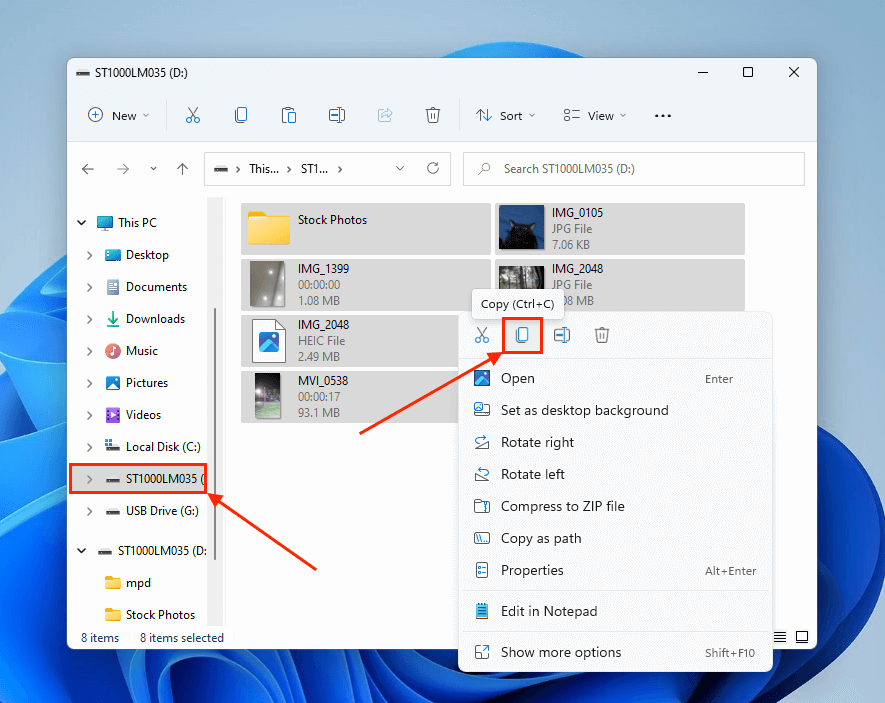
- Once AOMEI Partition Assistant is done creating the exFAT partition, you can go into Windows Explorer and copy the files from your FAT32 partition.
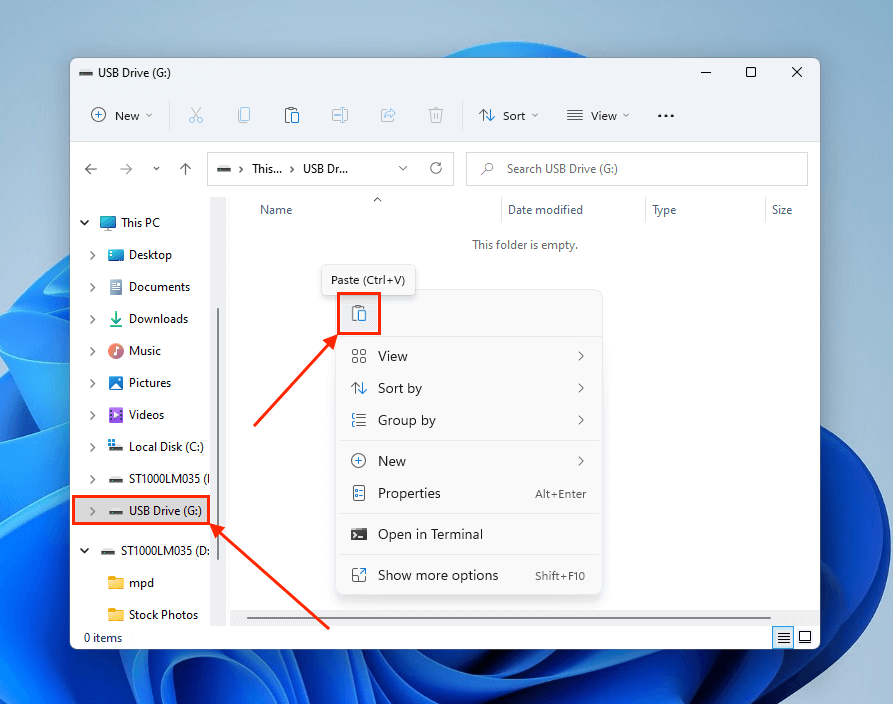
- Navigate to the new exFAT partition (which should now appear in File Explorer) and paste your files.
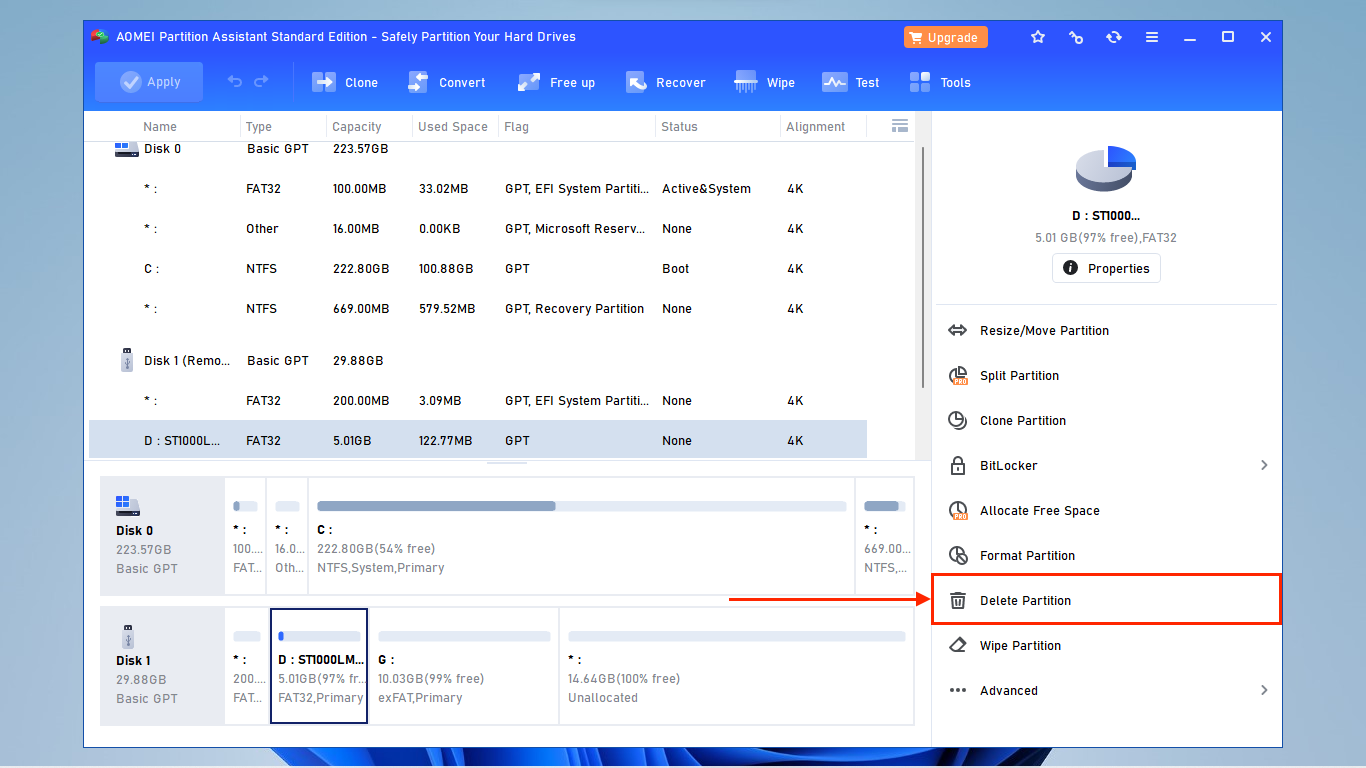
- Once you’ve copied your files from your FAT32 partition to your exFAT partition, you can use AOMEI Partition Assistant to delete the FAT32 partition and turn it into Unallocated space. Open the app again, select your FAT32 partition, and click Delete Partition.
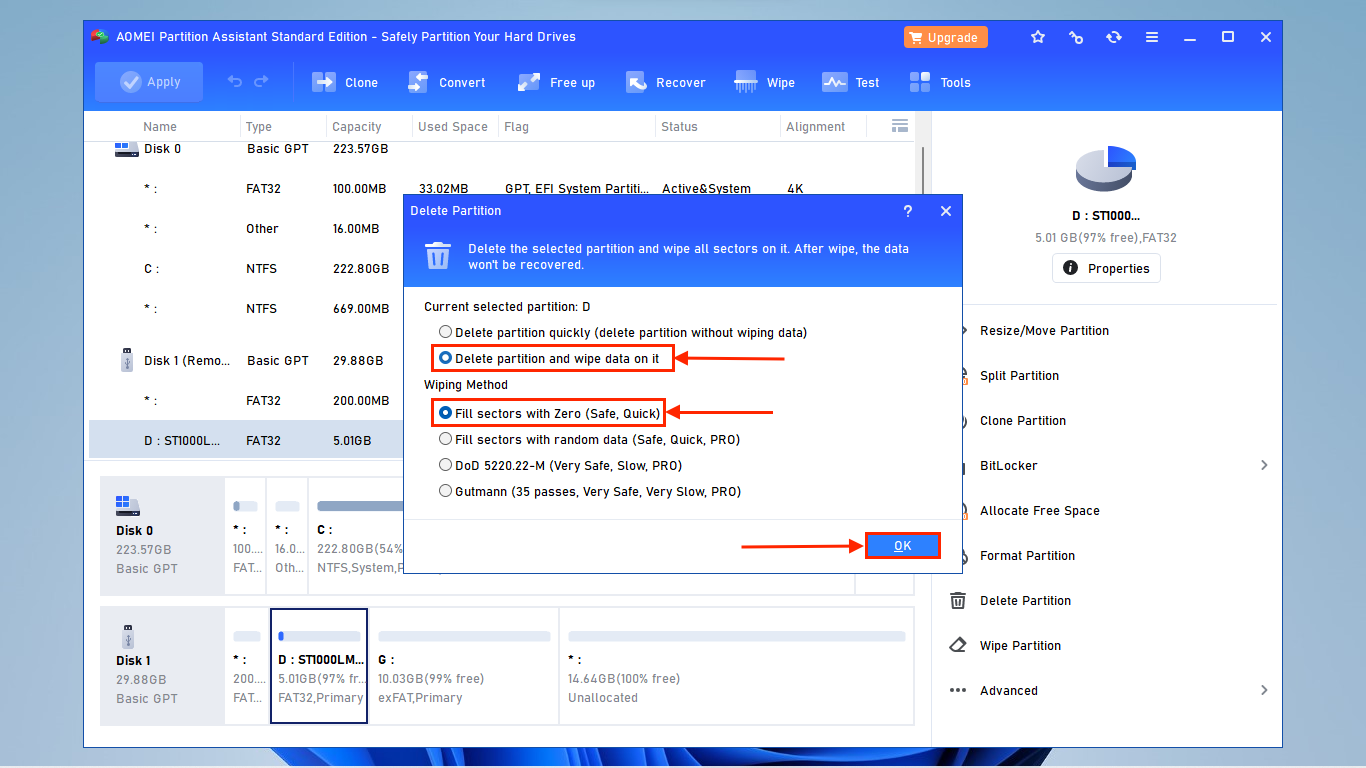
- Select Delete partition and wipe data on it and Fill sectors with Zero (Safe, Quick). Then, click OK. You will go through steps 3-6 again – review the operation and confirm. Your files will be safely stored in the new exFAT partition.


Conclusion
Converting a partition’s file system without losing data is simpler than it sounds as long as you have the right tools and you know how to use them. They are pretty much entirely free (depending on your preferences), and most of them come pre-installed on your operating system.
And if this is your first time creating a comprehensive backup of your drive or partition, don’t let it be the last! Being comfortable with the process of regularly backing up your data and being able to rely on those backups will make it much easier for you to switch up your setup or bounce back from disasters.