Reading Time: 8 minutesFiles disappeared from your USB stick? Safely eject your USB from your PC and set it aside until you read the rest of this article.
Windows 10 has greatly improved its antivirus and error-checking tools, which have gotten even better with the release of Windows 11. However, both systems are still prone to errors that lead to data loss on both internal and external storage devices.
But depending on what caused it, you still have a good chance of restoring your files with the right tools and information. This guide has all the tools and information you need for the best chance of getting your files back.
Are My USB Flash Drive Files Recoverable?
In many cases, data recovery from a USB flash drive is not only possible but highly likely. However, there are several factors that affect your success rate, which we’ll briefly cover below.
If your files are in the Recycle Bin (see Method 1 of the guide section), the factors below don’t apply.
- Availability of backups – Certain cloud backup services can automatically back up external storage devices as they are connected to the PC. Backups guarantee successful recovery. If you don’t have any backups, pay closer attention to the other factors below.
- Data overwriting – Successful data recovery often relies on whatever “file data” remains on the flash drive. Even if you delete a file through Windows, its physical data still exists on the flash drive itself. However, it will eventually be overwritten by new files (e.g. you saved new files to the USB). At that point, recovery is pretty much impossible.
- Size of the drive – Smaller flash drives are harder to recover simply because they are more likely to have their data overwritten. There’s just less free space for Windows to write new data so overwriting occurs more often.
- Flash drive health – Flash memory cells have a limited number of write/erase cycles and wear out over time. The more worn the NAND flash memory is, the harder it is to recover.
- Logical damage – Logical damage, such as accidental deletion or formatting, file system corruption, files disappear after copying, USB not showing files, etc. is easy to recover in most cases.
- Mechanical damage – Mechanically damaged drives are not recoverable until the damage has been resolved. For example, if your storage device isn’t detected, data recovery won’t be possible (unless handled by experts – see Method 4).
- Physical damage – If your drive is physically damaged, DIY data recovery should absolutely not be attempted. Jump to Method 4.
4 Methods to Recover Lost or Deleted Files from Your Flash Drive on Windows 10/11
Below are step-by-step guides for 4 reliable methods to recover files that disappeared from your flash drive on Windows 10 and 11. We strongly recommend reading through all the content once while your flash drive is disconnected from your PC to avoid any more data loss from occurring before you’re ready to recover your data.
Method 1: Restore USB Files From the Recycle Bin or .Trashes Folder
The deleted files from your flash drive should have initially been sent to the Recycle Bin, which is a special folder on your desktop. The Recyle Bin stores those files until you empty it, you manually delete them again from within the Recycle Bin, or you choose to recover it.
In other cases, files that are deleted from external storage devices are sent to a hidden .Trashes folder you can find in your drive’s root.
If your USB files are missing but space is still used or the files deleted from the flash drive are not in the Recycle Bin, there’s a good chance they’re in the .Trashes folder.
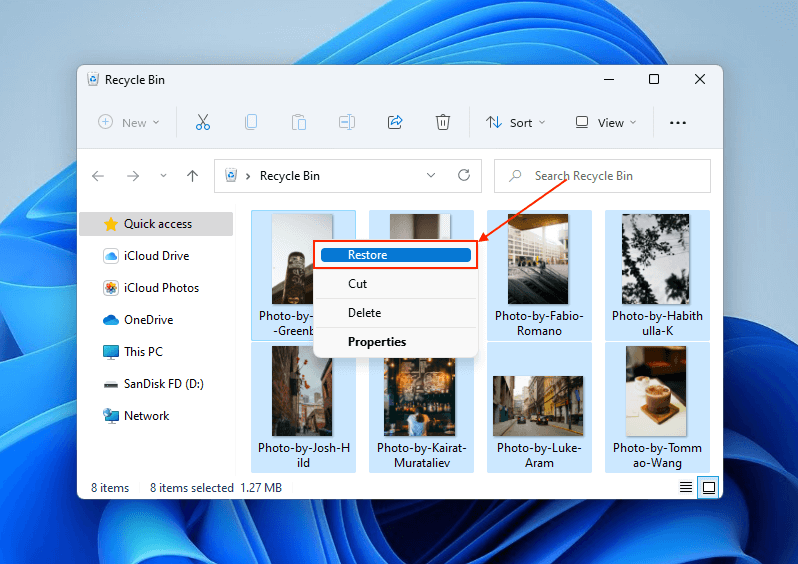
Windows Recycle Bin
- Connect your flash drive to your PC.
- Open the Recycle Bin by clicking its icon on your desktop or using the Start Menu.
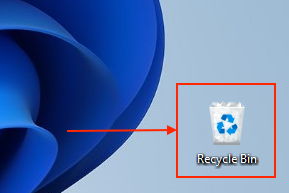
- Right-click the file you want to recover and click Restore. You can also drag a selection box over the files missing from the flash drive so you can restore multiple at once.


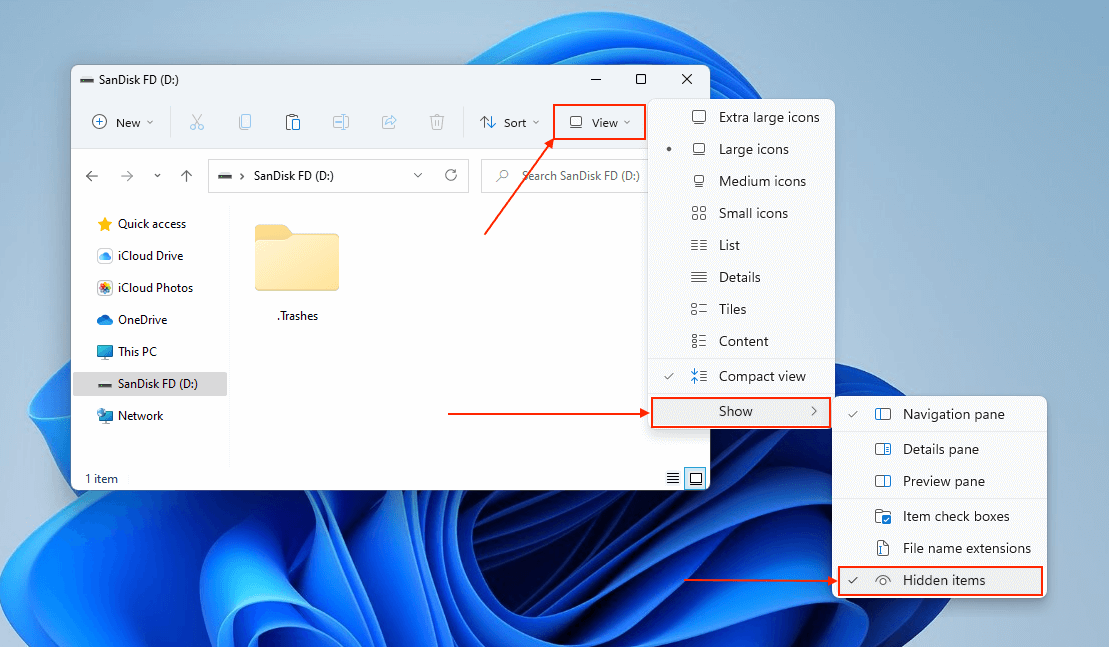
.Trash folder on Flash Drive
- Open File Explorer and navigate to your flash drive’s root folder.
- Click View > Show > Hidden items. If the .Trash folder appears, you can copy its contents to your PC.

Method 2: Check Your Backups
Cloud storage services like Google Drive, iCloud Drive, Dropbox, etc. have certain automatic backup features that sometimes include external drives. For example, Dropbox has a feature called Autoplay, which automatically uploads photos and videos from external devices upon connection.
In other words, it’s possible that you automatically backed up your flash drive just by plugging it into your PC if you have cloud storage apps installed.
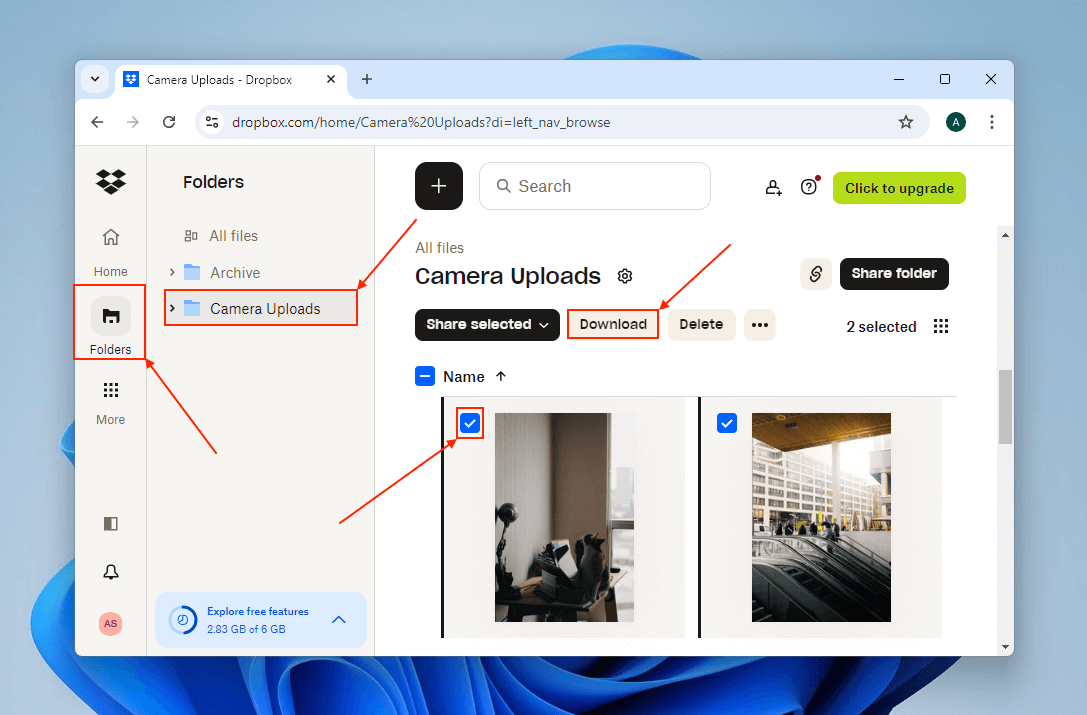
Those photos and videos are uploaded to a Dropbox folder called Camera Uploads, where you can view and download them.
- Log in to Dropbox.com (or whichever website is used by your cloud storage service).
- Click the Folders button in the sidebar and open the Camera Uploads folder. Mark beside the files you want to download and click Download.

Method 3: Data Recovery Software
If your files are no longer in the Recycle Bin nor the Trash folder and you don’t have any backups, the next viable solution is to use data recovery software. Data recovery software can recover missing files in a USB by scanning for and restoring its physical data directly from the flash drive’s disk.
We’ll demonstrate this process below using two beginner-friendly data recovery tools that specifically excel at restoring a variety of data types, which commonly make up the contents of USB flash drives.
Option A: Disk Drill
Disk Drill is one of the most popular data recovery tools available because of its easy to use interface and powerful capabilities. Disk Drill clearly breaks the process down step by step so beginners won’t get lost in random menus along the way.
Disk Drill also recognizes more file signatures than most of its competitors, including documents (.pdf, .psd, .doc/.docx, .xls/.xlsx, etc.), photos (.jpg, .png, .gif,.cr2, etc.), and videos (.mp4, .mov, .gopro, etc.). It’s very good at restoring original file names and folder structures from exFAT, FAT32, and NTFS file systems, which are commonly used on flash drives.
Disk Drill only lets you recover up to 500 MB worth of data for free (which is a lot of files, unless they’re videos). However, you can scan and preview your data as much as you want, which is a good way to check if your files are recoverable
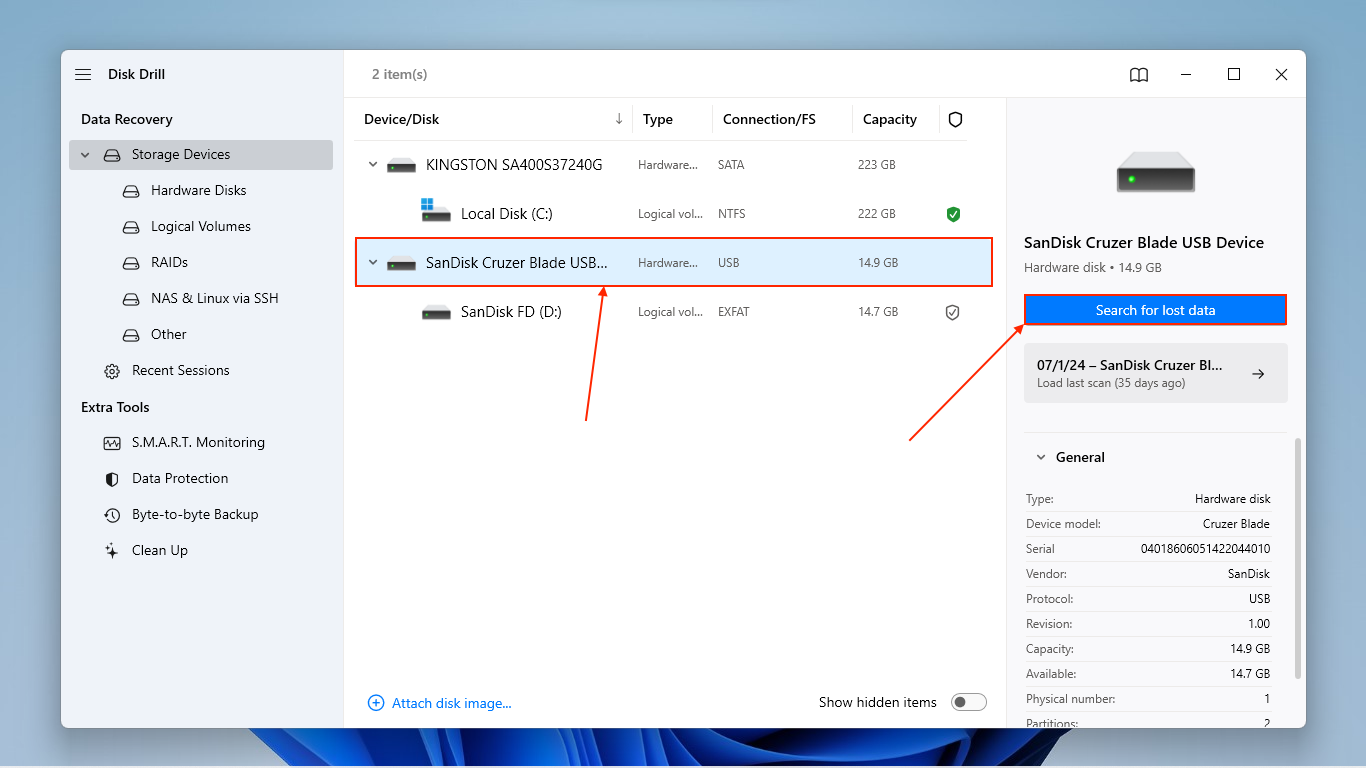
- Download and install Disk Drill on your PC.
- Connect your flash drive to your PC. Then, launch Disk Drill.
- Select your flash drive from the list of disks and click Search for lost data.
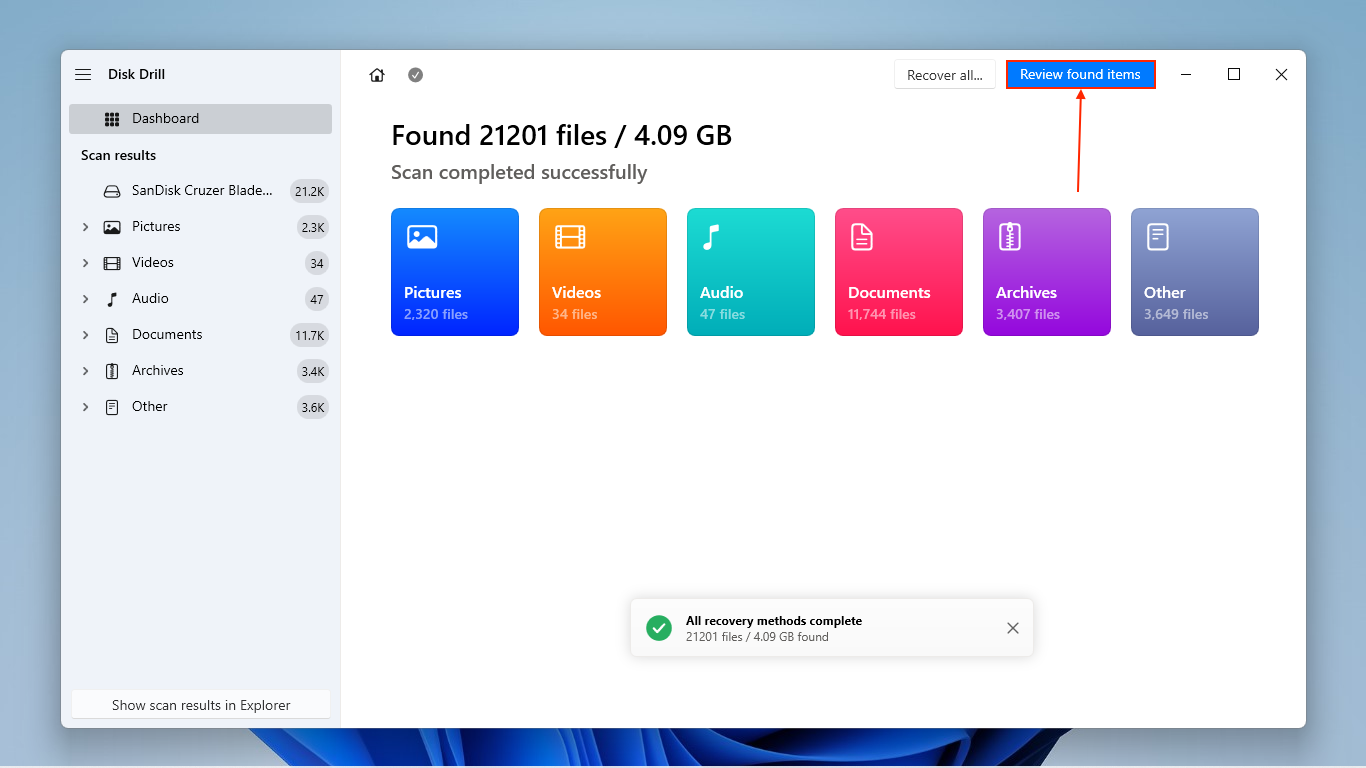
- Once Disk Drill is done scanning your USB, click Review found items.
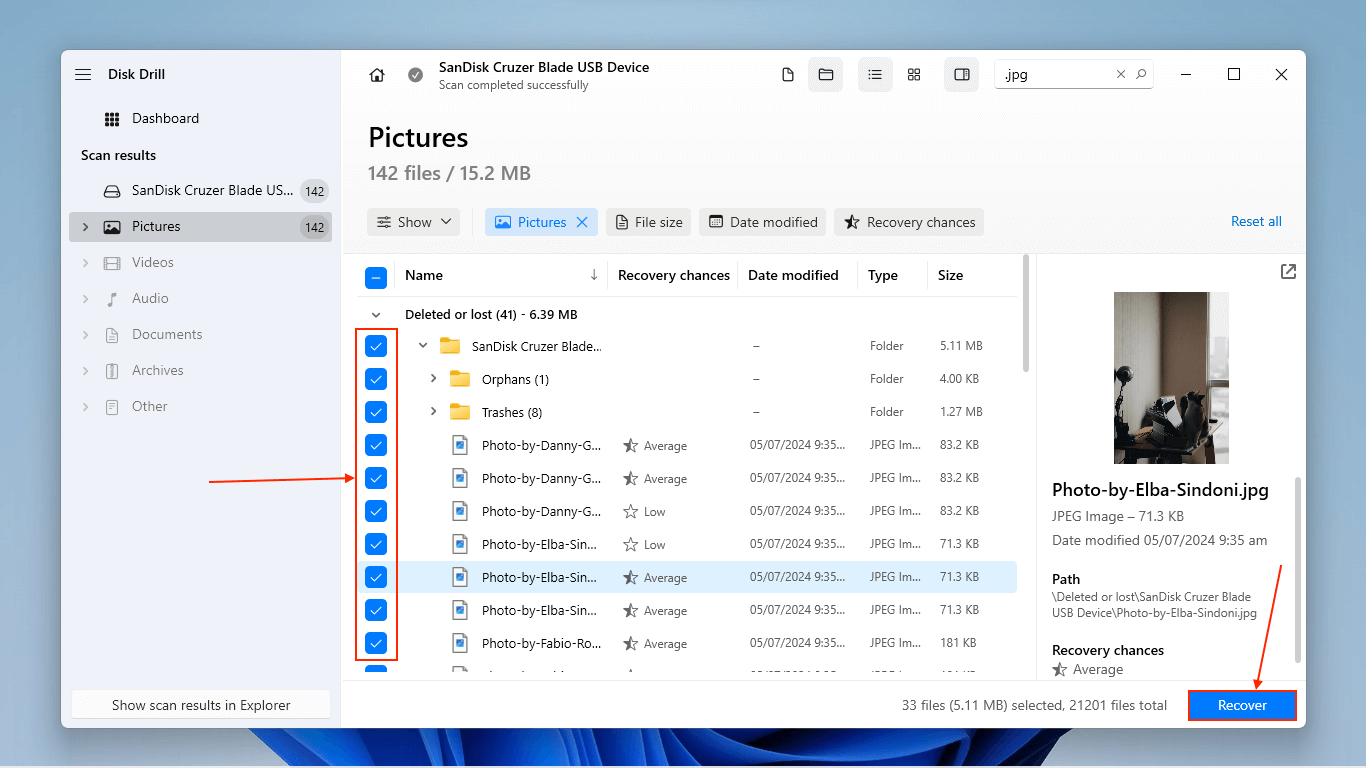
- If you only want to restore specific files, use the filters in the sidebar as well as the search bar in the top right to narrow down your results. You can type file names or even file extensions (e.g. .jpg). Make sure to click on your files once to display their preview, which ensures their recoverability.
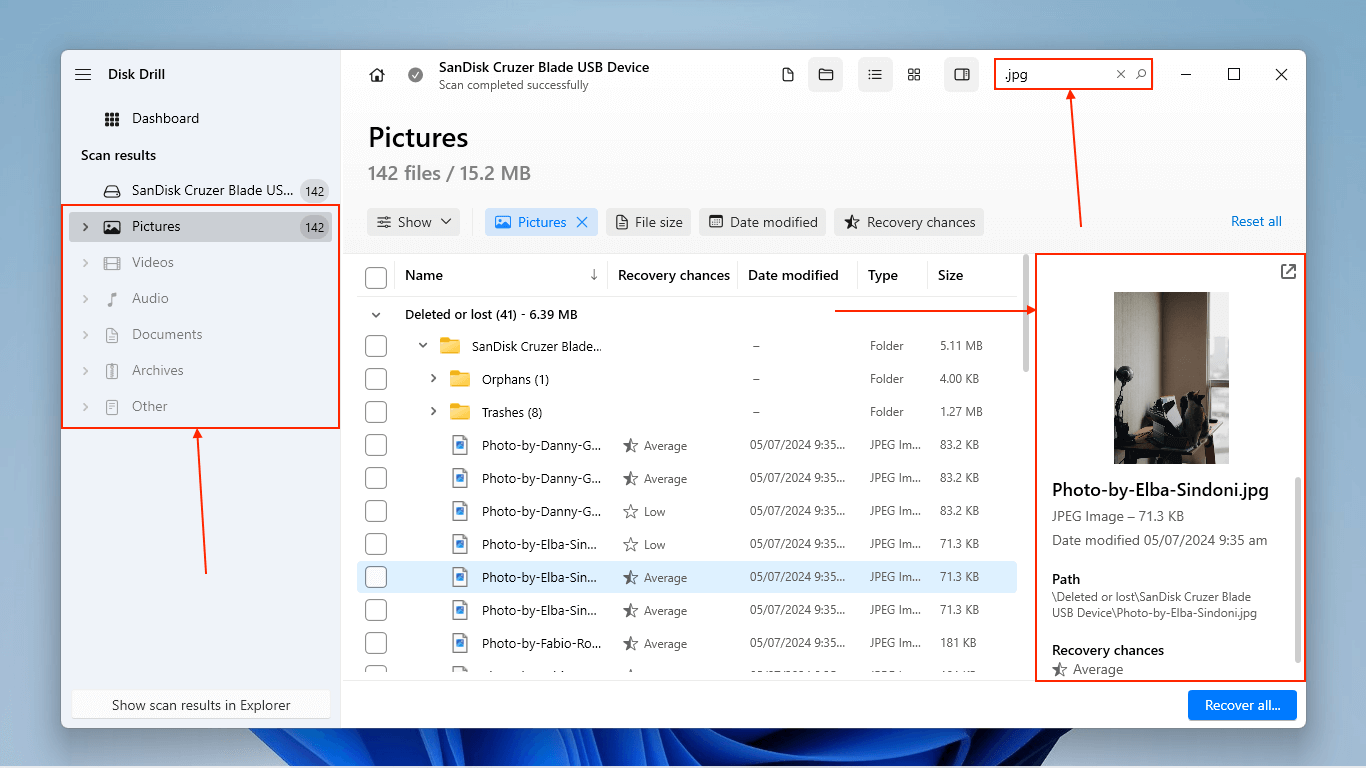
- Mark the boxes beside the files and folders you want to restore. Then, click Recover. If you want to restore everything Disk Drill found, leave all boxes blank and click Recover all (it’s the same button).
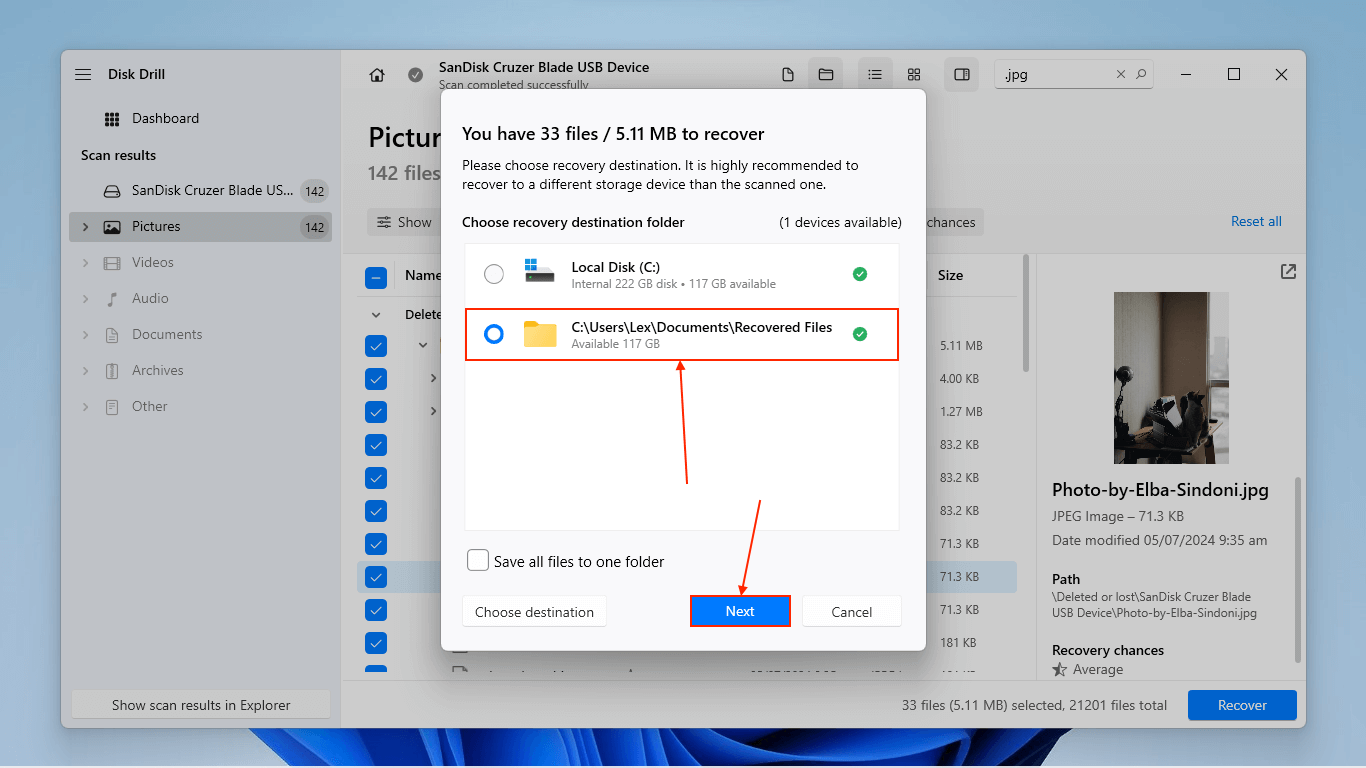
- Choose a location on your PC where you want Disk Drill to save the restored files. Then, click Next.


Option B: PhotoRec
PhotoRec is a 100% free and open-source data recovery software with a humble interface and powerful signature scanner. While it’s not as polished as Disk Drill, it’s straightforward enough as a tool for beginners to use if you follow along with our guide.
PhotoRec also has a massive file signature database and supports almost every common extension across documents, photos, videos, and more. It’s a good choice for storage devices that carry a variety of files, like flash drives.
The app’s biggest weakness is that it only has a single scan type, but it might be enough under good conditions if you have a really strict budget.
For this demonstration, we’ll be using QPhotoRec, which is a version of PhotoRec with a graphical user interface. It already comes with the official download, so no additional setup is required.
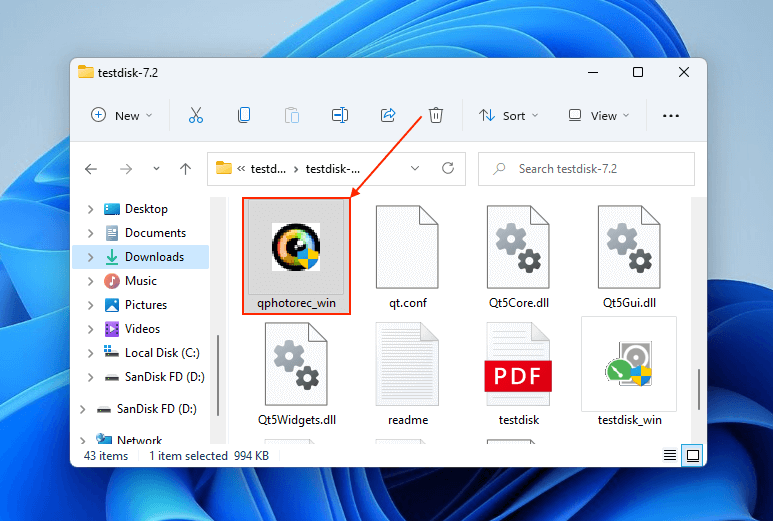
- Download TestDisk (which includes PhotoRec) to your PC. Unzip the folder if required.
- Connect your flash drive to your PC. Then, open the TestDisk folder and double-click QPhotoRec.exe.
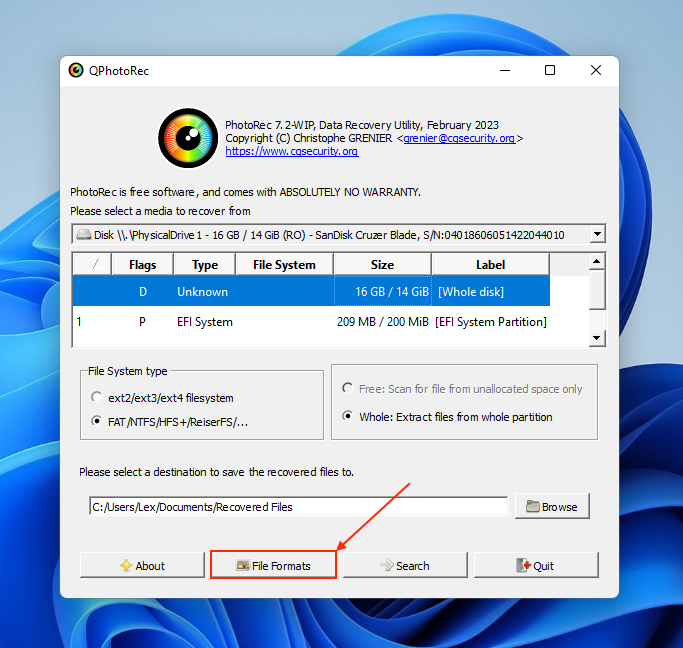
- Use the dropdown menu near the top of the window to select your flash drive from the list of disks. Select the entry with the Label “[Whole Disk]”, then click Browse.
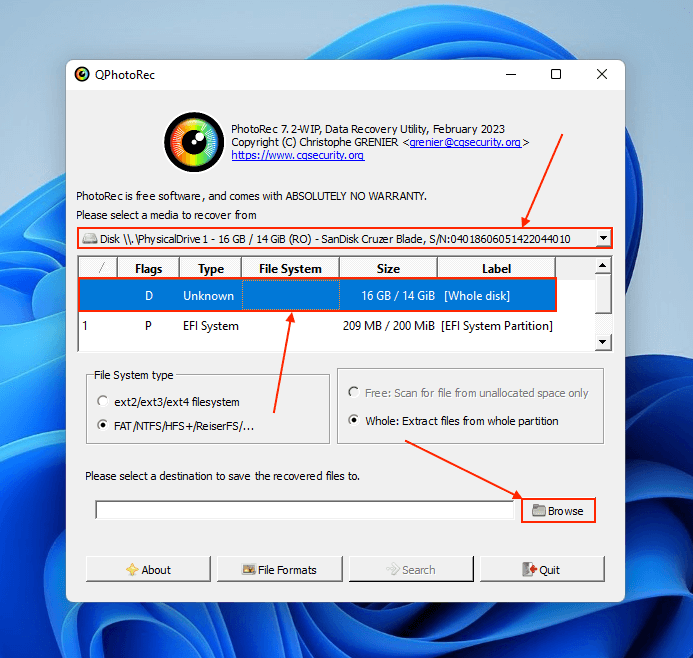
- Choose a folder where PhotoRec will save the files it manages to restore. Then, click Select Folder.

- Click File Formats.
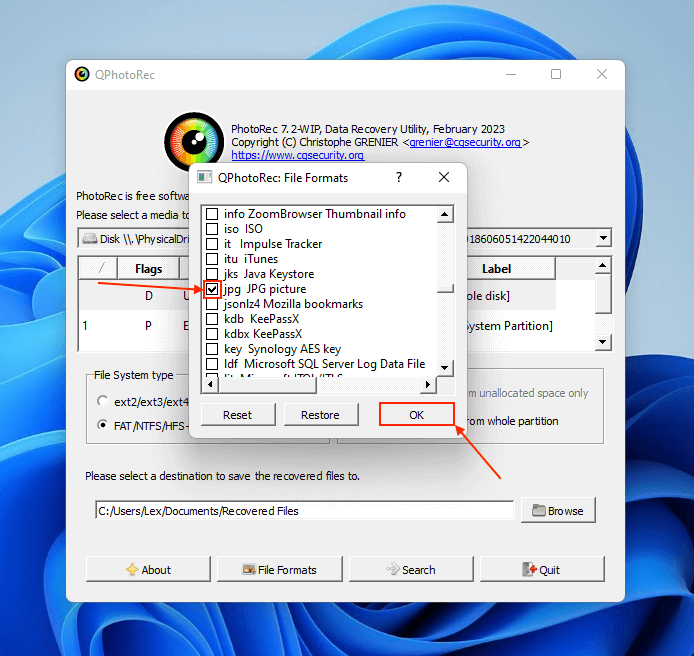
- Mark the boxes beside the file signatures you want PhotoRec to scan for. Then, click OK.
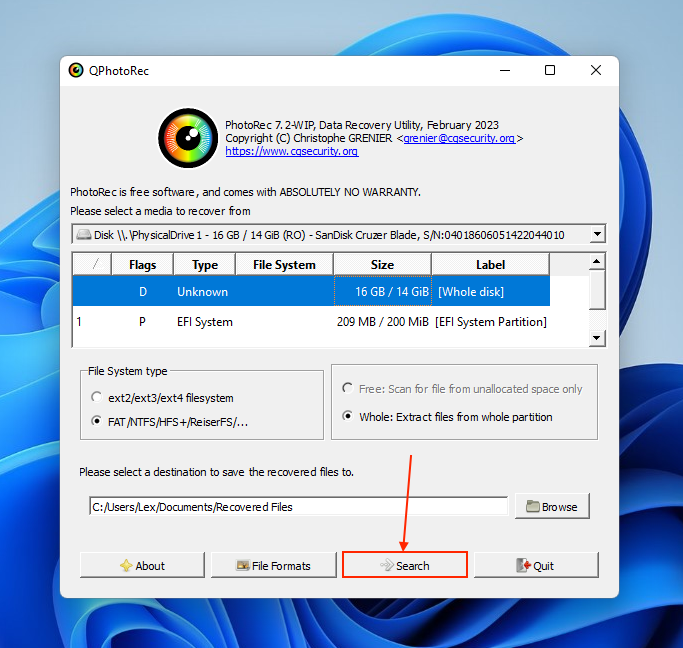
- Finally, click Search.
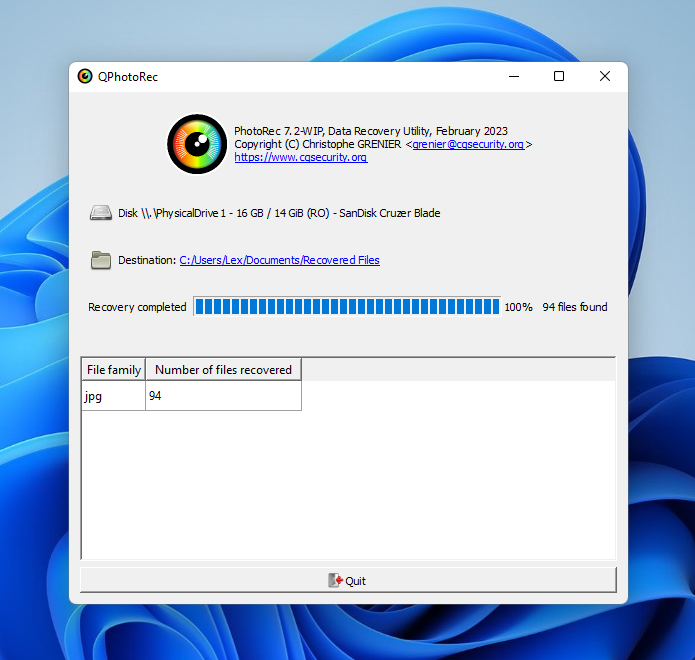
- PhotoRec will automatically save all the files it discovers to the location you specified in step 4. It will also tell you how many files of each type it was able to restore. Feel free to close the app at this point.


Method 4: Professional Data Recovery Services
If your flash drive is physically damaged or you simply want to skip DIY options and hire specialists instead, you can send your USB to a professional data recovery service.
Professional data recovery services have advanced tools and expertise that can restore data under conditions where DIY solutions can’t. They also have a higher success rate for less complex data loss scenarios, so they’re ideal if you need to restore your flash drive files at all costs… Just expect to spend a few hundred dollars at least.
If you’re unfamiliar with data recovery services, try to shop around for the following:
- No Data – No Charge – Most top data recovery services will only charge you for the job if they successfully restore the specific data you wanted to recover. If they fail, you will only have to pay for shipping.
- Reasonable shipping fees – Big recovery centers have multiple branches so make sure you’re sending your drive one close to you in order to manage shipping expenses. Some companies offer free inbound shipping, but you’re typically expected to pay for return shipping.
- Free replacement drive and/or parts – Some recovery services provide the return drives and/or replacement parts of your old drive for free. This perk isn’t as common.
- Cleanroom – While unnecessary for certain cases of data loss, having a cleanroom is critical if your flash drive needs to be disassembled for recovery. It prevents tiny particles from damaging sensitive internal components.
- Good user reviews – Check user reviews on platforms like Google Reviews, Yelp!, TrustPilot, etc. Make sure that you pay attention to: (a) reviews with different star levels, (b) reviews for the correct branch (it matters), and (c) the most recent reviews.
Wait! Something might be wrong with your flash drive…
Can files disappear from a flash drive? Not if you didn’t delete them or format the USB. If any files copied to the USB drive disappear for seemingly no reason, the device might be corrupted. We recommend formatting it once you’ve recovered your data to start with a fresh file system.
We also recommend creating regular backups of your flash drive if you use it to store important files – consider using cloud storage services with automatic backup features.