
Reading Time: 6 minutesNVMe SSDs are extremely fast and powerful and can greatly increase your PC’s performance. On the flip side, NVMe data recovery is much harder… But not impossible.
To successfully recover data from an NVMe SSD, you need to use the right tools and perform a few simple but critical preparatory steps. It also helps to know exactly what factors affect recovery so you can properly manage your expectations.
To help you, we compiled all that information into this easy-to-follow guide. Read on!
Before proceeding, make sure that your NVMe SSD is completely powered down to avoid further data loss. Make sure you’re ready to perform the steps in this article before booting your drive again.
Is it Possible to Restore Data from an NVMe SSD?
Yes, it’s possible to restore data from an NVMe SSD – it’s just harder and has a lower probability of success. Specifically, recovering your data from an NVMe SSD (or NVM Express SSD) relies on 4 main factors:
1. Availability of Backups (Very helpful but CAN be optional)
The best way to recover data from any storage device is by restoring a backup that was created in advance. Simply connect your backup drive to your PC and extract the files (using File History, Backup and Restore Windows 7, or third-party tools).
However, if you were unable to create a backup of your NVMe SSD, recovery is still possible – but the next 2 factors become MUCH more significant.
2. Data Overwriting
When a file gets lost or deleted, its data still physically exists on your SSD’s disk. There is a way to access and restore that data using certain tools, which we’ll demonstrate in the guide section.
However, that data will eventually get overwritten – either by new files that you actively save to your SSD, by background PC operations (like downloading Windows Updates), or due to TRIM, which is the next factor we’ll discuss.
Just know that once file data gets overwritten by any of the above, data recovery is pretty much impossible.
3. TRIM
TRIM is one of the biggest reasons why it’s much harder to recover files from an NVMe SSD – or any SSD in general – compared to traditional hard drives.
TRIM is a special SSD-only feature that automatically clears up file data instead of leaving it to be overwritten by new files. While TRIM is a big reason why SSDs are fast, it also makes data recovery extremely difficult – or in most cases, impossible.
However, there are cases where SSDs with TRIM can still be recovered with the right tools and (more importantly) conditions. More on this in the next section.
4. Cause of Data Loss
The 3 main causes of data loss are:
- Accidental deletion or formatting by the user
- Software-based errors a.k.a logical issues (file system corruption, boot sector issues, malware infection, etc.)
- Physical damage
In cases that involve the first two scenarios, you have a decent chance of restoring data yourself using the steps in this article – as long as the previous factors we discussed are on your side.
But if your NVMe has been physically damaged, we strongly encourage you to send it to a professional data recovery center instead. They have the tools, facilities, and specialists to work on your damaged SSD without further risking your data.
How to Recover Data from an NVMe SSD
This is the guide section, where we carefully break down each step on how to recover data from an NVMe SSD. We suggest reading each section before following along with your PC so you can prepare any tools (both hardware and software) that are required.
Step 1: Disable TRIM
When enabled, TRIM automatically occurs in the background when the disk is idle or not engaged in resource-heavy activities.
There is a small possibility that TRIM hasn’t gotten to your files yet, giving you a small window of opportunity to disable the feature and restore your files.
Fortunately, you can disable TRIM using Command Prompt using a single easy command.
- Open Command Prompt as Administrator via the Start Menu.
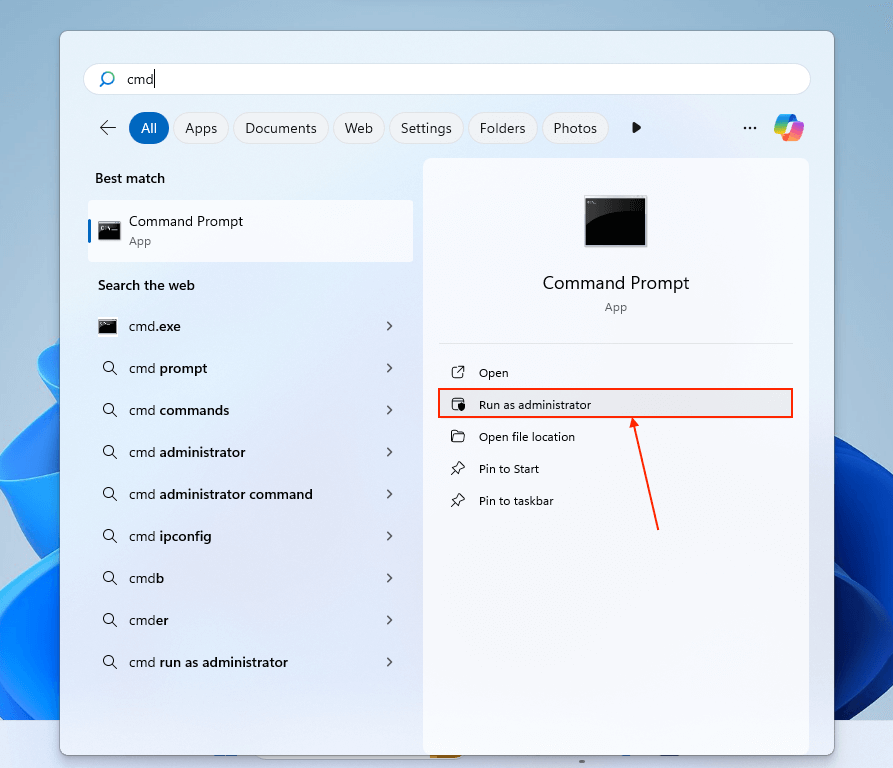
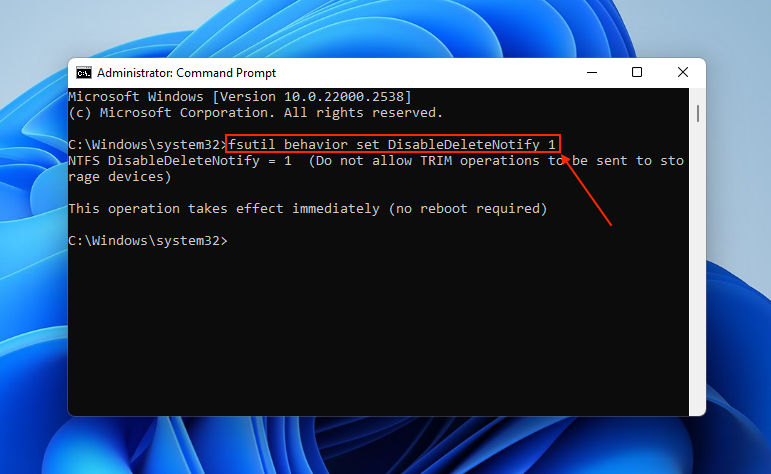
- Type the following command and hit Enter:
fsutil behavior set DisableDeleteNotify 1


Step 2: Download and Install Data Recovery Software on an External Storage Device
Data recovery software is a tool that you can use to restore data from your NVMe SSD – whether it was deleted, formatted, or corrupted. There are various NVMe data recovery tools available online but we’ll be using an app called Disk Drill for the sake of this demonstration.
Disk Drill has several advantages specifically for restoring SSDs, such as a very large signature database that recognizes a wide variety of file types, as well as the ability to reliably restore original file names and folder structures on exFAT and NTFS disks.
Most importantly, Disk Drill can be installed on an external drive. NVMe SSDs are typically used as system drives thanks to their very high performance – installing an app directly on the drive can wipe the file data needed to restore the files.
If you used your NVMe SSD as an external storage device via an enclosure, you can install the data recovery software directly on your PC instead. Then, proceed to the next section but make sure to select the correct drive from the disk selection menu.
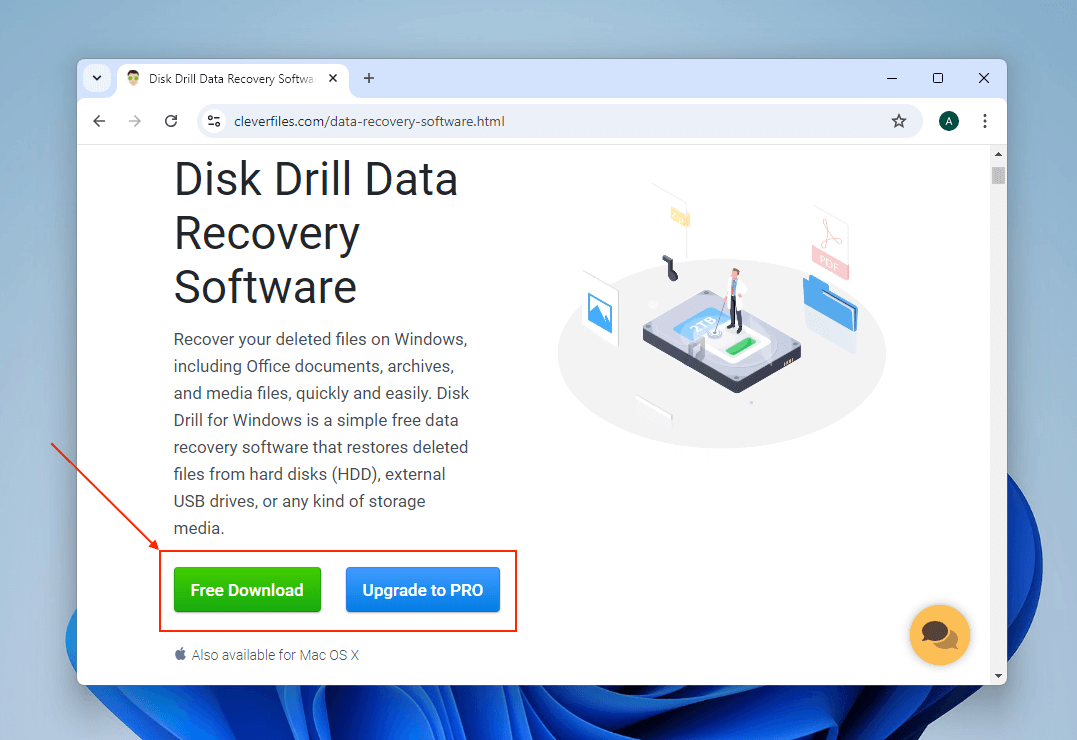
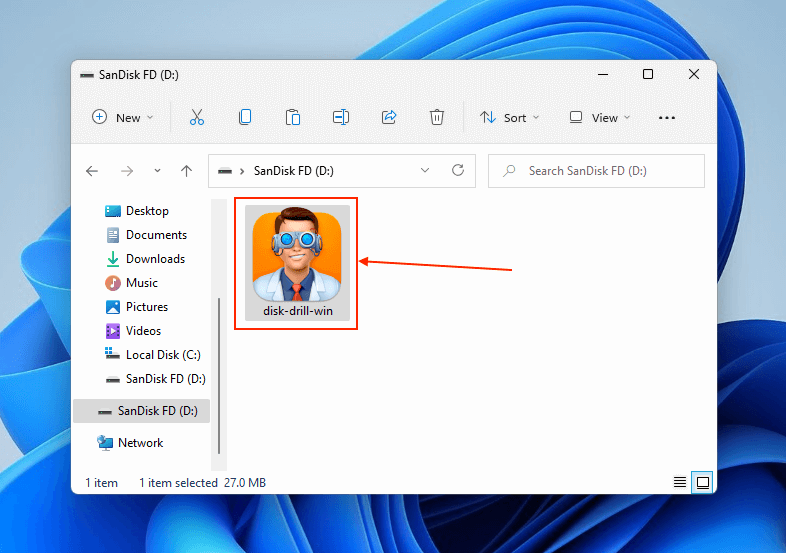
- Download Disk Drill from the Cleverfiles website but make sure to save the installer file in your external storage device.
- Launch the installer from your external drive (if you’re restoring an internal NVMe SSD).
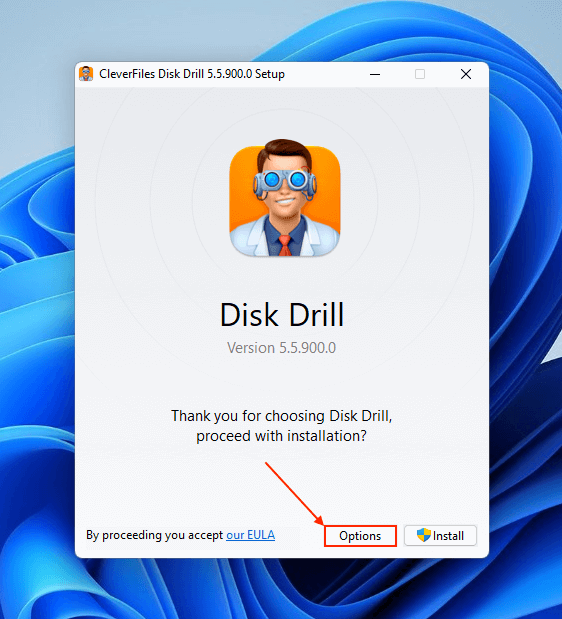
- Click Options.
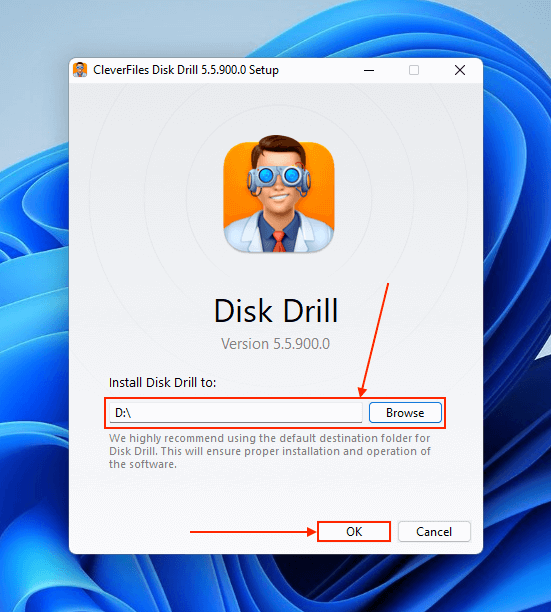
- Use the Browse tool to select an appropriate installation folder for Disk Drill. Again, we recommend installing it somewhere OTHER THAN your NVMe SSD. In our case, we’re installing it on an external storage device because our SSD is a system drive. Once you’ve chosen a safe destination, click OK.
- You will return to the previous menu. This time, click Install.


Step 3: Use Data Recovery Software to Scan your NVMe SSD
Once Disk Drill has been installed on your external drive (or system disk if you used your SSD as an external drive), you can launch the app and attempt to recover files from your NVMe SSD.
You can install Disk Drill for free and scan and preview your files as much as you want. You can also restore up to 500 MB without purchasing a license.
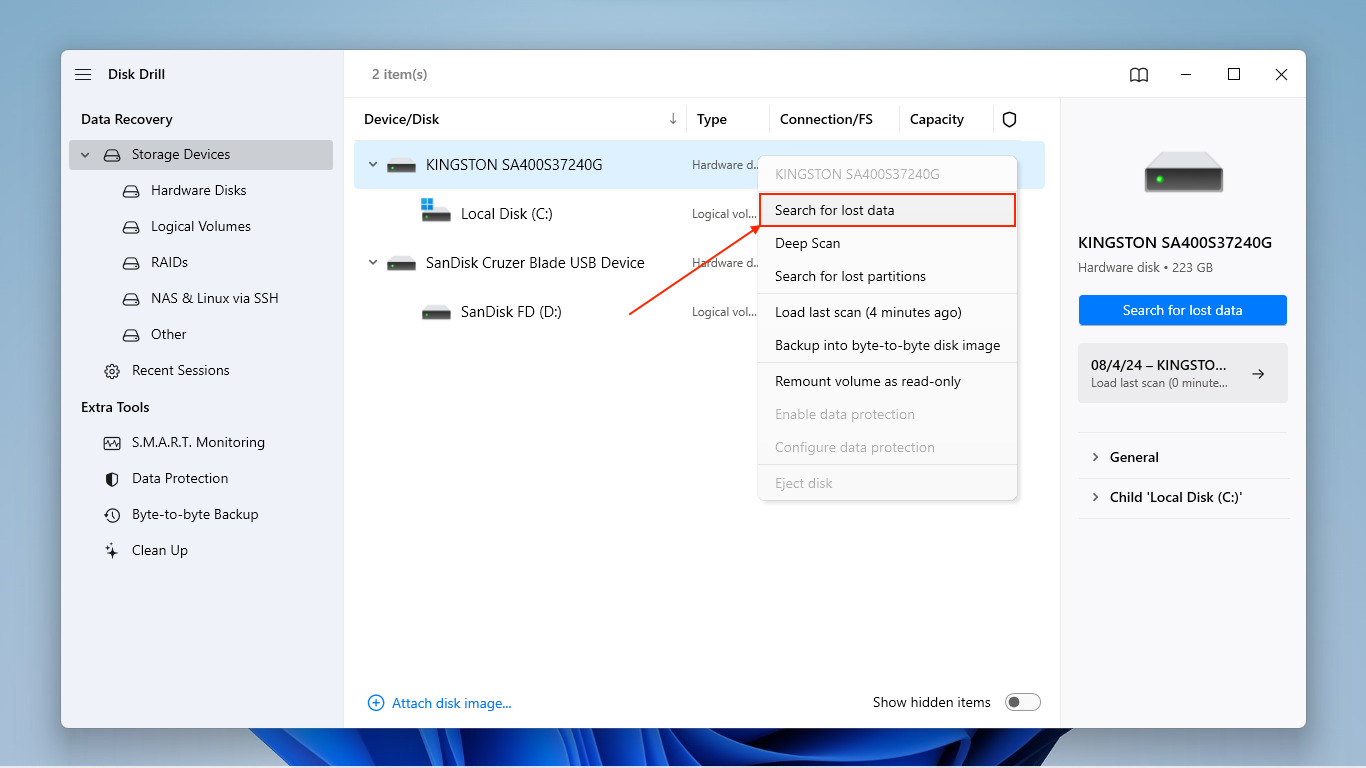
- Open Disk Drill from your external storage device or from your PC’s system drive, depending on your case.
- Right-click your SSD and click Search for lost data.
- Once Disk Drill is done scanning your NVMe SSD, click Review found items.
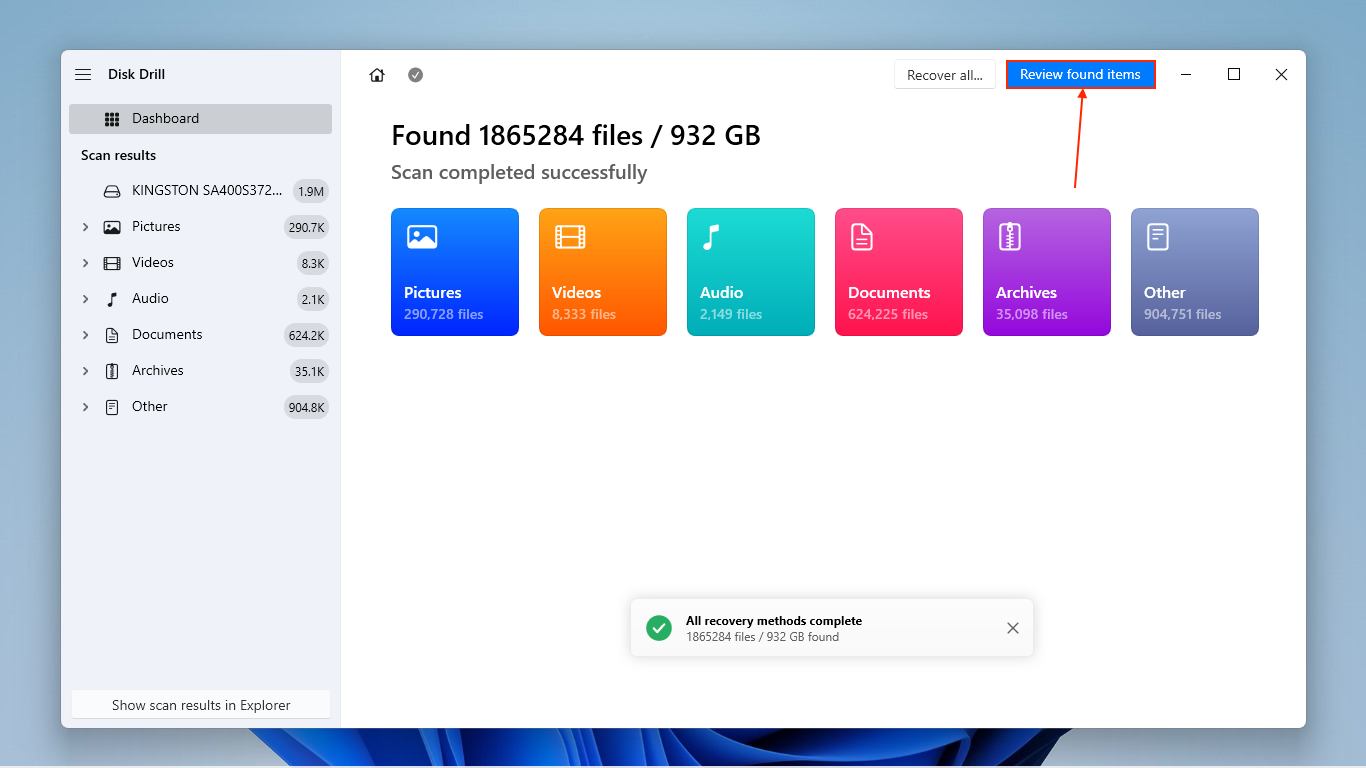
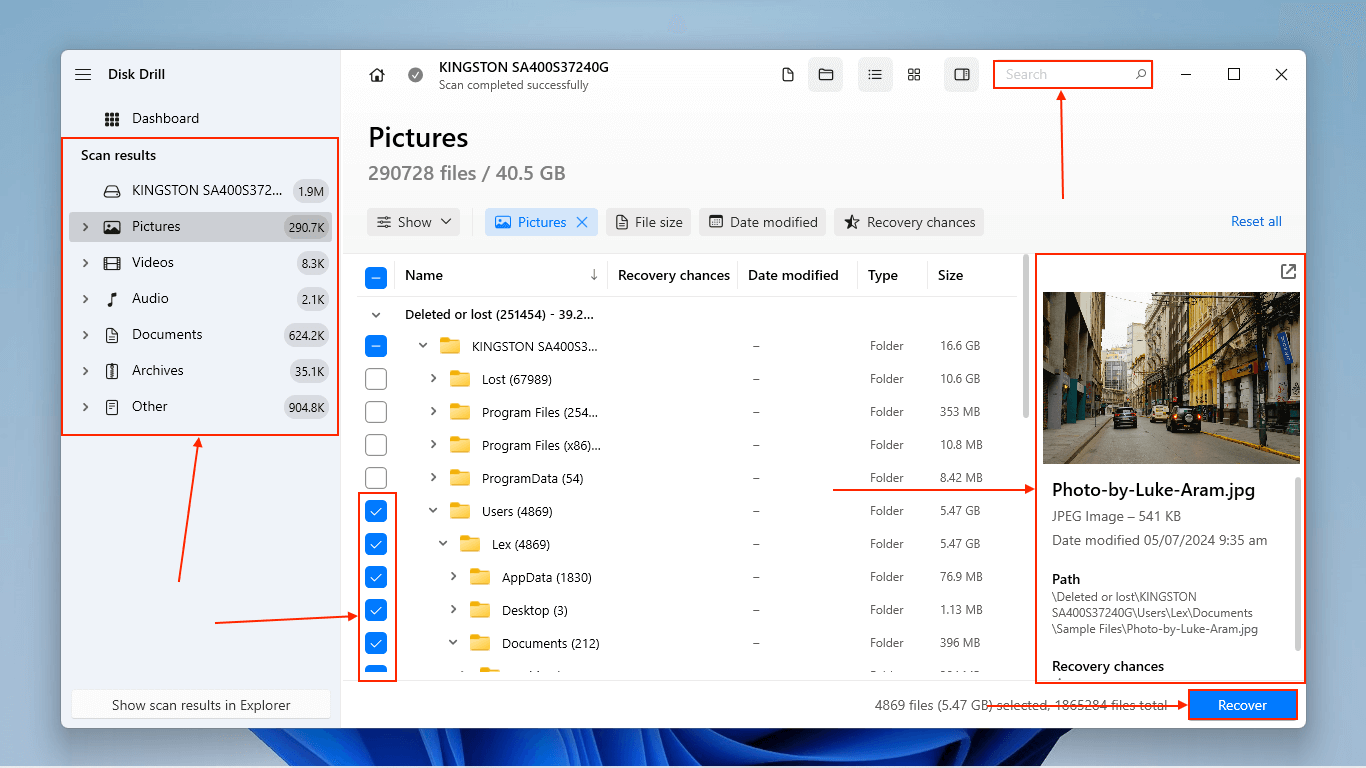
- The sidebar on the left and the search bar in the top right allows you to narrow down the results (if you only want to restore specific files). Clicking on any file will display a full preview in the right sidebar, which is useful for checking for corruption. You can select files and folders by marking the boxes beside them or you can select all files by leaving the boxes blank. Once you’re ready, click Recover.
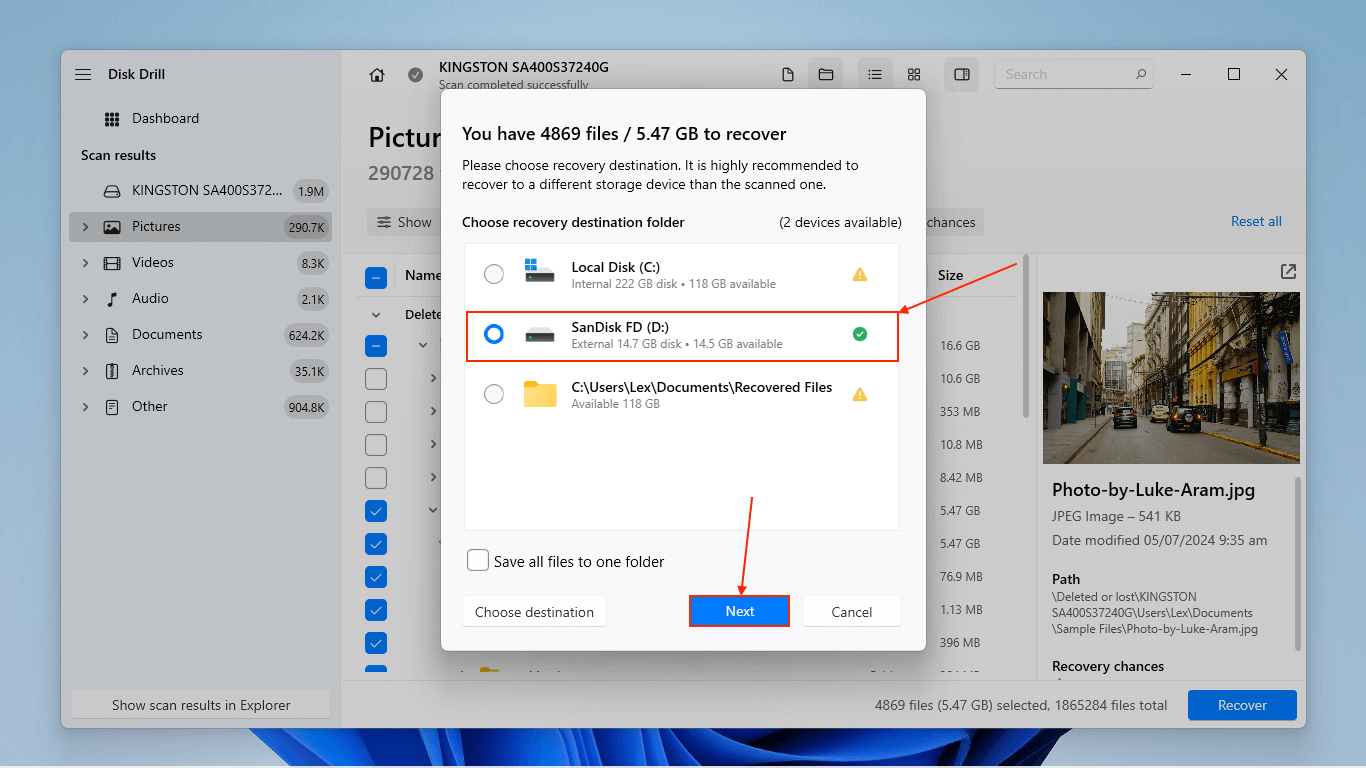
- Choose a location other than your NVMe as the destination for the restored files. This is to avoid overwriting any lost data. Finally, click Next to proceed with recovery.


Want to check out more of the best NVMe data recovery software?
Disk Drill is one of our top software recommendations on this website and (in our opinion) one of the best NVMe data recovery software tools However, it’s far from the only option available.
While we’re super confident in recommending Disk Drill to you, we also encourage you to check out our beginner-friendly coverage of the top 6 free and paid SSD recovery tools, which went through rigorous testing and analysis by our writers and tech team.
Good luck!