
Reading Time: 8 minutesCFast cards are a different breed of memory card developed specifically for very high-quality photography. However, its increased capabilities also mean that more things can go wrong, leading to data loss and corruption.
We wrote this article to make sure you get the RIGHT information about CFast card data recovery. This guide is not only comprehensive, but it’s highly specific to CFast cards and it’s written to help you safely attempt to restore your files even without any prior tech knowledge. Read on!
What You Need to Know About Data Loss on CFast Cards
CFast cards are commonly used by professional photographers due to their exceptional read and write speeds, which are crucial for working with high-definition and burst photos. They are also more secure and durable and they can store more data than SD cards.
However, this also means that CFast cards are constantly subjected to intensive usage and rigorous conditions. Professional photographers process hundreds to thousands of high-definition photos in a day, depending on the scale of the project and their team makeup.
As a result, CFast cards are more prone to certain data loss vulnerabilities or scenarios. We briefly describe these vulnerabilities in the text below. We strongly encourage you to familiarize yourself with them so you can better select the recovery method most suitable for your needs.
- Human error – One of the most common reasons for data loss on a CFast card is human error, such as accidental formatting or deletion.
- Increased risk of corruption – Due to their frequent and intensive use in professional settings, the “cumulative risk” of corruption is increased. You’re more likely to encounter read or write errors, power outages, software bugs, viruses, etc. simply due to how much the memory card gets used. Corruption usually manifests as errors, data loss, your CFast card not showing up in File Explorer, etc.
- Physical damage – They are prone to increased wear and tear due to the intensity of professional usage – especially in challenging environments like the desert, jungle, or snowy areas. The sensitive connectors on these memory cards may also be worn to the point of intermittent contact issues or they may completely fail. Either scenario leads to data loss or corruption.
- Mechanical issues – CFast cards also have a built-in controller and ATA/IDE interface. The controller is in charge of memory management tasks like data storage and retrieval. The ATA/IDE interface communicates with the host device for tasks like actual data transfer. Firmware is required for both of these components to operate as intended. Unfortunately, firmware can get corrupted – which may cause data loss, data corruption, or loss of access to data (e.g. your PC can’t read your CFast card)
In the next section, we’ll advise you on which methods are best suited to your personal needs.
It’s also possible that your CFast card reader is not working – replacing it or testing it with another memory card is one of the first things you should try.
4 Methods to Recover Files from a CFast Card on Windows
There are a total of 4 realistic methods to recover lost or deleted files from a CFast card. Methods 1-3 can help you restore your files in case of human error and logical damage.
If your CFast card is mechanically or physically damaged, jump to Method 4 ASAP.
Method 1: Restore From .Trashes folder
Depending on the history of usage of your CFast card, it’s possible that a .Trashes folder had been created at some point in time. .Trashes is a special folder that appears in the storage device’s root to store “deleted” files.
Windows doesn’t create the .Trashes folder itself, but you can access it through your Windows PC and copy its contents to your system drive.
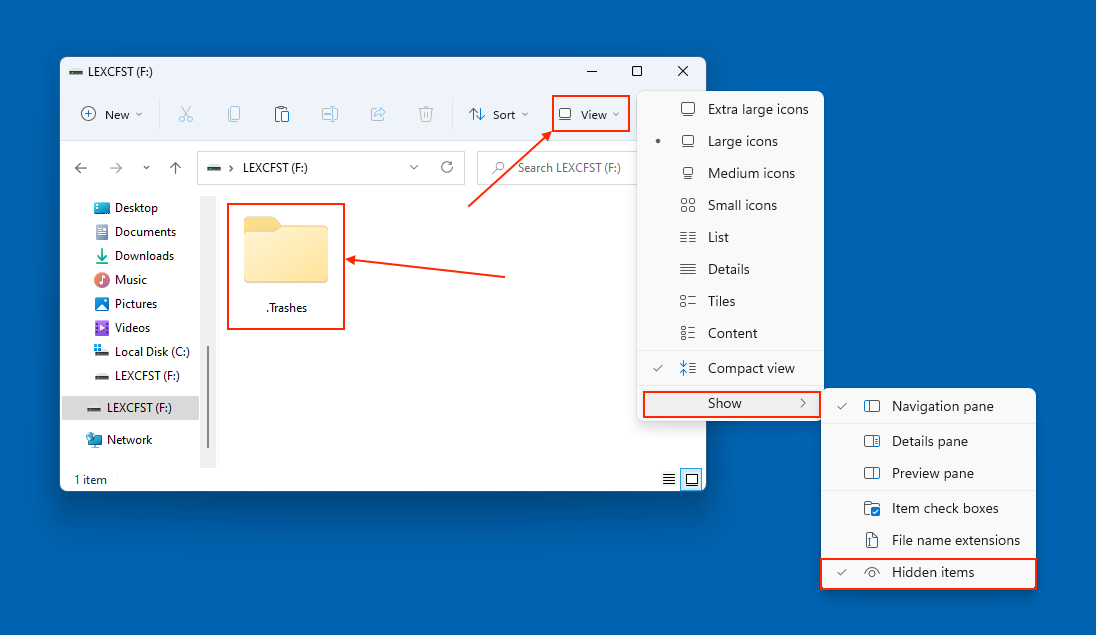
- Open File Explorer and navigate to your CFast card’s root folder.
- Click View > Show and click Hidden items. If the .Trashes folder appears, open it. Then, you can simply copy the files you want to save to any location you want on your PC.

Method 2: Check Cloud Backups
Some cloud storage services can automatically upload files from a recognized external storage device every time it’s connected to your PC.
Dropbox is the example we’ll be using for this demo. If you or another user enabled automatic uploads for your CFast card, Dropbox will automatically upload any new photos it finds whenever you plug it into your computer.
The photos are uploaded to a folder called Camera Uploads, which is safely stashed in the Dropbox server. We’ll show you how to access it.
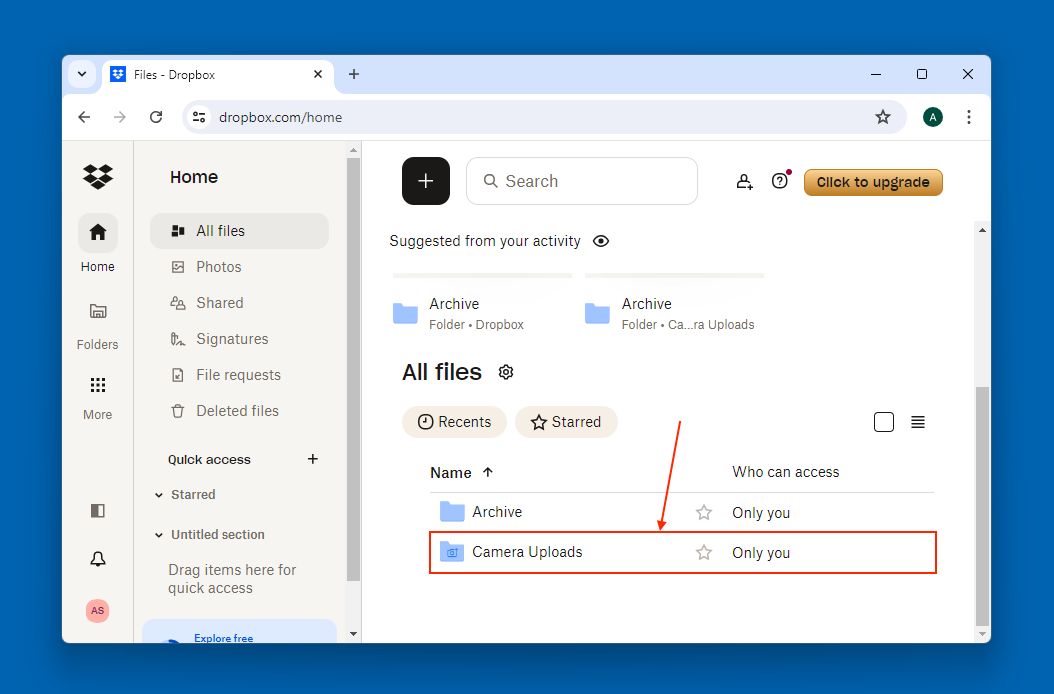
- Launch any browser and log in to Dropbox.com.
- Open the Camera Uploads folder.
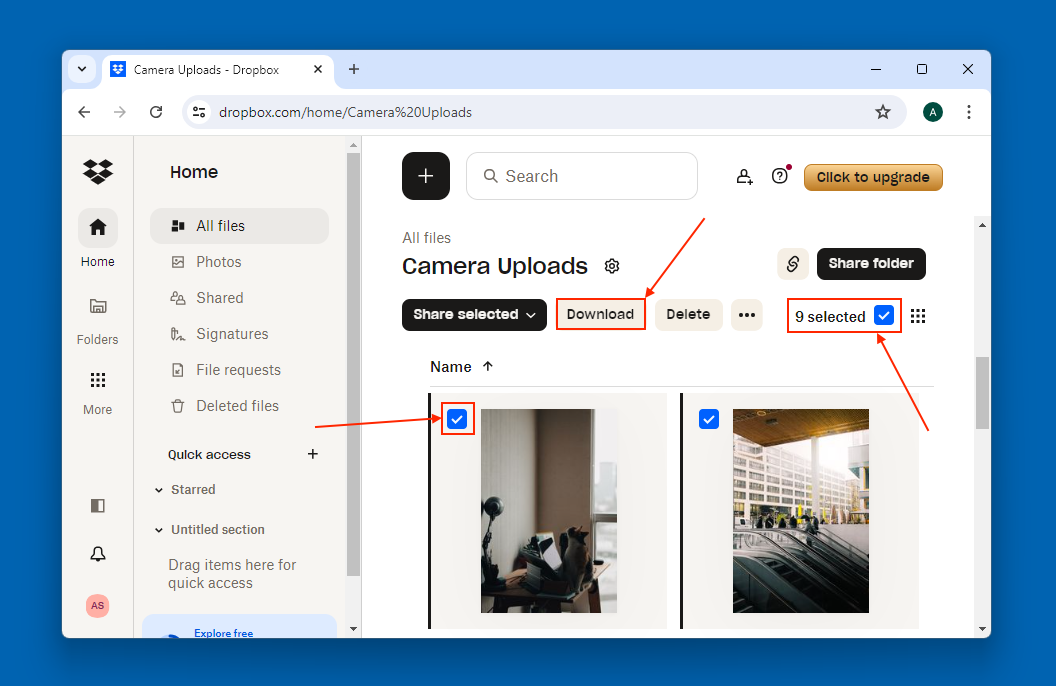
- You can either select individual photos or click the multi-select box on the Dropbox menu bar to select all photos in the Camera Uploads folder at once. Then, click the Download button.


Method 3: Use Data Recovery Software to Recover the Files from Your CFast Card
If your files aren’t in the .Trashes folder nor in your cloud folders, you can try using data recovery software to restore them.
Data recovery software is a tool that can directly scan your CFast card’s disk for any data left behind by the missing files (which the data recovery software uses to restore those files).
We prepared two well-known and reliable data recovery tools to demonstrate this process to you. Both of them offer free recovery.
Option A: Disk Drill
Disk Drill is one of the top data recovery apps for home users because of its beginner-friendly design and powerful core recovery capabilities.
It’s very good at scanning all major Windows file-based systems (exFAT, FAT32, NTFS) and it has a massive database of file signatures that recognizes proprietary file types from manufacturers like Canon (CR2, CR3, CRW), Kodak (DCR, KDC), Adobe (CinemaDNG), GoPro (GPR), Nikon (NEF, NRW), Sony (SR2, SRF), and many more.
Disk Drill is also capable of recovering data from corrupted CFast cards, even if they don’t show up in File Explorer (as long as they appear in Disk Management). Finally, its preview tool is capable of displaying almost all file types it recognizes – including RAW photos and even videos. This is super useful for evaluating whether or not your files are even recoverable.
We’ll demonstrate how to use Disk Drill to restore data from your CFast card. You can recover up to 500 MB of data for free (but you can scan your CFast card and preview your files as much as you want.
- Download Disk Drill to your PC. Then, create a folder anywhere on your local drive (e.g. Documents). This will be the destination of the recovered files.
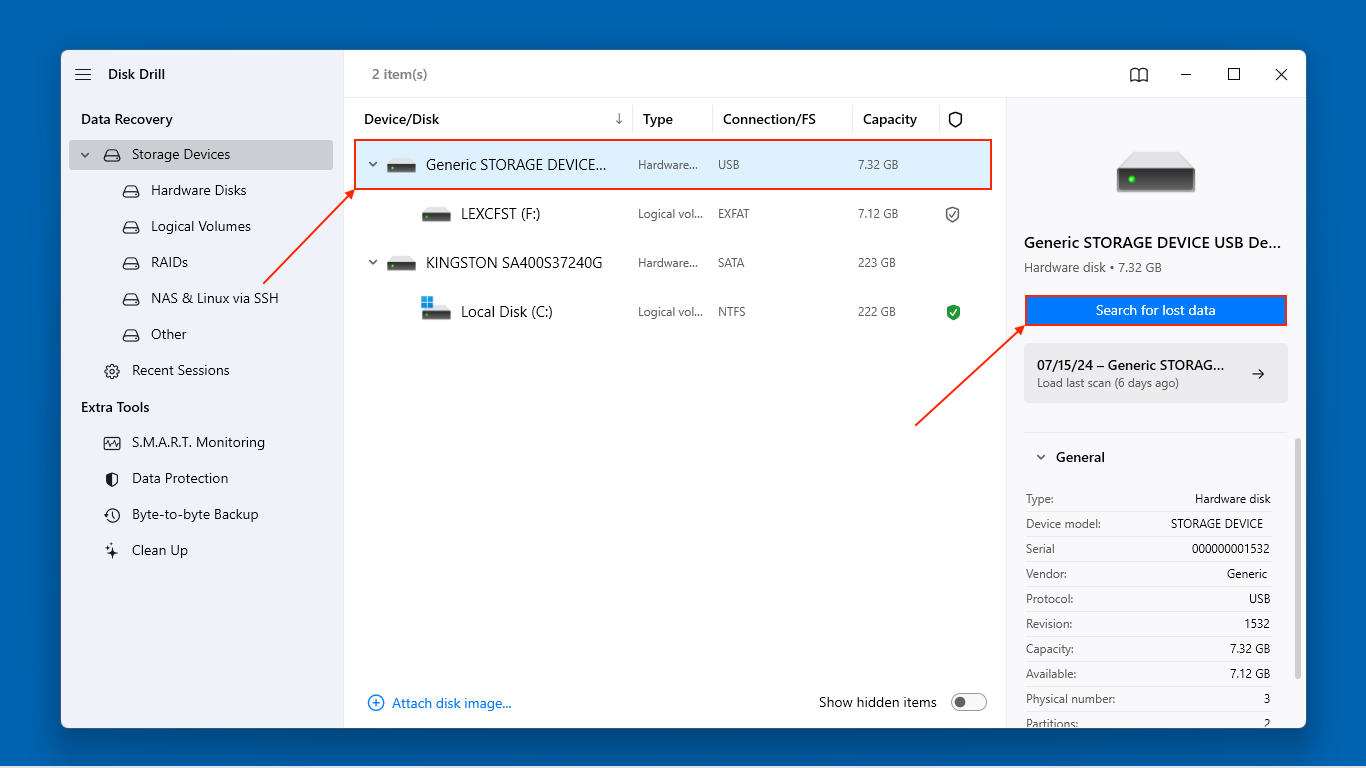
- Connect your CFast card to your PC using a CFast card reader and writer. Then, launch Disk Drill.
- Select your CFast card from the drive list (or your USB card reader, which is what might actually show up) and click Search for lost data.
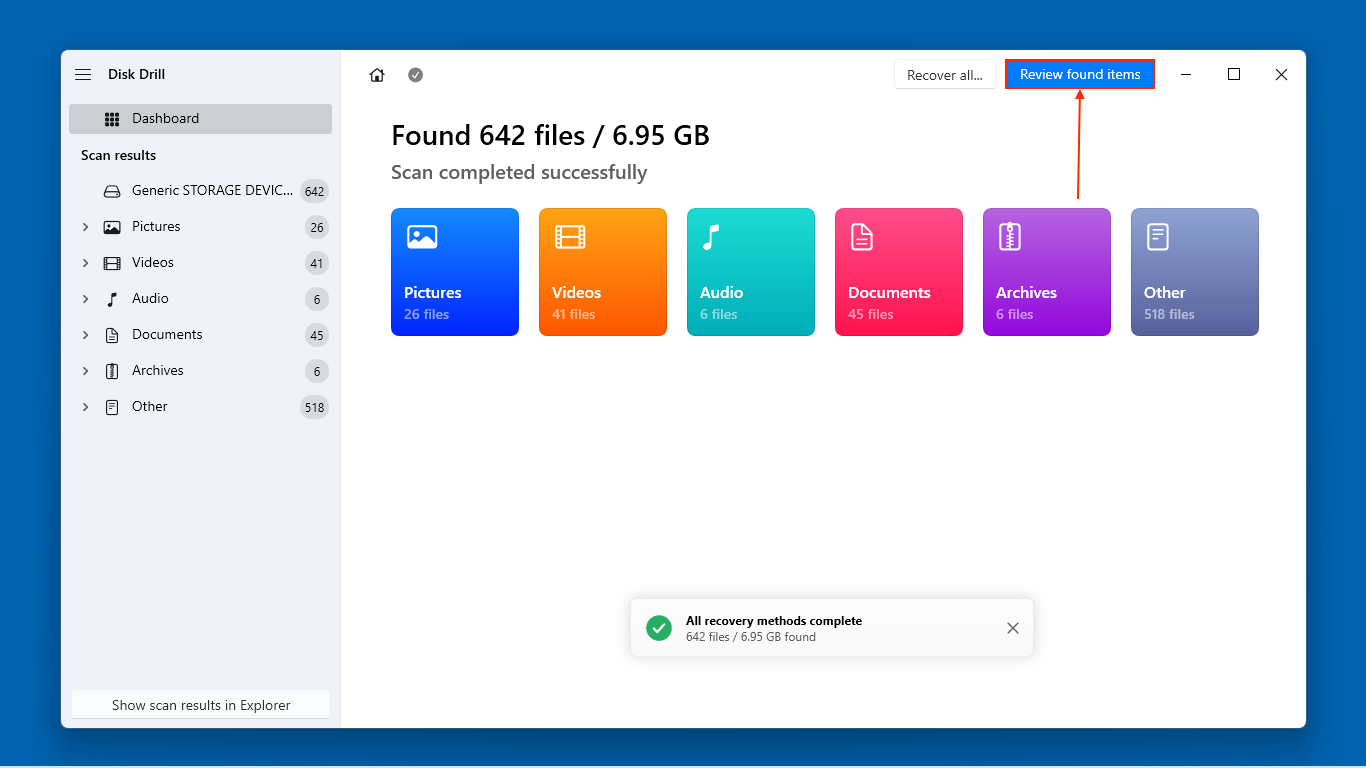
- Wait for Disk Drill to finish scanning your memory card. Then, click Review found items.
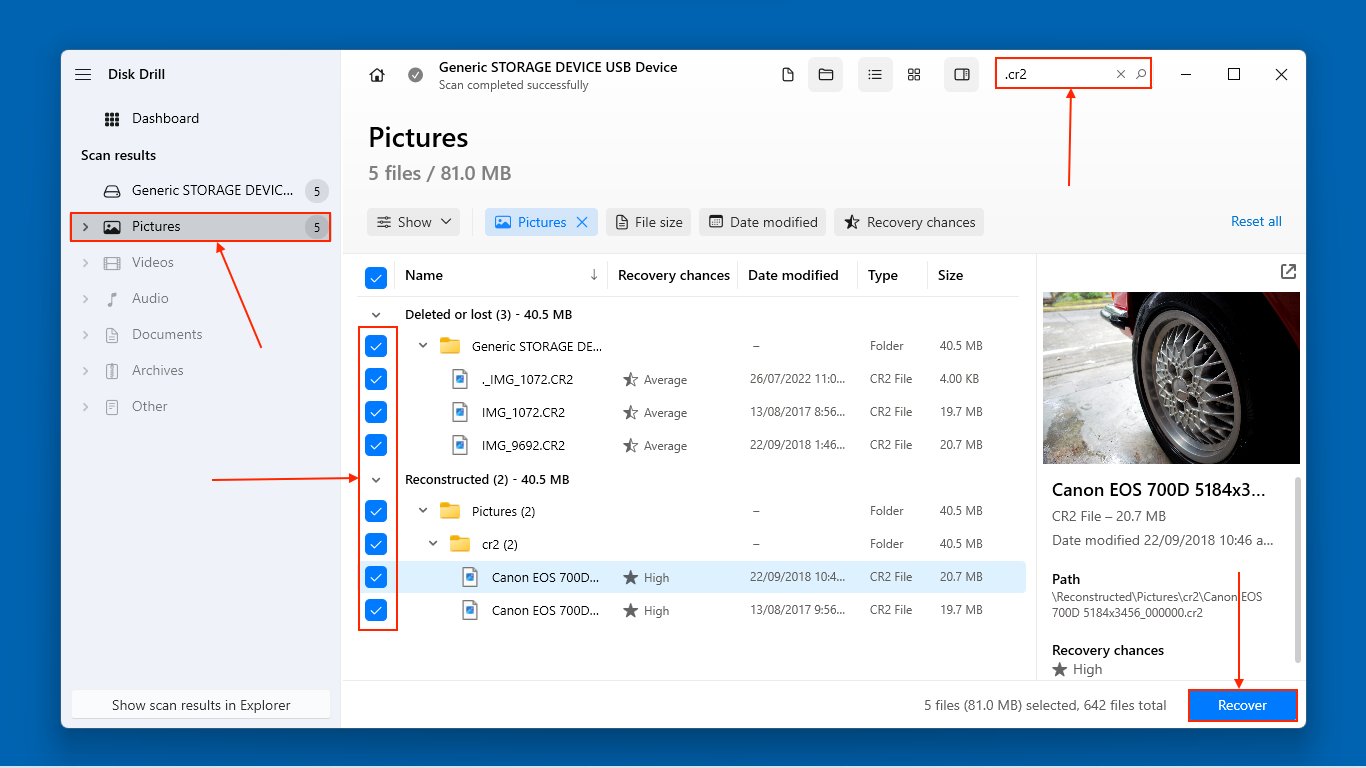
- On the left sidebar, you can click the file type you want to browse exclusively. For example, you can tell Disk Drill to only display photos. You can also type file signatures in the search bar to make the scan results even more specific. Make sure to click on each file once to check if its preview is working. Then, click the empty boxes beside the files you want Disk Drill to recover. Finally, click Recover.
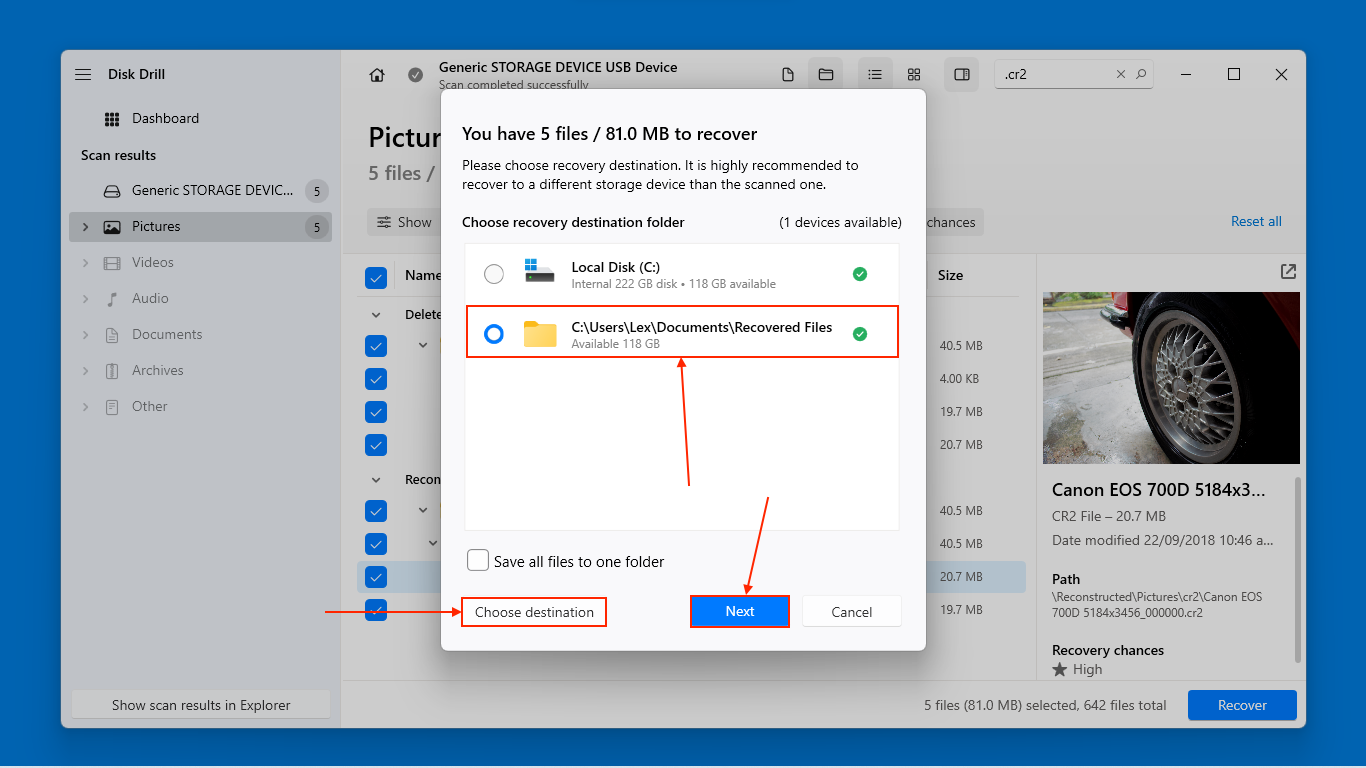
- Select the folder you created in step 1 and click OK to proceed with recovery.


Option B: PhotoRec/QPhotoRec
PhotoRec is a completely free and open-source data recovery software. It has fewer capabilities overall compared to Disk Drill, but it has a very good signature scanner that recognizes most mainstream image file types as well as popular proprietary file extensions.
For beginners, we recommend using QPhotoRec, which is PhotoRec but with a graphical user interface that you can actually click. The original PhotoRec has a keyboard-only interface that resembles Command Prompt. Both versions come packaged with the free download of TestDisk, which is the developer’s partition recovery tool.
We’ll demonstrate how to use QPhotoRec to restore data from your CFast card.
- Download PhotoRec (which comes with TestDisk) from CGSecurity’s website.
- Connect your CFast card to your PC using a CFast card reader and writer. Then, open QPhotoRec.exe (with GUI) or PhotoRec.exe (without GUI).
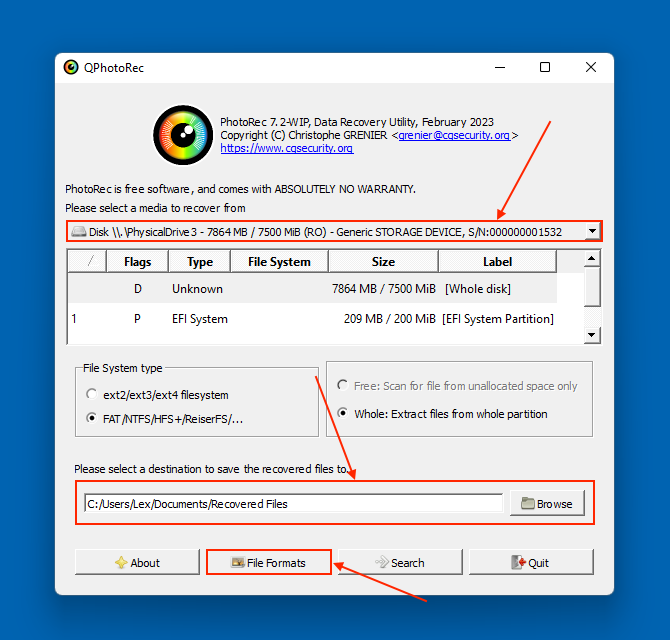
- Using the dropdown menu at the top of the partition list, select your CFast card. Then, click the Browse button to choose a location where you want QPhotoRec to save the restored files. Then, click File Formats.
- Mark the boxes beside the file signatures you want PhotoRec to look for. You can click the Reset button to de-select all file signatures at once (so you can manually enable the file signatures you want to scan for). Then, click OK.


PhotoRec doesn’t really have a file-browsing tool for scan results. It simply recovers whatever it finds during the scan and saves the files to the destination folder you specified. So once PhotoRec is done with the scan, you can directly browse the files in File Explorer.
Method 4: Send Your CFast Card To a Professional Data Recovery Service
Professional data recovery services are businesses that you can pay to restore data from your CFast card. While this is, by far, the most expensive option, professional data recovery services can greatly increase your chances of getting your files back.
Aside from having knowledgeable experts work on your memory card, they also have advanced tools and facilities that can better mitigate risks of further damage or permanent data loss and enable more complex recovery operations.
Never tried using a professional data recovery service before? Here’s what to look for:
- Cleanroom (optional) – If your CFast card is mechanically or physically compromised, you may need a data recovery center that has a Class 100 Cleanroom. It can filter out tiny particles that can scratch your memory card’s internal components.
- No data – no charge guarantee – The best data recovery centers won’t charge you anything (aside from shipping) if they’re unable to restore the data you specifically wanted.
- Free Assessment – Most of the top centers will provide a free consultation over the phone and provide a more comprehensive quote after a free in-lab analysis.
- Free shipping (optional) – Some data recovery services offer free inbound shipping. Return shipping is rarely free, though, so make sure the branch you’re using is reasonably close by.
- 24/7 emergency services (optional) – If you need to restore your CFast card files ASAP (e.g. deliverables for clients or team projects), you can spend a little extra to have a dedicated team working on your device until recovery is complete. Not all data recovery services offer this option.
We strongly encourage you to check the reviews for each data recovery service on platforms like Trustpilot, Google Reviews, Yelp!, etc. Make sure that you specifically look at the reviews for the branch you’re thinking of using.
A few more tips before you go…
If your case of data loss occurred due to corruption, don’t use the same CFast card for new footage – use it for secondary hard backup instead.
We also recommend that you enable automatic backups for a cloud backup service you like, such as Dropbox or Microsoft OneDrive. Then, you can simply plug your CFast card to your PC before going to bed and format it in the morning.