
Reading Time: 12 minutesThe latest version of Disk Drill, version 6, builds on everything users loved about Disk Drill 5 and adds even more. This time, a new, revolutionary method for recovering videos from cameras and drones has been introduced, alongside a radically redesigned byte-to-byte backup feature and many other improvements. In our in-depth review of Disk Drill 6, we’ll thoroughly test its updated data recovery capabilities, explore the new modules in real scenarios, and see how these changes make Disk Drill stand out in the crowded field of recovery tools.
Disk Drill for Windows: An Overview
Before moving on to the main features of Disk Drill for Windows, let’s take a look at the basic characteristics of the tool and how it fares in these parameters:
| Latest Version | v6.1.1162 |
| Price Range | $89 (Pro), $499 (Enterprise) |
| Supported Windows Versions | Windows 10 (x64 only), 11 (x64 & ARM) |
| Number of Supported File Types | About 400 |
| Supported File Systems | FAT16/FAT32/exFAT, NTFS, NTFS5, ReFS, HFS, HFS+, APFS, EXT2/EXT3/EXT4, BTRFS |
With the release of version 6, Disk Drill introduces its brand new Advanced Camera Recovery (ACR) module – the first of its kind for true recovery of fragmented videos from cameras and drones, a feature that no direct competitor currently offers. This major addition complements Disk Drill’s powerful signature scanning engine, which can recognize about 400 file types during deep scans (in version 6, added support for N-RAW and NEV signatures). The software also continues to support a wide range of file systems, including FAT16/FAT32, exFAT, NTFS, HFS/HFS+, APFS (New for Windows!), ReFS (New!), and ext2/ext3/ext4, giving it the ability to recover files regardless of their type from these file systems.
| Parameter | Disk Drill | Recuva | EaseUS Data Recovery Wizard | Recoverit Data Recovery | Stellar Data Recovery |
| Recovery speed | Fast | Average | Fast | Fast | Slow |
| Phone support | No | No | Yes | Yes | Yes |
| Email support | Yes | Yes | Yes | Yes | Yes |
| File signatures quantity | 400 | 50 | 1000 | 1000 | 200 |
| RAW devices scan | Yes | No | Yes | Partial | Partial |
| File preview | Yes | Partial | Partial | Partial | Partial |
| Fragmented video recovery | Yes | No | No | No | No |
| NAS recovery | Yes | No | Partial | Partial | No |
Is Disk Drill Safe?
Yes, Disk Drill is safe. It has been tested and found to be free of viruses and malware, when downloaded from the official website. You even can check it yourself! Download installer and upload it to VirusTotal (Owned by Chronicle – a Security Subsidiary of Google).

It’s important to download Disk Drill directly from the official site to avoid potential risks from third-party downloads.
The software respects user privacy and uses non-destructive recovery methods for data integrity. While Disk Drill collects some anonymous usage data for improvement purposes, users can opt out of this.
Overall, Disk Drill is a trusted choice for data recovery, backed by positive feedback from its user base.
Main Features of Disk Drill
Disk Drill comes with a whole host of features that allow you to recover all your data in a user-friendly way. Some main features of Disk Drill include:
User-Friendly UI
Disk Drill 6 retains the same clean and user-friendly interface introduced in version 5, ensuring that new and experienced users alike feel right at home. Visually, there are no drastic changes, so anyone familiar with the previous version will have no trouble navigating the software. The only notable additions are a couple of new menu options related to the Advanced Camera Recovery (ACR) feature. Thankfully, these extra options have been seamlessly integrated without cluttering the layout or making the UI any harder to use – everything remains simple, clear, and easy to operate.
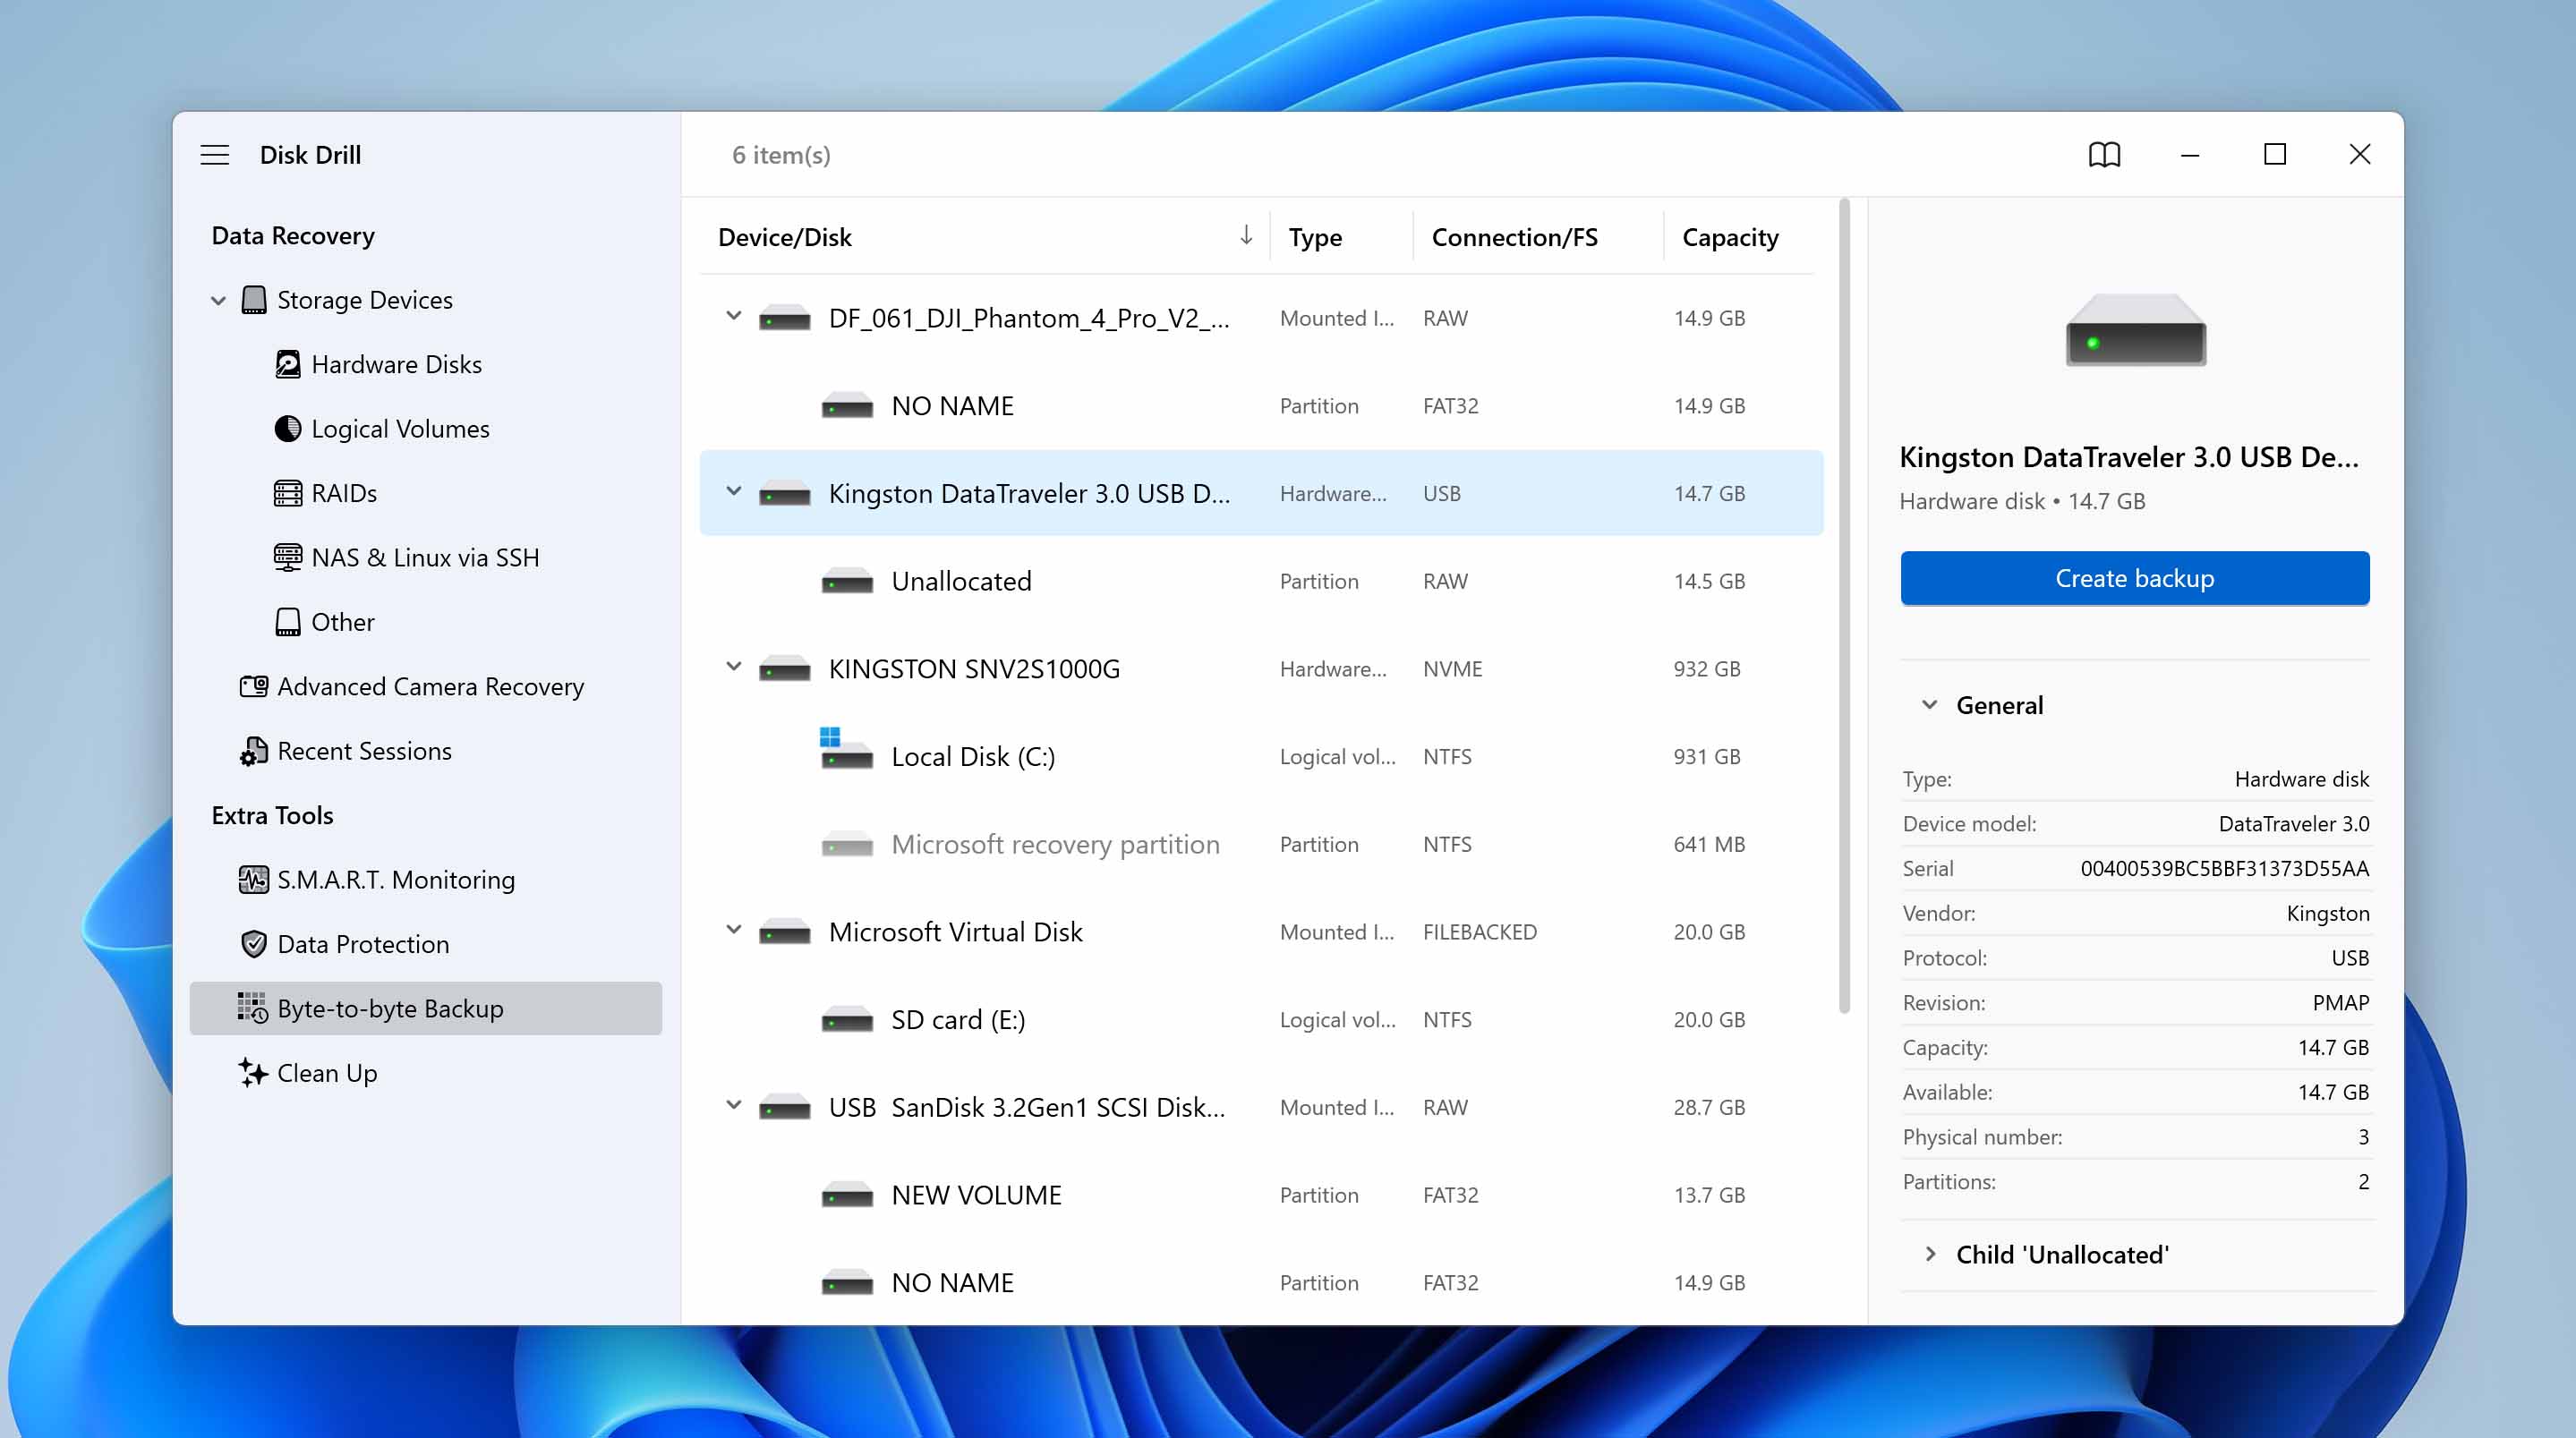
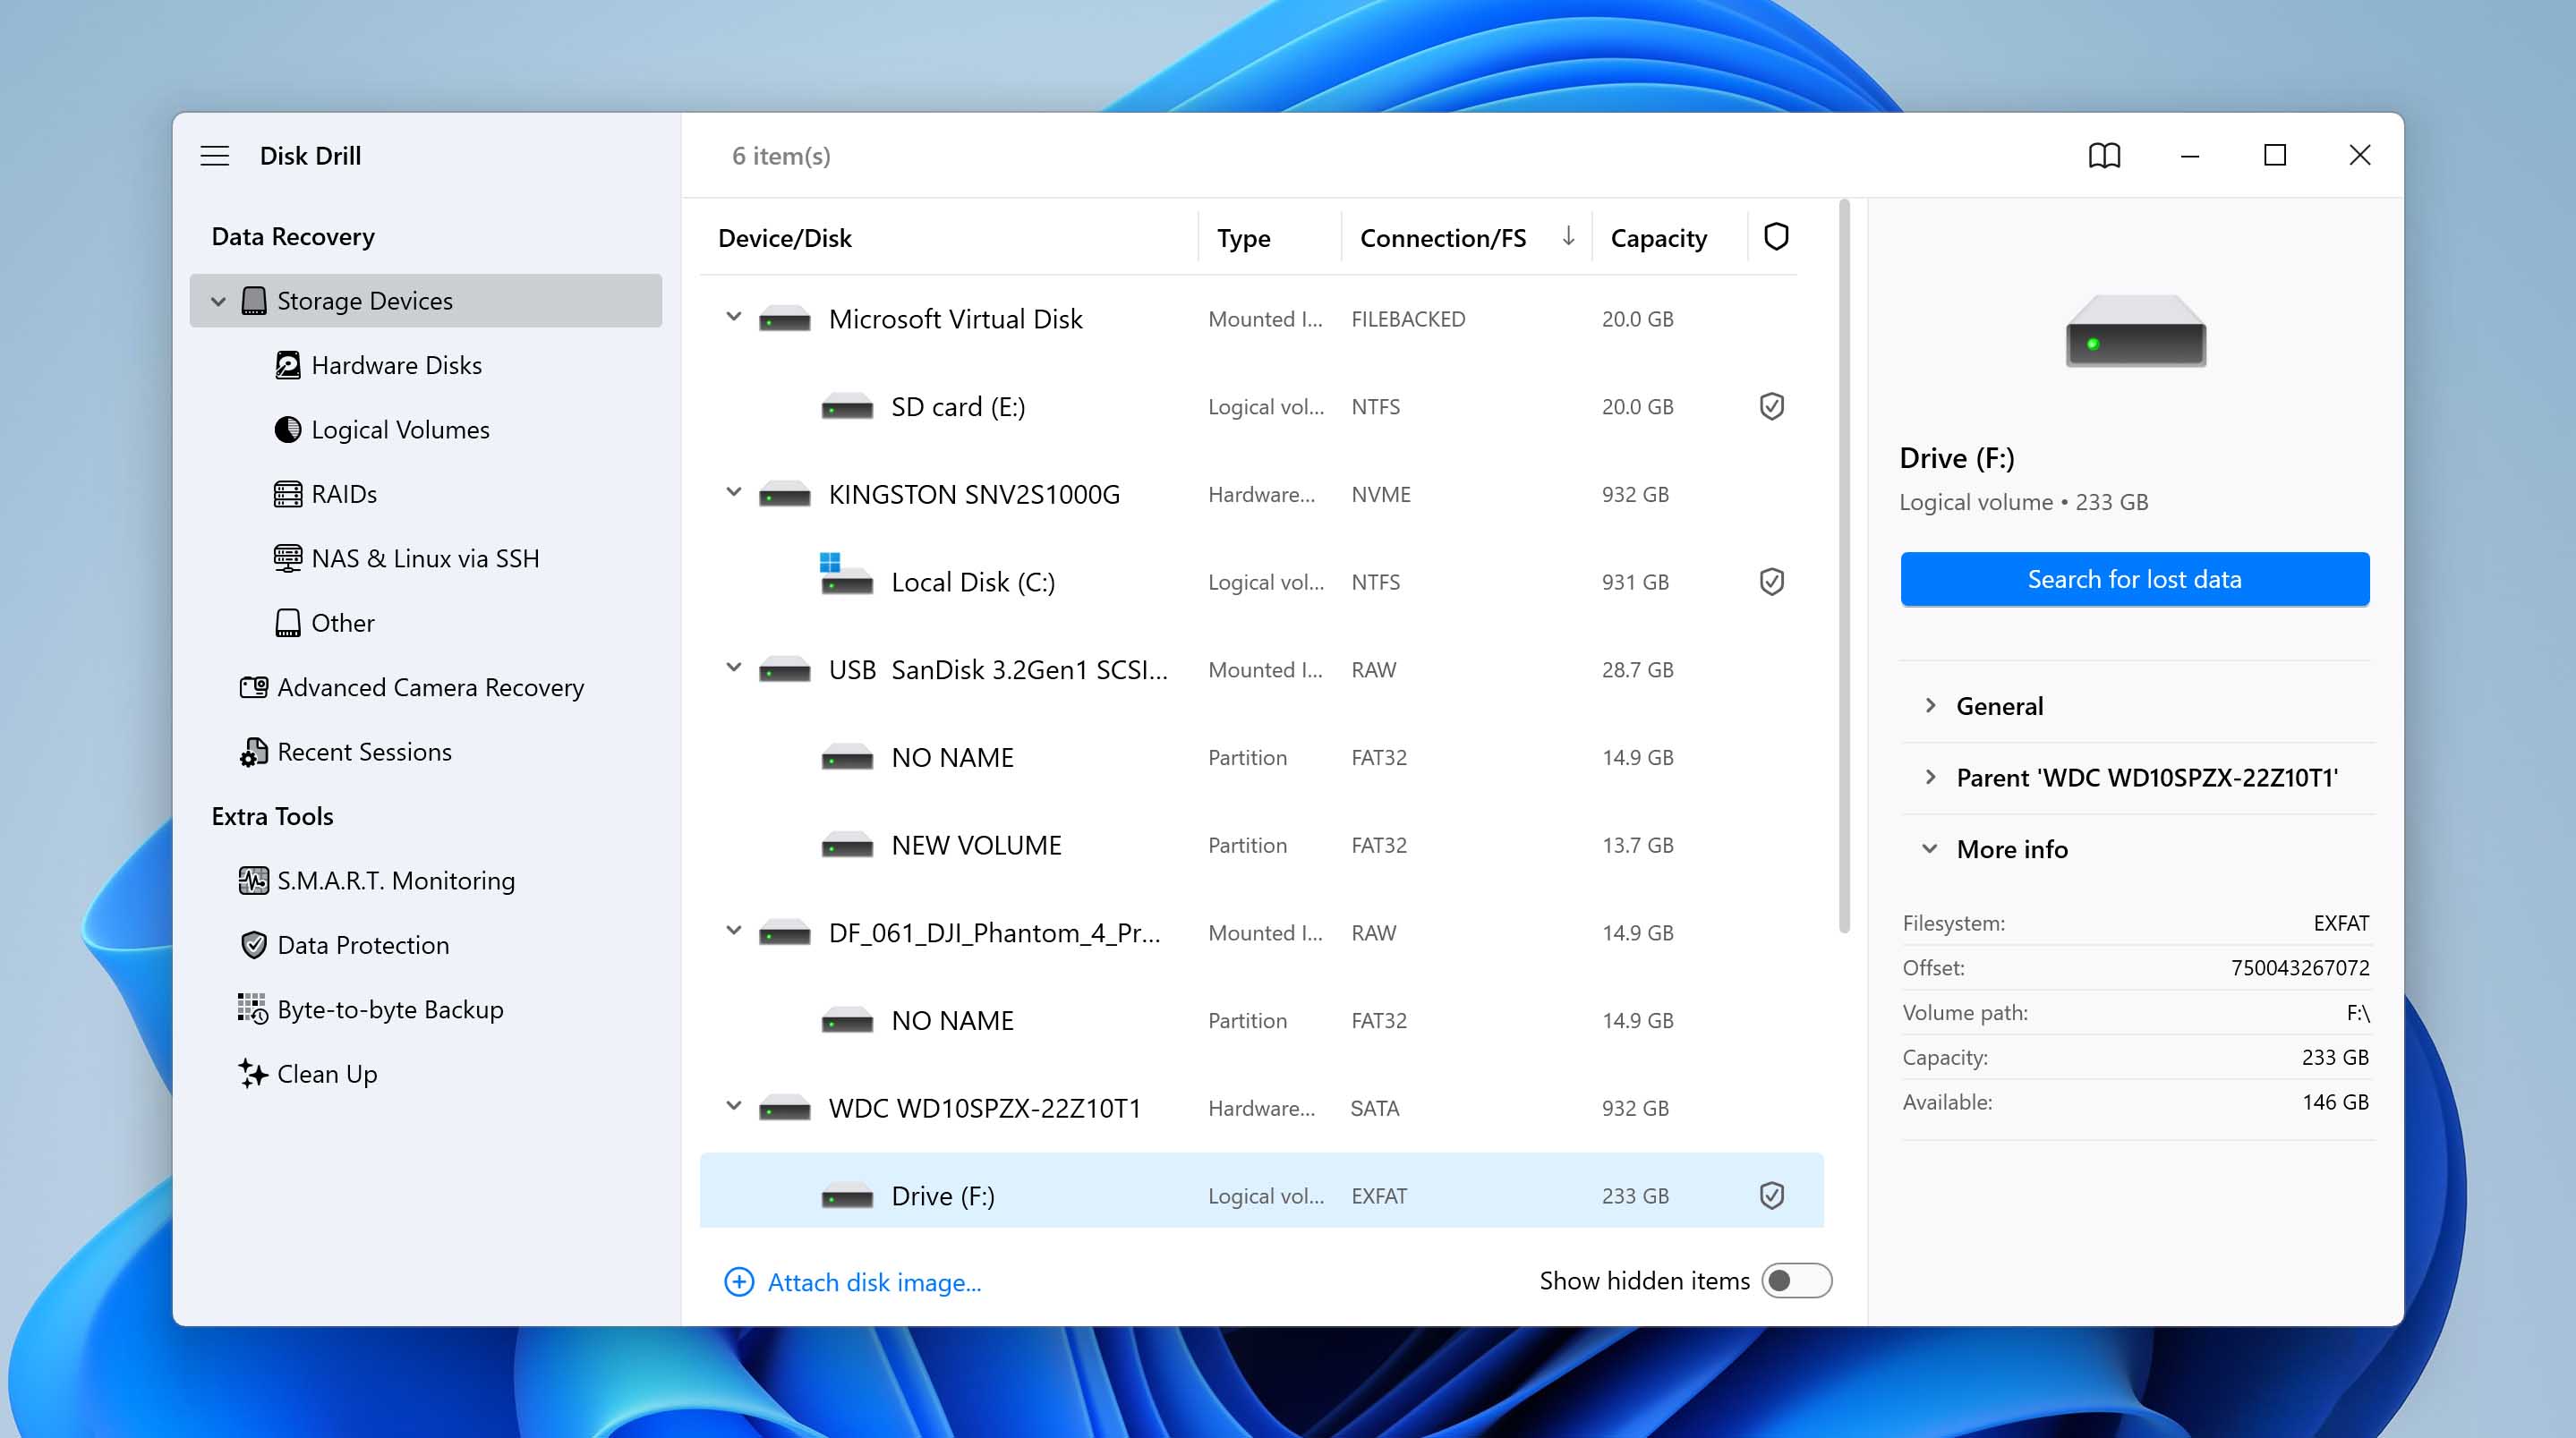
By default, Disk Drill’s UI places you on the Storage devices screen, under Data Recovery. Data recovery scans are as simple as selecting a drive or partition and then clicking Search for lost data. You can see detailed information about the selected partition or drive by checking the information bar on the right, under Search for lost data.
The navigation bar on the left lets you filter what you want to see – Storage Devices (Hardware disks, Logical volumes, RAIDs, NAS & Linux via SSH, and Other), Advanced Camera Recovery, and Recent sessions. Under Extra tools, you get access to features like S.M.A.R.T. monitoring, Data Protection, Byte-to-byte Backup, and Clean Up.

Data Recovery
The primary purpose of Disk Drill is data recovery, and the program still excels at it. With version 6, improvements have been made to the disk search and reading algorithms, which significantly boost scan speed and overall efficiency. Disk Drill can surprise you with the amount of recoverable data it finds in each scan.
Another important aspect of the data recovery process in Disk Drill is the ability to access previous scans in the future. Simply access saved scans using the Recent sessions option under Data Recovery. Furthermore, the scans can be paused and resumed at any time, even on another OS. After the scan is over, you can preview the files and confirm whether they’re completely recoverable.
Disk Drill clearly displays the recovery chances next to each file type. On the file recovery screen, there is an extensive filter feature that allows you to filter files by minimum file size, time frame of the deletion, and recovery chances. You can also opt to view the recoverable files in Windows Explorer.
Byte to Byte Backup
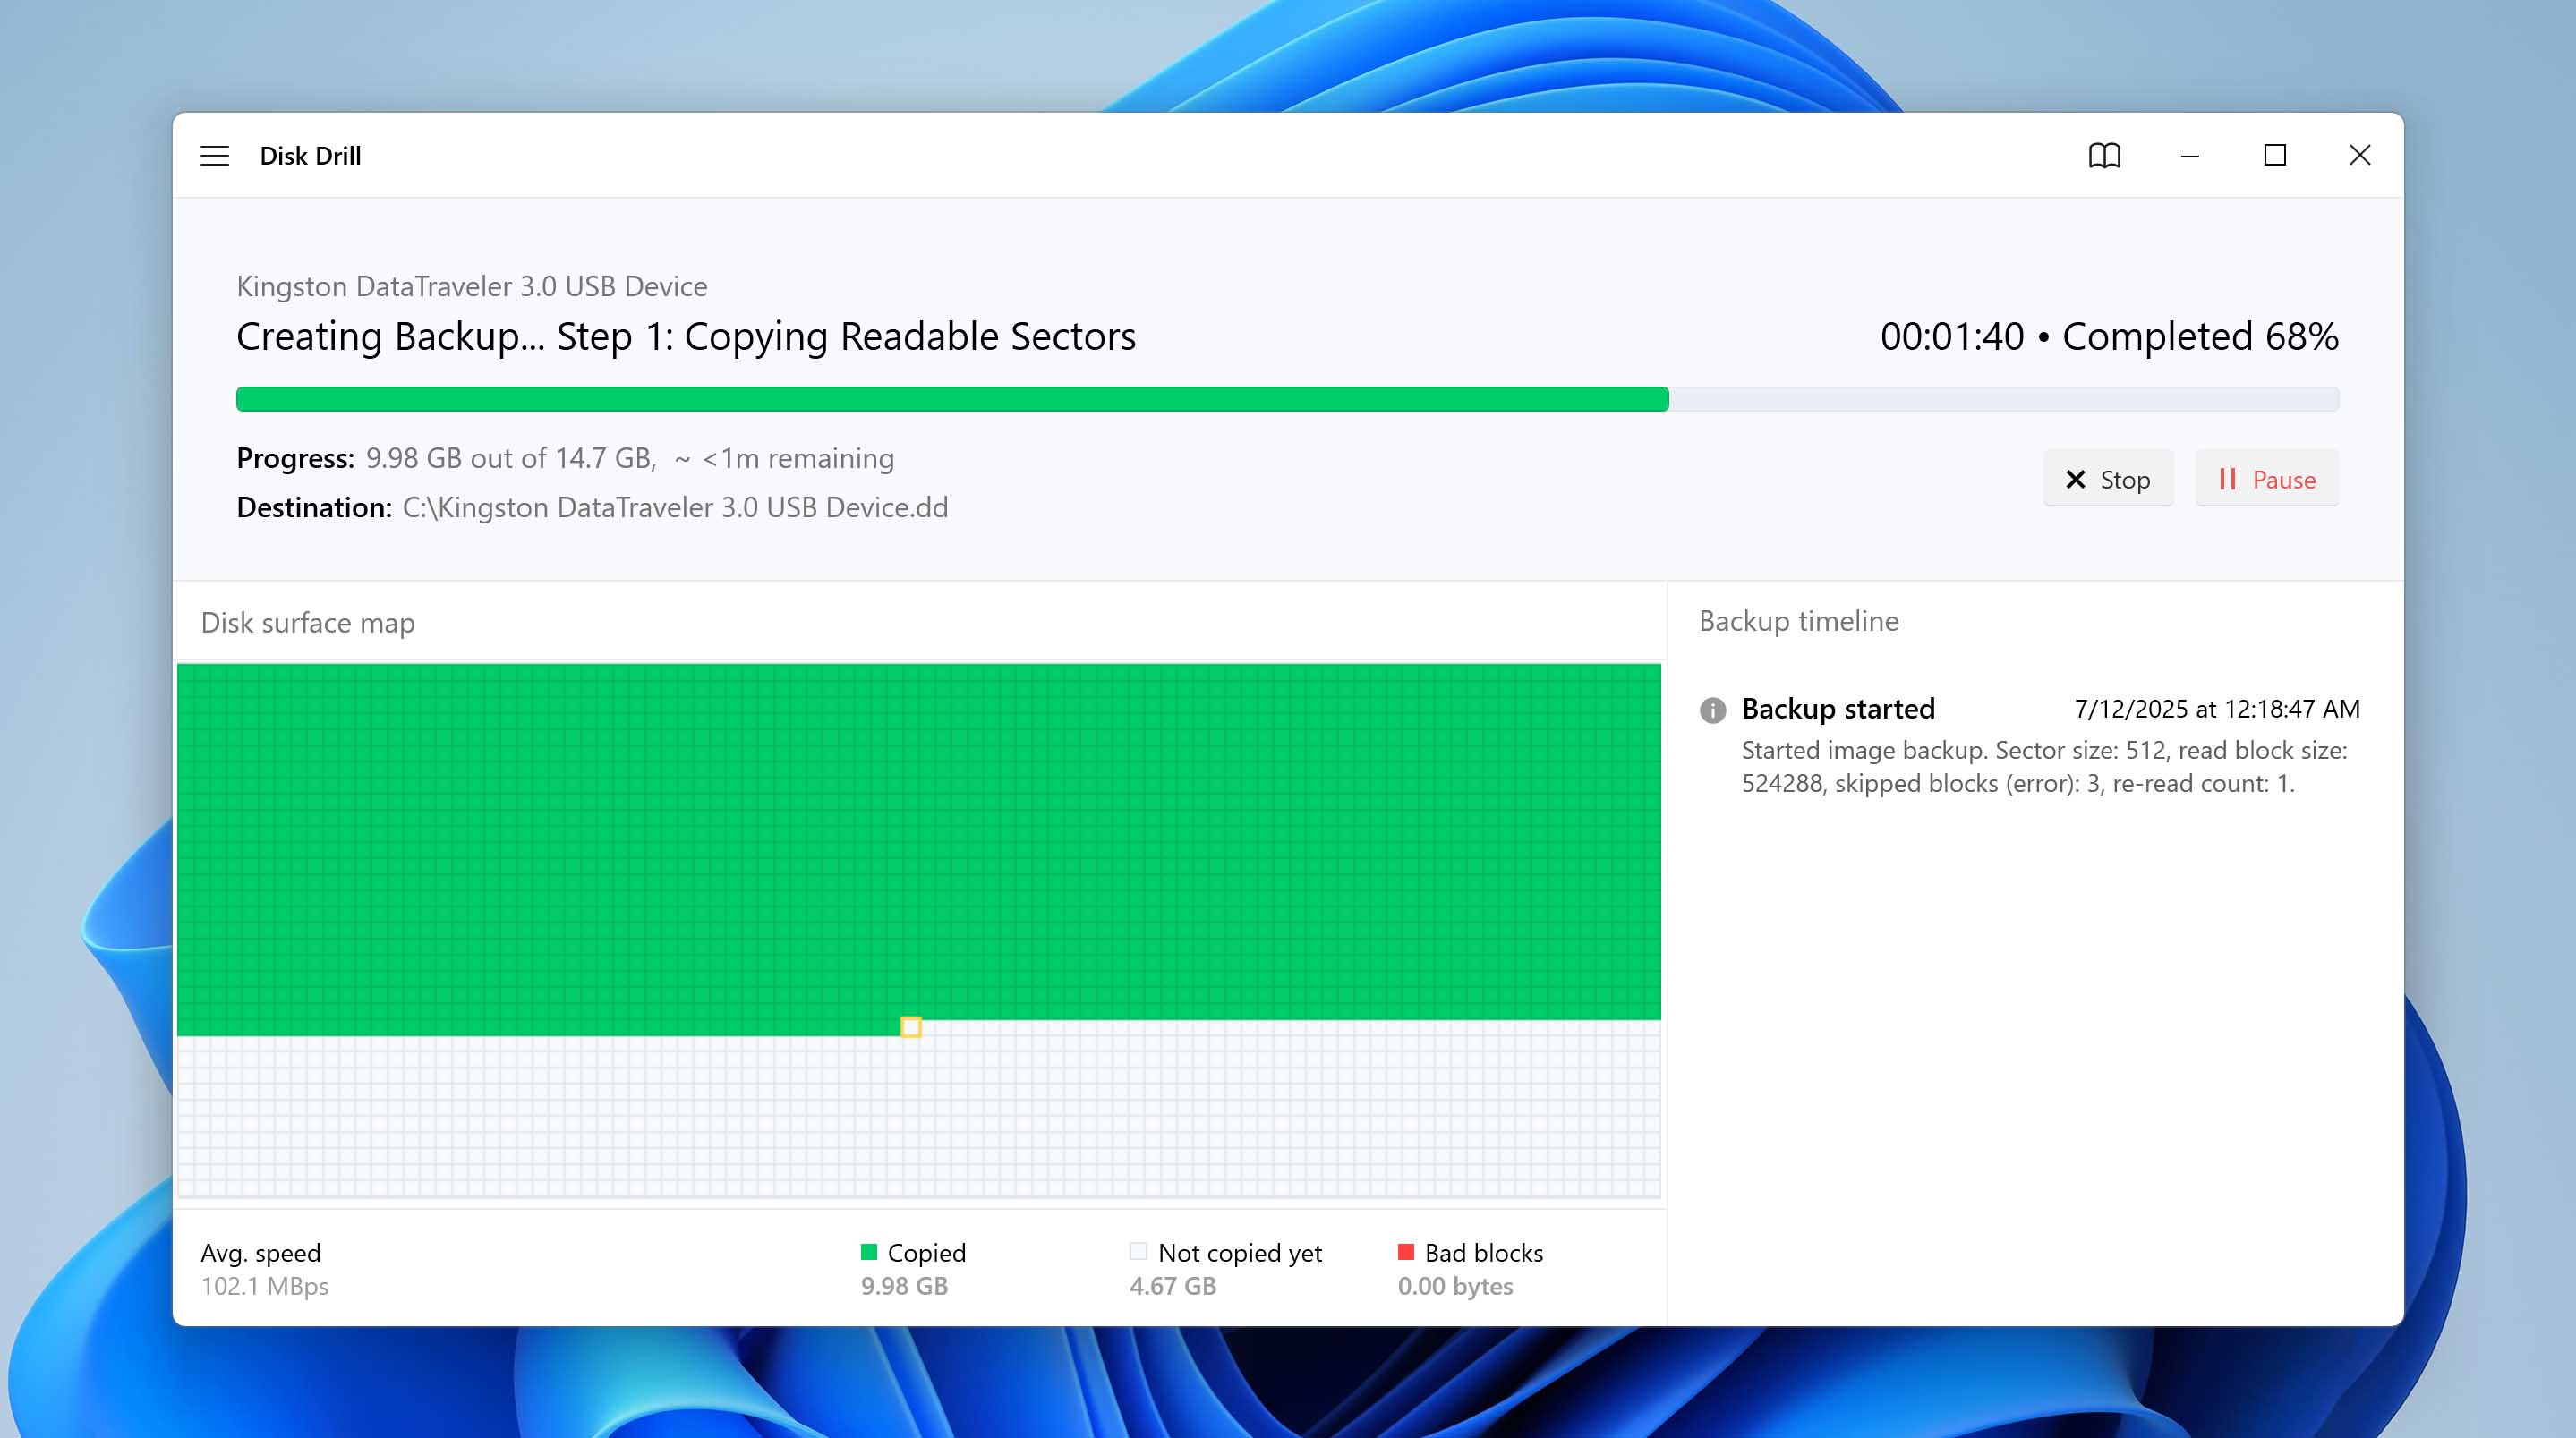
One of our favorite and most useful features of Disk Drill is the byte-to-byte backup tool, which has been significantly improved in version 6. The new Smart Multi-Pass Backup handles damaged sectors more intelligently, creating an initial complete backup by skipping bad blocks and then revisiting them with additional read attempts to maximize data recovery without risking further disk damage. Improved multithreaded reading and writing boost speed and reduce wear on failing drives. Automatic block size adjustment and the ability to skip slow zones with a clear visual disk map make the backup process faster, safer, and more flexible than before. As always, the backup is created in a universal, uncompressed format that works with any professional recovery or forensic tool.
Here’s how you can use the byte-to-byte backup feature:
- Open Disk Drill.
- Click on the Byte-to-byte Backup option under Extra Tools.
- Select the storage device you want to create a disk image of. You can select individual partitions as well.
- Click on the Byte-to-byte backup button again.
- Now, choose a directory to save the disk image. You can modify various parameters like the file name and backup file format.
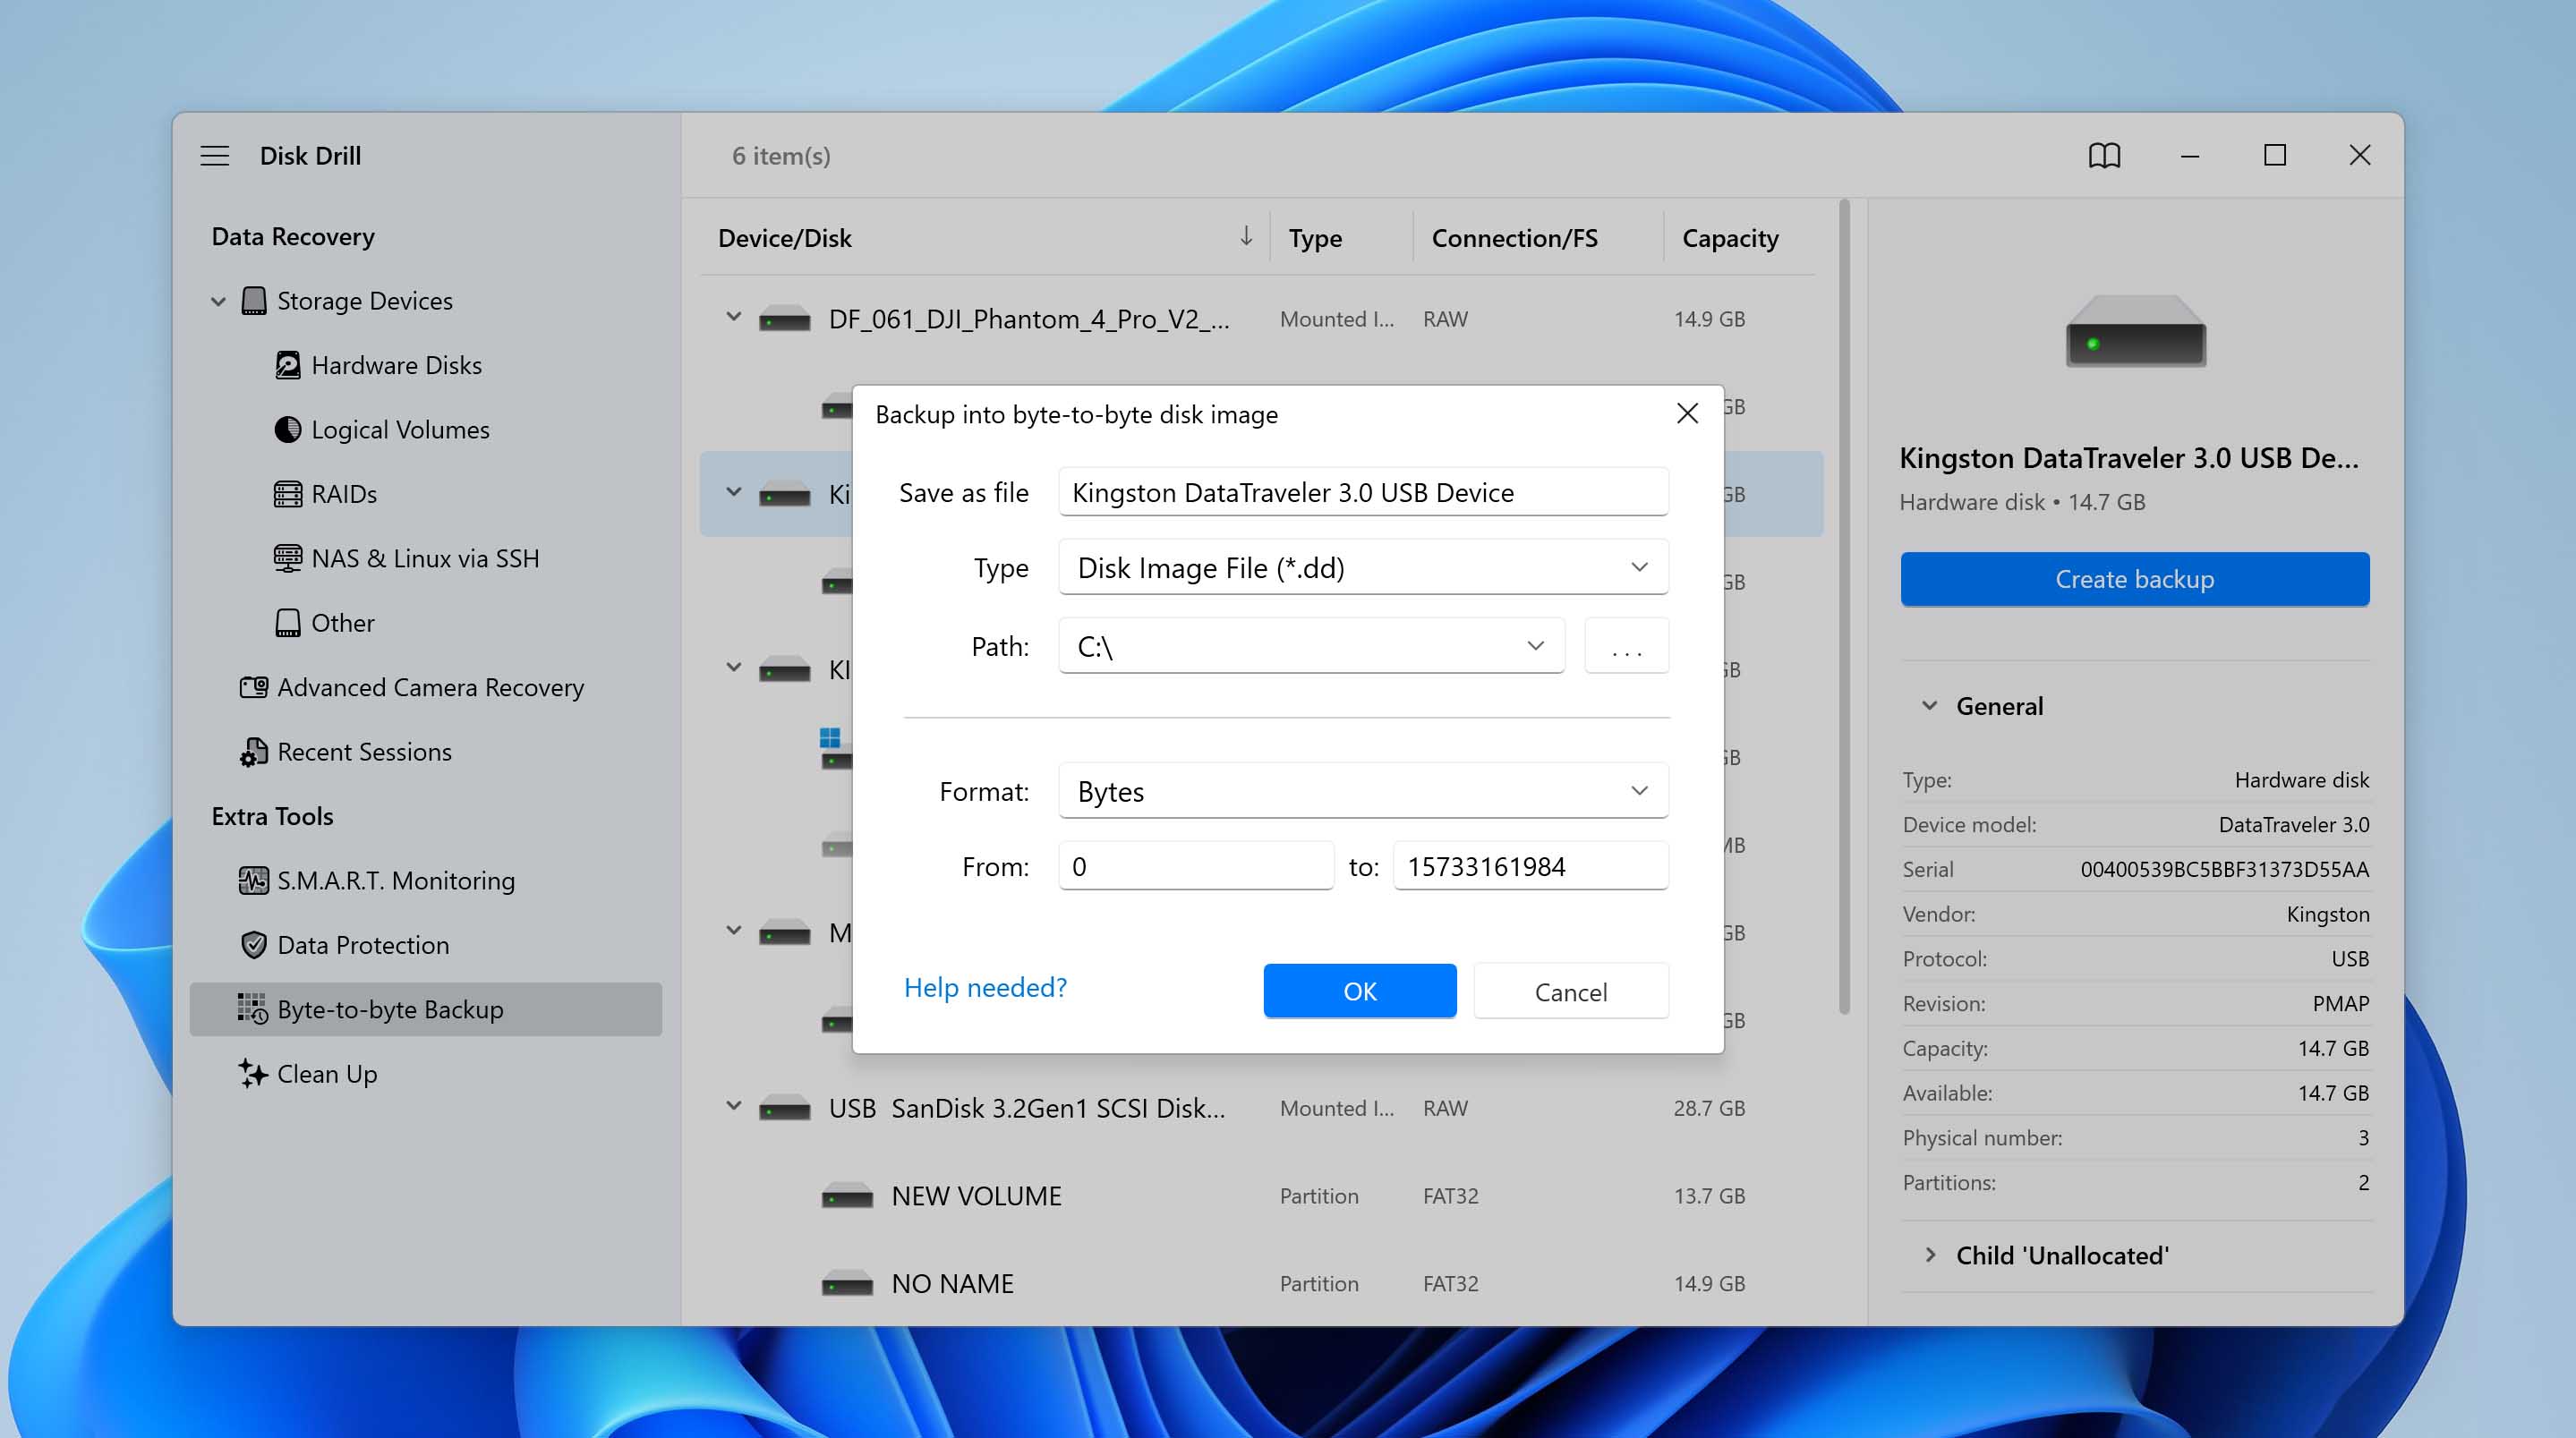
- Click OK.
- Disk Drill will begin creating the image. It may take some time, depending on how large the image is.


To scan the created disk image for recoverable data, simply go to Data Recovery> Attach disk image. Locate the disk image, and it will be added as a virtual disk in the data recovery screen.
Disk Drill Cost and License Tiers
While Disk Drill is free to download and install, if you want to recover more than 500 MB of data, you will have to purchase a Pro license.
Here is a breakdown of the pricing plans for Disk Drill:
| Disk Drill Basic | Disk Drill Pro | Disk Drill Enterprise |
| Price: Free | Price: $89 (+$29 for Lifetime Upgrades.) | Price: $499 (+$99 for Lifetime Upgrades.) |
| Recovery up to 500 MB | Unlimited Data Recovery | Unlimited Data Recovery |
| 1 user | 1 user with up to 3 simultaneous activations. | 10 users with unlimited activations. |
Out of all these plans, Disk Drill Pro is the most value for money. If you need to recover a small amount of data, then you don’t need to purchase a license at all, since the free version offers data recovery of up to 500 MB.
Testing Disk Drill for Windows 11
We’re going to test the updated Disk Drill version 6 on Windows 11 by following a simple approach that you can also use as a guide for data recovery. Our test covers the new features and improvements in real-world scenarios to see how well they perform.
Here are two of our test scenarios: recovering data from an SD card from a DJI drone and an internal HDD. Both devices were low-formatted before recording the data for the test.
We’ll start from the installation app and go through all steps – selecting the device, initiating a scan, reviewing and previewing recoverable files, and then proceeding to recover and save them.
Before proceeding with the installation, keep in mind the system requirements for Disk Drill: a system running Windows 10 or 11 (x64 is required) to use the updated version of Disk Drill 6, while previous versions of the application support Windows XP and higher.
Here is the installation process:
- Open your browser and download Disk Drill for Windows.
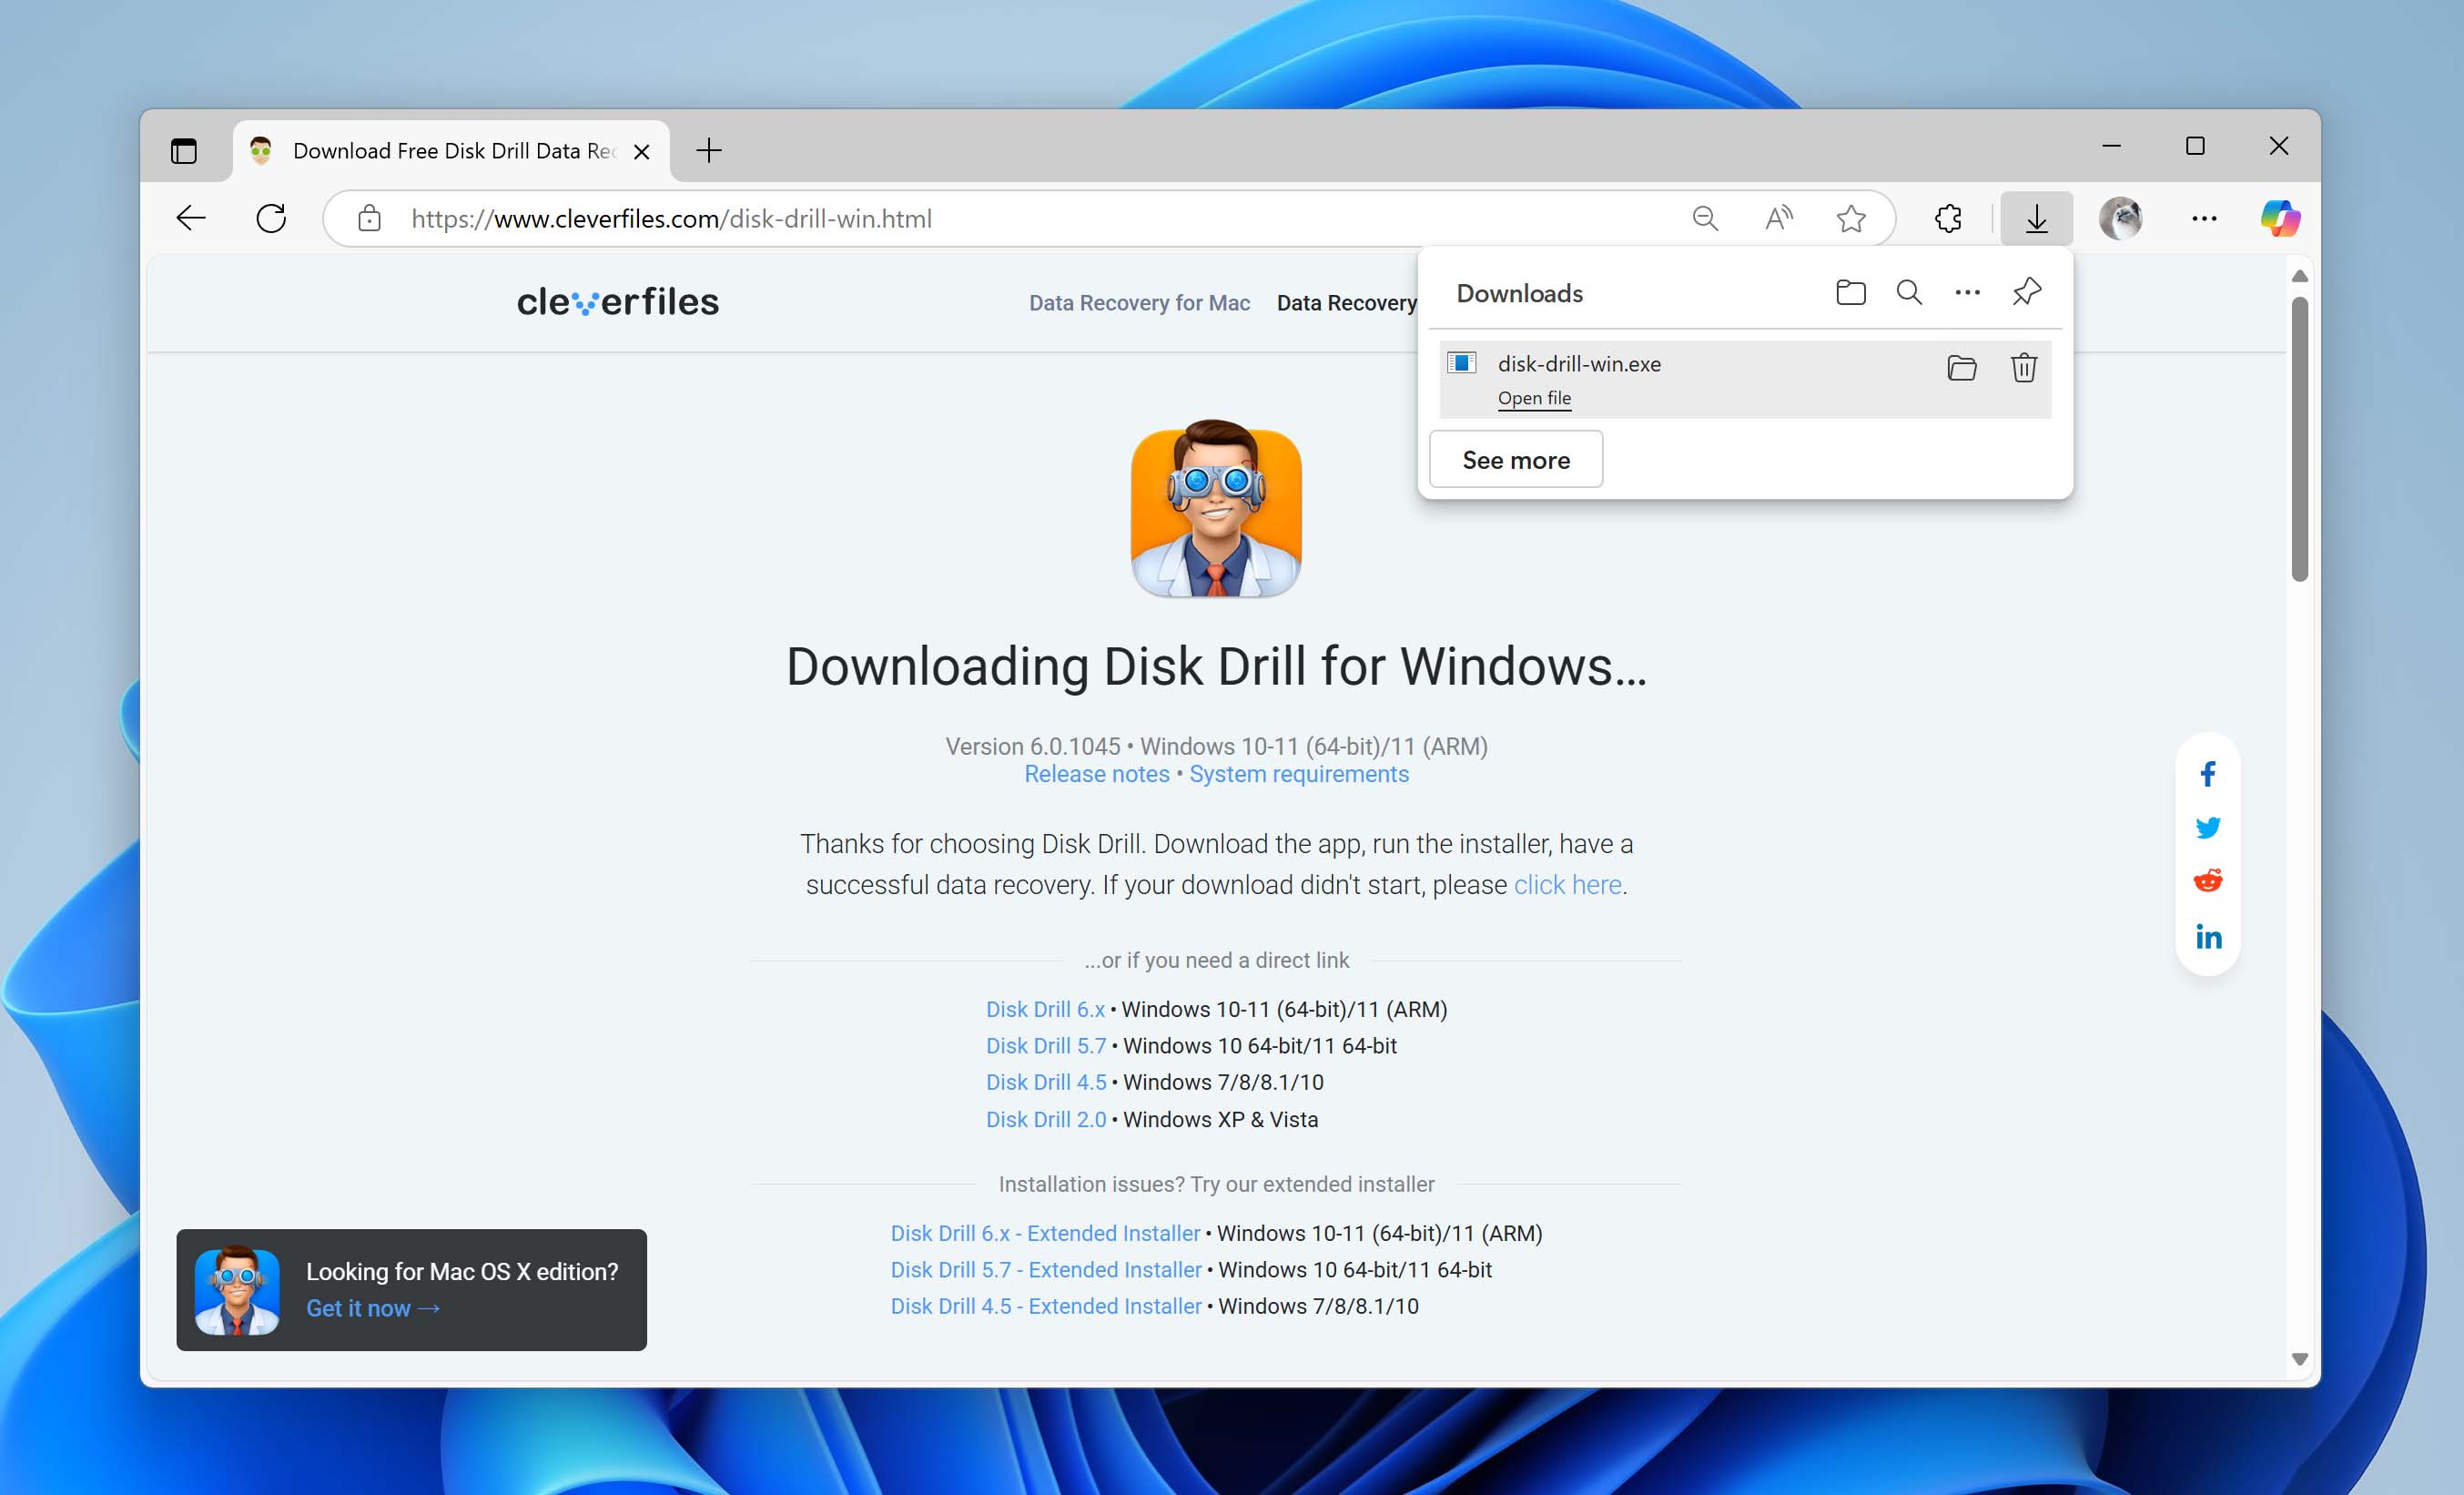
- Run the downloaded setup file.
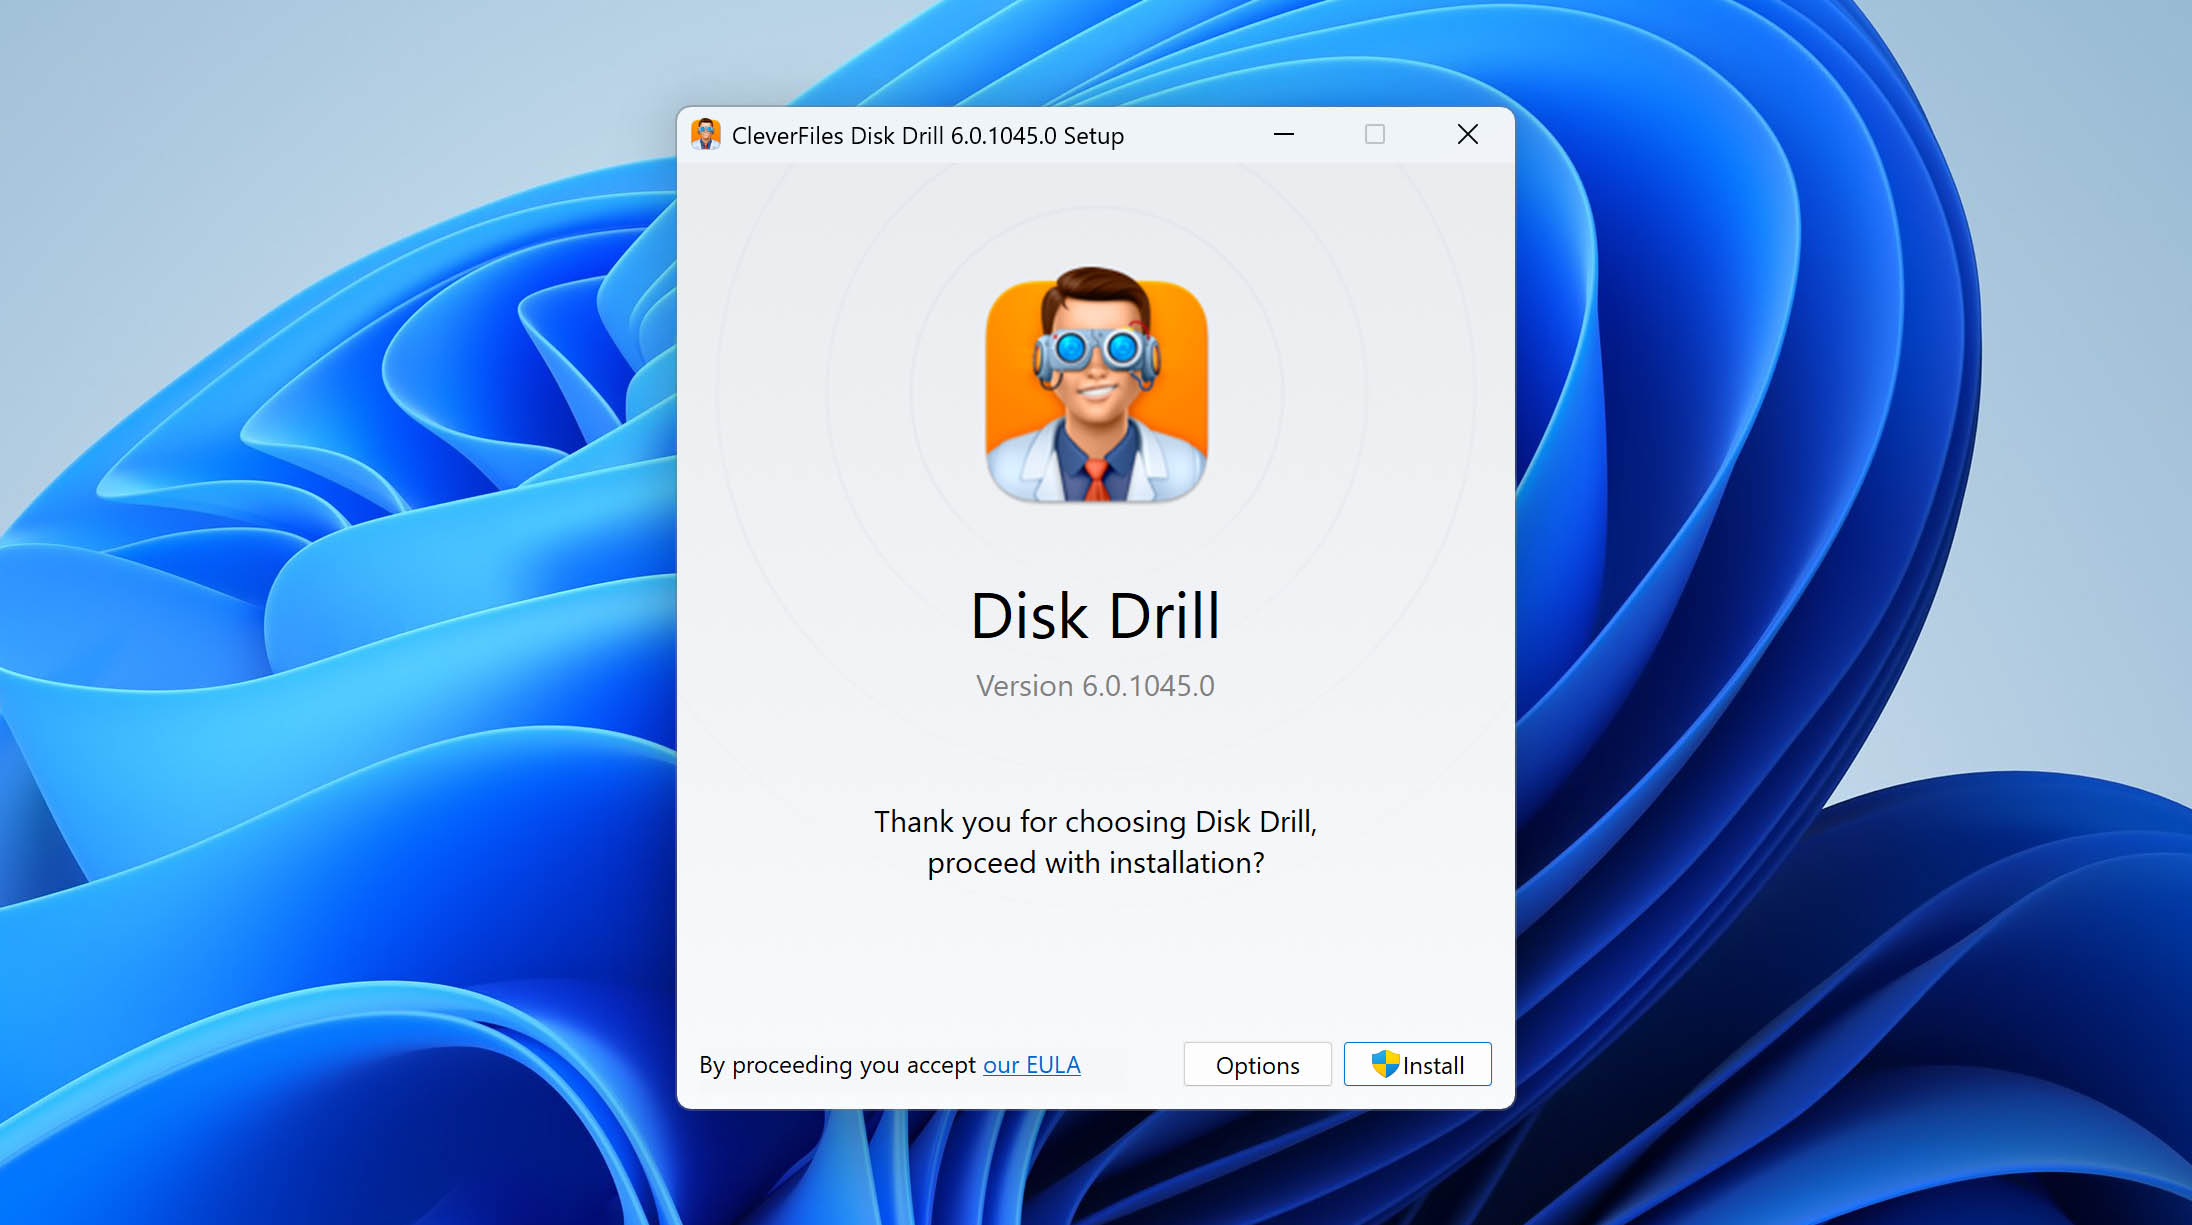
- Setup wizard will guide you through the rest.


Scenario 1: SD Card with Footage from the Drone
- Open Disk Drill and go to the Advanced Camera Recovery tab.
- In the list of devices, select the SD card or its backup from the drone or camera (in our case, it’s a formatted card device backup with recordings from a DJI drone).
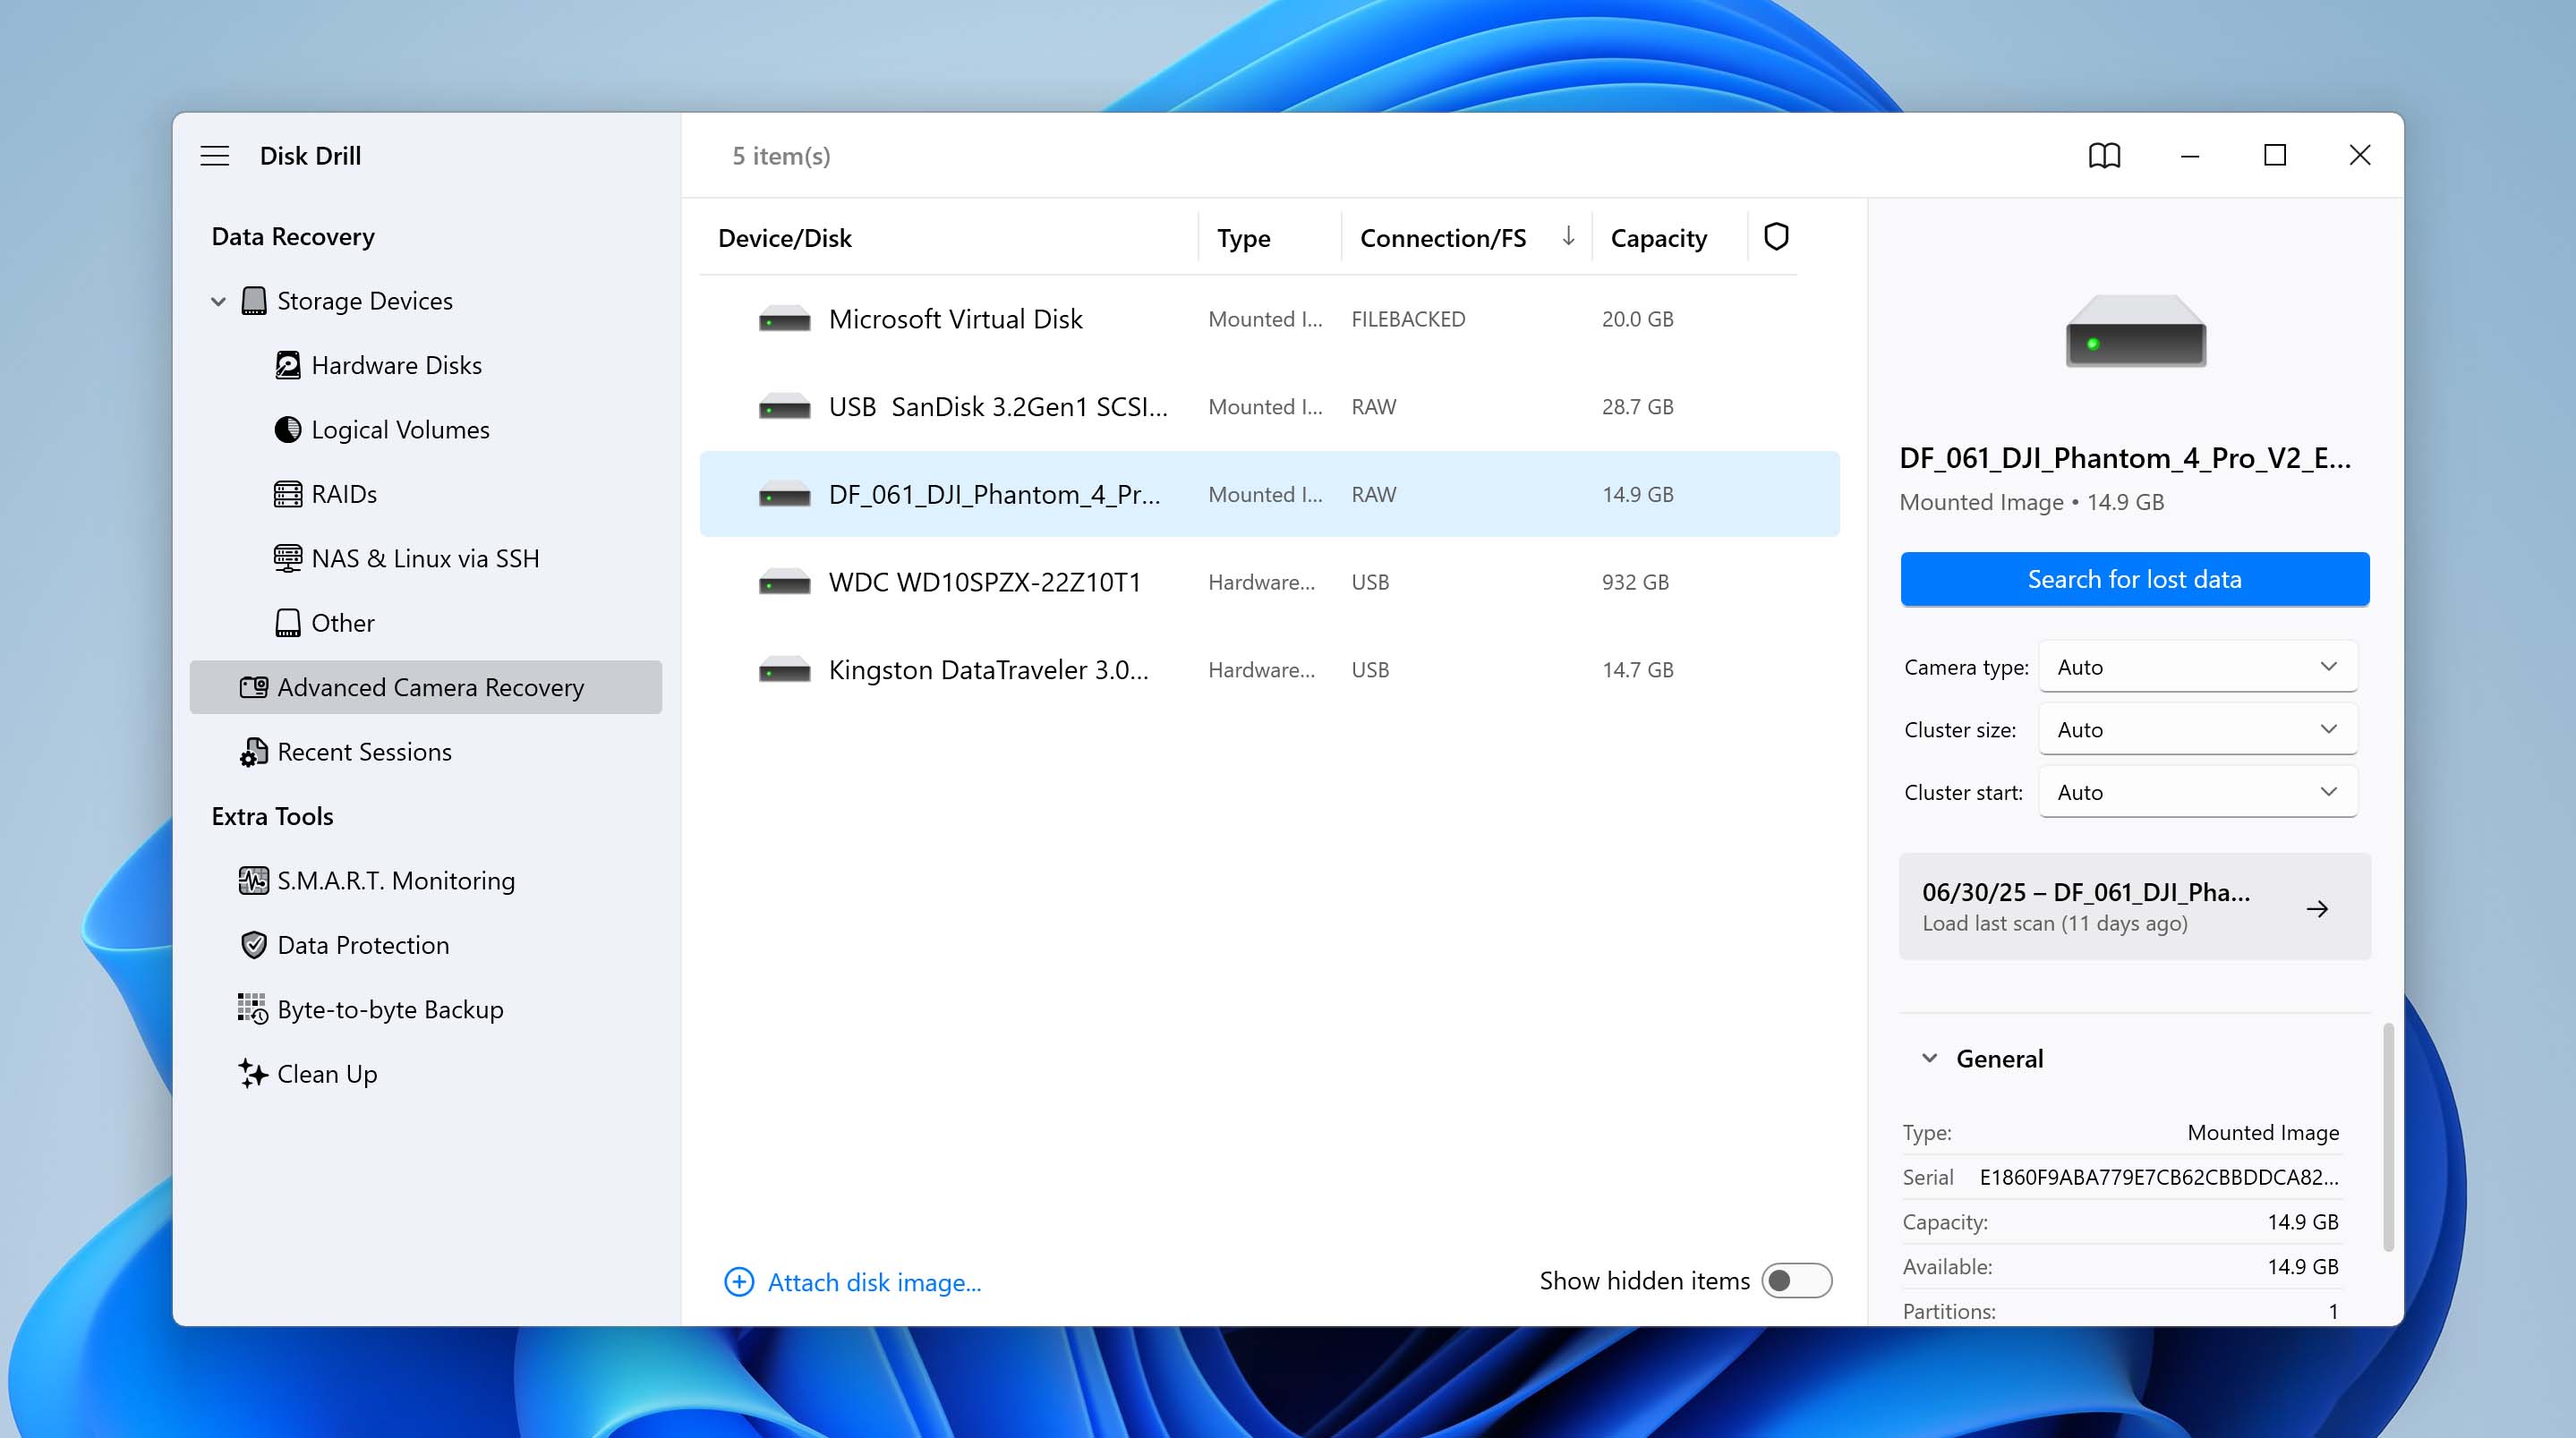
- You can select the camera type or cluster size manually, but we don’t recommend changing these – Disk Drill’s automatic algorithms handle this better, and incorrect settings could prevent correct file identification and force you to rescan.
- Click Search for lost data and wait for the scan to finish (for us, it took 2 minutes), then click the Review found items button.
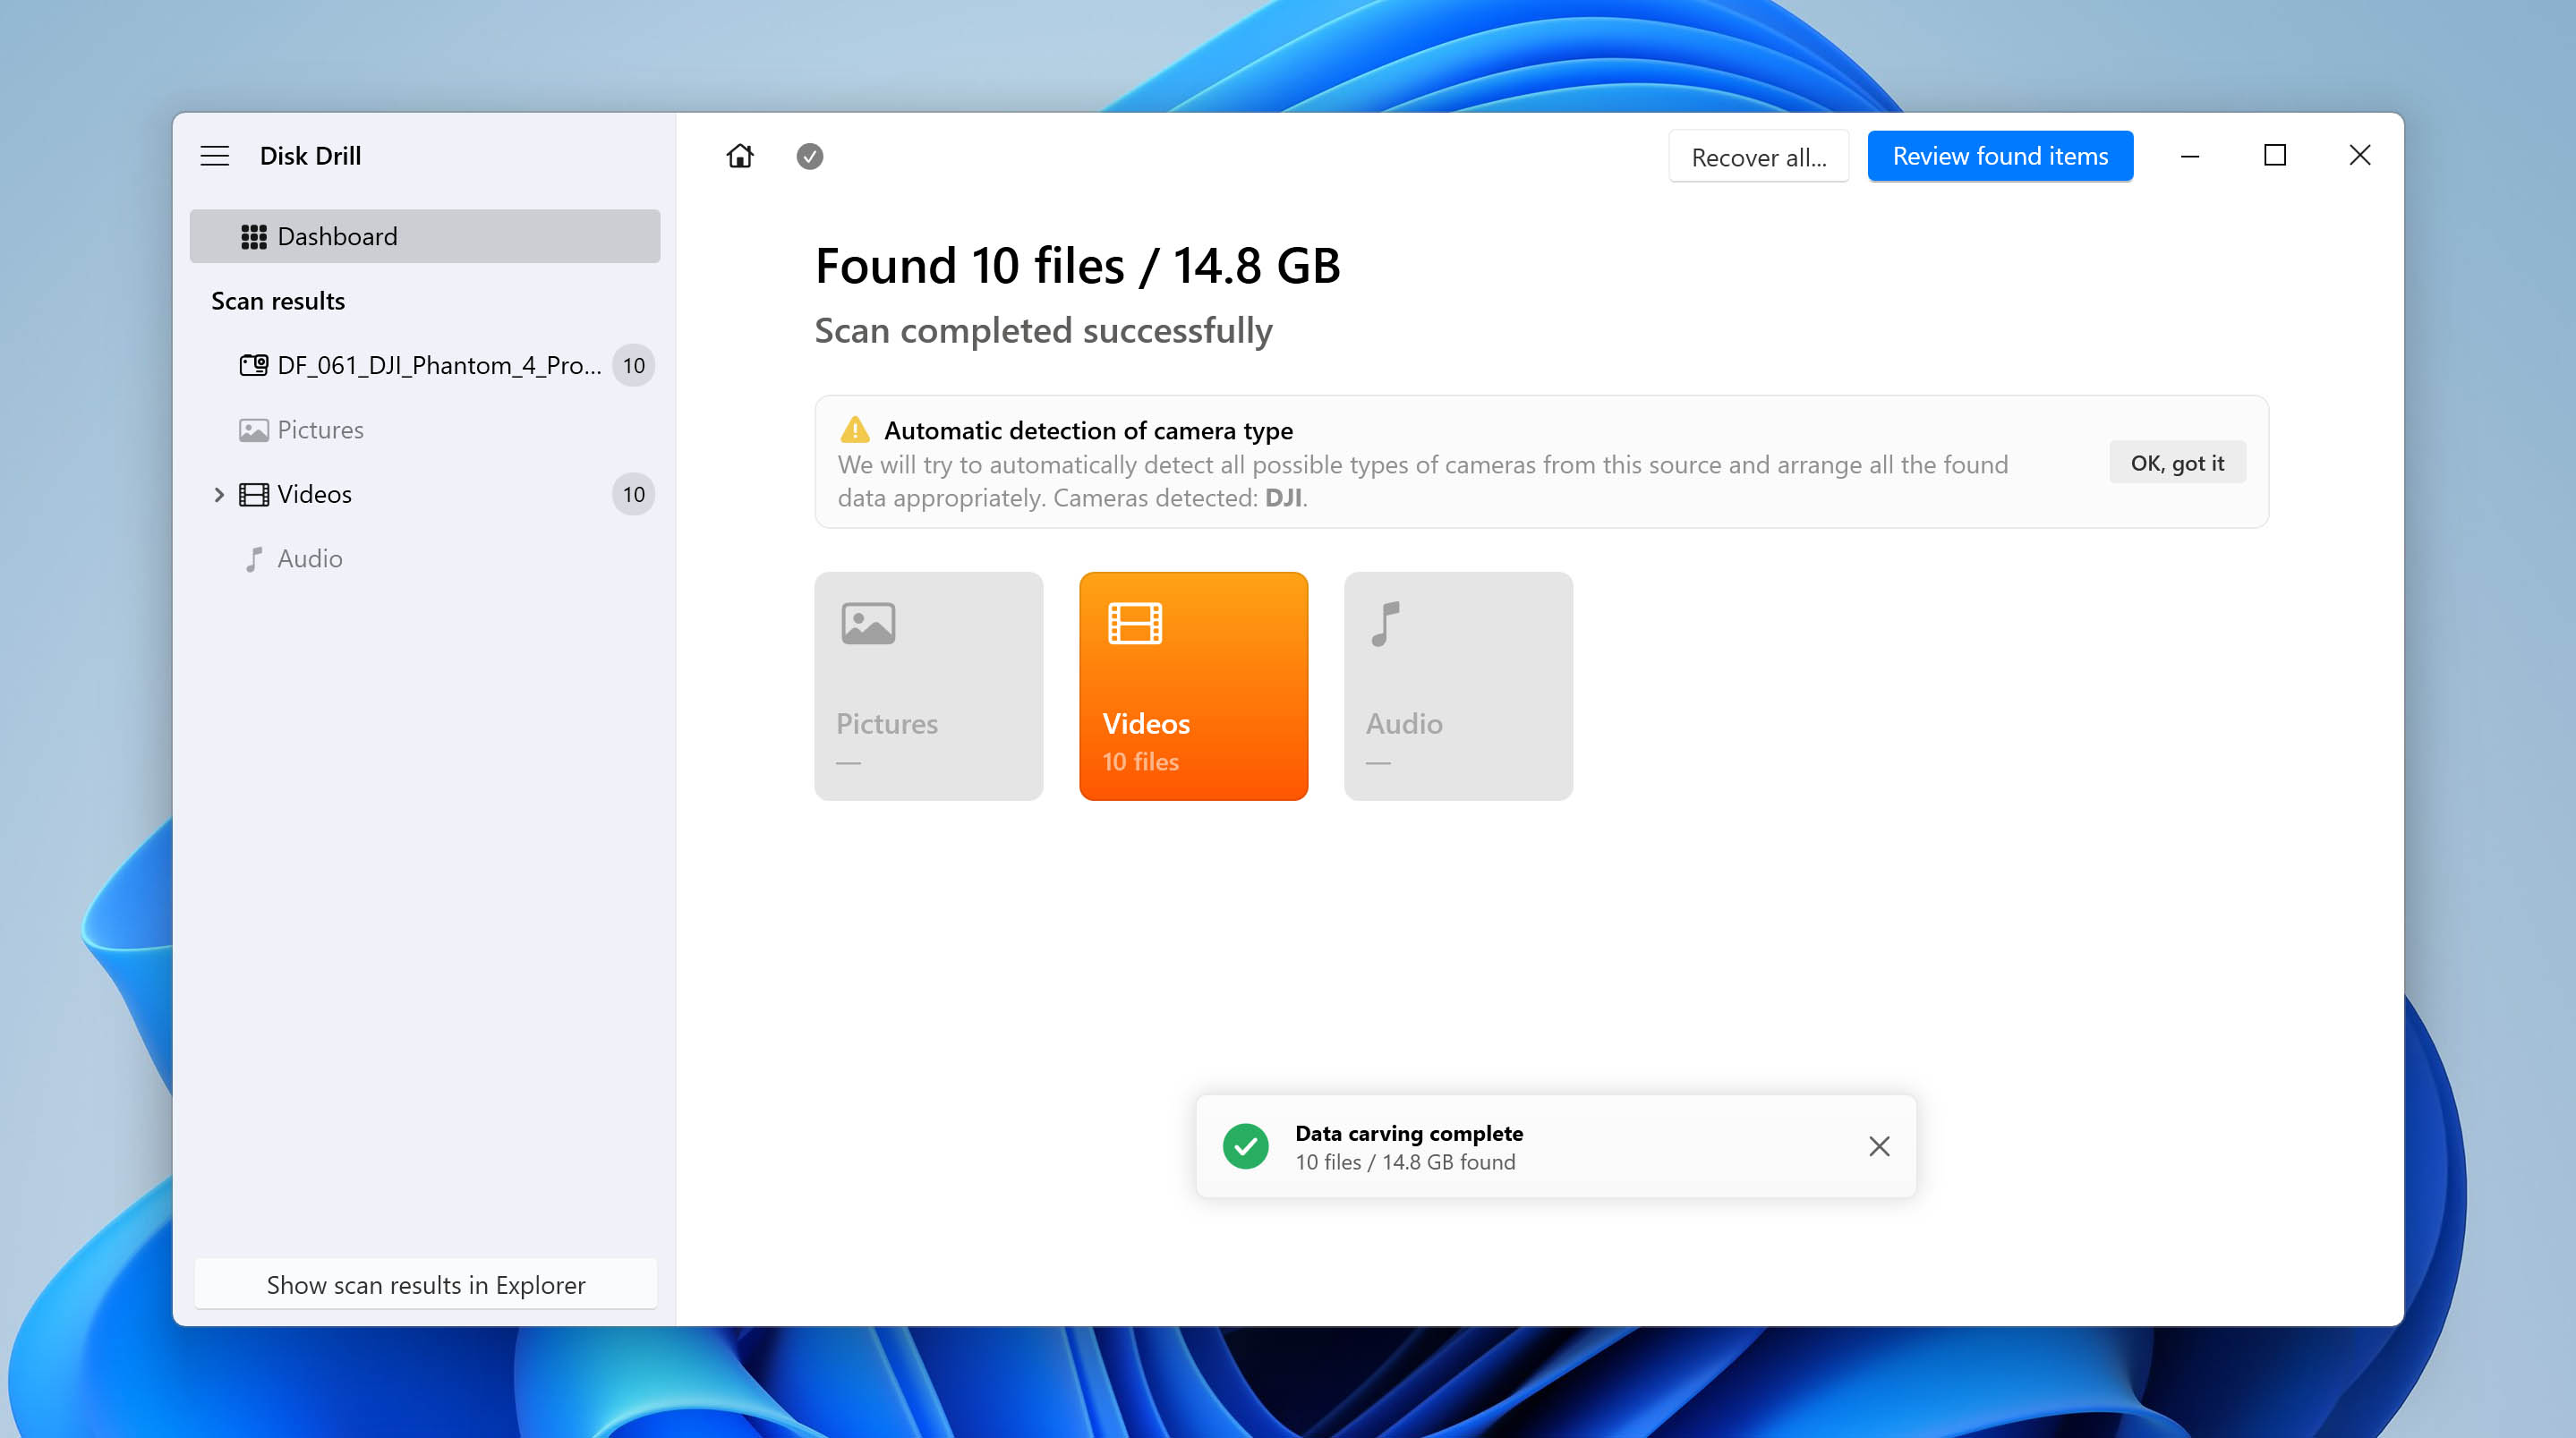
- View the results – they’ll be organized by camera types and cluster sizes. For convenience, you can browse the folders or switch to display only files without the folder structure to see just the recovered footage.
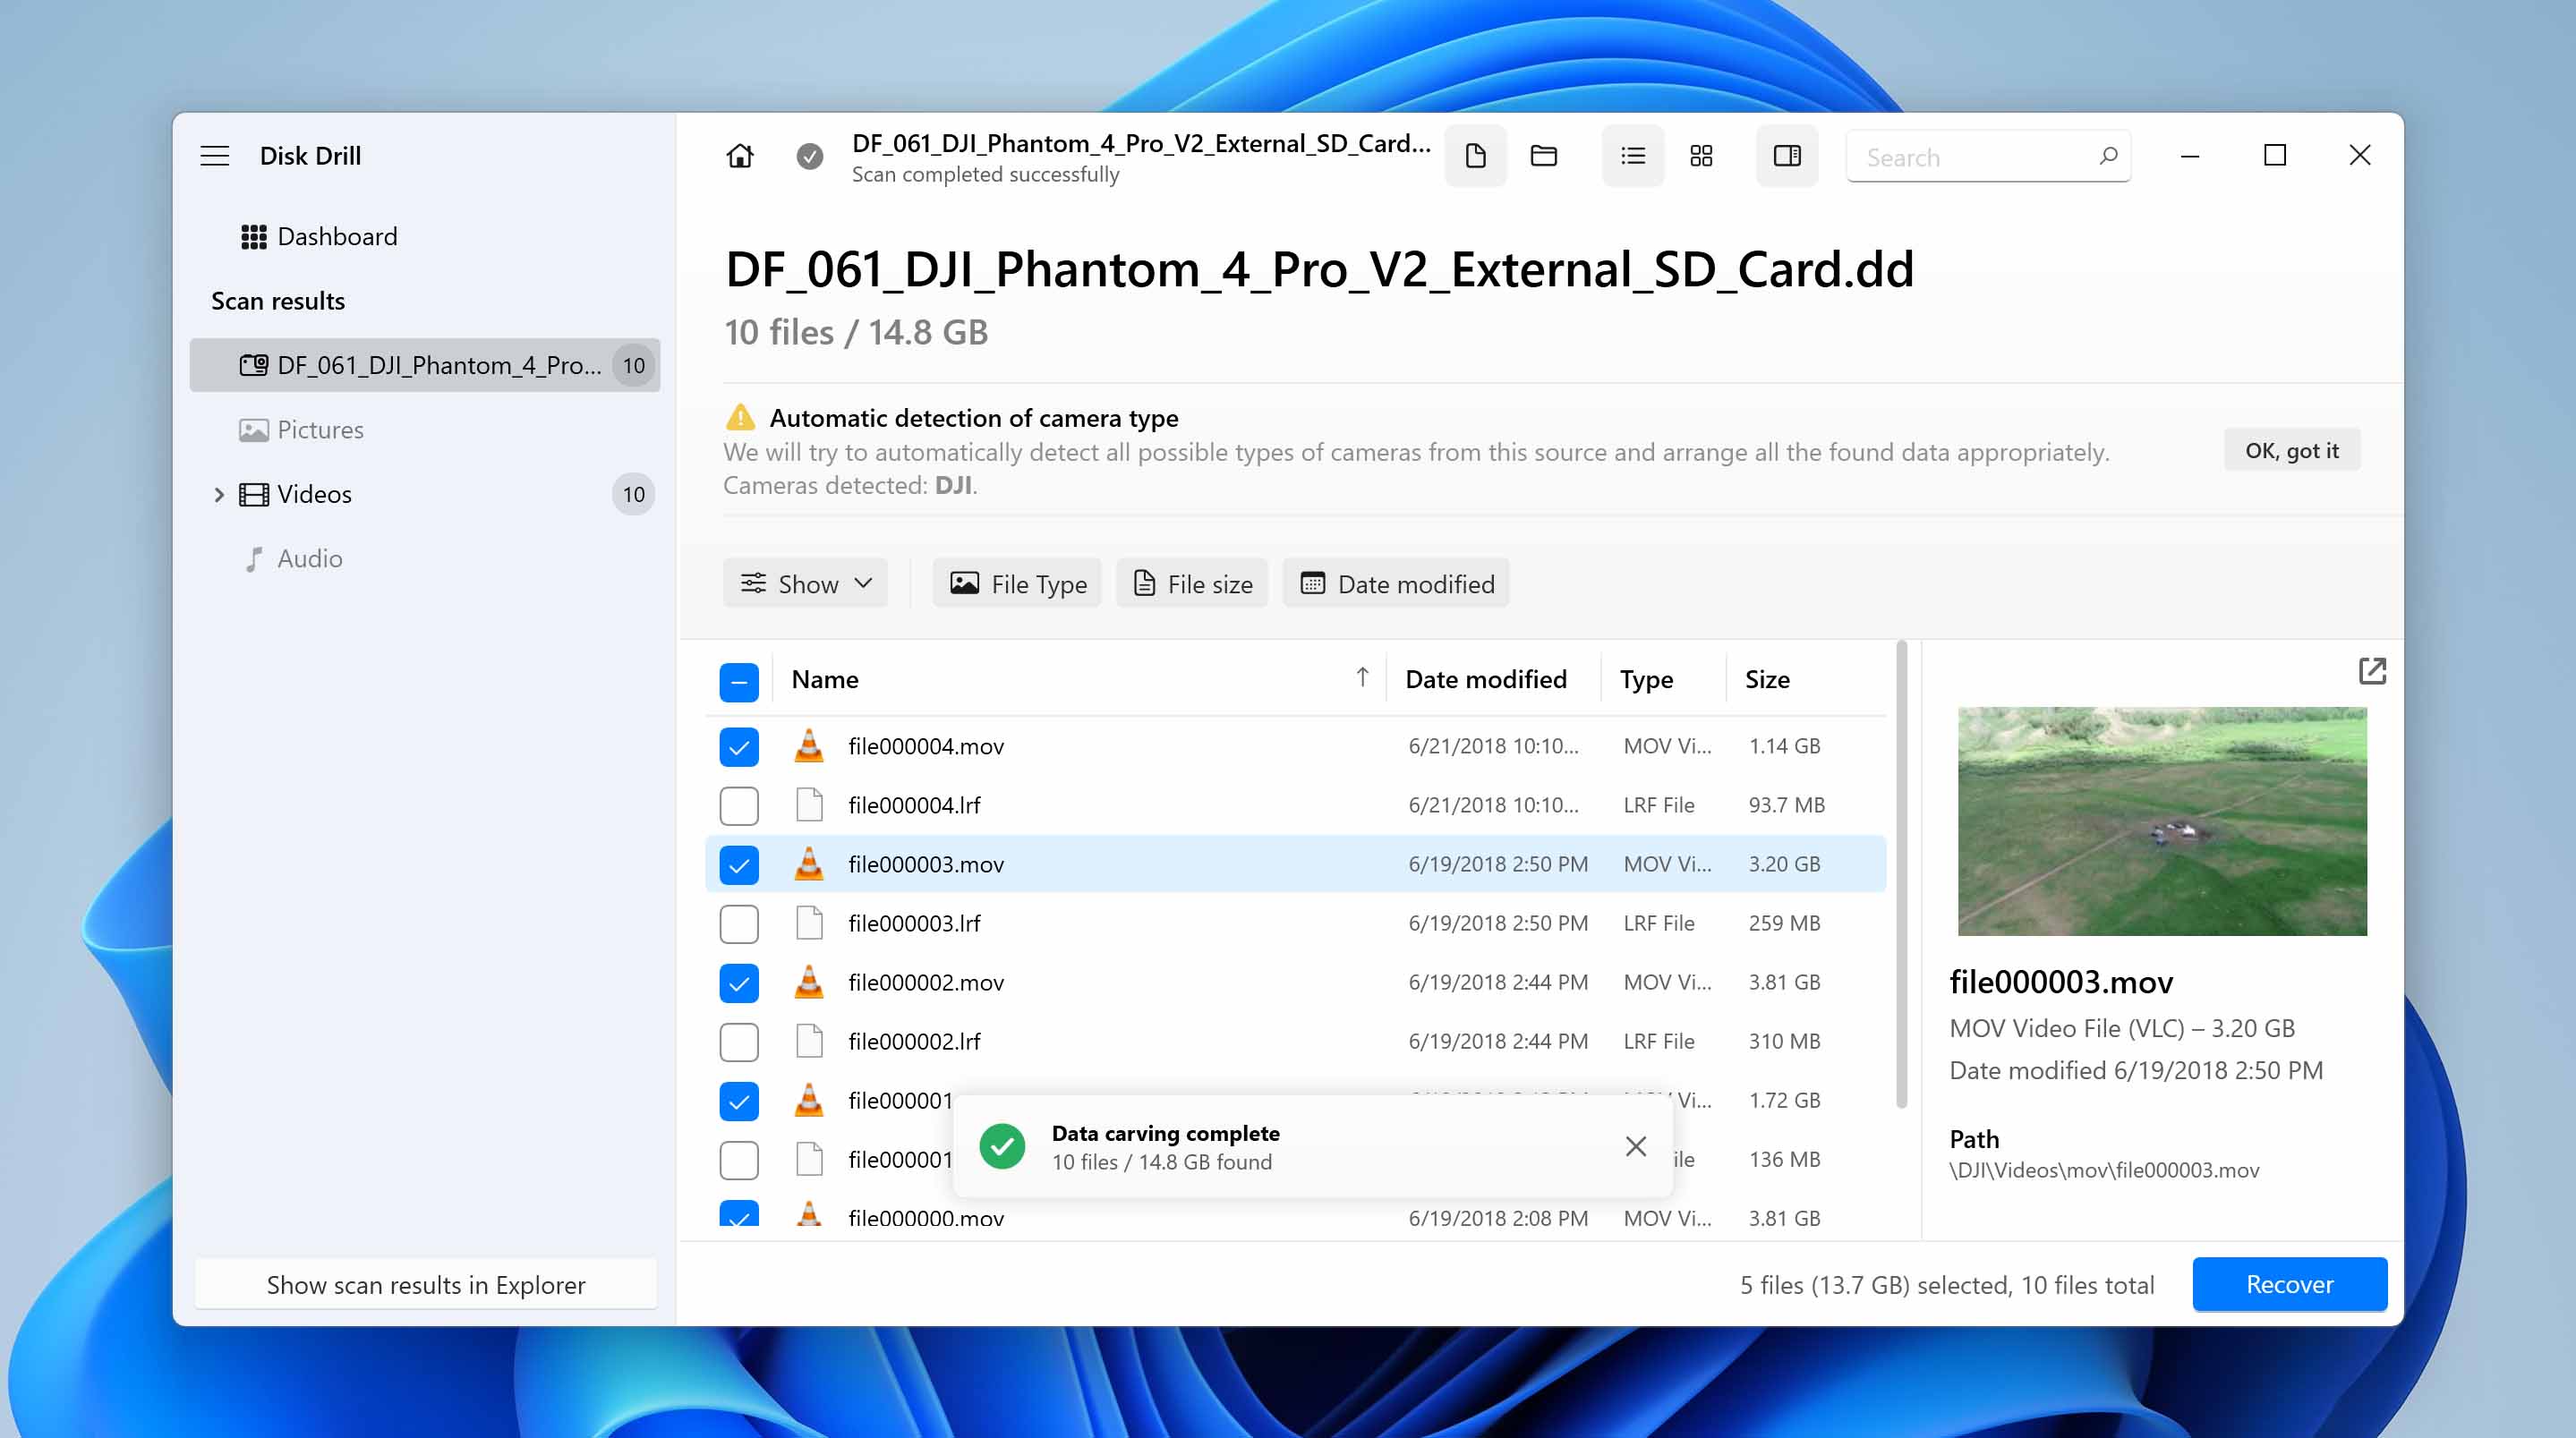
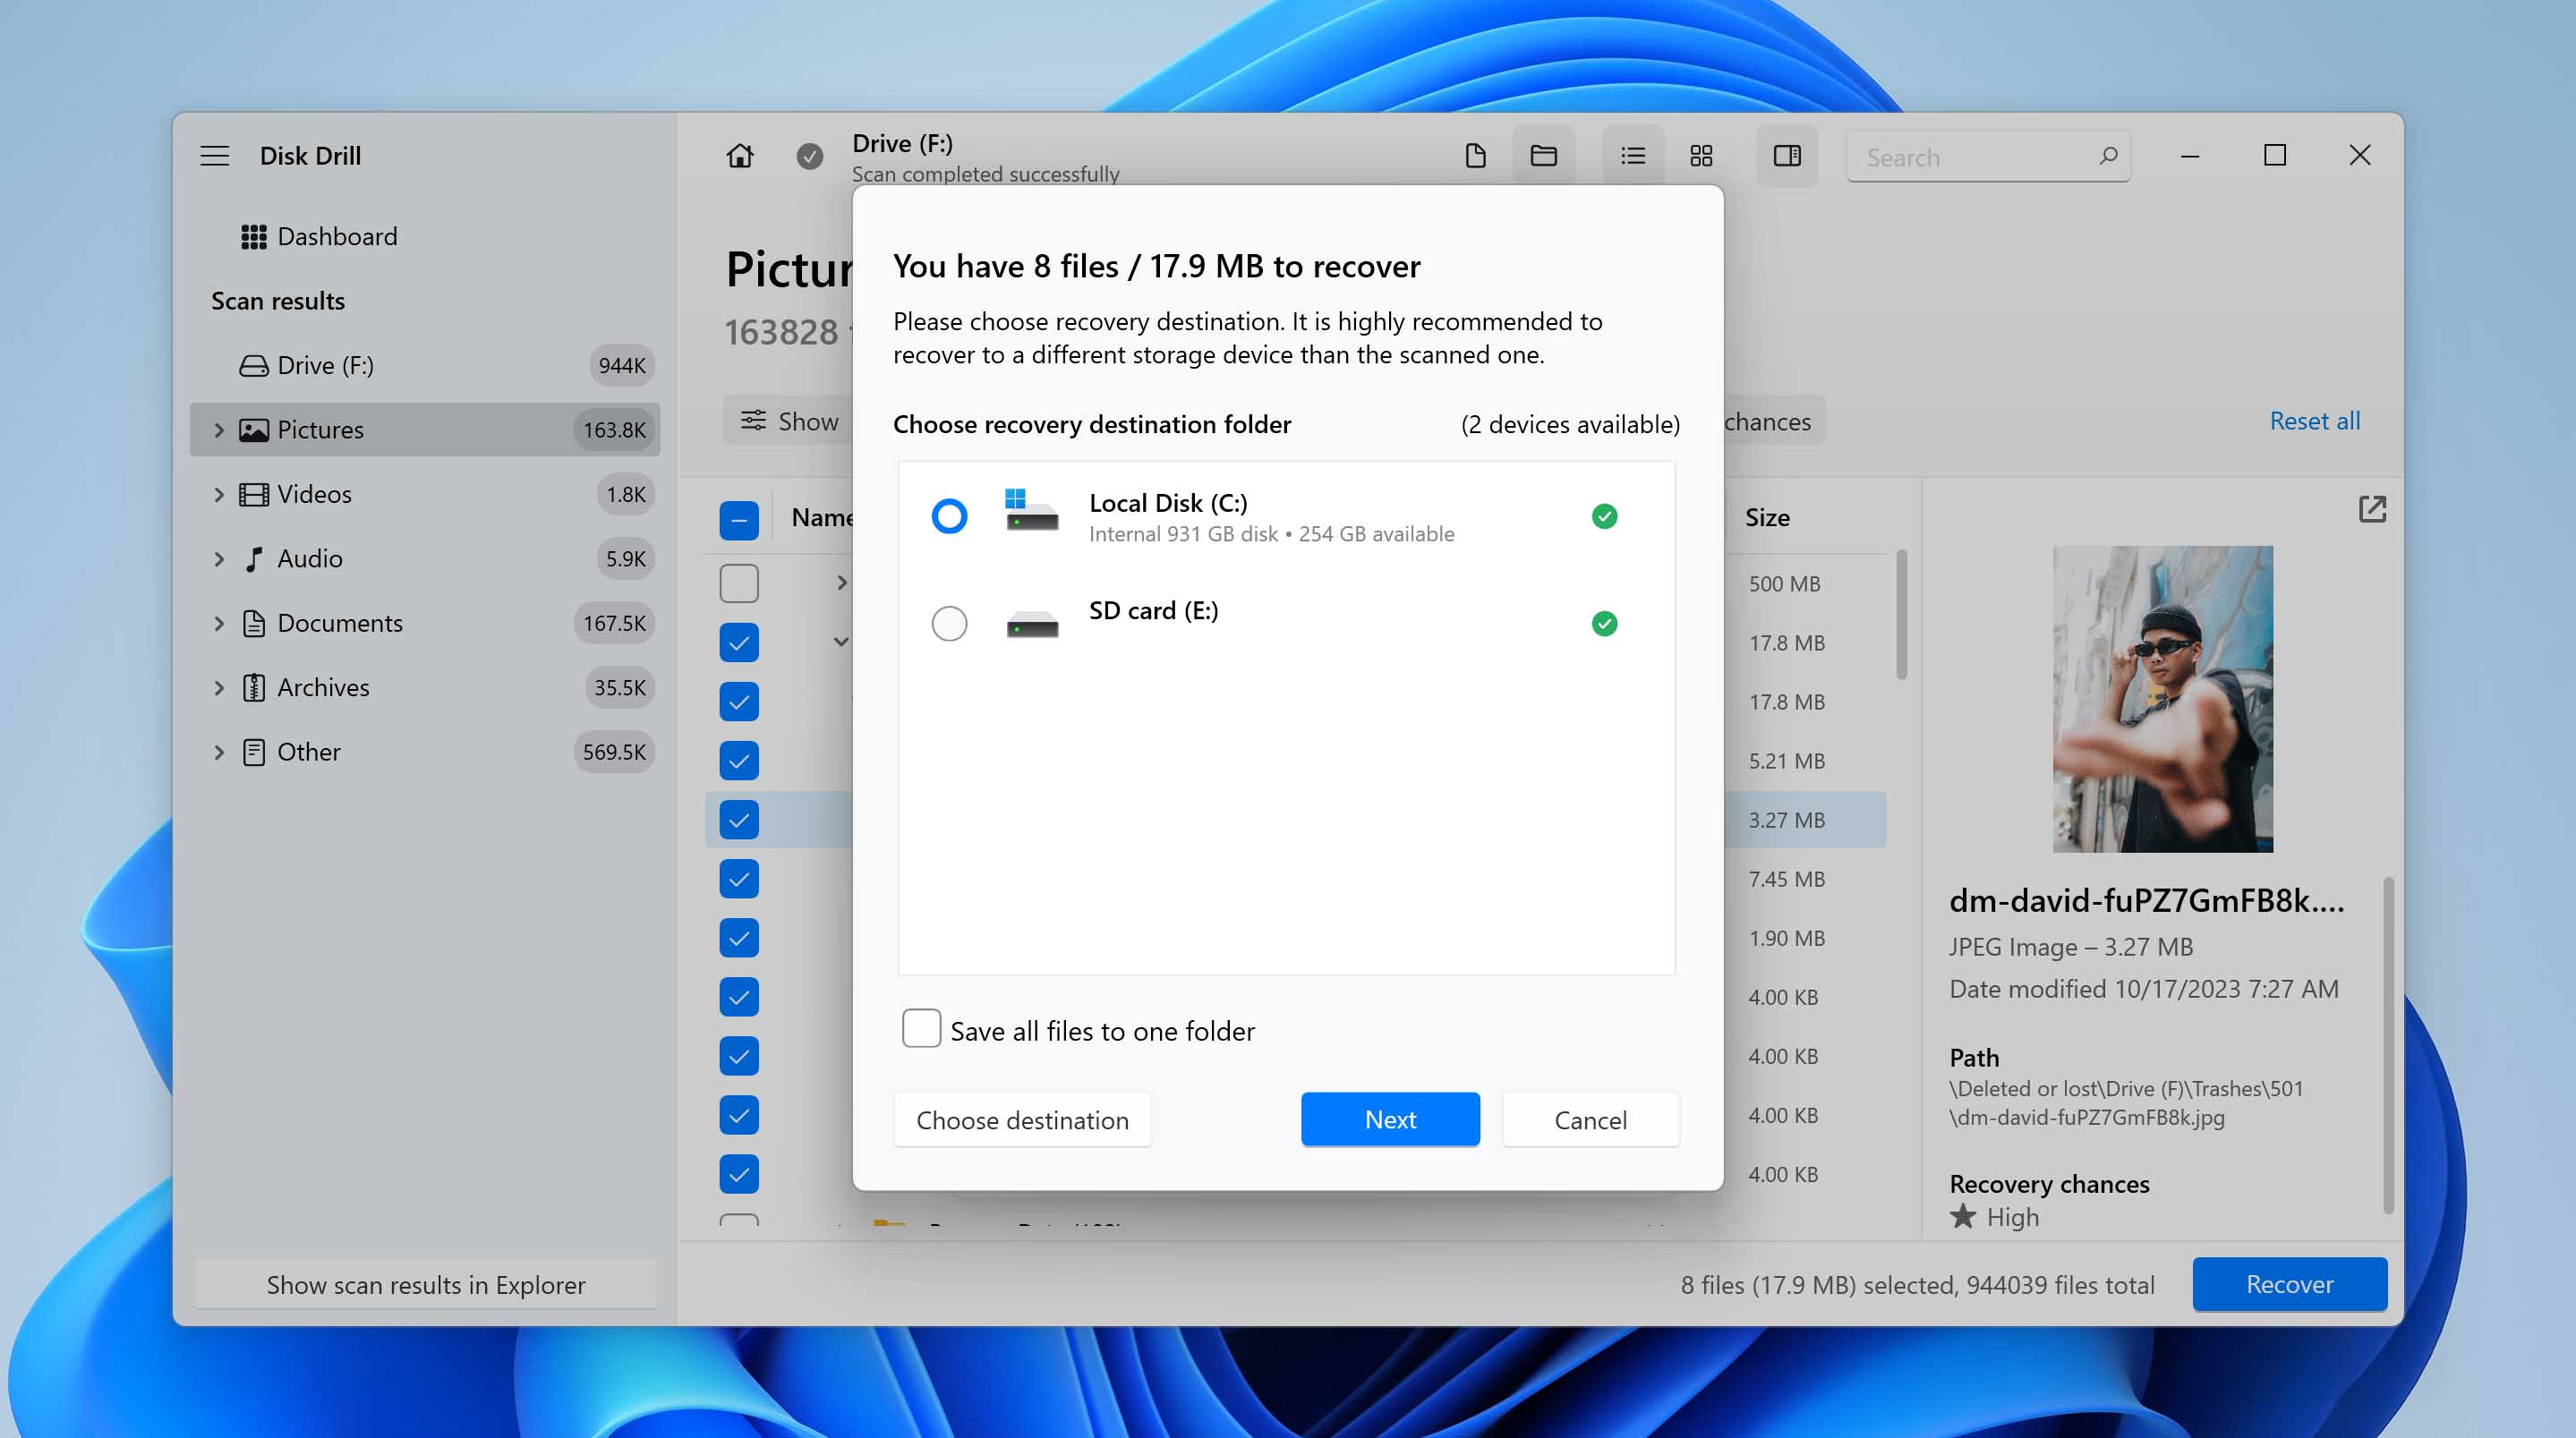
- Select the files to recover and click Recover. Choose a location other than the SD card to avoid overwriting, then click Next.
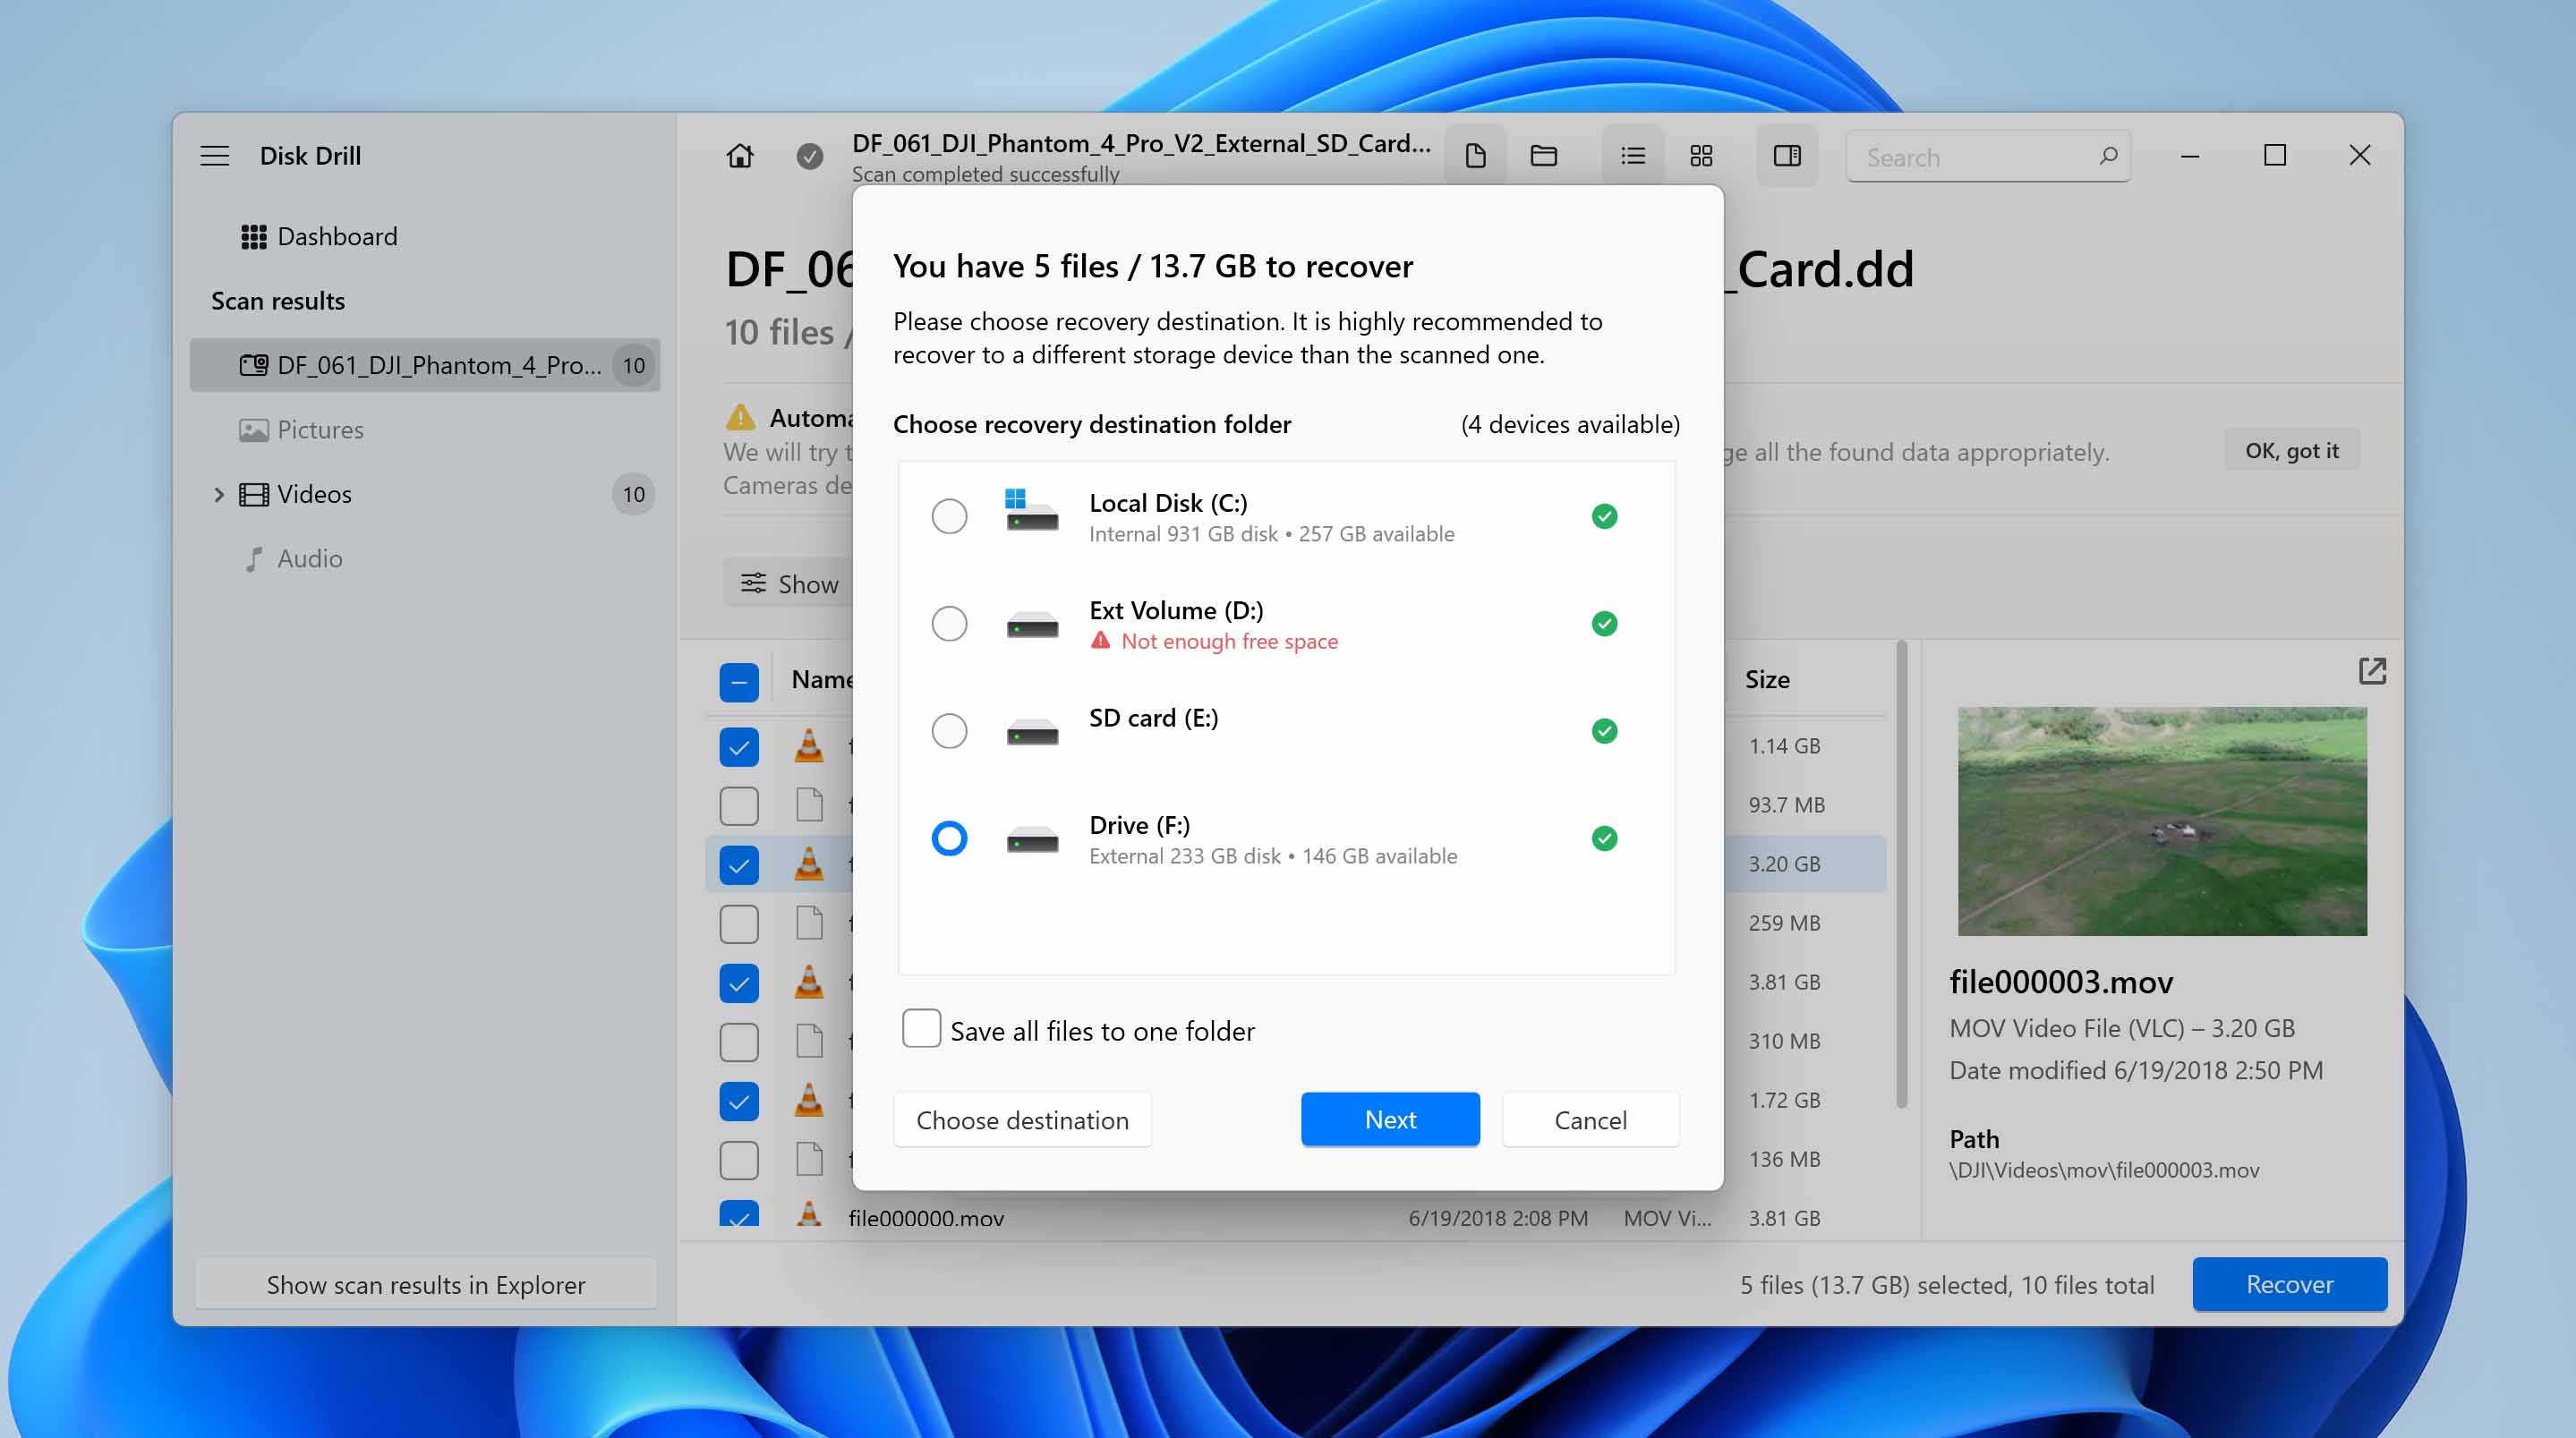


In our test, Disk Drill’s new Advanced Camera Recovery feature worked flawlessly – we recovered all five recorded videos from the drone’s SD card image without any issues. Since the card was formatted before the scan, this clearly demonstrates that these files were truly restored using Disk Drill’s ACR module, which pieces together fragmented video data without relying on file system metadata.
Scenario 2: Internal Drive
- Launch Disk Drill.
- Select the affected partition or the entire internal HDD on the Data Recovery tab. Click on Search for lost data and wait for Disk Drill to finish scanning the selected drive. The entire process shouldn’t take long.
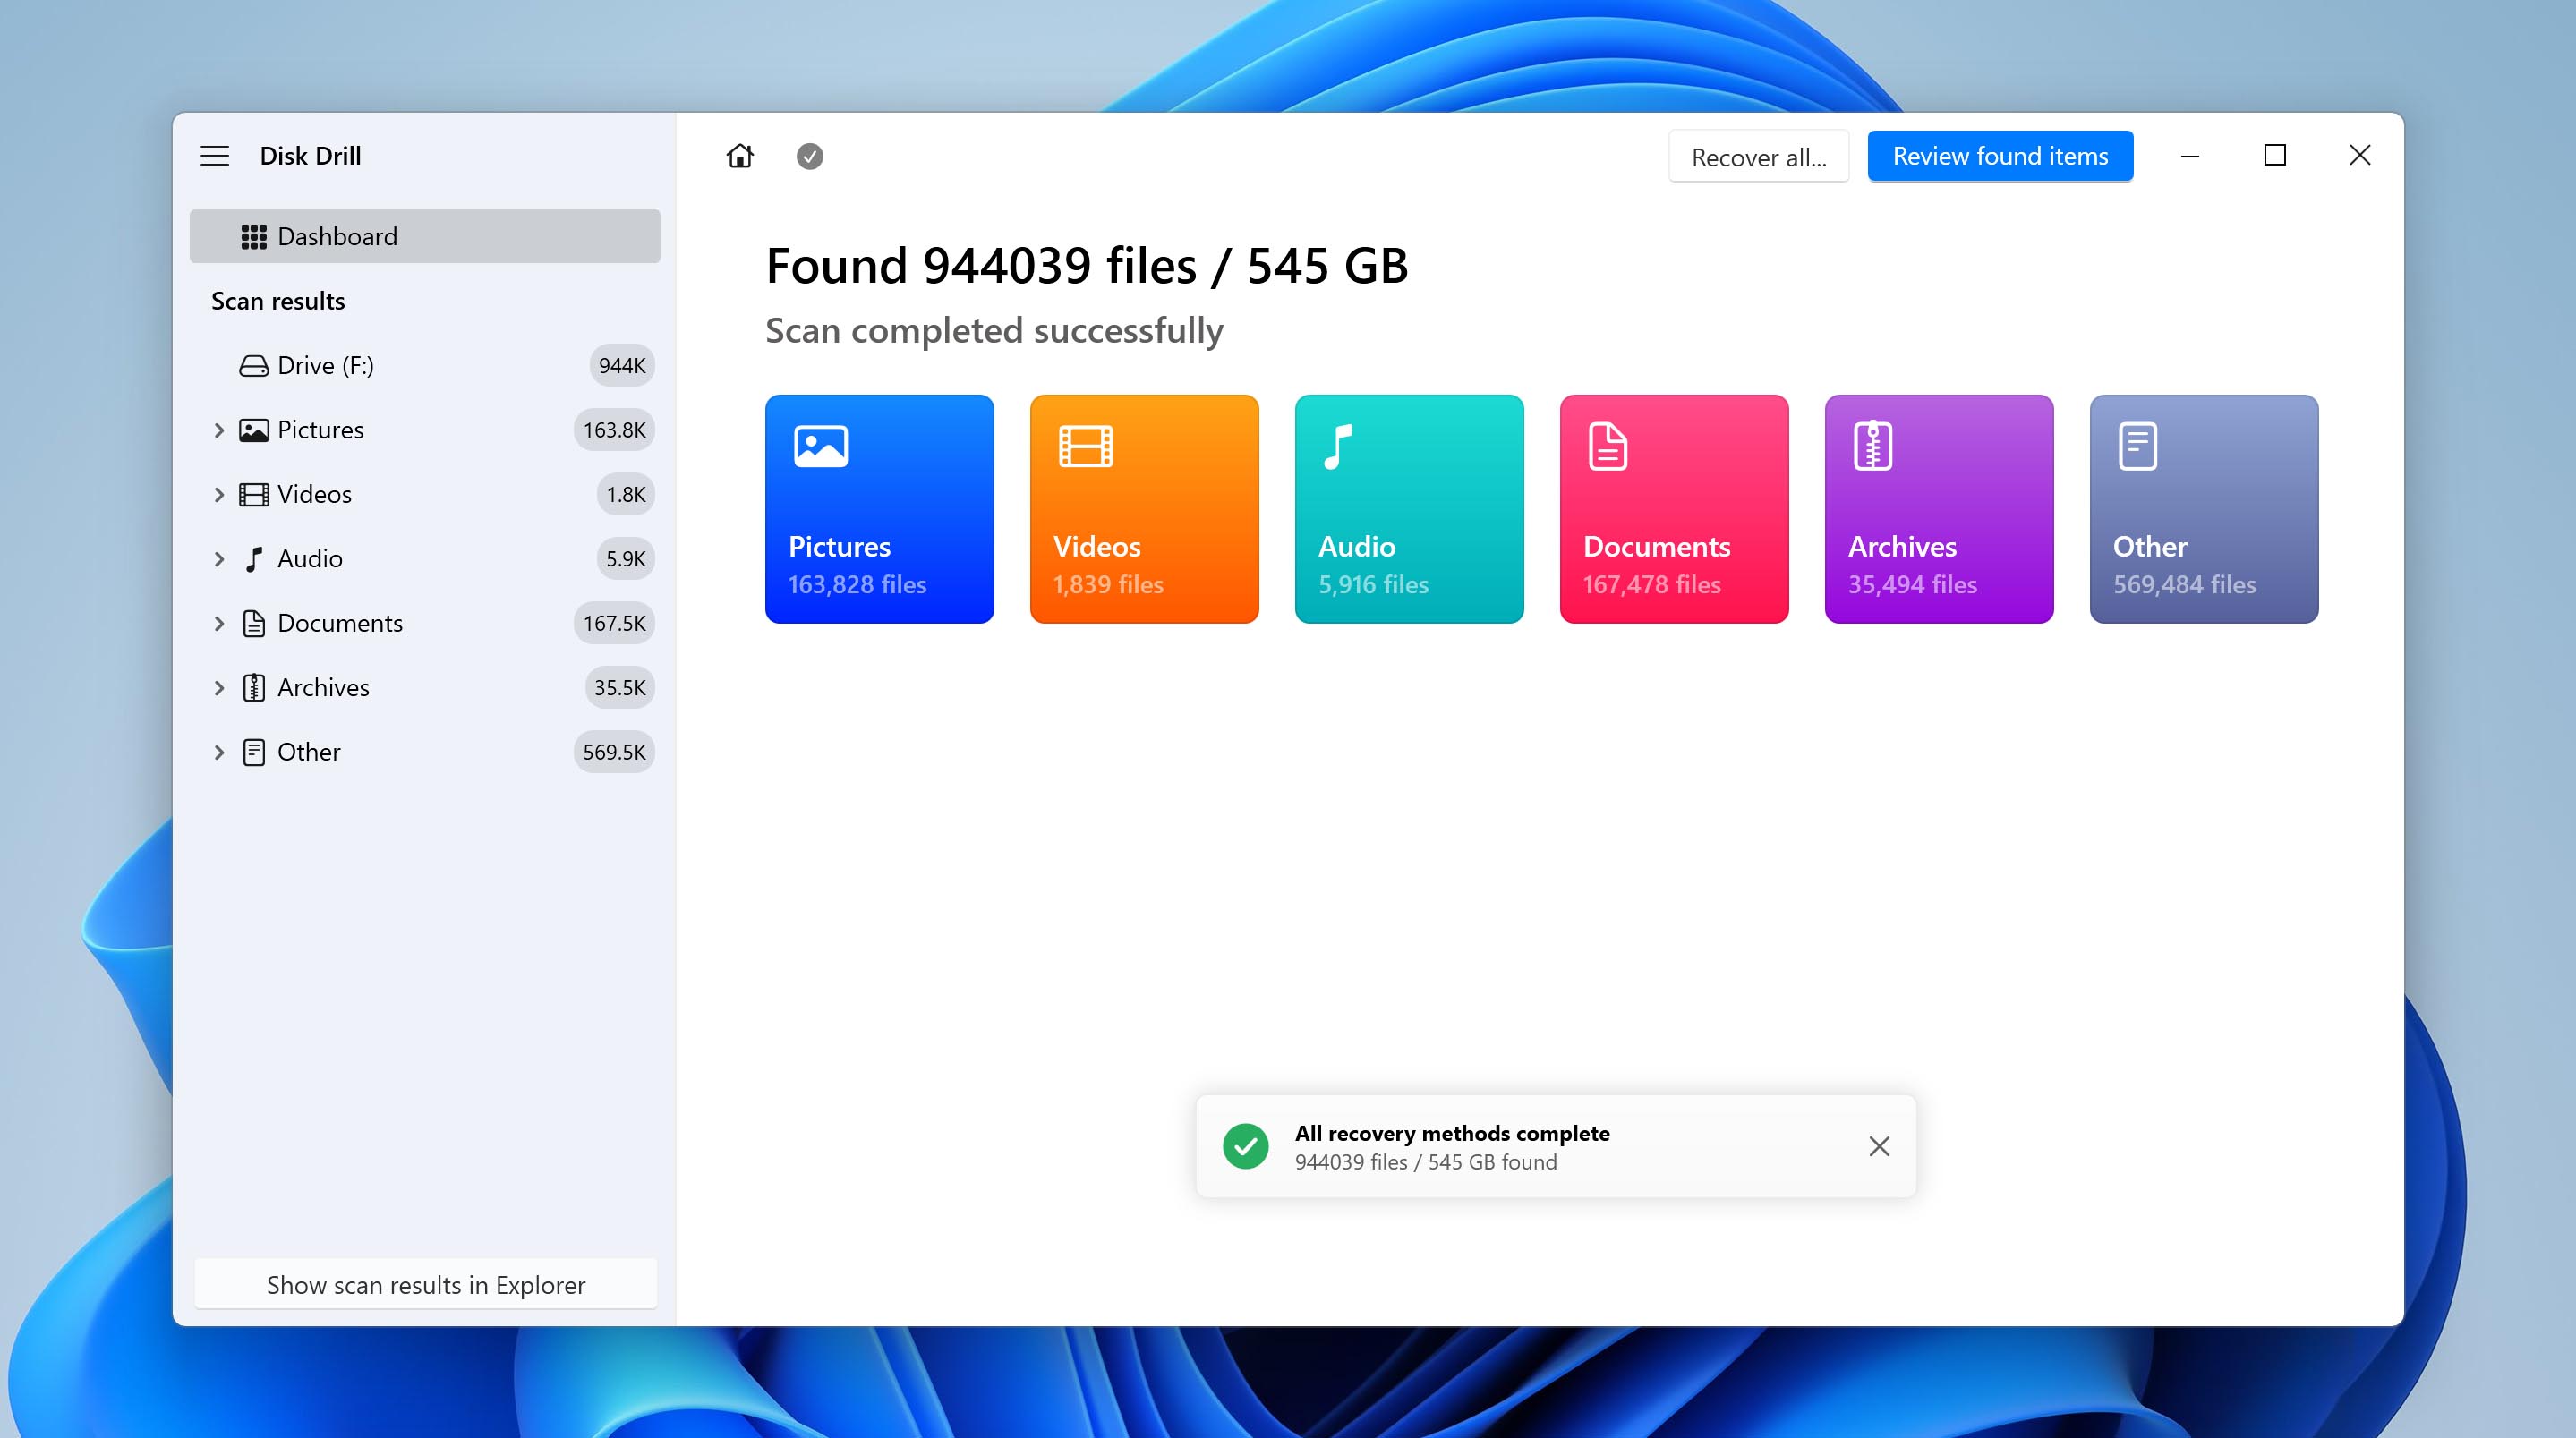
- Scan took us around 20 minutes for a 250GB partition. Once the scan is over, click on Review found items. Again, you can choose to click on a particular file type to filter out the results.
- Select the files you want to recover and click on the Recover button.
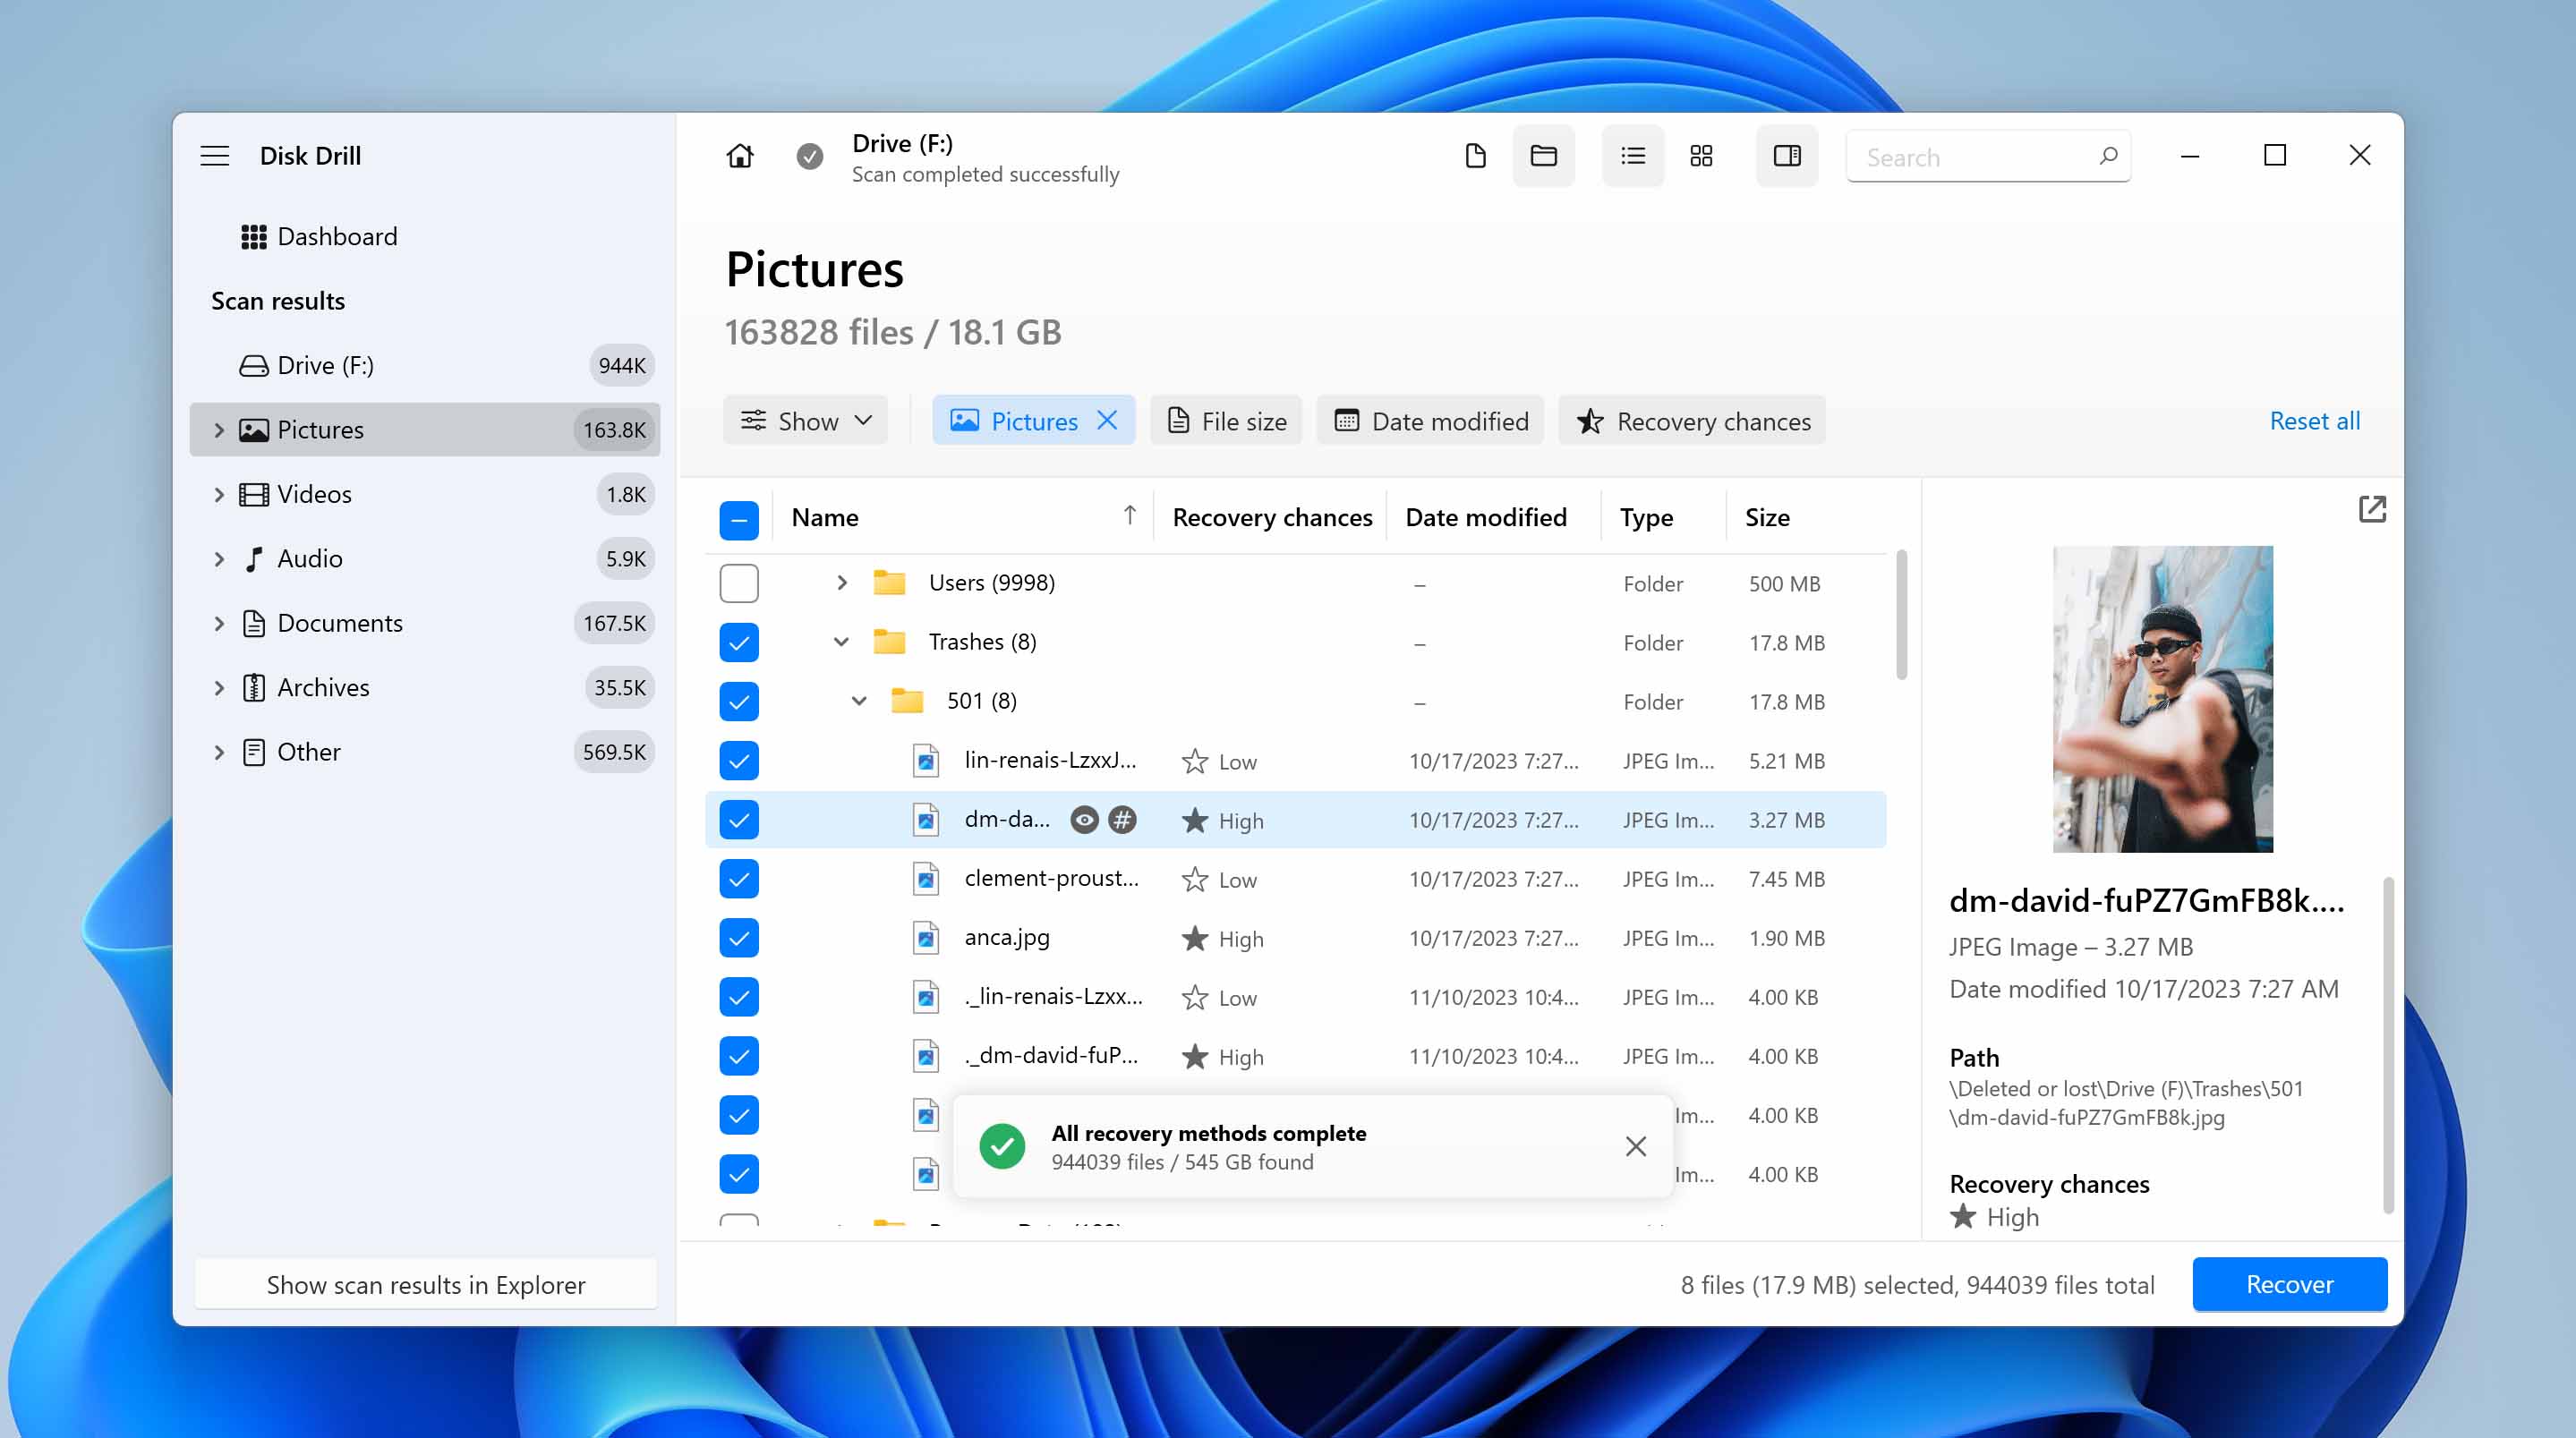
- Choose a recovery location for the files. Note how Disk Drill displays a warning sign next to the partition that we just scanned. Click on Next and wait for Disk Drill to finish saving the selected files.


We had 130 files that weighed 6GB on a partition. Disk Drill found A LOT more, but recovering 160GB of data wasn’t our goal in this test. All files used for this test were recovered and opened smoothly. So it’s safe to say Disk Drill passed our test with flying colors
Additional Features of Disk Drill
In addition to data recovery and backup, Disk Drill also comes with many nice-to-have features that are quite useful. These features include:
Data Protection Feature
Disk Drill comes with a Recovery Vault, that stores data for a predefined period of time. It acts like an additional security measure, should you accidentally delete files from the protected folders.
The best part is that the feature is completely free, and it offers instant file recovery.
To use the Recovery Vault, follow these steps:
- Open Disk Drill.
- Click on Data Protection under Extra tools.
- Simply switch the Recovery Vault switch to ON.
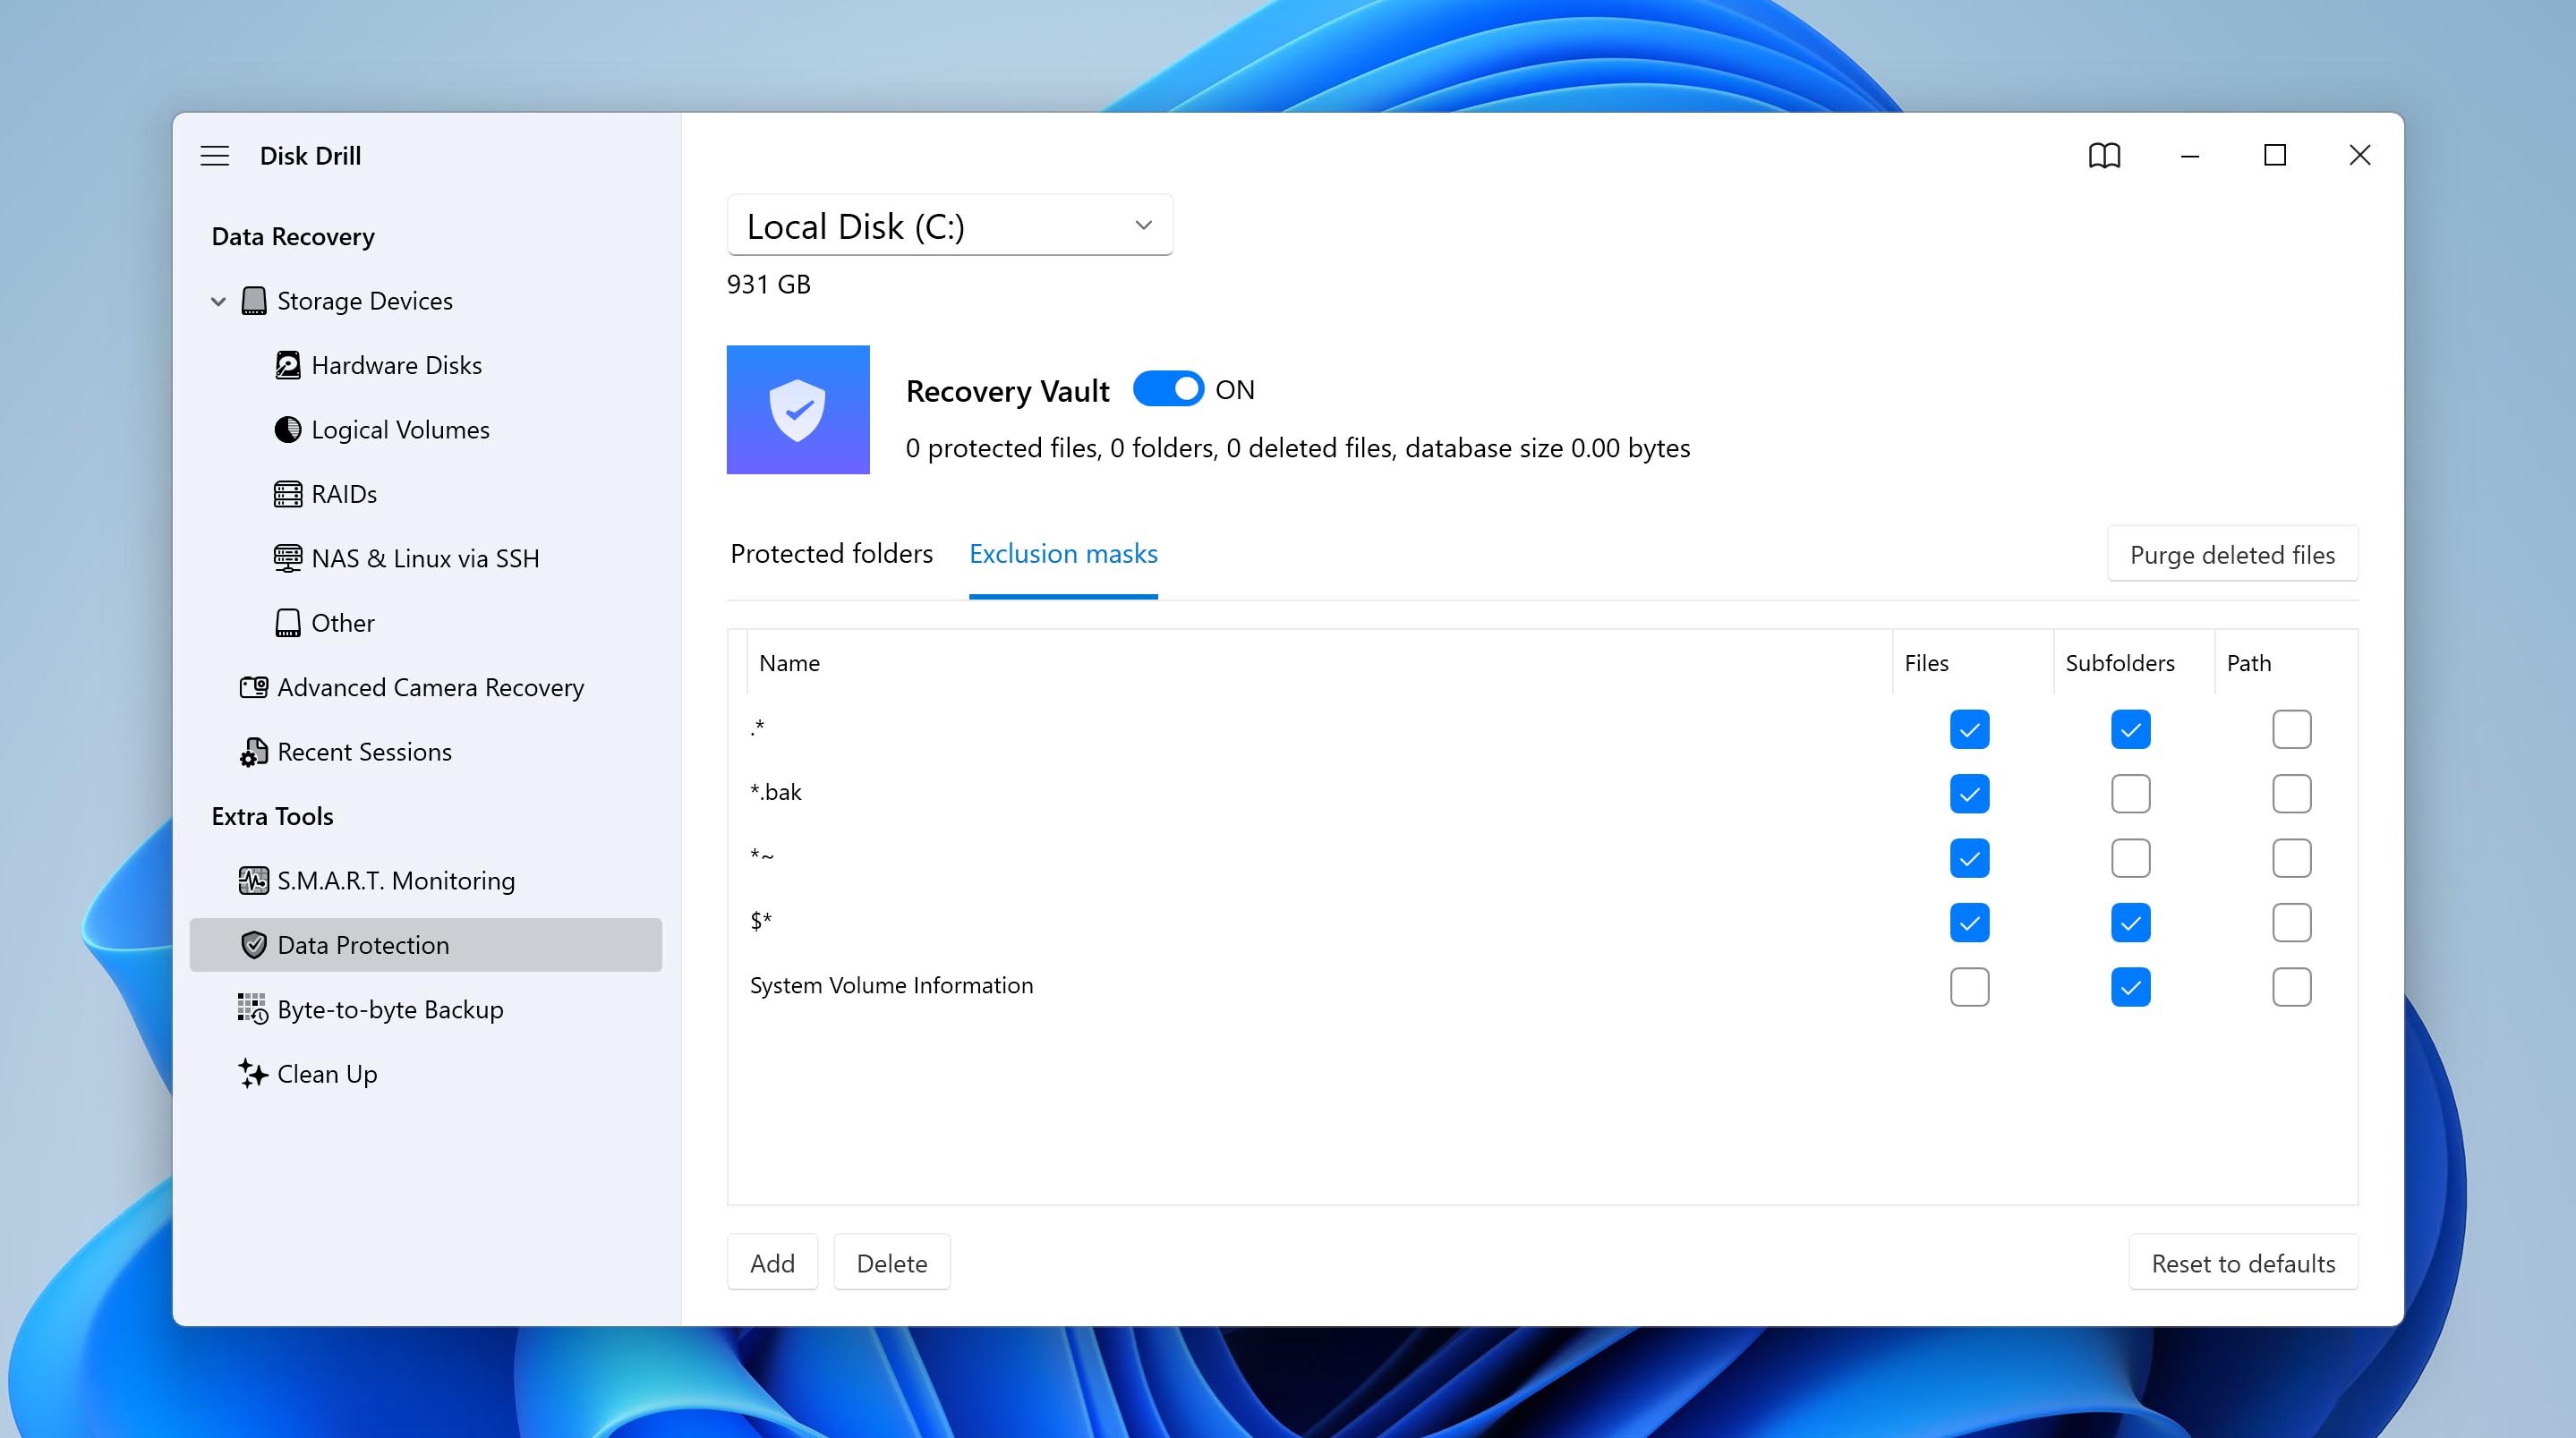
- In the Recovery Vault, use the Add and Delete options to modify the folders that are protected.

Save and Load Scan Sessions
The scan and load feature works well if you’re short on time, and you want to recover your data later. Once you perform a data recovery scan using Disk Drill, the app automatically saves the session, so you can get back to it later.

In essence, you don’t need to perform the scan again. Simply, choose the scan session from under the Recent sessions tab.

You can also manually save a session, by clicking the Save session as option on the Review found items screen.

Disk Drill comes with a cross-platform scan session management feature that essentially lets you load a saved scan session from a Mac computer, on a Windows PC, and vice-versa. You can effectively start a scan on one computer and finish it on another one.
S.M.A.R.T. Monitoring
S.M.A.R.T. stands for Self-Monitoring, Analysis and Reporting Technology and most modern storage drives come with this technology. It automatically detects and attempts to repair imminent hardware and software failures.
Disk Drill lets you check the S.M.A.R.T. status of your storage device easily. All you need to do is to click on S.M.A.R.T monitoring, under Extra tools.

RAID Recovery on Windows
RAID arrays provide better speed and more data redundancy, but they’re still vulnerable to data loss. Disk Drill’s RAID recovery feature remains a valuable tool for rebuilding and recovering data from damaged RAID configurations. In version 6, Disk Drill takes this further by allowing you to connect to your NAS over SSH and scan it directly over the network – no need to physically connect the NAS to your PC with a cable. This makes it much easier to recover data from modern NAS devices alongside traditional RAID setups. The scanning process works just like with any other drive – simply choose the RAIDs tab under Data Recovery, connect your array or NAS, and start your scan.

Clean Up Module
Disk Drill has a Cleaner feature. It scans the selected drive and presents you with all the space occupied in the form of a visual map. This helps to free up space on your PC by getting rid of files you don’t need. This tool is especially handy for quickly identifying clutter without having to sift through files manually.

Verdict: Disk Drill
Recovering lost data using Disk Drill for PC was a pleasant experience. There were no technical hiccups whatsoever. The UI deserves a special mention for being welcoming, and the built-in tutorials do a stellar job in helping new users find their way around the application.
All in all, both new and experienced users need not look anywhere else for a capable data recovery solution.
We’re nitpicking, but if there is a lot of recoverable data, then full scans may take a while to complete. However, this is the case for most data recovery programs.
✅ Pros
- An easy-to-use interface that is not riddled with technical jargon.
- Full-fledged file preview.
- Support for numerous devices and configurations, including RAID & NAS, and the ability to scan virtual drives.
- Advanced filtering feature for recoverable files.
- Free trial of up to 500 MB of data recovery.
- Useful goodies such as data protection and disk backup.
- Wide compatibility across Windows and macOS.
⛔️ Cons
- Doesn’t run on Linux.
- No phone support in case of an emergency.
- Only supports automatic assembling of existing RAID arrays, without a dedicated module for advanced RAID configuration.
FAQ
- Connect your iPhone to the Mac device.
- Find the iPhone in Disk Drill.
- Scan the iPhone for recoverable data.
- Review, and recover the deleted files as usual.
- 32 GB USB Flash Drive (All recovery methods) - 3 minutes.
- 250 GB internal HDD Partition (Quick Scan) - <1 minute.
- 10 GB Internal SSD Partition (All recovery methods) - 2 minutes.
- 128 GB Internal SSD (All recovery methods) - 17 minutes.
- Run the setup file you initially downloaded to install Disk Drill.
- Click on Uninstall.
- When prompted, click on Yes.
- Disk Drill will be uninstalled.
- In Windows search, type Programs and Features.
- Click on the Add or remove programs option.
- Find Disk Drill and click on the three vertical dots towards the right side.
- Click on Uninstall.
- When prompted, click on Uninstall.
- In the user account prompt, click on Yes.
- This will essentially launch the Disk Drill setup file, and the steps are exactly the same as in the first method. This method is useful if you can’t seem to find the original downloaded setup file.