Reading Time: 8 minutesYou’ve decided to completely reinstall your Windows in the last-ditch effort to speed it up and solve various errors. Now, you might be wondering how to recover lost files after factory reset on Windows 10.
Luckily, there are ways to restore your important data. One of the best options to do this is by using professional data recovery software, but there are other options as well. Let’s take a closer look at them.
What Happens When You Factory Reset a Windows 10 PC?

When you factory reset a PC running on Windows 10, all third-party applications, settings, and potentially some personal files will be removed and the operating system will be restored to its original state, with only the preinstalled software and default settings in place.
The factory reset process (also called Fresh Start in versions of Windows 10 prior to version 2004) is a useful alternative to the traditional method of reinstalling Windows because you don’t need to have a separate installation media and because you can keep some of your data by selecting the “Keep my files” option or creating a manual backup.
Here’s a high-level description of what happens behind the scenes when you factory reset a Windows 10 PC:
- The reset process is initiated by preparing the necessary recovery environment and settings.
- All personal files, applications, and settings are erased if the option to remove everything is selected; otherwise, it tries to keep personal files intact.
- (Optional) If the Clean data option is selected, then the deleted files are overwritten with zeroes (more about this soon).
- The operating system (OS) files are reinstalled.
- The system checks for and applies the latest Windows updates to ensure the OS is up to date.
- Windows prompts the user to configure system settings such as region, language, and user account details.
The problem is that users often forget to select the option or back up their files, which inevitably leads to data loss. But don’t worry, lost data can often be recovered with the right tools and techniques, which we’ll discuss in the following sections.
Ways to Recover Files After Windows 10 Reset
The approach to recovering lost files after a factory reset on Windows 10 depends on whether the “Clean data” option was selected during the reset process. If it wasn’t selected, you can use data recovery software to retrieve your files (see Option A below).
However, if the “Clean data” option was selected, the deleted files are overwritten, making them impossible to recover using data recovery software. In such cases, you’ll need to rely on external backups (skip to Option B).
Option A: Use Data Recovery Software
Data recovery software works by scanning your hard drive for remnants of deleted files that are still physically present on the hard drive (haven’t been overwritten or wiped using the TRIM feature).
1. Disk Drill
Our top choice for Windows data recovery is Disk Drill, as it delivers excellent results while being user-friendly.
Disk Drill supports all file systems used by Windows, including NTFS, FAT32, and exFAT. Additionally, it can recover a wide range of file types, such as documents, photos, videos, and more. The free version of Disk Drill allows you to preview an unlimited number of files and recover up to 500 MB in total. To unlock unlimited recovery, you can purchase a lifetime license for $89.00.
This is how you can recover files after a factory reset with Disk Drill:
- Install and launch the app. Visit CleverFiles and download Disk Drill. To avoid overwriting the data you’re trying to recover, make sure to install Disk Drill on a non-system storage device, such as an external hard drive or a USB flash drive.
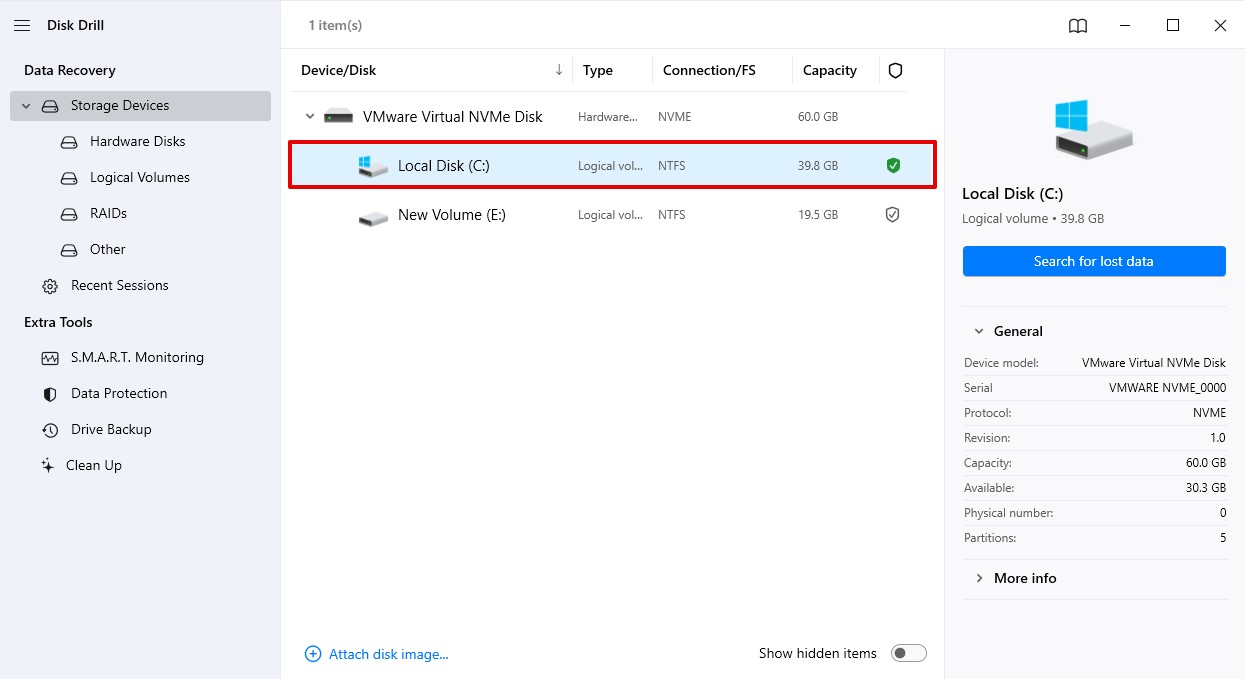
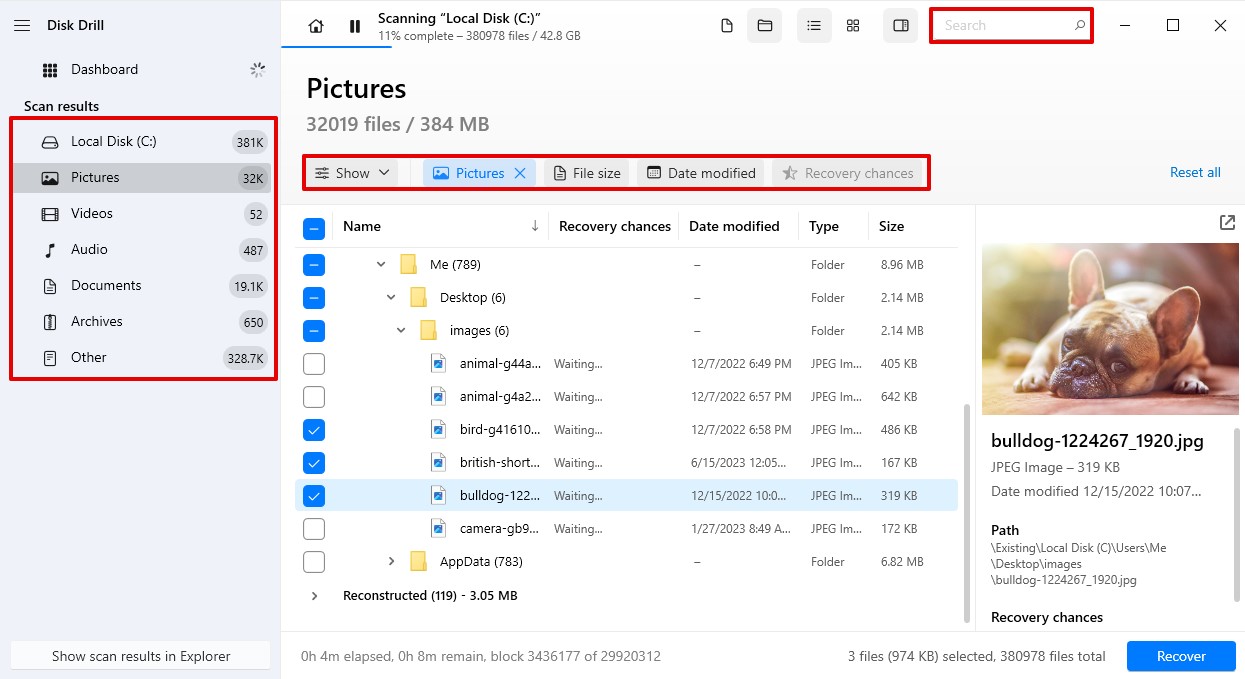
- Choose the hard drive that contains lost files. Navigate to the Storage Devices section if you aren’t there already and select your system drive (typically labeled with the letter “C”).
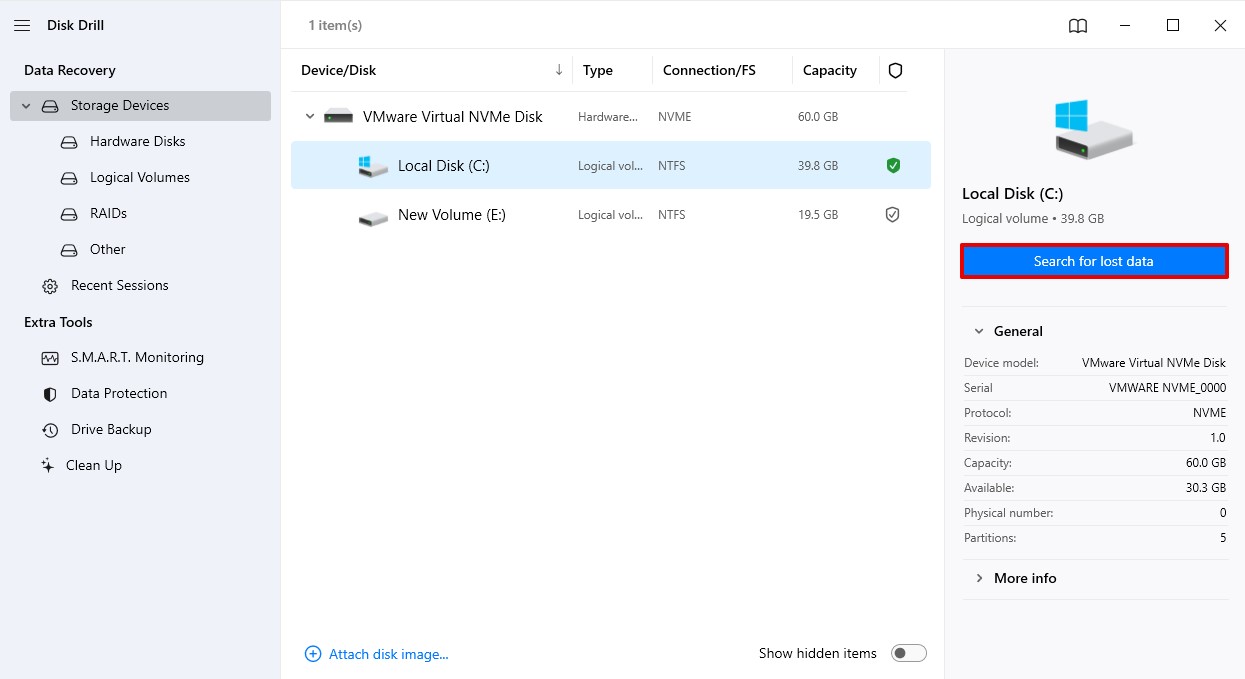
- Start a scan. Click the search for lost data button and wait for Disk Drill to scan your system drive. Then, review the found files.
- Select the files that you want to retrieve. Since Disk Drill may find hundreds of GB of data, you may feel a bit overwhelmed. Luckily, you can simplify your search and filter files by file type, date, size and you can even search for certain file names if you remember it. Use the Preview function to make sure that you’ve selected the right file. Once you are satisfied, click Recover.
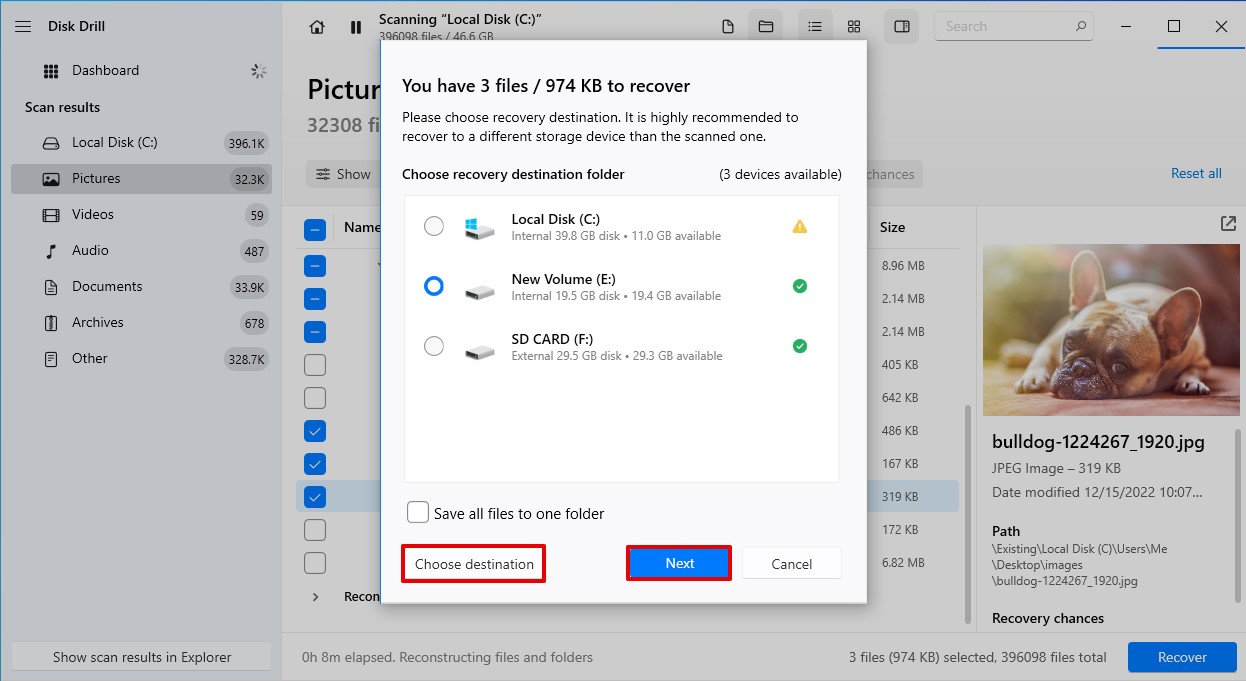
- Select the recovery destination. Finally, you need to tell Disk Drill where it should save the recovered data, then click on Next.
Additionally, Disk Drill has many useful tools that can prevent your problems from recurring. S.M.A.R.T. Monitoring, for example, will constantly scan your disk to find signs of impending drive failure, while Data Backup will create copies of your important files which you can recall if something unpredictable happens.
2. Windows File Recovery
If you prefer a native solution provided directly by Microsoft, Windows File Recovery is a reliable tool available for free via the Microsoft Store. Despite its command-line interface, which may be daunting for less technical users, the software can deliver decent results when scanning NTFS drives and looking for commonly used file formats.
Note: To run successfully, Windows File recovery requires that you have at least May 2020 update. To make sure that you have the latest version installed, go to Start > Settings > Update & Security > Windows Update > Search for updates.
This is how you can recover files after a factory reset with Windows File Recovery.
1. Run the app
Right-click on the Start icon and select Search. Type in File Recovery and the app will pop up on the top of the search bar. Make sure that you select Run as administrator.

2. Select Scan Mode
Windows File Recovery lets you pick between 3 modes: Default, Signature, and Segment. Default works like a Quick scan, and Segment mode presents you with a more thorough and slower approach. Signature mode will let you scan through the drive by file type. This includes ASF, MP3, MPEG, JPEG, PNG, ZIP, and PDF.
Since Windows File Recovery delivers the best results when recovering lost data based on file system information, we decided to focus on the Default mode.
To recover data using the Default mode of Windows File Recovery, you would write something like: winfr C: D: /n *.docx
- C signifies the main drive where your Windows is installed
- D is a drive to which all restored files will be transferred (you can also use E:, F:, G:, etc.)
- n is a switch used for filtering search
- * can be replaced with a specific file path, which will speed up the scan: winfr C: D: /n \Users\Admin\Documents
- .docx stands for Word document, but you can use any other file extension
In practice, it would look something like this:

Now, hit Enter to confirm the command and type in “Y” to start the scan.
Since the full path wasn’t specified, the scan will take a bit longer. As mentioned, the recovered files will be saved on another disk with a specified date and time.
To search for multiple file formats simultaneously, just add more switches. If I wanted to locate all of the PowerPoint, Excel, and Word files, I would simply write: winfr C: D: /n *.pptx /n*.xlsx /n *.docx
Option B: Recover From an Existing Backup

When the Clean data option was selected during a factory reset, data recovery software becomes ineffective, as the deleted files are overwritten. In such cases, the only viable solution to retrieve your lost data is to rely on an existing backup. You may be able to find your files in one or more of the following backup sources:
- Manually created backups: We’re talking about backups that you’ve created yourself, usually by copying important files to an external storage device, such as a USB flash drive, external hard drive, or even an optical disk. To recover your files, simply connect the storage device to your PC and copy the files back to your system.
- Automatically created backups (File History): Windows 10 has a built-in backup feature called File History, which automatically backs up your files to an external storage device. If you had File History enabled before the factory reset, you could restore your files from the backup. To do this, go to Start > type “File History” > click File History (Control Panel) > tap or click Select a drive > choose your backup drive. You can then restore your files with File History.
- Cloud backups (OneDrive): If you’ve been using a cloud storage service like OneDrive to back up your files, you can easily recover them after a factory reset. Simply sign in to your OneDrive account on your PC and sync your files to restore them. You can also access your files through the OneDrive website and download them manually.
The key to recovering lost data through external backups is to have created them beforehand. If you haven’t done so, then you can turn your data loss experience into a valuable lesson on the importance of regular backups. Moving forward, you can create a robust backup strategy that combines different backup methods so that your data is always protected.