
Reading Time: 7 minutesLosing crucial Tesla dashcam footage when you most require it, is a situation no one wants to be in. But, if you do find yourself in this situation, fret not—because you can recover the Tesla dashcam footage. However, your success depends on—the age of the dashcam footage, the recording mode you used, and the state of the USB drive where these videos were stored. The sections below cover all these bases, and if everything goes well, you’ll have recovered the deleted footage once you’re through reading this article.
What Are the Recording Modes in Tesla Dashcams?
Usually, Tesla dashcams record in one-minute increments for a total of 1 hour. This means that the Tesla dashcam saves one-minute clips, recorded for an hour. After an hour these clips are overwritten by the clips of the next hour, starting from the oldest first. This is what complicates data recovery—as overwritten footage can’t be recovered. It’s no surprise that many users find this feature annoying and pointless. But, Tesla does this to comply with data privacy laws.
Apart from this one-hour loop, Tesla dashcams can permanently save the last 10 minutes of recorded footage. This can be done using three modes:
- Auto: In Auto mode, your Tesla automatically saves a clip to your USB drive, when it detects a safety event—like a collision, or airbag deployment.
- Manual: In Manual mode, you can save the most recent 10 minutes of dashcam footage by tapping the dashcam icon.
- On Honk: In this mode, just honk to save the last 10 minutes of recorded footage to your USB drive.
Psst: Manually saved videos, whether saved by pressing the dashcam icon, or honking, are never overwritten. You can find these clips in the SavedClips folder on your Tesla dashcam USB drive.
In addition to these recording modes, Teslas come with a Sentry mode which is activated when the car is in park mode. When enabled, Sentry mode constantly monitors your car’s surroundings using its cameras and sensors. In addition to alerting you when it detects suspicious movement around your car, your Tesla also saves a 10 minute recording of the security event to your USB driver.
Things to Do Before Recovering Data from Your Tesla Dashcam
There are some steps you can take to maximize your chances of recovering the deleted footage from your Tesla dashcam.
Do these before you actually attempt data recovery:
- Immediately stop recording new footage using your Tesla dashcam, and remove the USB drive. This prevents the new footage from overwriting the previous one.
- Connect your USB drive to a computer. To view your Tesla dashcam footage, go through these folders—RecentClips, SavedClips, and SentryClips. Take a look at each of them to ensure the footage you’re looking to recover is not present on the drive.
- Finally, and this can’t be stressed enough, don’t write any new files to the USB drive. This will substantially decrease, and potentially obliterate any chances of data recovery.
How to Recover Tesla Dashcam Footage
So, you didn’t find the required footage in your Tesla dashcam’s USB drive. Maybe you accidentally deleted it, or it’s vanished into thin air. The best thing you can do in this situation is to use a reliable data recovery program and scan your USB drive. Now, there are plenty of third-party data recovery tools that can help you achieve this, but it’s recommended you pick one from this list.
One great option is Disk Drill—it’s exceedingly easy to use, and it’s also one of the oldest players in the business. Additionally, the program’s in-built preview feature is a godsend when selecting which footage to recover. Due to the sheer number of files data recovery scans may uncover, a good preview feature makes the herculean task of determining which video you want to recover, much easier.
Disk Drill is available for both Windows, and macOS. The Windows version lets you recover up to 500 MB of data for free.
Here’s how to use Disk Drill to retrieve videos from your Tesla dashcam:
- Download Disk Drill, and install it.
- Connect the Tesla dashcam USB drive to your computer.
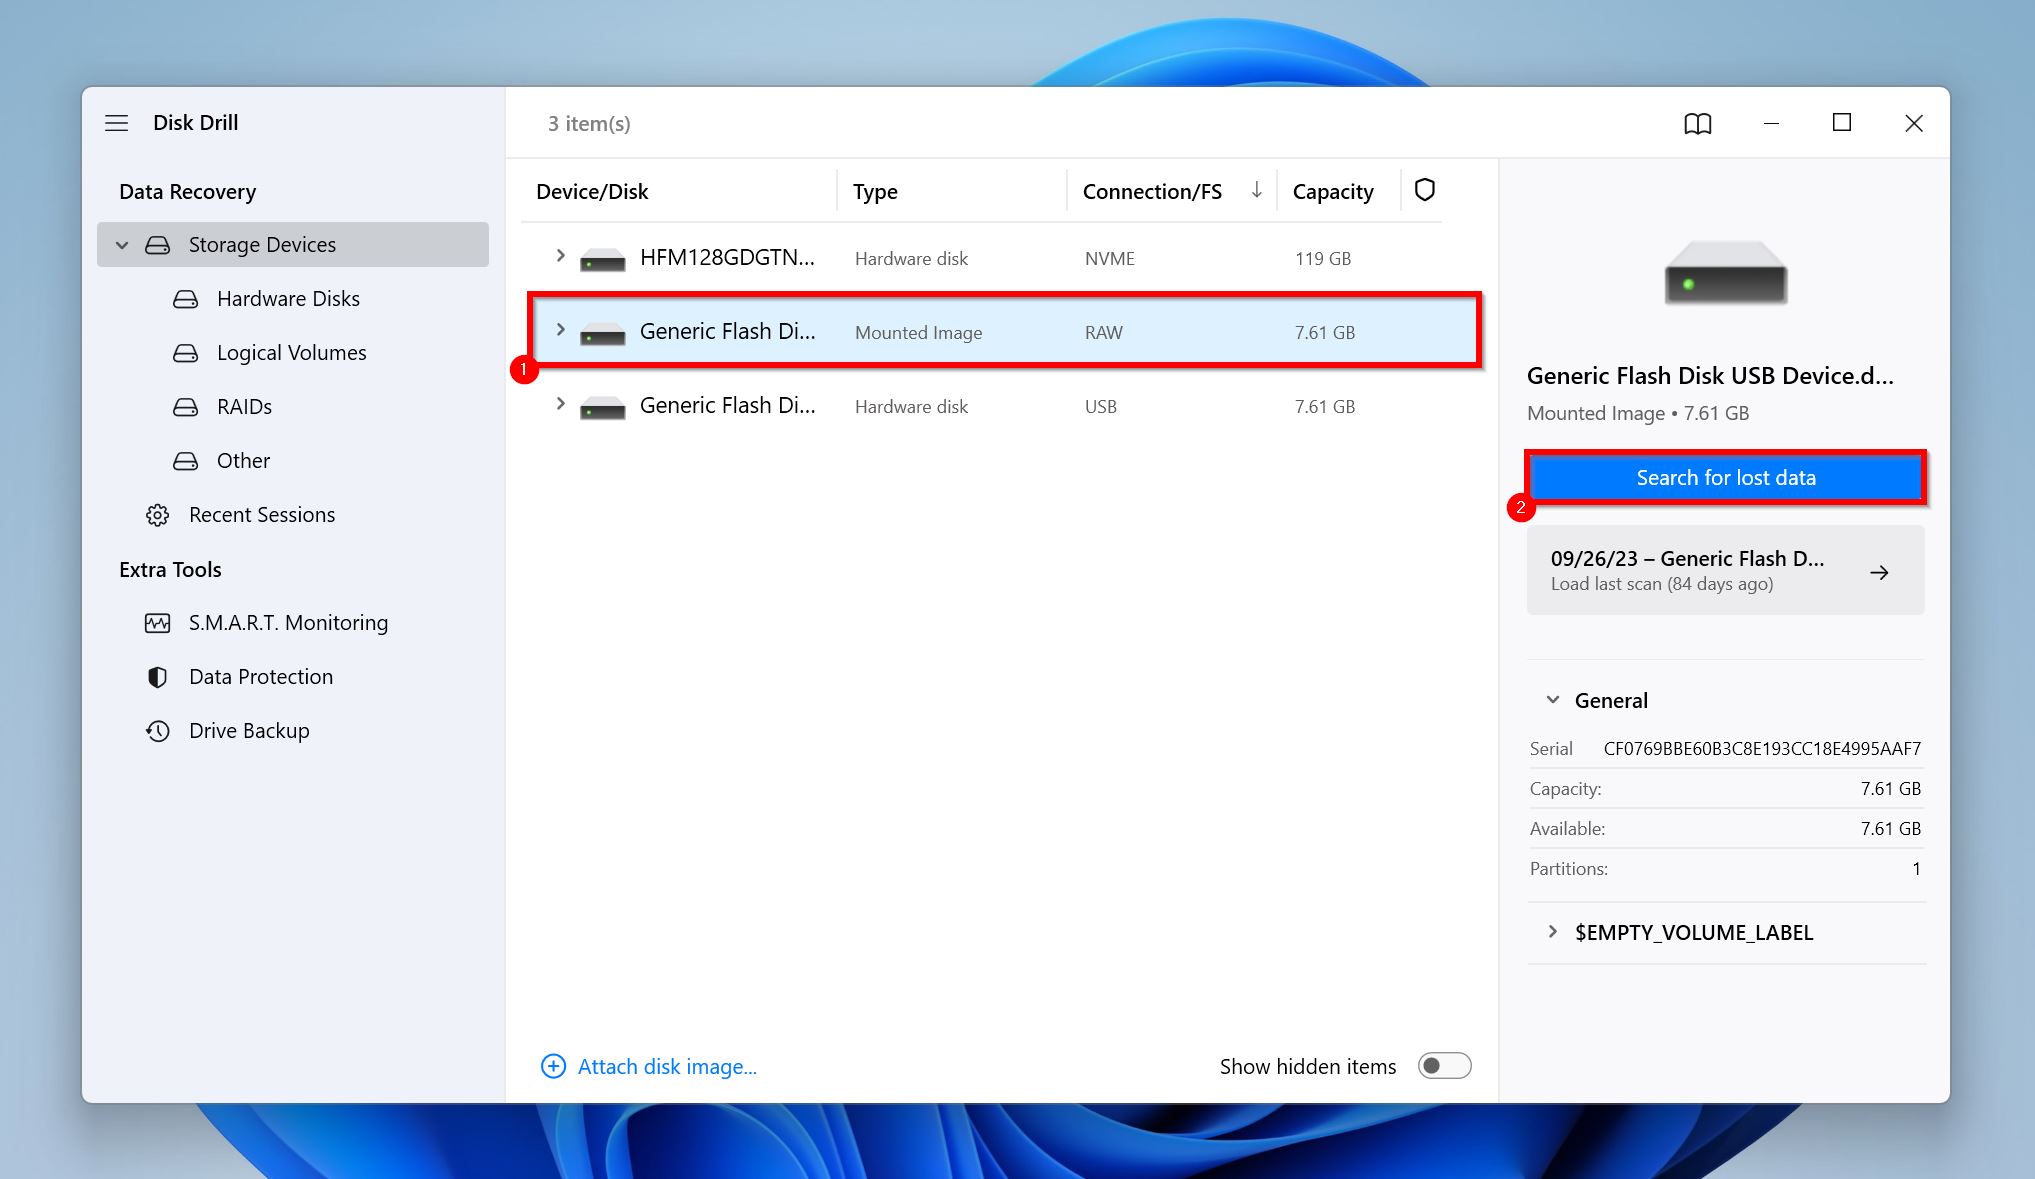
- Open Disk Drill, select the USB drive, and click on Search for lost data.
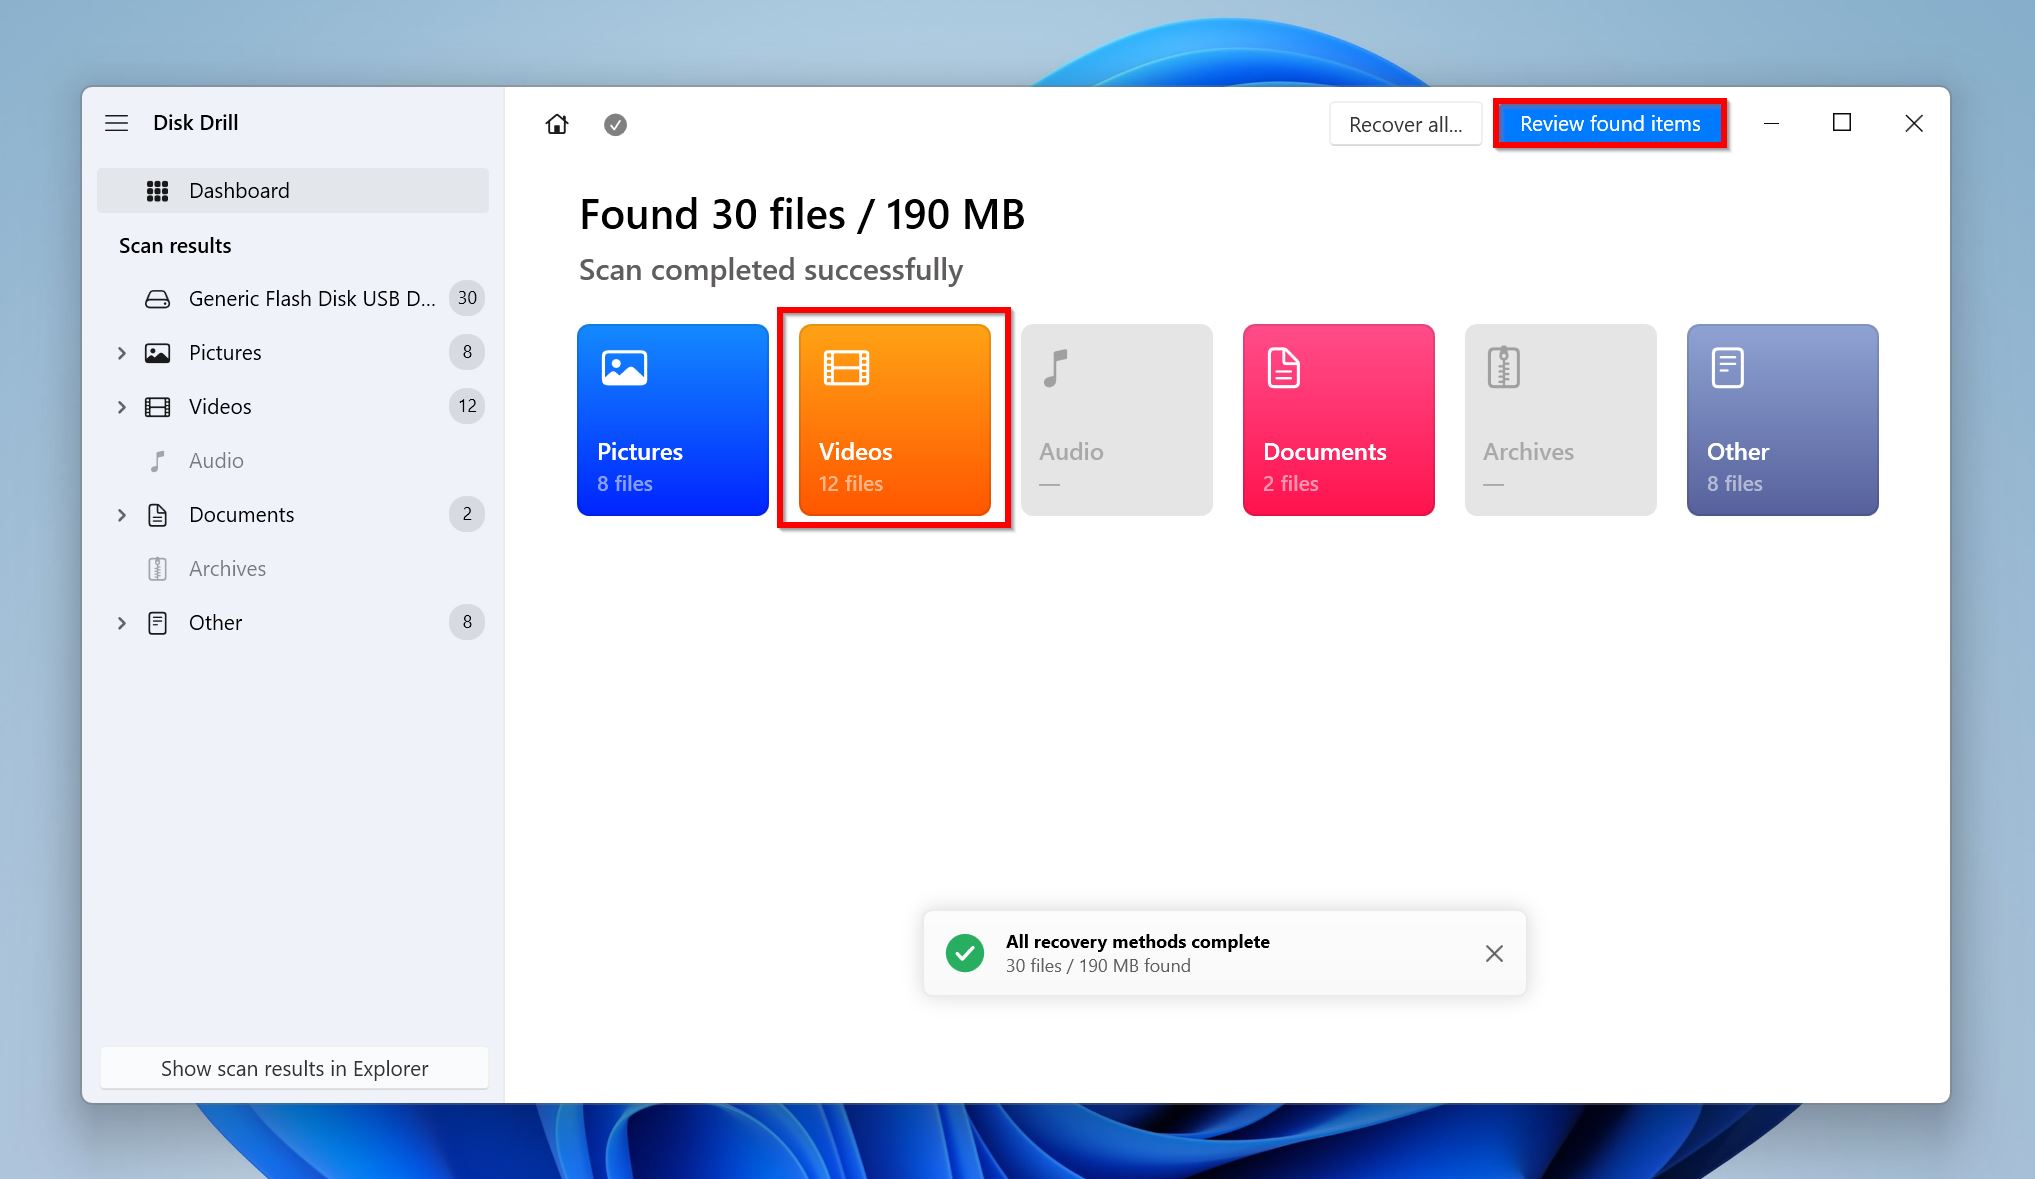
- Click on Videos once the data recovery scan completes. This will filter out the results to only display video files.
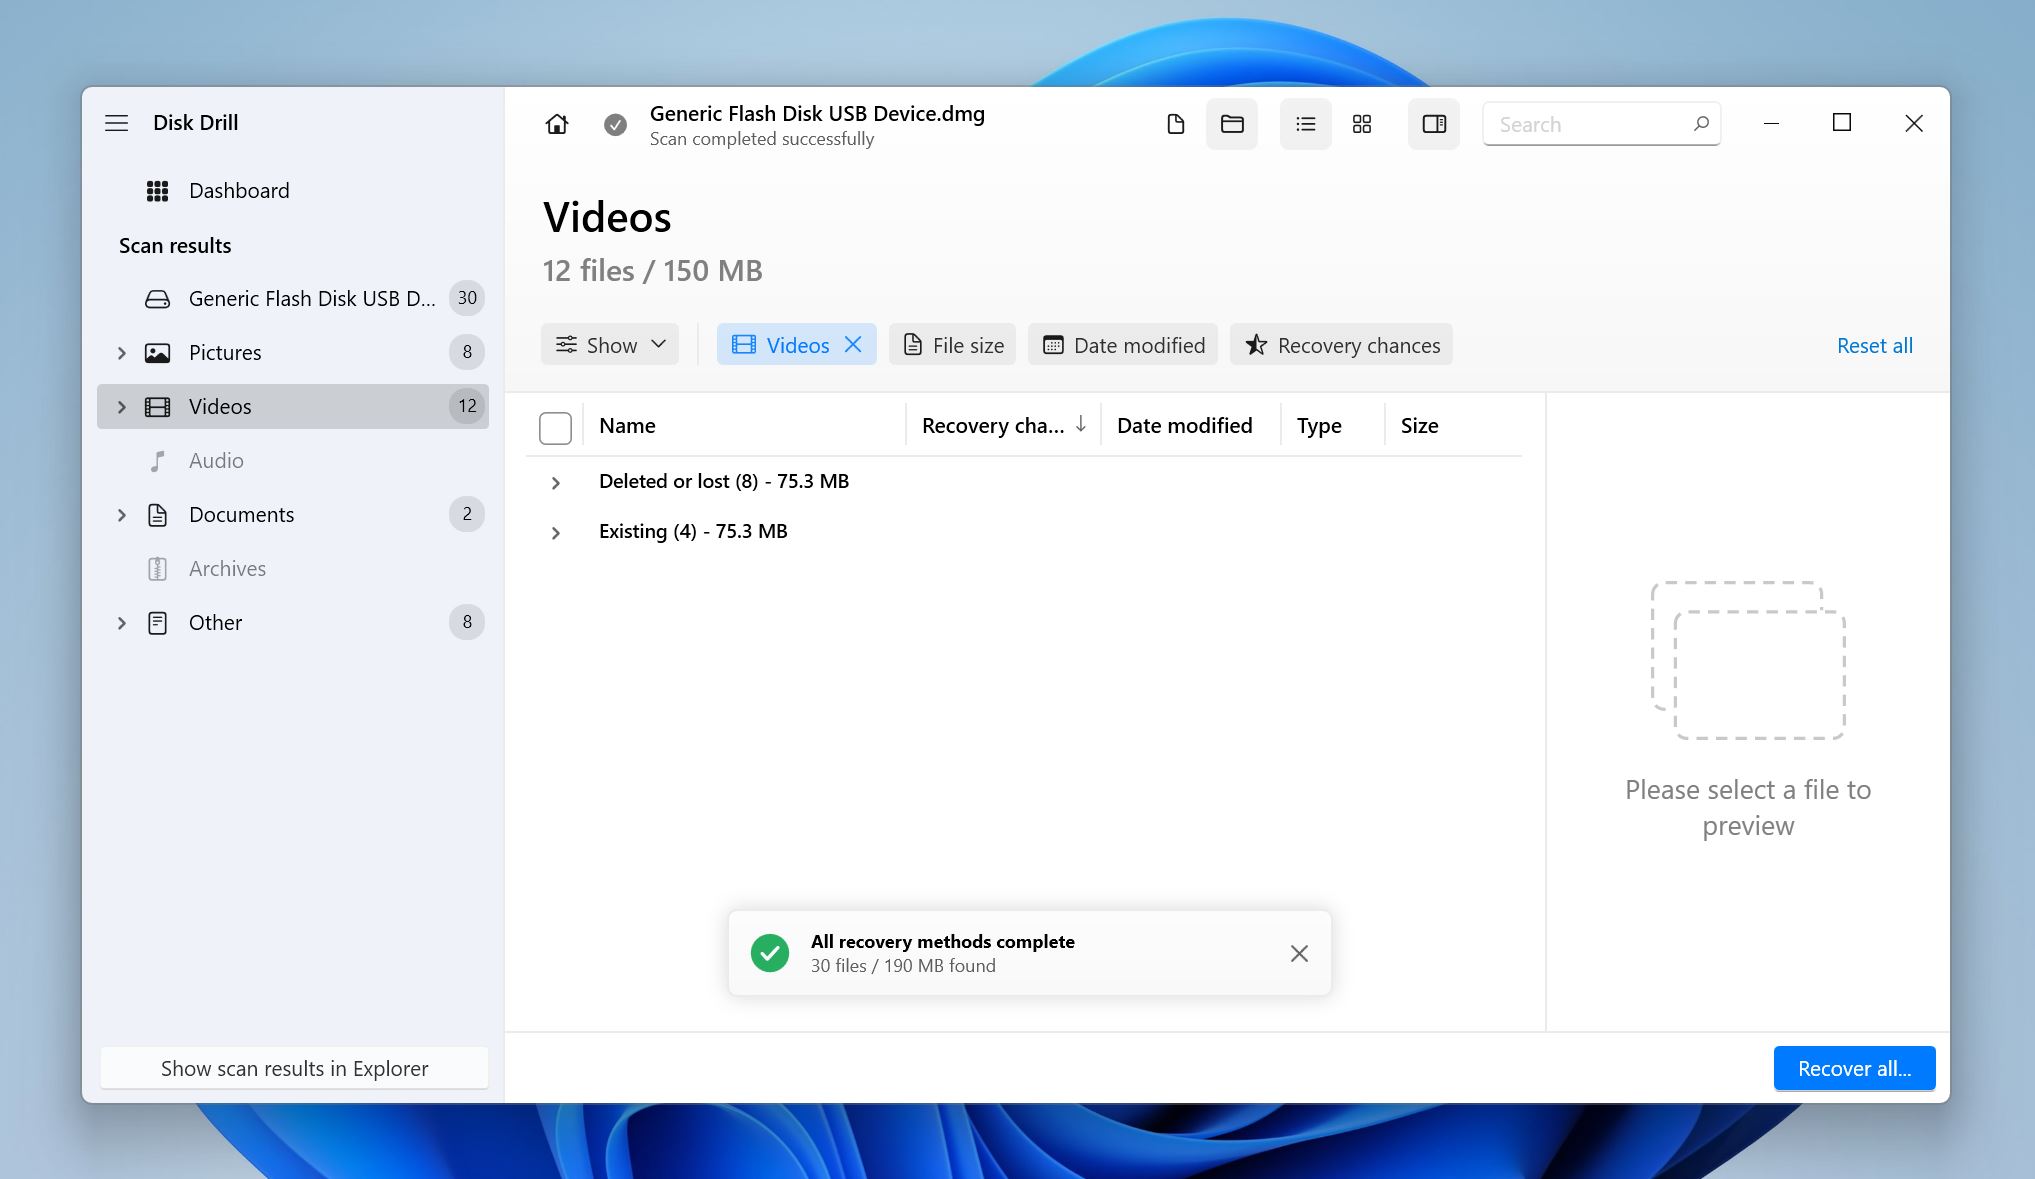
- Expand the Deleted or lost, and Reconstructed sections.
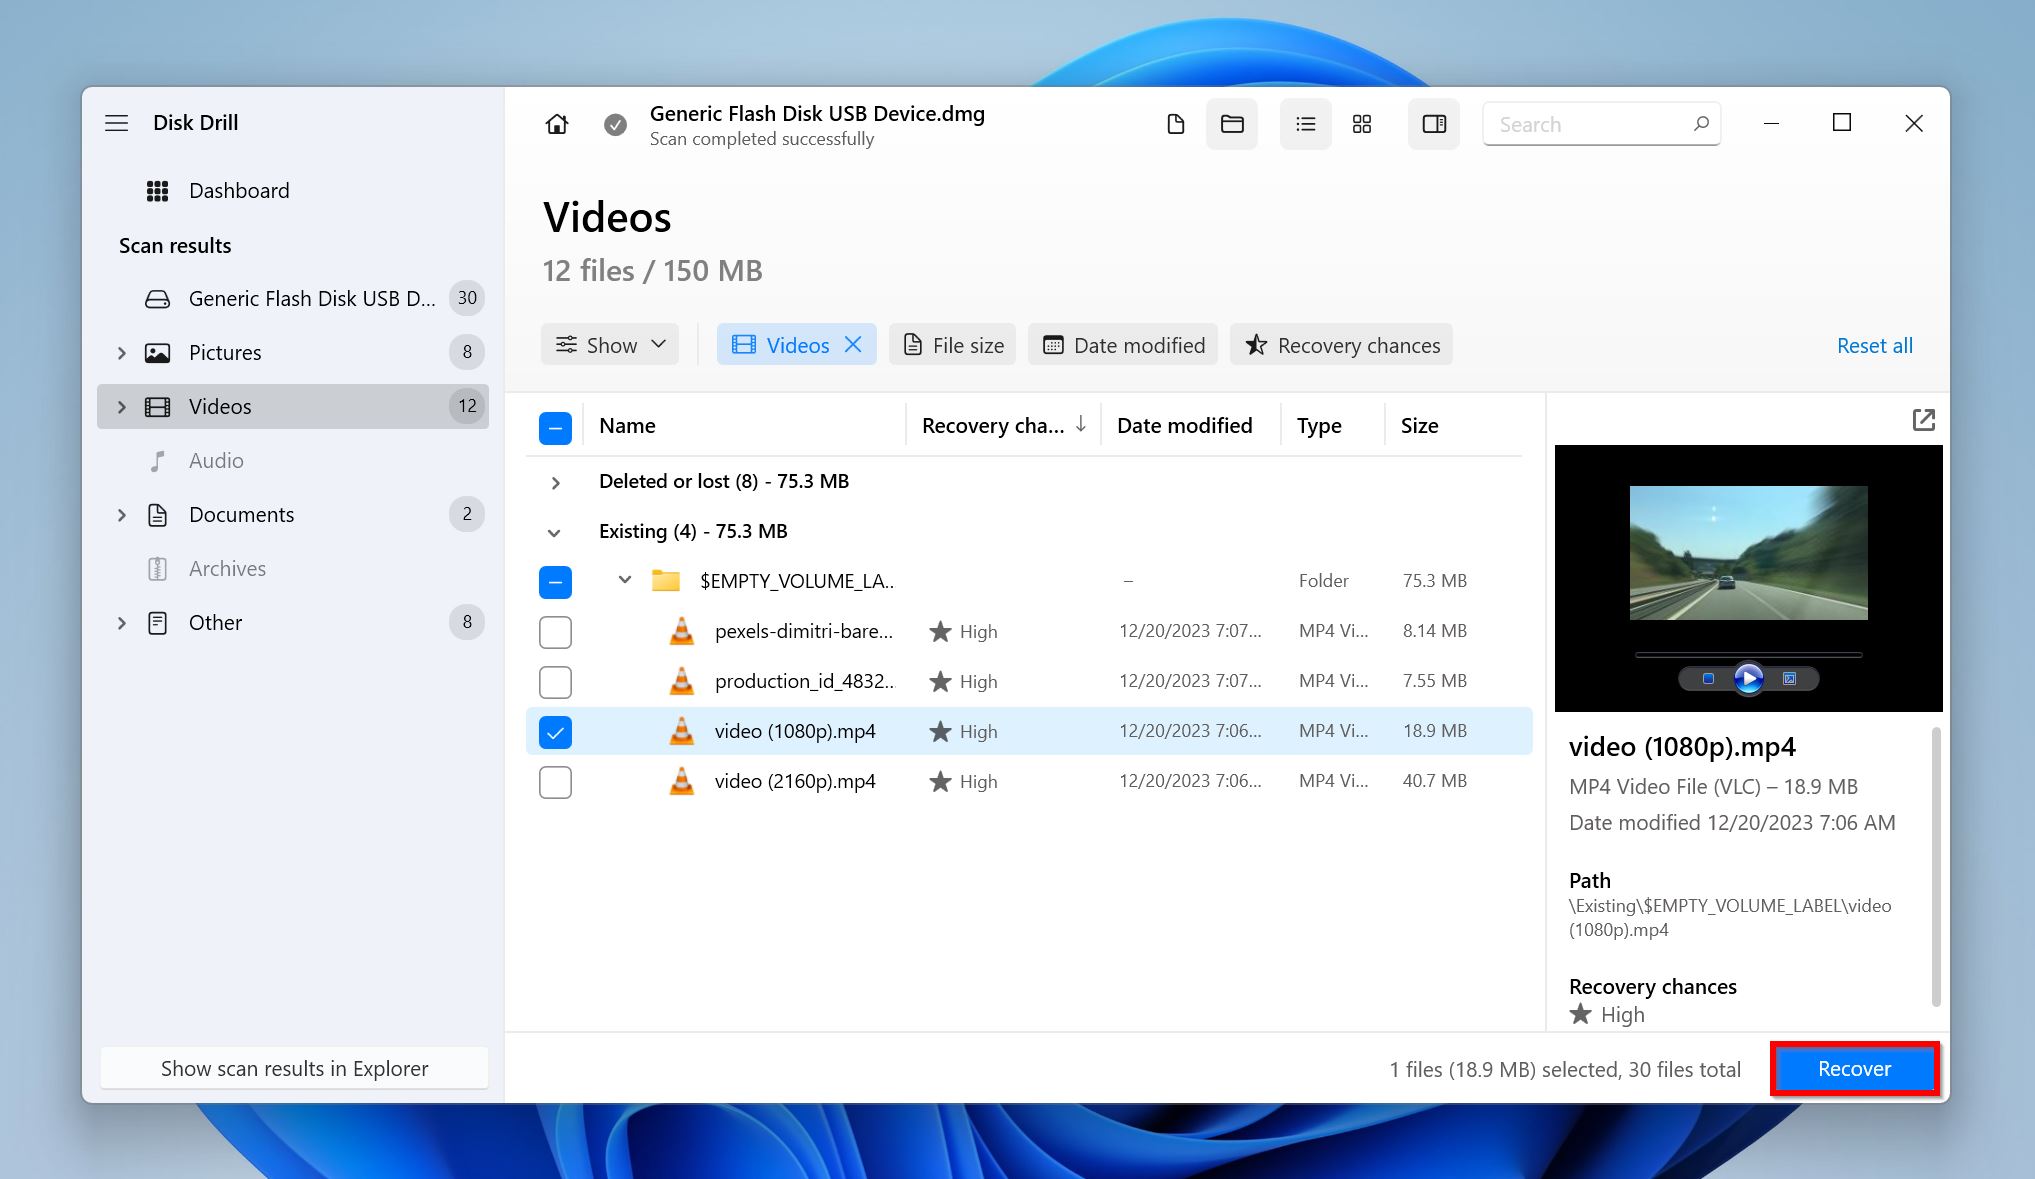
- Select the videos you wish to recover. Disk Drill displays a preview of the currently selected video, on the right pane, but you can manually preview any file by clicking the eye icon next to the filename. Click Recover once you’re done selecting.
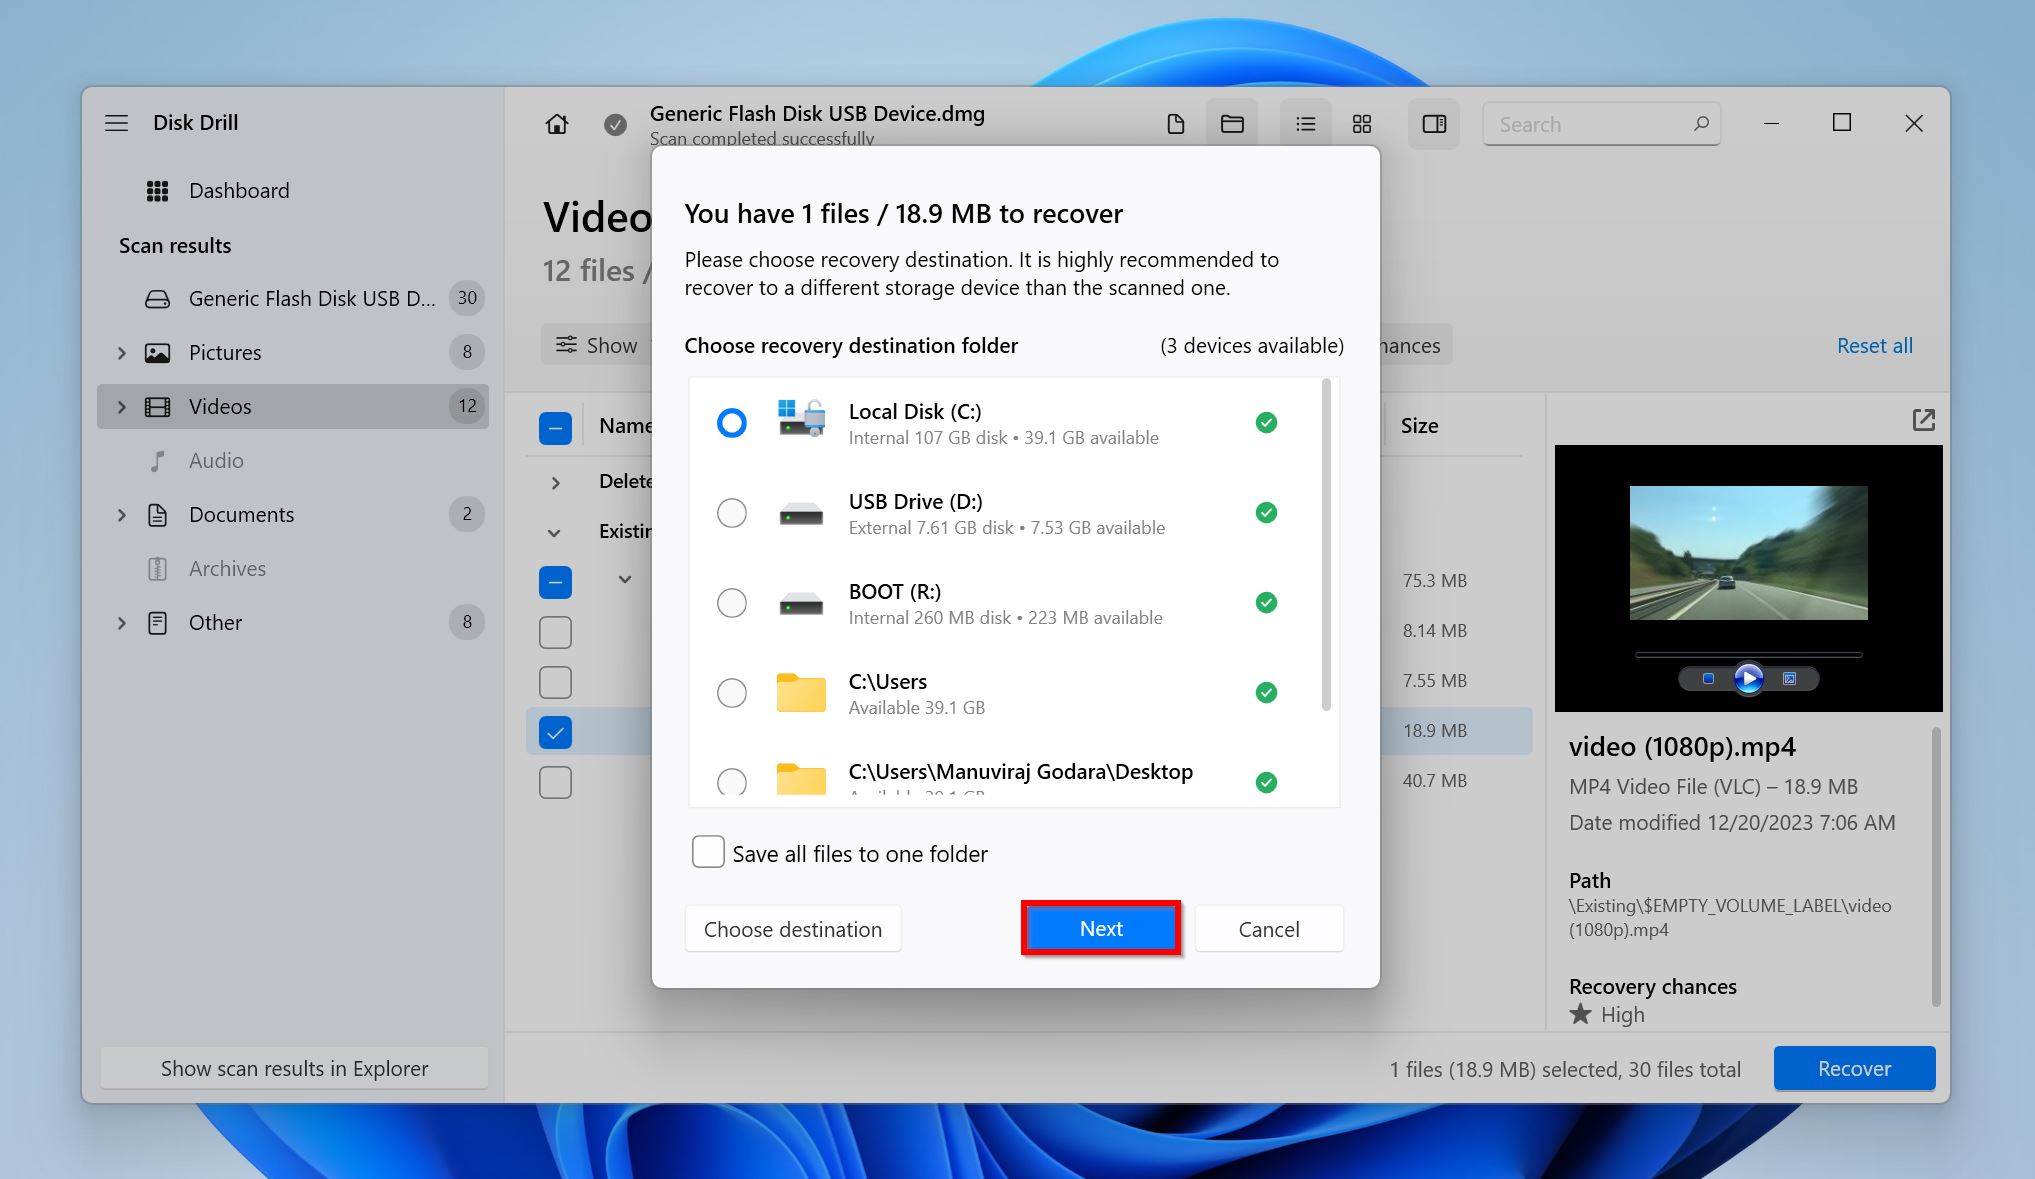
- Choose a recovery destination for the files. It’s recommended you save the videos to any other drive except the USB drive you’re recovering the videos from. Click Next.
- Disk Drill will recover the videos.


What To Do If DIY Data Recovery Didn’t Work?
Albeit rare, sometimes data recovery programs are unable to find the required dashcam footage. This could be because the footage was overwritten, or there’s a problem with the USB drive itself.
But, you’re not out of options yet.
There are two other things you can do to recover deleted footage from your Tesla dashcam:
Contact a Professional Data Recovery Service
A professional data recovery company can recover deleted footage from your USB drive for a fee. However, depending on how severe the data loss is, and how much footage you want to recover, using these services can be quite expensive. Luckily, most companies only charge you if the data is recoverable.
Here’s what to expect when using the services of a professional data recovery company:
- Contact the data recovery company, and explain your situation. Usually, companies have a 24*7 hotline.
- Ship your USB drive to the company for evaluation, or drop it off at a drop-off point. The evaluation itself is usually free.
- The data recovery company will get back to you with a quote. You can then decide if you want to go through with the recovery, or not.
- If you do decide to go ahead, the company will recover your data and typically ship it to you in a brand new storage drive.
(Only Applicable for Tesla Autopilot Recordings) Request Tesla to Retrieve the Footage
If the footage you’re looking to recover was recorded during a mishap—like an accident—when the car was in Autopilot mode, Tesla may have a copy of the clip. This too, if you’d opted in for data sharing.
Here’s how you request Tesla for your footage:
- Visit the Tesla Contact Us page and log in using your Tesla account credentials.
- Choose Data Privacy Request from the Regarding drop-down menu, under Ask a Question.
- Then choose Obtain a Copy of My Data from the next drop-down menu.
- Pick the data range and click on Submit.
Unfortunately, you can’t recover any continuously recorded dashcam footage (RecentClips), and Sentry footage using this method.
Measures Against Loss of Dashcam Footage in the Future
Dashcam footage can often be used to prove your innocence in case of a mishap. It can also help authorities find the bad guys in hit-and-run cases, etc.
There are some things you can do to ensure that important footage is never overwritten, or deleted:
- Copy the Footage to a Secondary Location: Every few days, remove your dashcam USB drive from your Tesla, connect it to a computer, and save all your footage in a secure location. Having a backup of your dashcam footage provides unparalleled peace of mind.
- Use the Cloud: It’s a shame Tesla dashcams don’t offer cloud storage features. But you can manually upload the videos from your USB drive to a cloud storage service of your choice. This ensures that your footage remains accessible no matter where you are. If you’re up for a little bit of technical DIY, here’s an article that outlines how to automatically store your Sentry Mode and dashcam videos on the cloud.
- Use Reliable USB Drives: USB drives have a finite lifespan, and cheap ones can give up on you quickly, and without warning. So yeah, don’t cheap out on a USB drive, especially if you have continuous recording enabled on your Tesla dashcam.
Conclusion
Well, recovering videos from your Tesla dashcam ain’t rocket science. Accidental deletion is easy to get back from—a good data recovery tool should be more than enough. However, the continuous recording feature in your Tesla dashcam continuously overwrites previous footage as well, which is what complicates data recovery.
If a data recovery program couldn’t help you out, you can always contact Tesla and request your data, or use the services of a professional data recovery company.