Reading Time: 8 minutesOneDrive is the cloud service provided by tech juggernaut Microsoft. It’s one of the more popular online storage platforms around, allowing users to upload their files to the internet for sharing, accessing on the go, or general safekeeping. But just because your files are backed up on the web doesn’t mean they’re immune from data loss.
In this guide, we’ll go through the different ways you can retrieve files from OneDrive that were accidentally deleted or lost due to unforeseen circumstances. This includes recovering data from a deleted user.
How to Find Lost or Missing Files in OneDrive
Before you dive right into the recovery portion of this guide, you should first make sure that your files have actually been deleted. After all, there’s always a chance that they may have just been moved to a different folder, or there could be an option that’s preventing them from appearing properly.
So here are a couple of steps you should take even before attempting data retrieval:
Step 1: Search for Lost files on OneDrive
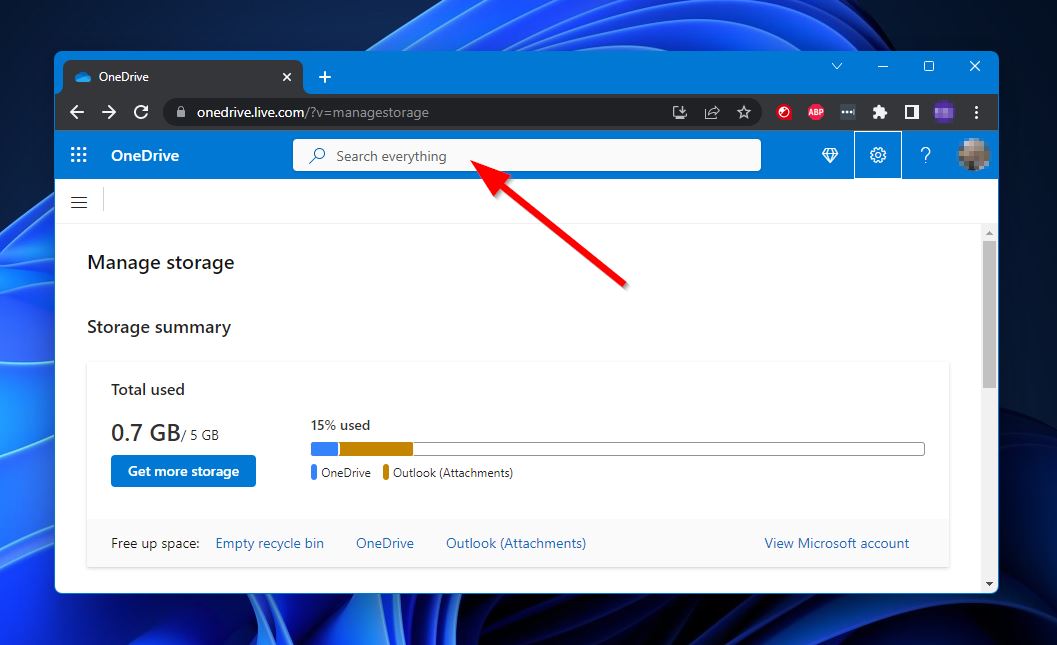
After navigating to the OneDrive homepage and signing into your account, you’ll notice a search bar near the top of the page labeled “Search everything.” Start off by inputting the names of your missing or deleted files into the search bar and do a quick scan of your OneDrive to see if they turn up.
Step 2: Check OneDrive Personal Vault Items
OneDrive has a “Personal Vault” feature where you can place a few important files that should be kept extra secure. Files that are deleted from this vault will not appear in the OneDrive Recycle Bin if the vault is locked. Since we’ll be tackling how to retrieve items from that Recycle Bin in the next section, let’s unlock it first.
To check OneDrive personal vault items, simply follow the steps below:
- First, head to the OneDrive homepage and log into your account.
- Next, click the “My Files” option on the left-side panel.

- Right-click “Personal Vault” from the list of available files and folders and choose “Unlock.”
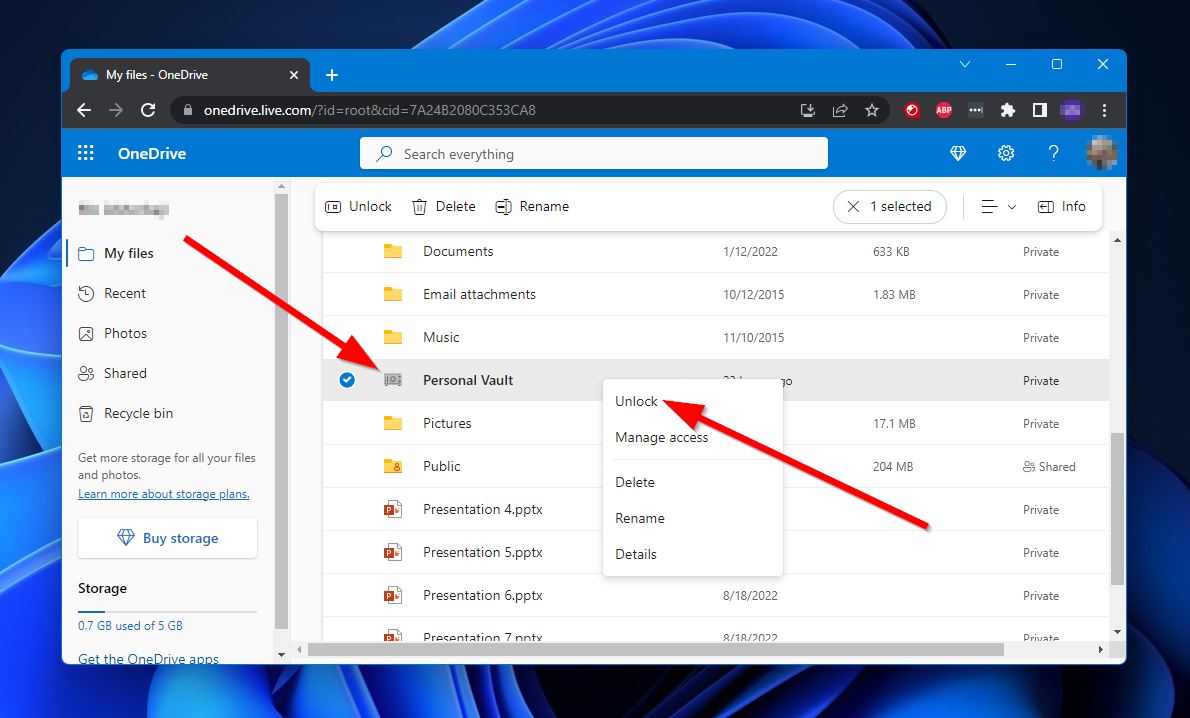
- Upon clicking, a small pop-up will appear, asking you to verify your identity using one of several methods. Select the one that’s most applicable to you and complete the verification process.
- After that, your “Personal Vault” should now be accessible, and any deleted files will appear in the Recycle Bin.
How to Recover Deleted Files or Folders in OneDrive
Depending on your circumstances, there are quite a few options available when it comes to recovering deleted files from OneDrive. One of the cloud service’s features might just do the trick, or you may have to depend on third-party software.
Method 1: Restore Files from the OneDrive Recycle Bin
When a file is deleted from OneDrive – accidental or otherwise – the most probable landing spot for it would be the platform’s Recycle Bin. Fortunately, for cases like these, the solution is exceedingly simple. You just have to head to the OneDrive recycle bin location and restore them.
Follow the steps below to restore deleted files from OneDrive Recycle Bin:
- First, head to the OneDrive homepage and log into your account.
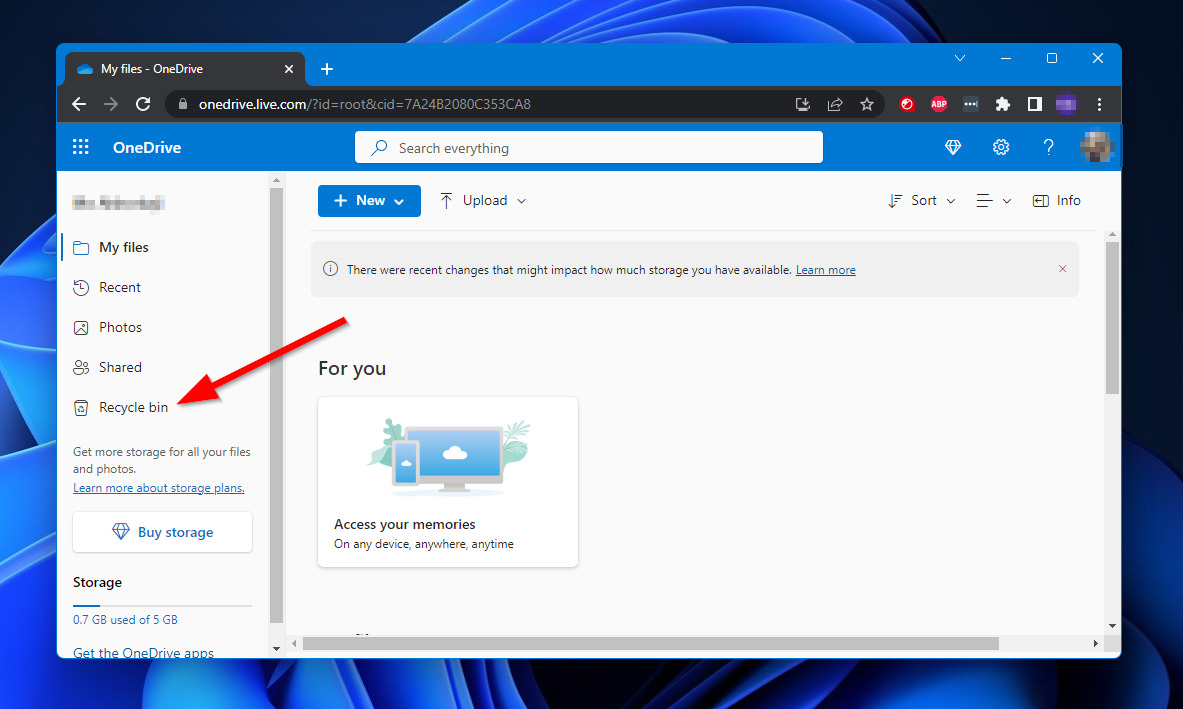
- Access OneDrive Recycle Bin from the left-side panel.
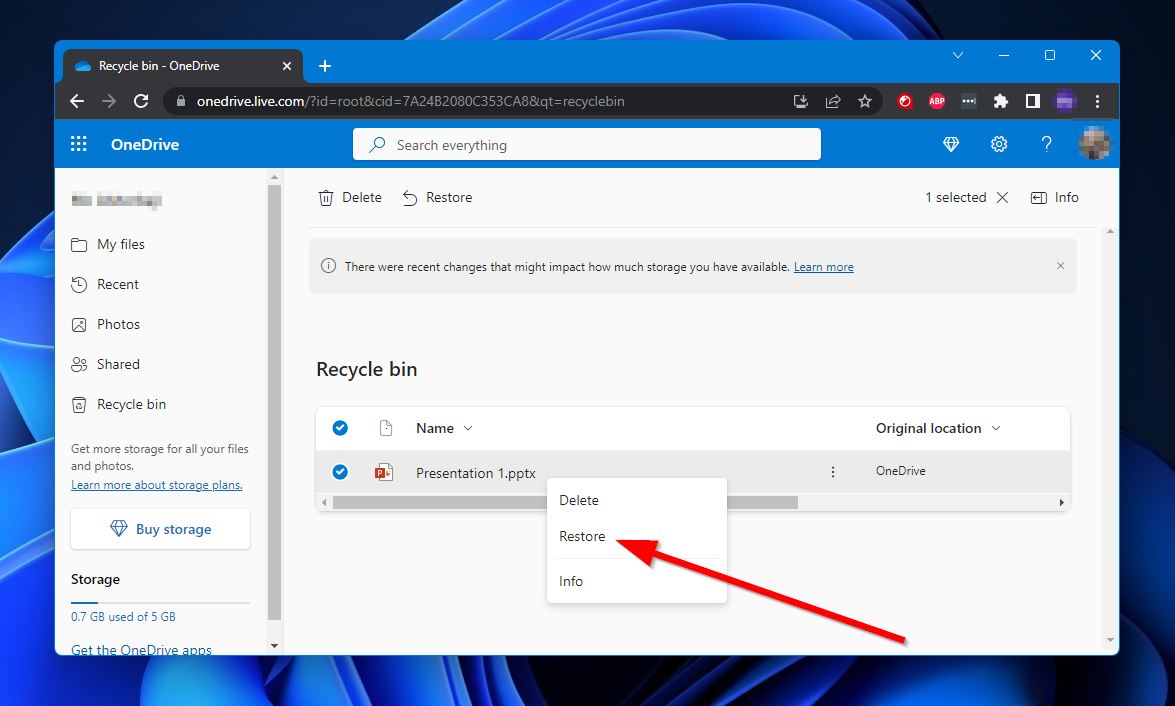
- Next, right-click the files you want to recover and select the “Restore” option.
Keep in mind that if you’re using a personal OneDrive account, files in the Recycle Bin will automatically be purged after 30 days. For school or work accounts, this will happen after 93 days.
Method 2: Restore Deleted Files from Your Desktop Recycle Bin
Take note that “online-only” files that are deleted from your OneDrive will not appear in your Windows Recycle Bin. The only ones that do are from folders that were shared with other users through the service.
Here’s a quick and simple step-by-step guide on how to recover OneDrive files that were deleted from shared folders:
- To get started, head to your Windows Recycle Bin from your desktop or “This PC.”
- Right-click the files you want to recover and choose the “Restore” option.
Method 3: Recover Permanently Deleted Files from OneDrive with Data Recovery Software
Deleted OneDrive files that were saved on a local disk can be restored with the help of a proficient data recovery program. These types of software are generally designed to scan for any files that were erased or lost from a storage device.
Disk Drill is one of the more popular options, boasting incredible recovery rates, an attractive user interface, and highly efficient scans. Some of its other highlights include the following:
- Support for just about any file type there is, whether it’s media files, documents, or archives.
- Compatible with most file systems and storage devices on both Windows and Mac.
- Has a Cross-Platform Scanning feature that lets you start a scan on one type of OS and continue it on another.
In case you’re not completely sold on the program, you can try Disk Drill’s free trial version. This lets you experience all of the app’s features and recover up to 500 MB worth of files.
To recover permanently deleted files from OneDrive using Disk Drill, simply follow the steps outlined below:
- To get started, download the Disk Drill installation file from the Cleverfiles website and install it on your computer.
- Next, run the program and select the storage device where your lost OneDrive files were last saved. By default, this is the same drive where your operating system is installed. Click the “Search for lost data” button to continue.
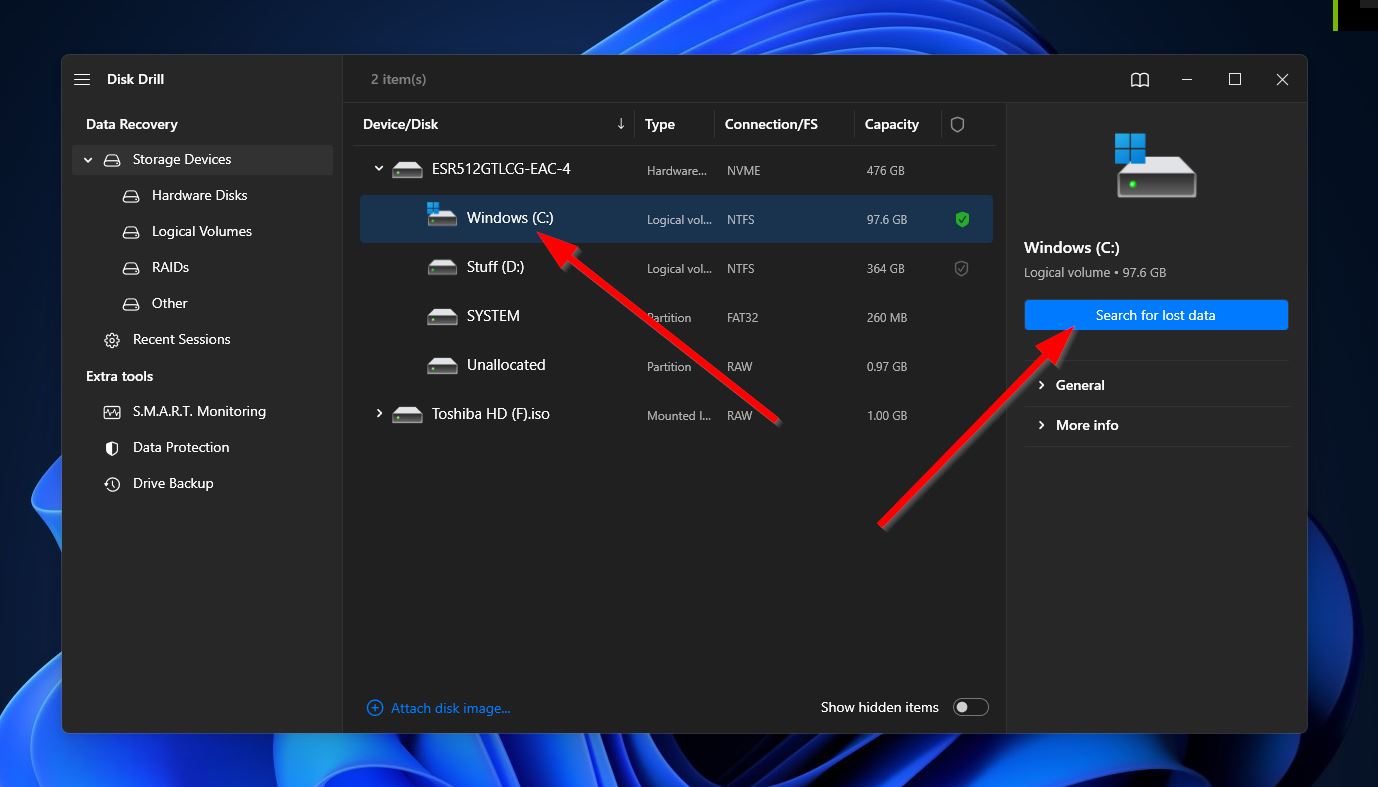
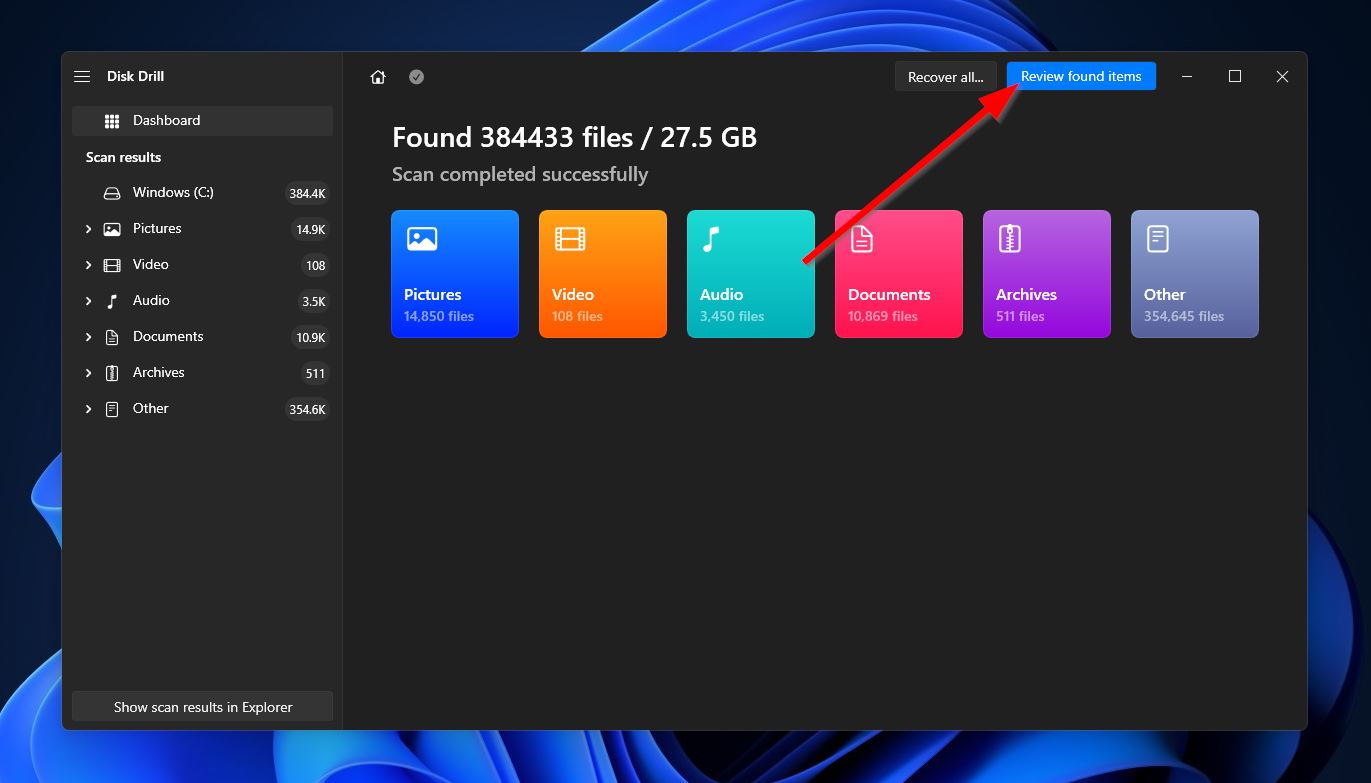
- Upon clicking, Disk Drill will start scanning your drive for any deleted or missing files that can be retrieved. Of course, the larger the storage capacity of your drive, the longer this process will take. As the scan continues, you can click the “Review found files” button on the top-right corner to switch to the results screen and check out which files have been located so far. You can also simply wait for the scan to end first then click the same button to browse through the results.
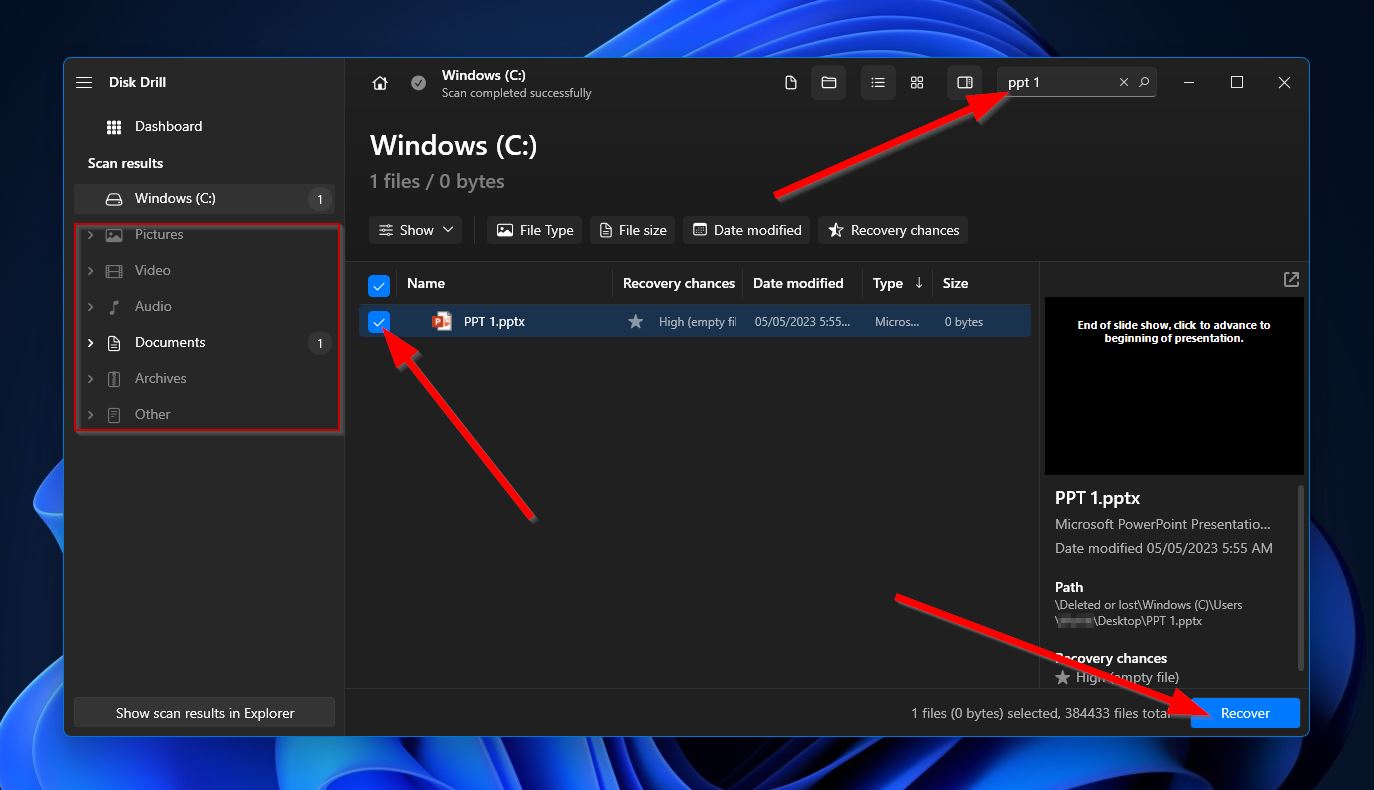
- Once you get to the results section, you’ll have to browse through the found files until you find the deleted OneDrive ones that you’re looking for. You can make this process a whole lot easier by using the category filters on the left side of the screen or the search bar at the top-right corner. It’s worth noting that the search bar allows both file names as well as extensions. When you locate the files that you’re after, simply tick the checkboxes beside the file names to select them, then hit the “Recover” button to proceed to the next step.
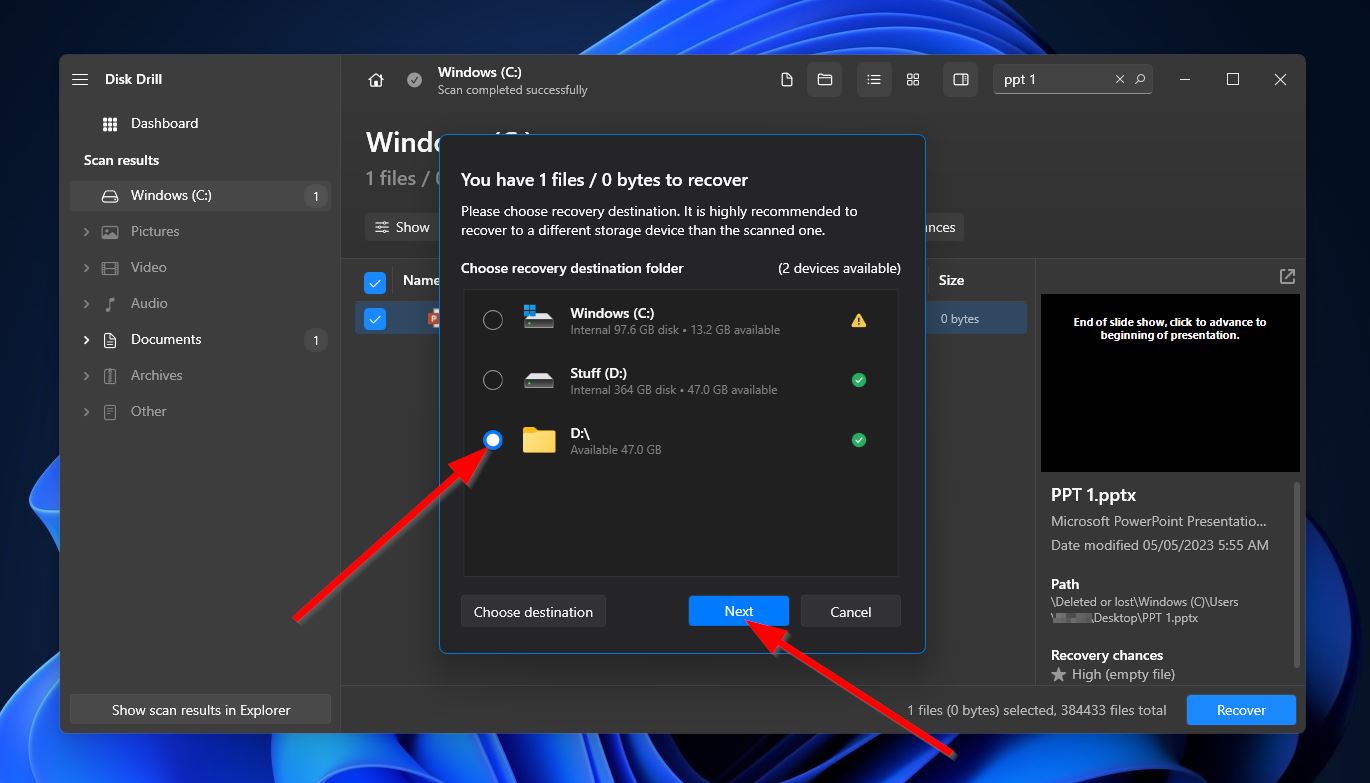
- Next, a small window will appear where you’ll be asked to choose a storage location for your recovered files. This has to be on a different storage device than the one you’re trying to recover from. Click “Next” once you’ve decided.
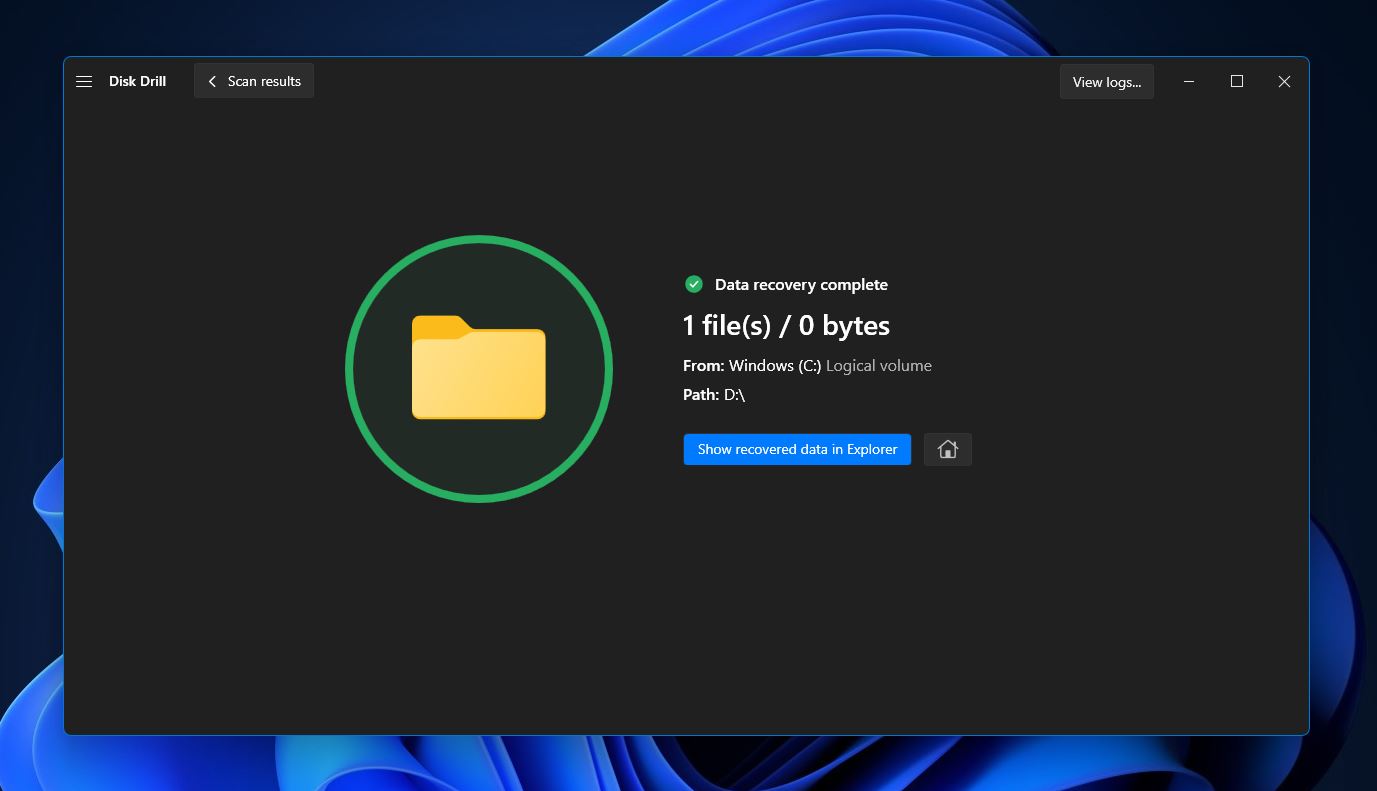
- After that, Disk Drill will now begin attempting to recover the files you selected. Once done, you’ll see a completion message with a button labeled “Show in Recovered Files in Explorer.” Clicking the button will open the folder where your restored files are saved.
Method 4: Restore Entire OneDrive
If none of the aforementioned methods work for you, you can try restoring your entire OneDrive account to a previous time. However, this is only possible for users who have a Microsoft 365 subscription.
Here’s how you can restore OneDrive to recover deleted files:
- First, head to the OneDrive homepage and log into your account.
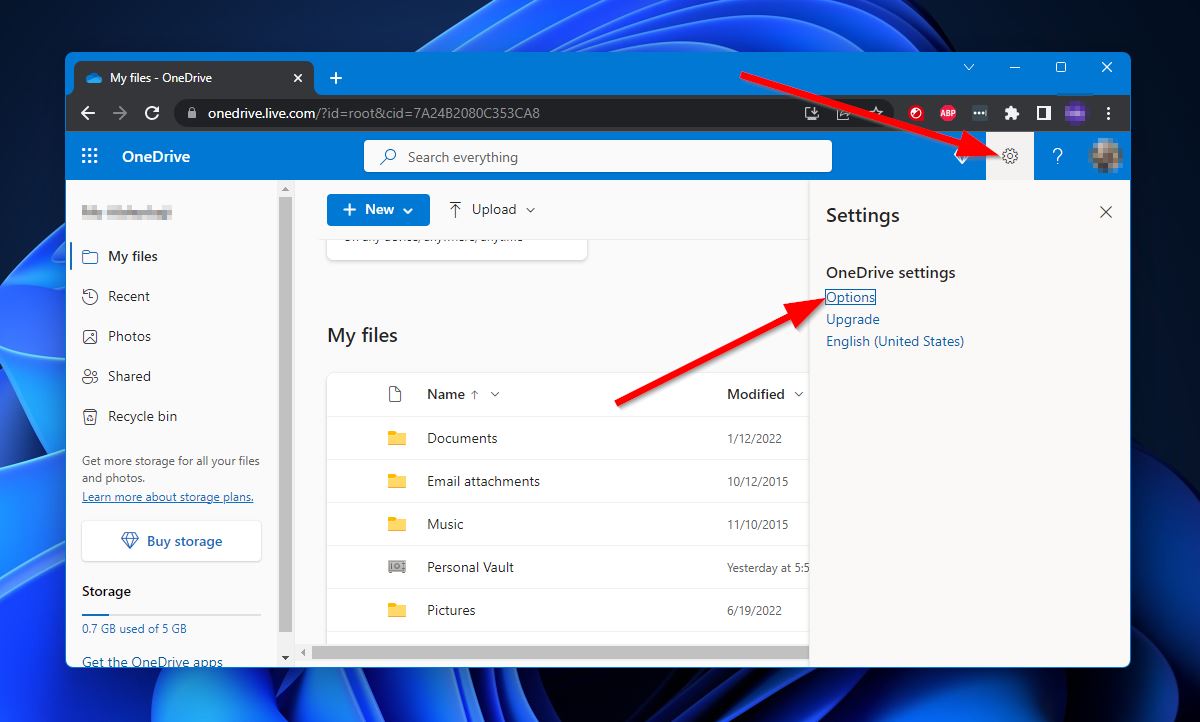
- Click the settings wheel on the top-right corner and select “options.”
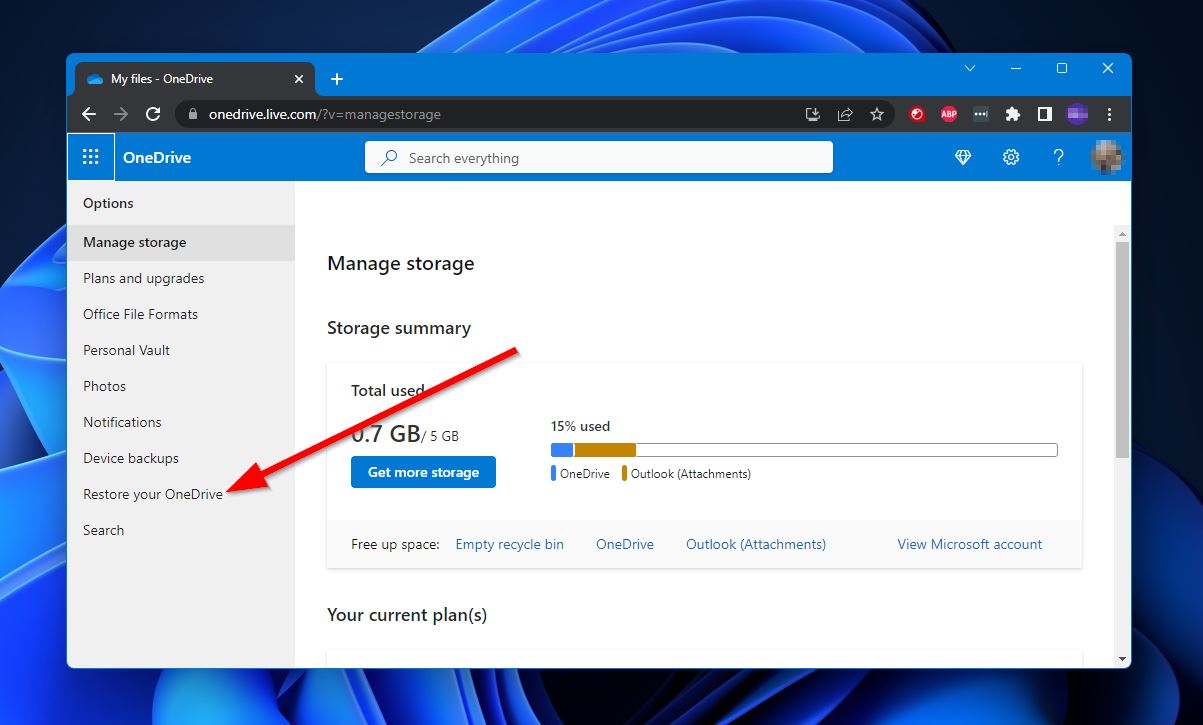
- Next, choose “Restore your OneDrive.”
- Finally, select the date that you want to restore your OneDrive to and click “Recover.”
How to Recover OneDrive Files from Deleted User
Before you can recover files belonging to a deleted user, you need to restore the deleted user first. For users that have been deleted within the past 30 days, the user and all their files can be restored through the Microsoft 365 admin center. Needless to say, you’ll need a Microsoft 365 subscription and global admin access to perform this.
Here’s how you can easily recover OneDrive files from a deleted user:
- Head to the Microsoft 365 admin portal and log in using the necessary credentials.
- Navigate to “Users” followed by “Deleted users”.
- Select the users you would like to recover and then click “Restore.”
Users who have been deleted for more than 30 days will no longer appear in the Microsoft 365 admin center, requiring you to use Windows PowerShell to restore the OneDrive instead. To do this, simply follow these steps:
- First, download and install SharePoint Online Management Shell.
- Run the PowerShell tool and connect to SharePoint as a global admin using the command “Connect-SPOService -Url https://contoso-admin.sharepoint.com -Credential admin@contoso.com.”
- After that, a Windows PowerShell credential request dialog box should appear, after which you’ll need to key in your password.
- Type in the command “Get-SPODeletedSite -Identity <URL>” to determine whether or not the user can be restored. In this case, “<URL>” refers to the URL string of the account. This is based on the username, which you can find in the Active or Deleted Users section of the Microsoft 365 admin center. A sample URL would look something like “https://contoso-my.sharepoint.com/personal/SampleUser1″>https://contoso-my.sharepoint.com/personal/SampleUser1”
- Next, key in “Restore-SPODeletedSite -Identity <URL>” to restore the user back to an active state.
- Finally, type in “Set-SPOUser -Site <URL> -LoginName <UPNofDesiredAdmin> -IsSiteCollectionAdmin $True” to assign an administrator to the particular OneDrive in order to access any required data. “<UPNofDesiredAdmin>” here refers to the email address of the user you’re trying to recover.
FAQ:
- Use a data recovery program if the files were stored on your local disk
- Restore your OneDrive to a previous date
- Bad sectors
- Outdated drivers
- Corrupted operating system files
- Outdated or corrupt OneDrive client


