
Reading Time: 9 minutesSometimes you may find that your Windows user profile has suddenly disappeared for some unknown reason. When this happens, your personal system settings and personal files that were stored in the system’s user folders are missing.
In this article, we’ll walk you through different ways to restore a lost user profile in Windows, retrieve personal files from it, and even rebuild your profile if needed.
Reasons for Windows User Profile Deletion
Although information about the reason for the loss of the profile will not recover the profile or data from it, it is key to preventing the situation from happening again in the future. A user profile can be deleted for several reasons – some are clear, while others occur silently in the background.
- 😬 You might accidentally delete your profile during routine cleanup or when managing user accounts, especially if there are multiple profiles on the system. It’s easy to think you’re removing temporary files or unused folders, only to realize that you’ve deleted an entire user directory from the “Users” folder.
- 🤖 Programs or scripts you’ve installed may interact incorrectly with the system, leading to profile loss. This can include cleanup tools, antivirus software, or automated maintenance tasks that mistakenly flag your profile data as unnecessary and remove it without clear attention.
- ⚙️ After Windows installs an update, especially large feature updates or patches, you might find that your profile no longer appears or that Windows has replaced it with a temporary one. In certain cases, changes to the registry that occur during the update can stop Windows from loading your original profile correctly.
- 👾 Malware or viruses can also cause the issue. These threats may corrupt your profile, delete key files, or modify system registry entries. As a result, your account does not load properly. In more severe cases, ransomware encrypts or erases entire user folders before you can respond.
How to Restore a Deleted User Profile
In many cases, the profile itself still exists in some form – either in hidden system files, restore points, or previous versions stored by Windows. Regardless of the reason, we recommend proceeding from the first method to the last for optimal results.
Before you begin, make sure you’re logged into Windows with administrative privileges. This will allow you to access system-level recovery tools and registry settings.
Method 1. Use Windows System Restore
If your user profile disappeared recently, System Restore can help restore it – but only if you had restore points enabled before the deletion occurred. This method rolls back system files and settings to a previous state from a backup point, which can restore a missing user profile, but it does not affect your personal files. That is, this approach can restore the functioning of the system profile, but the lost personal files will need to be restored separately.
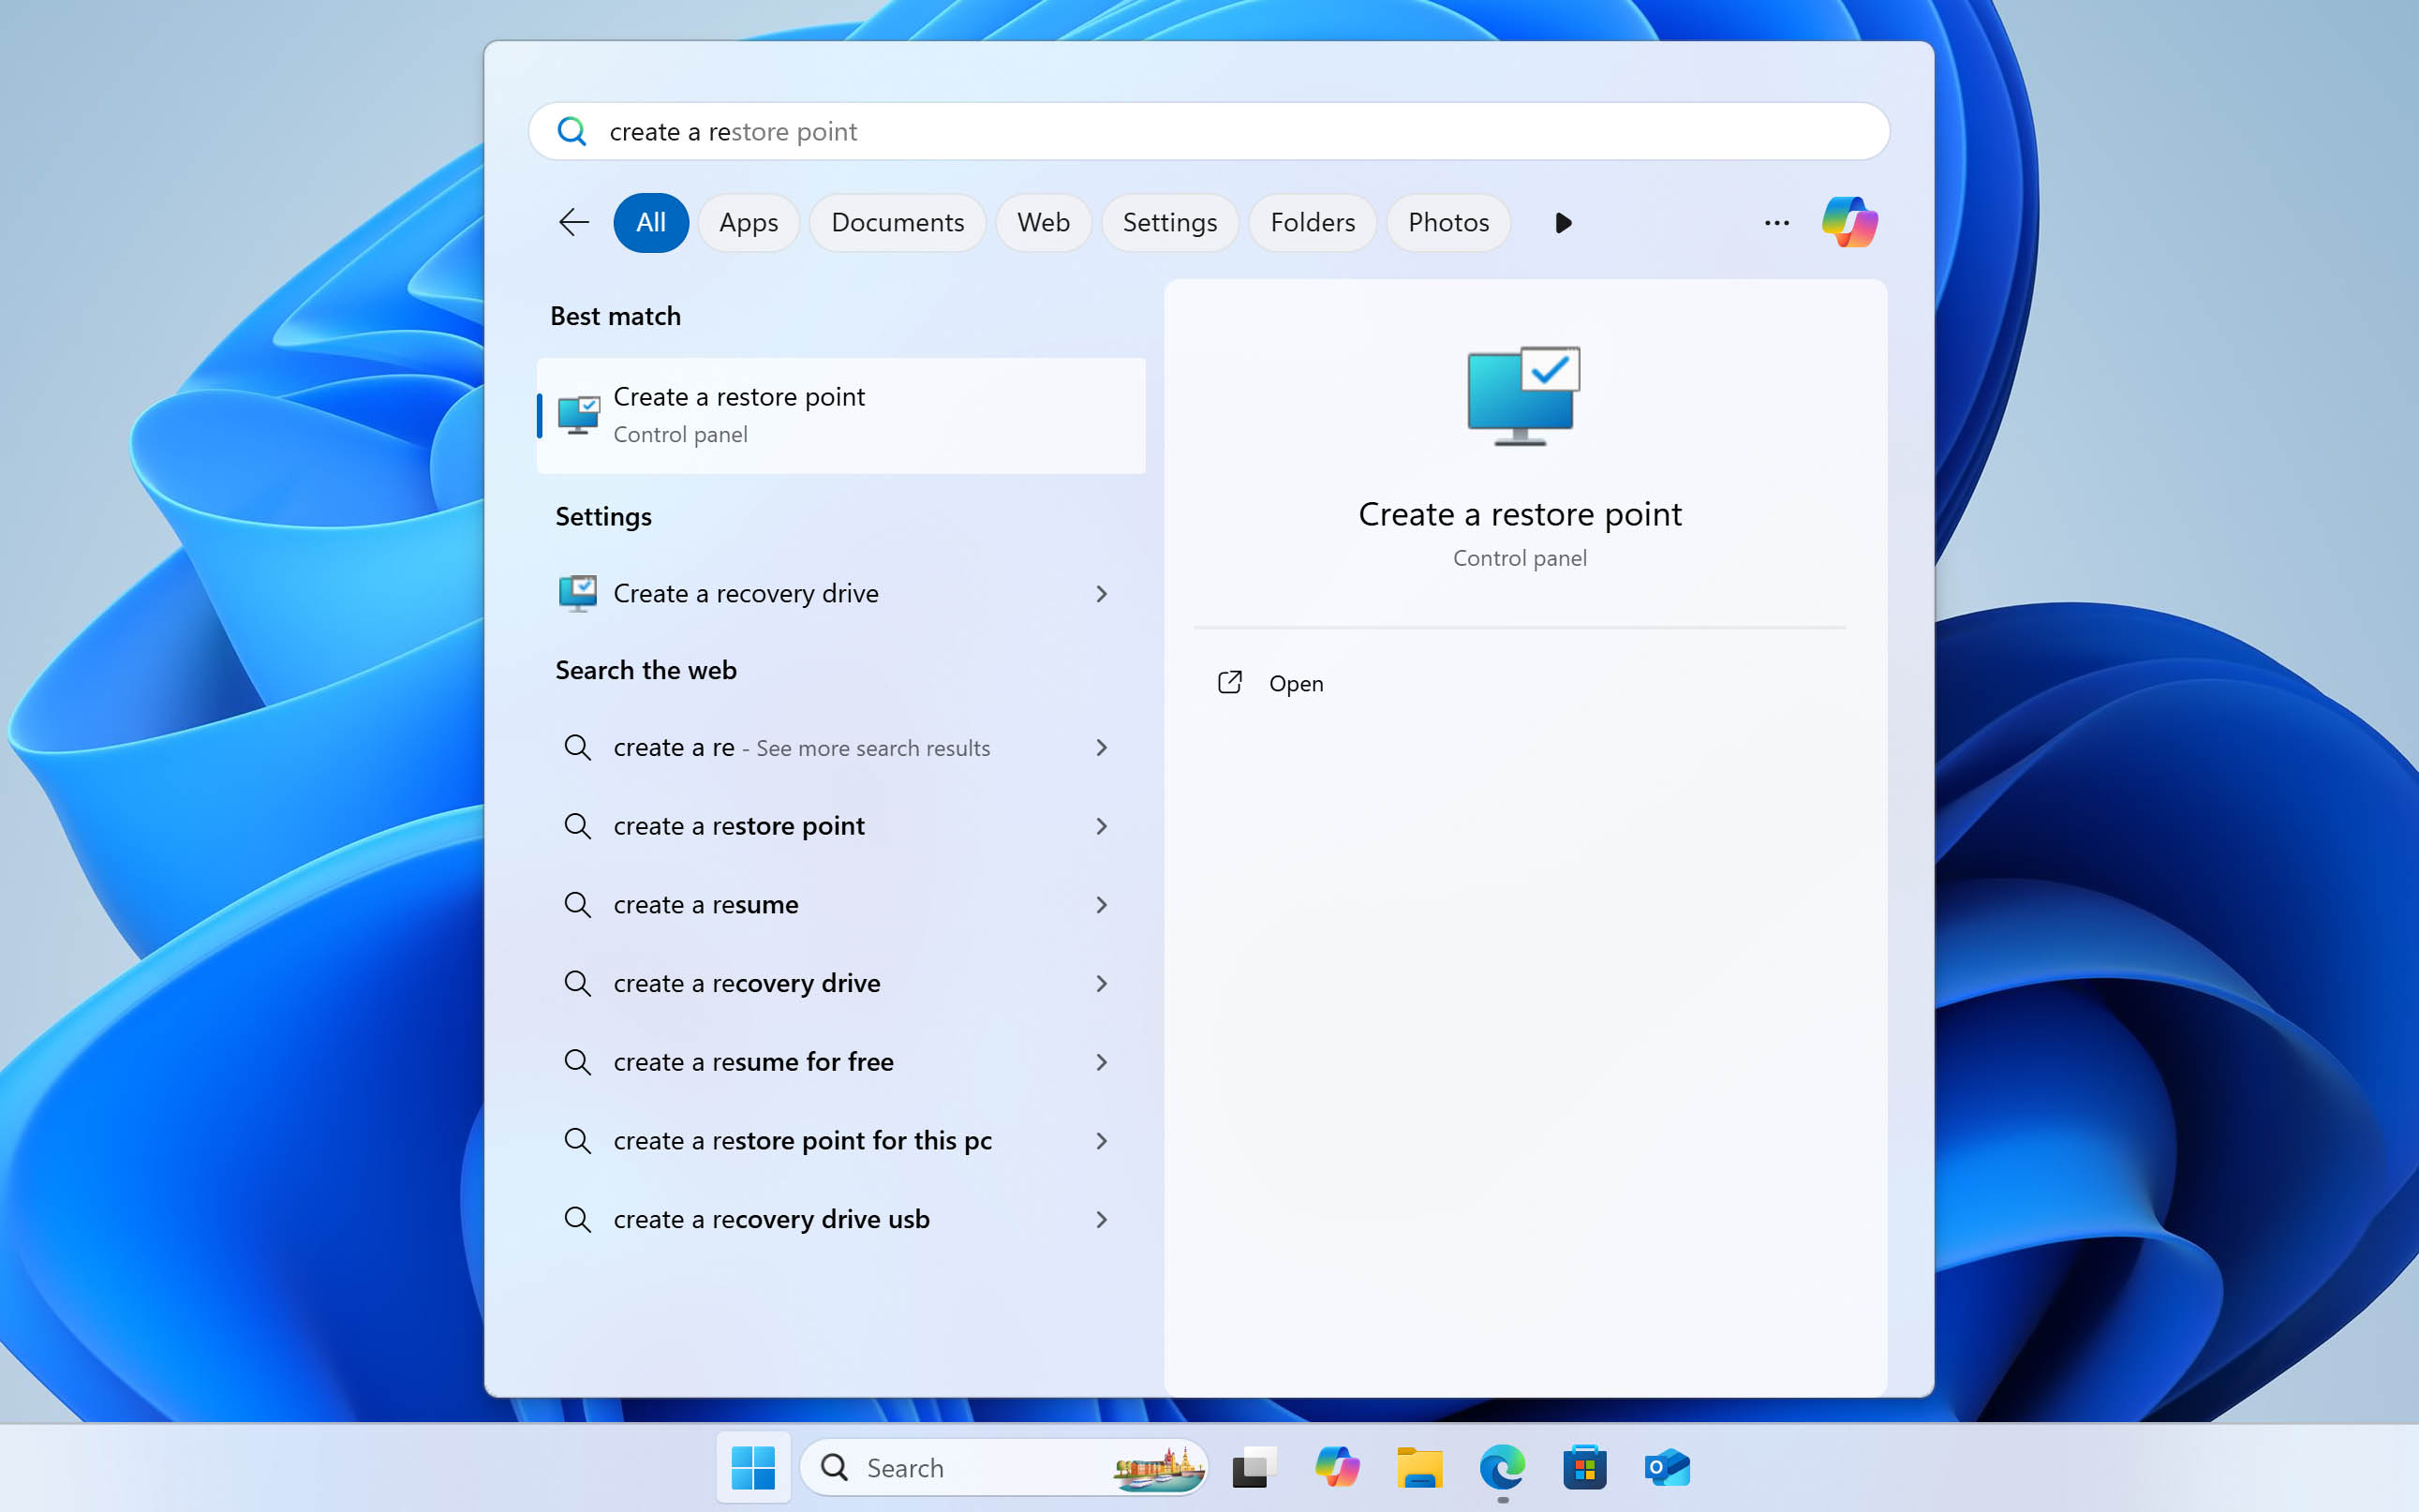
- Press Win + S and type ‘restore point’, then click on Create a restore point from the search results.
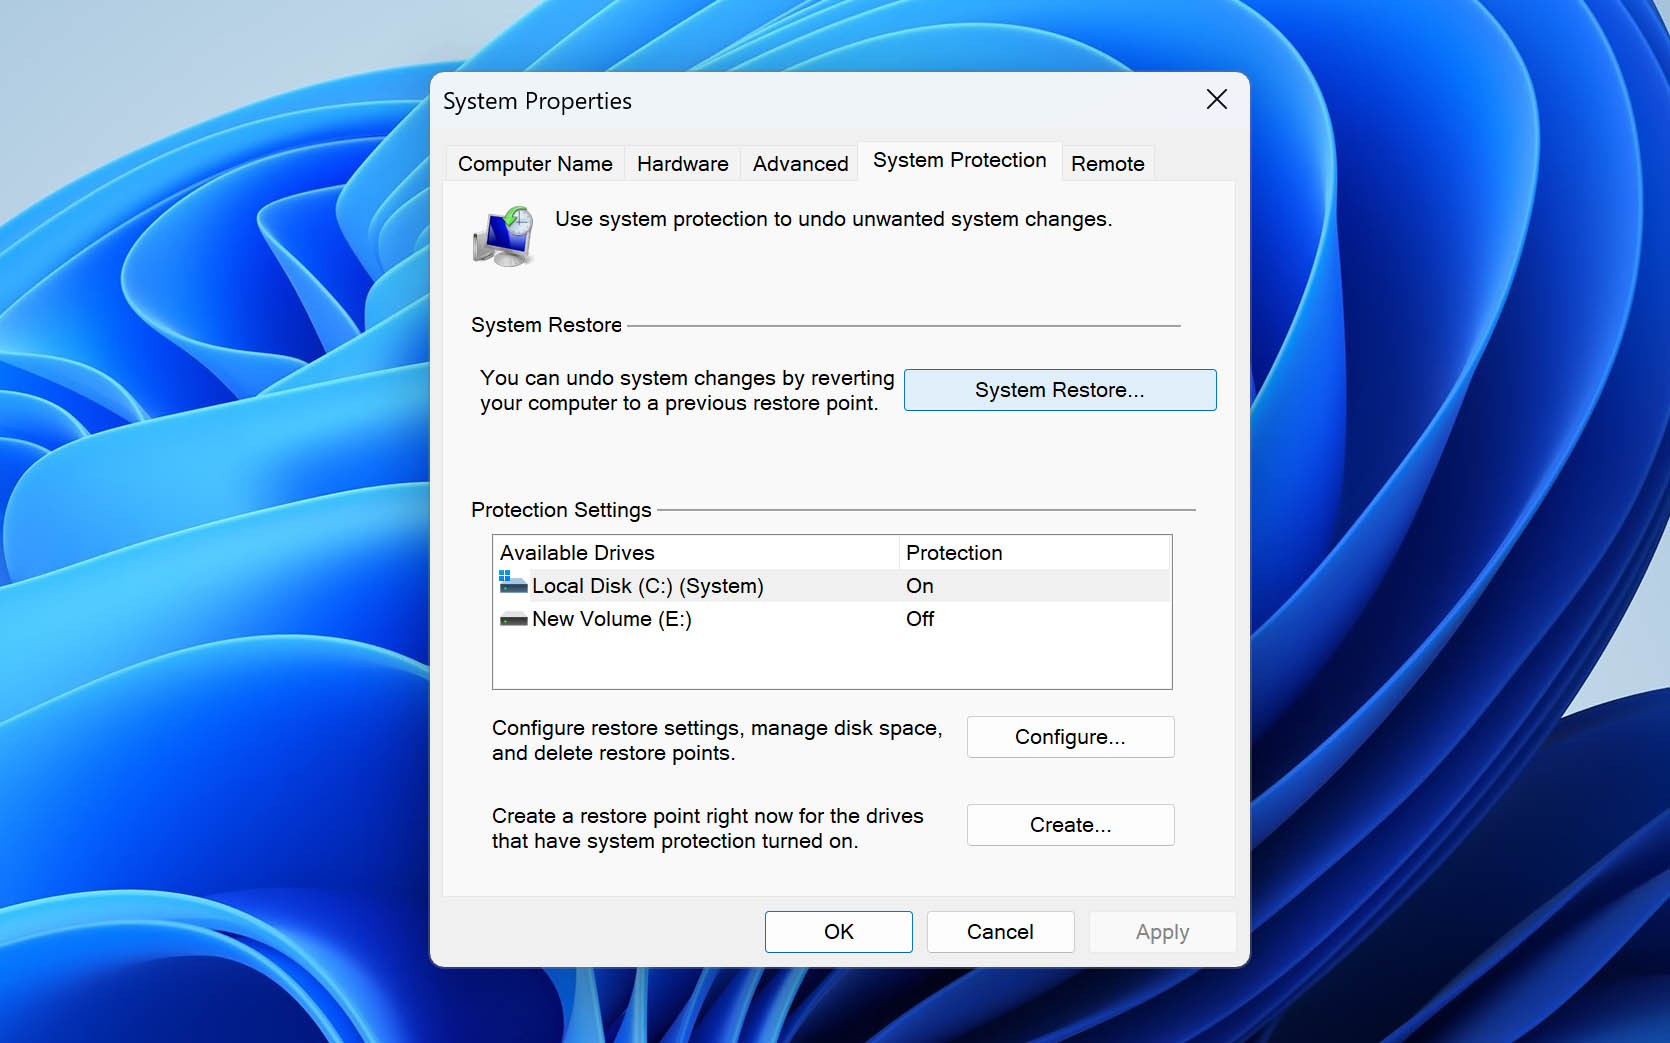
- In the System Properties window that appears, go to the System Protection tab and click on the System Restore… button.
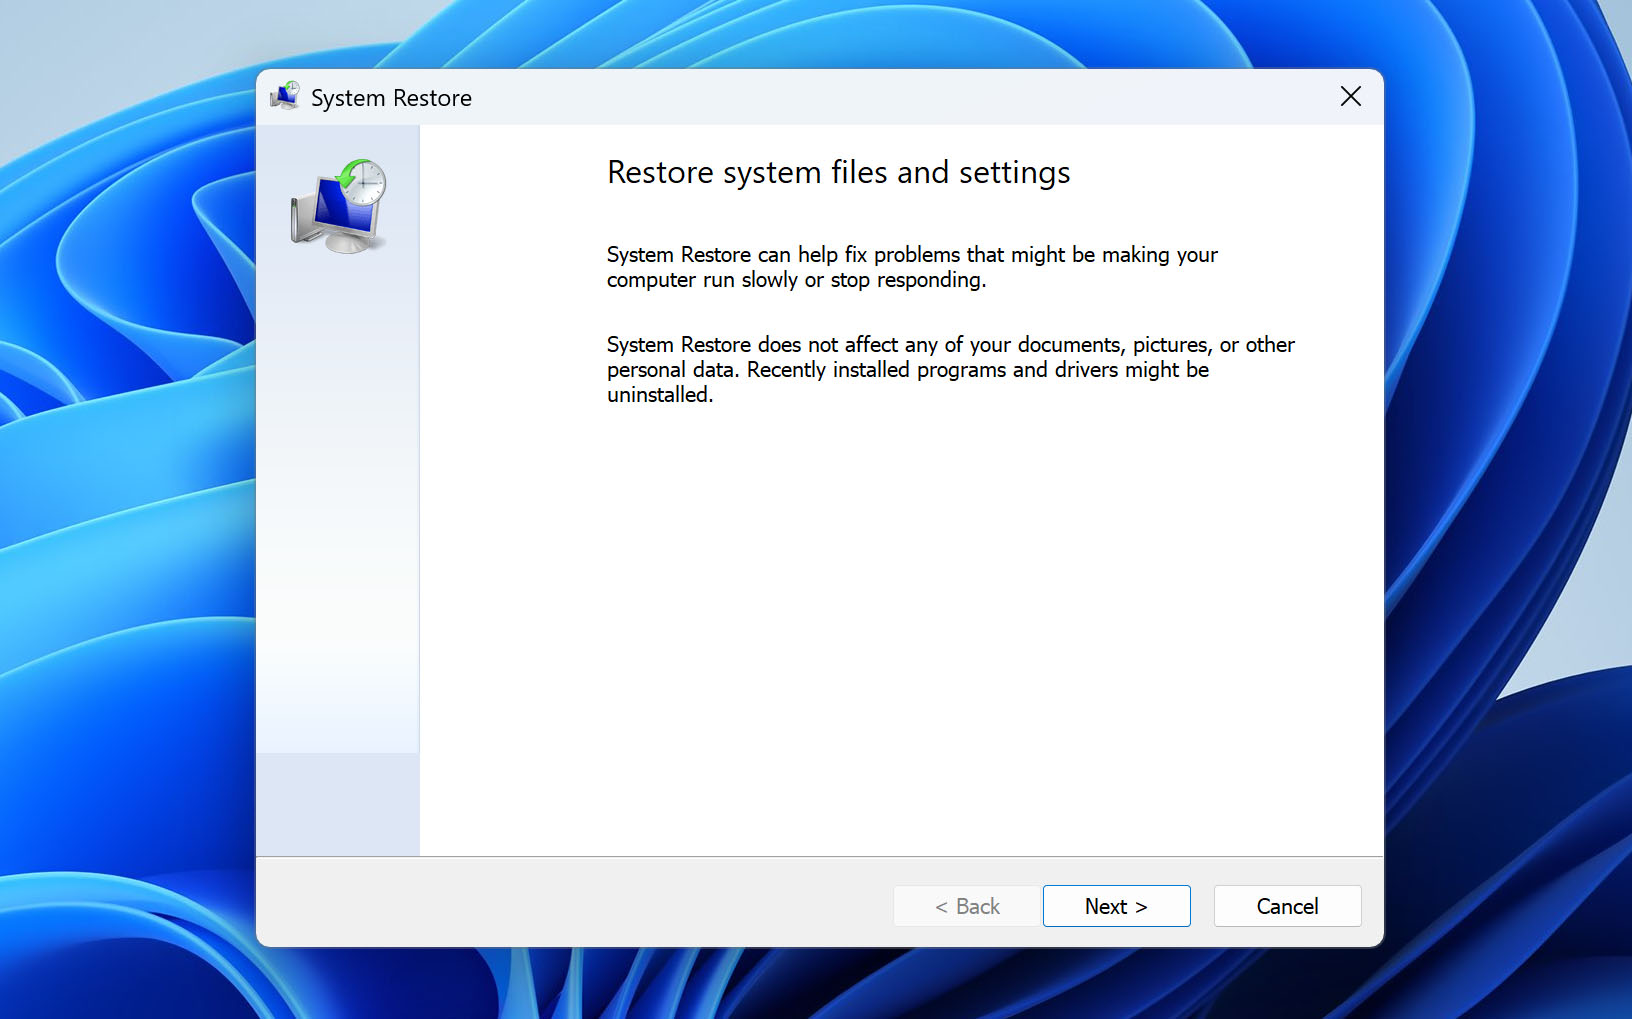
- Click Next to begin the restore process.
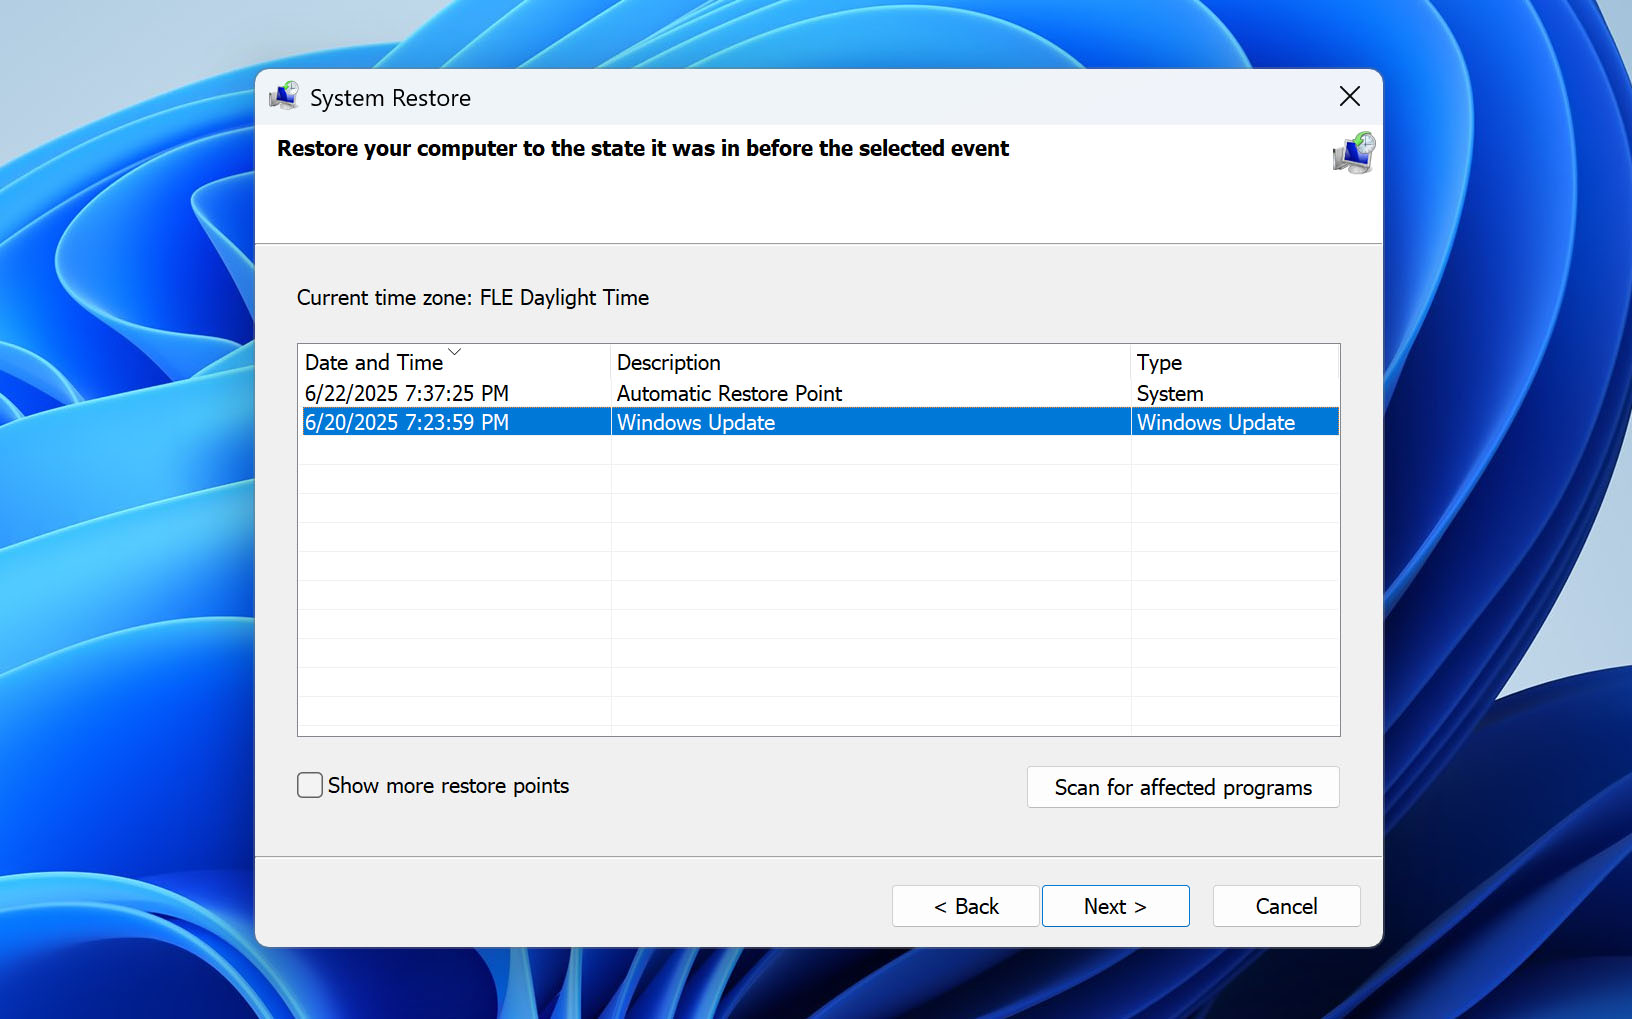
- You’ll see a list of available restore points. Select one that was created before your user profile was deleted. Use the timestamps and descriptions to guide your choice.
- Click Next, then confirm your restore point by selecting Finish.
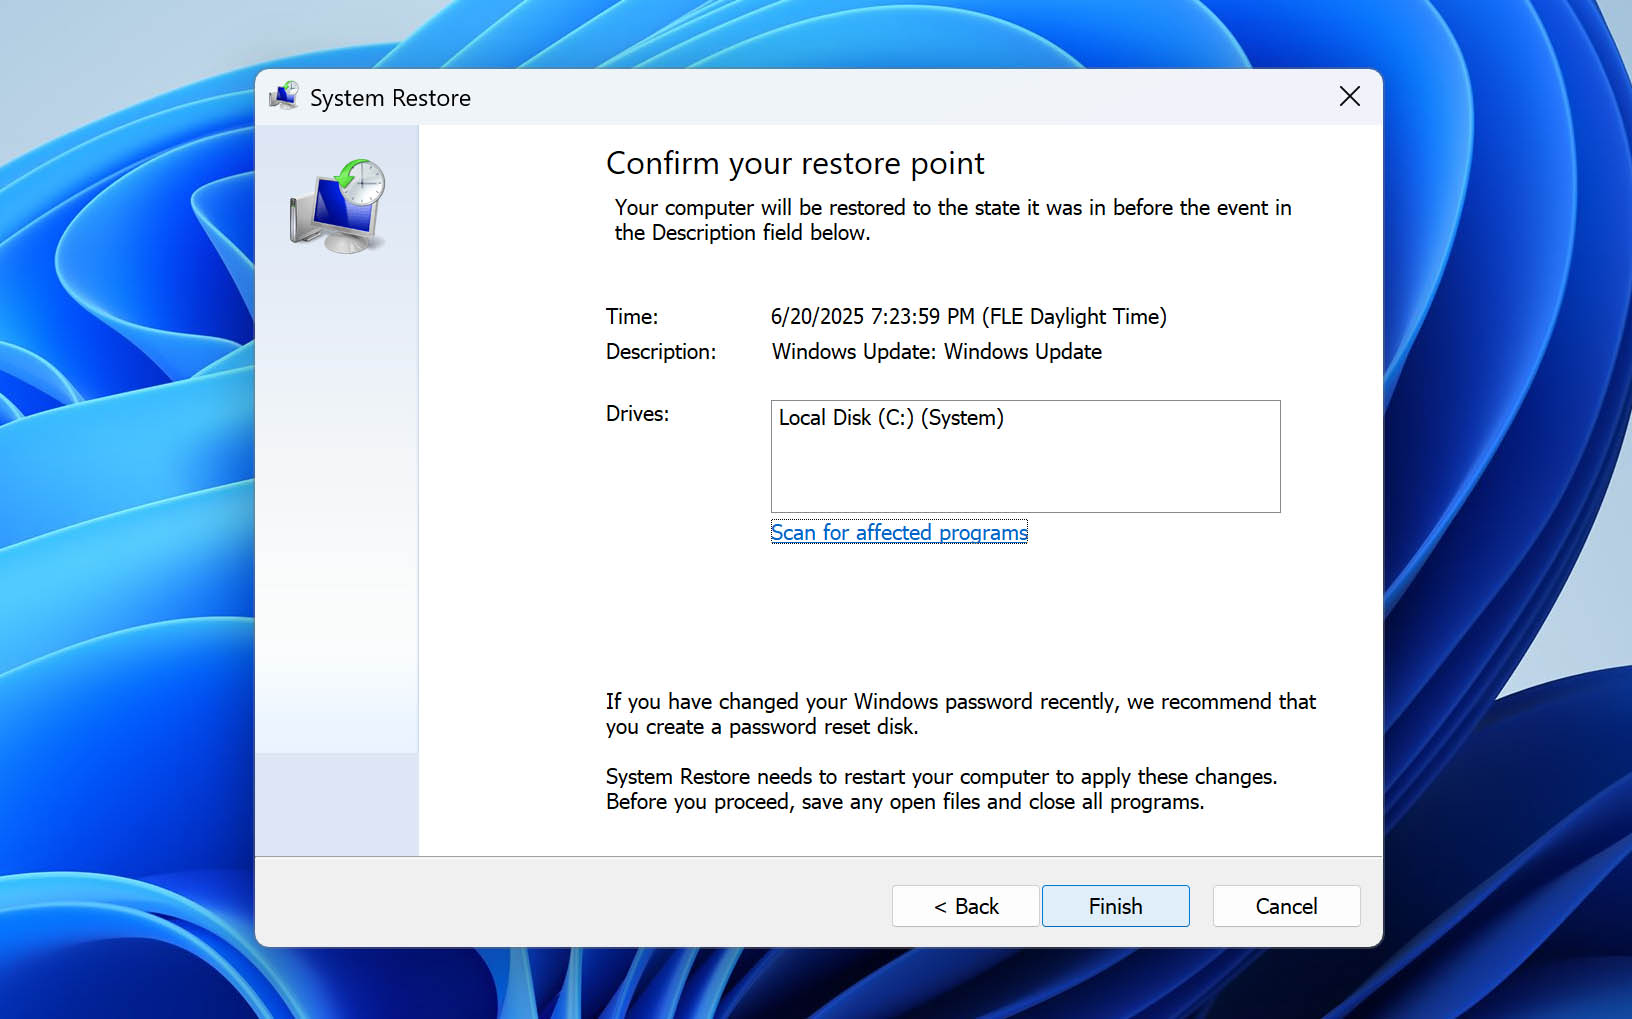
- A warning will appear notifying you that System Restore cannot be interrupted. Click Yes to proceed.
- Your system will restart, and the restoration process will begin. Once it’s complete, Windows will boot normally.


Once you’re logged in, check to see if your user profile has been restored. If it’s still missing or there aren’t any restore points, proceed with the next method.
Method 2. Restore User Folder with File History
If you had File History enabled before the user profile was deleted, this method allows you to recover the contents of the user’s folder with documents, desktop items, downloads, and other personal files. In most cases, this brings back a significant portion of what made up the original profile.
However, File History only backs up user data, not the system or registry configurations tied to that profile. So if core system files or registry entries related to the profile were altered or removed, this method won’t fully restore access to the account. Still, this step is important and serves as a recommended preparation before any advanced recovery methods, such as modifications in the Registry Editor, in the next method.
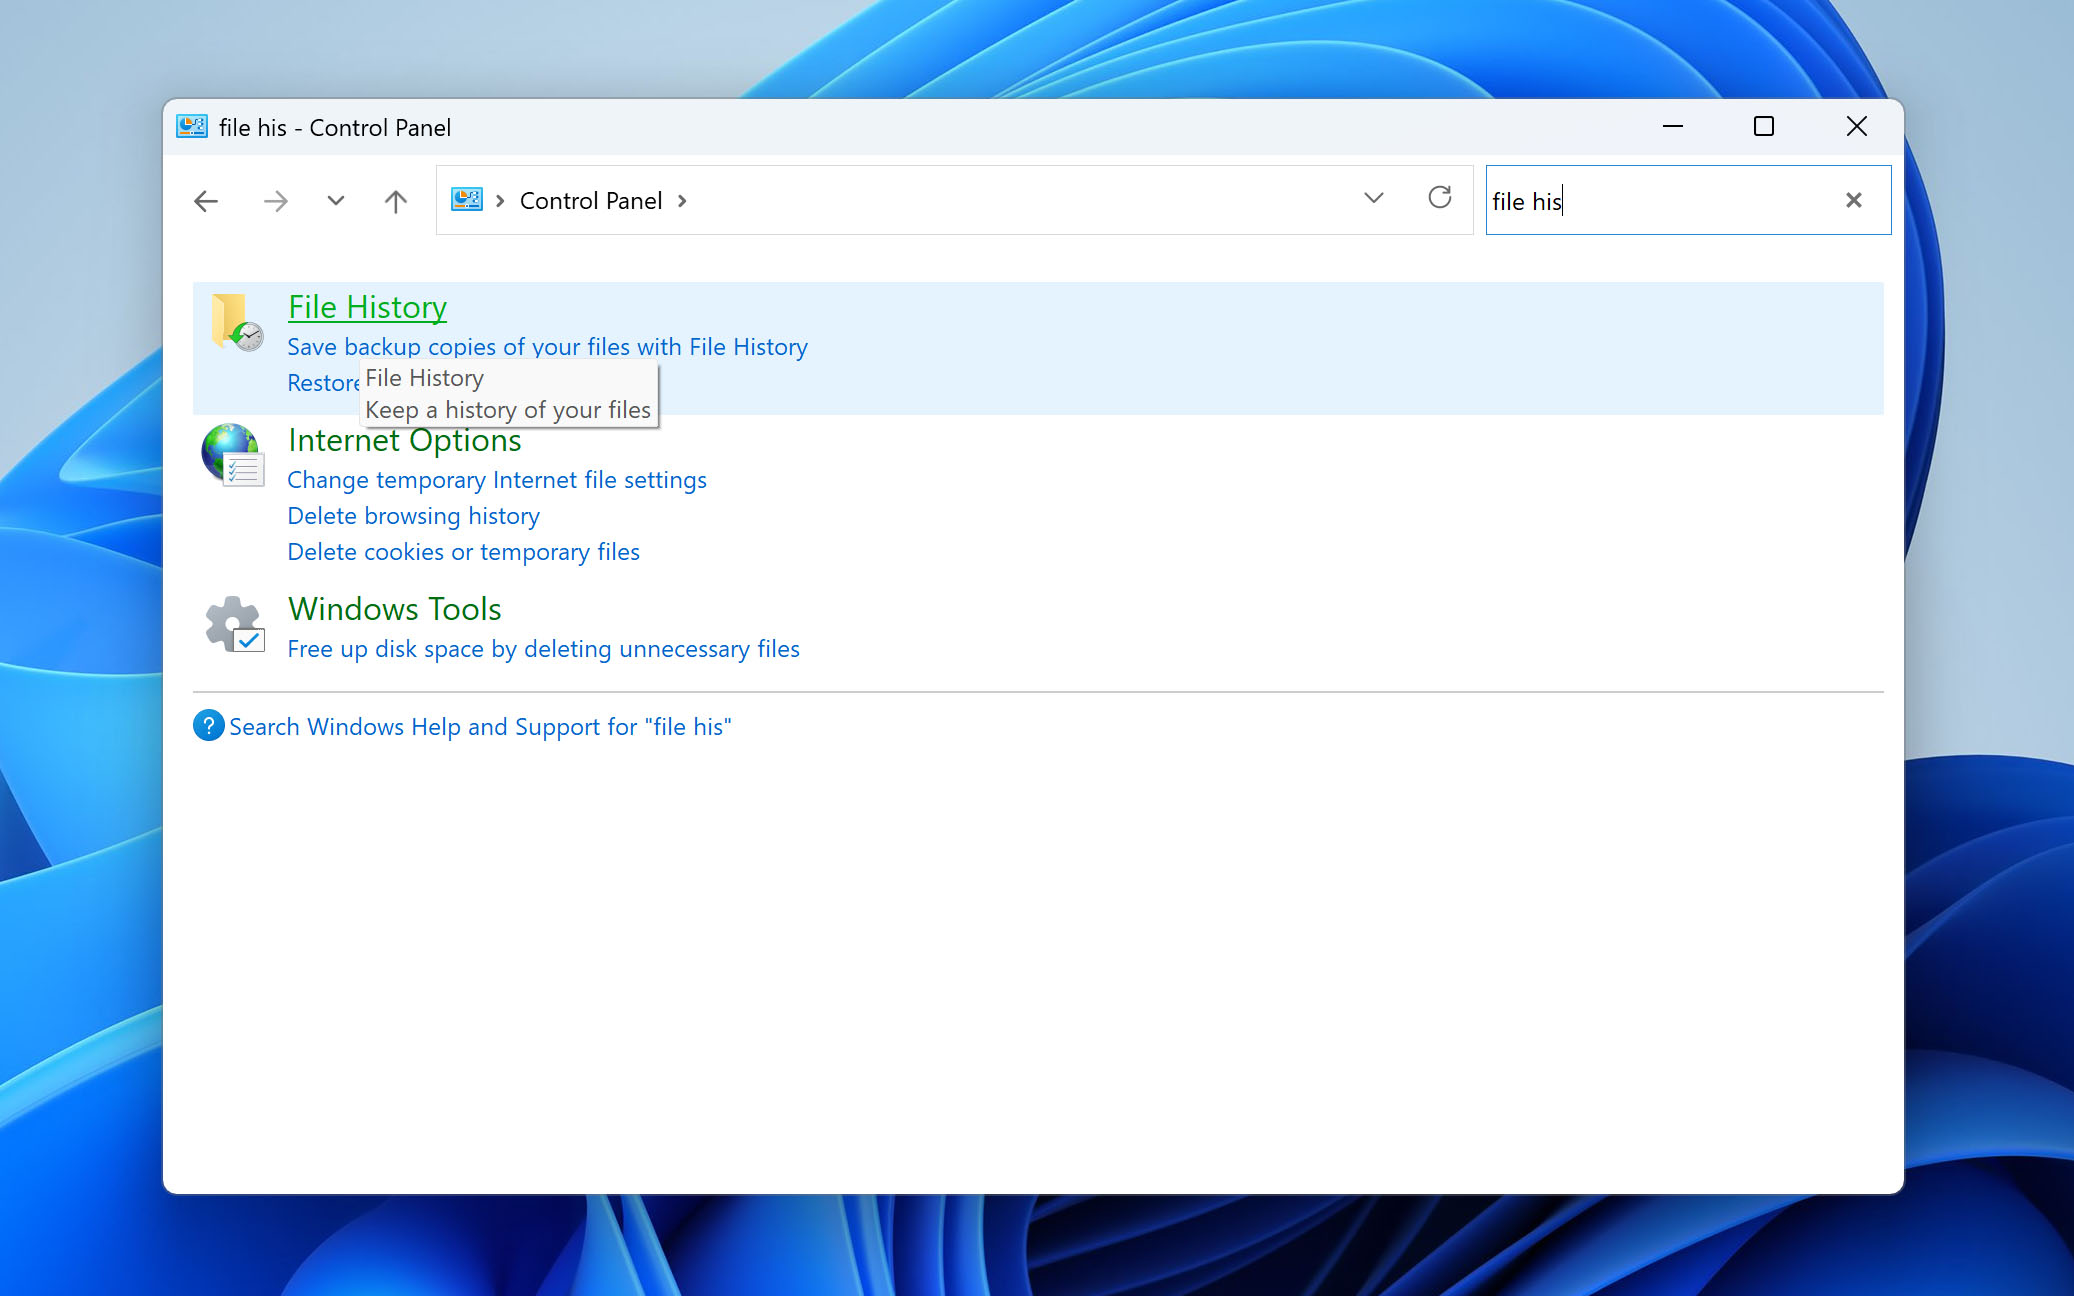
- Open Control Panel and go to File History (you can search for it directly in the Control Panel search box).
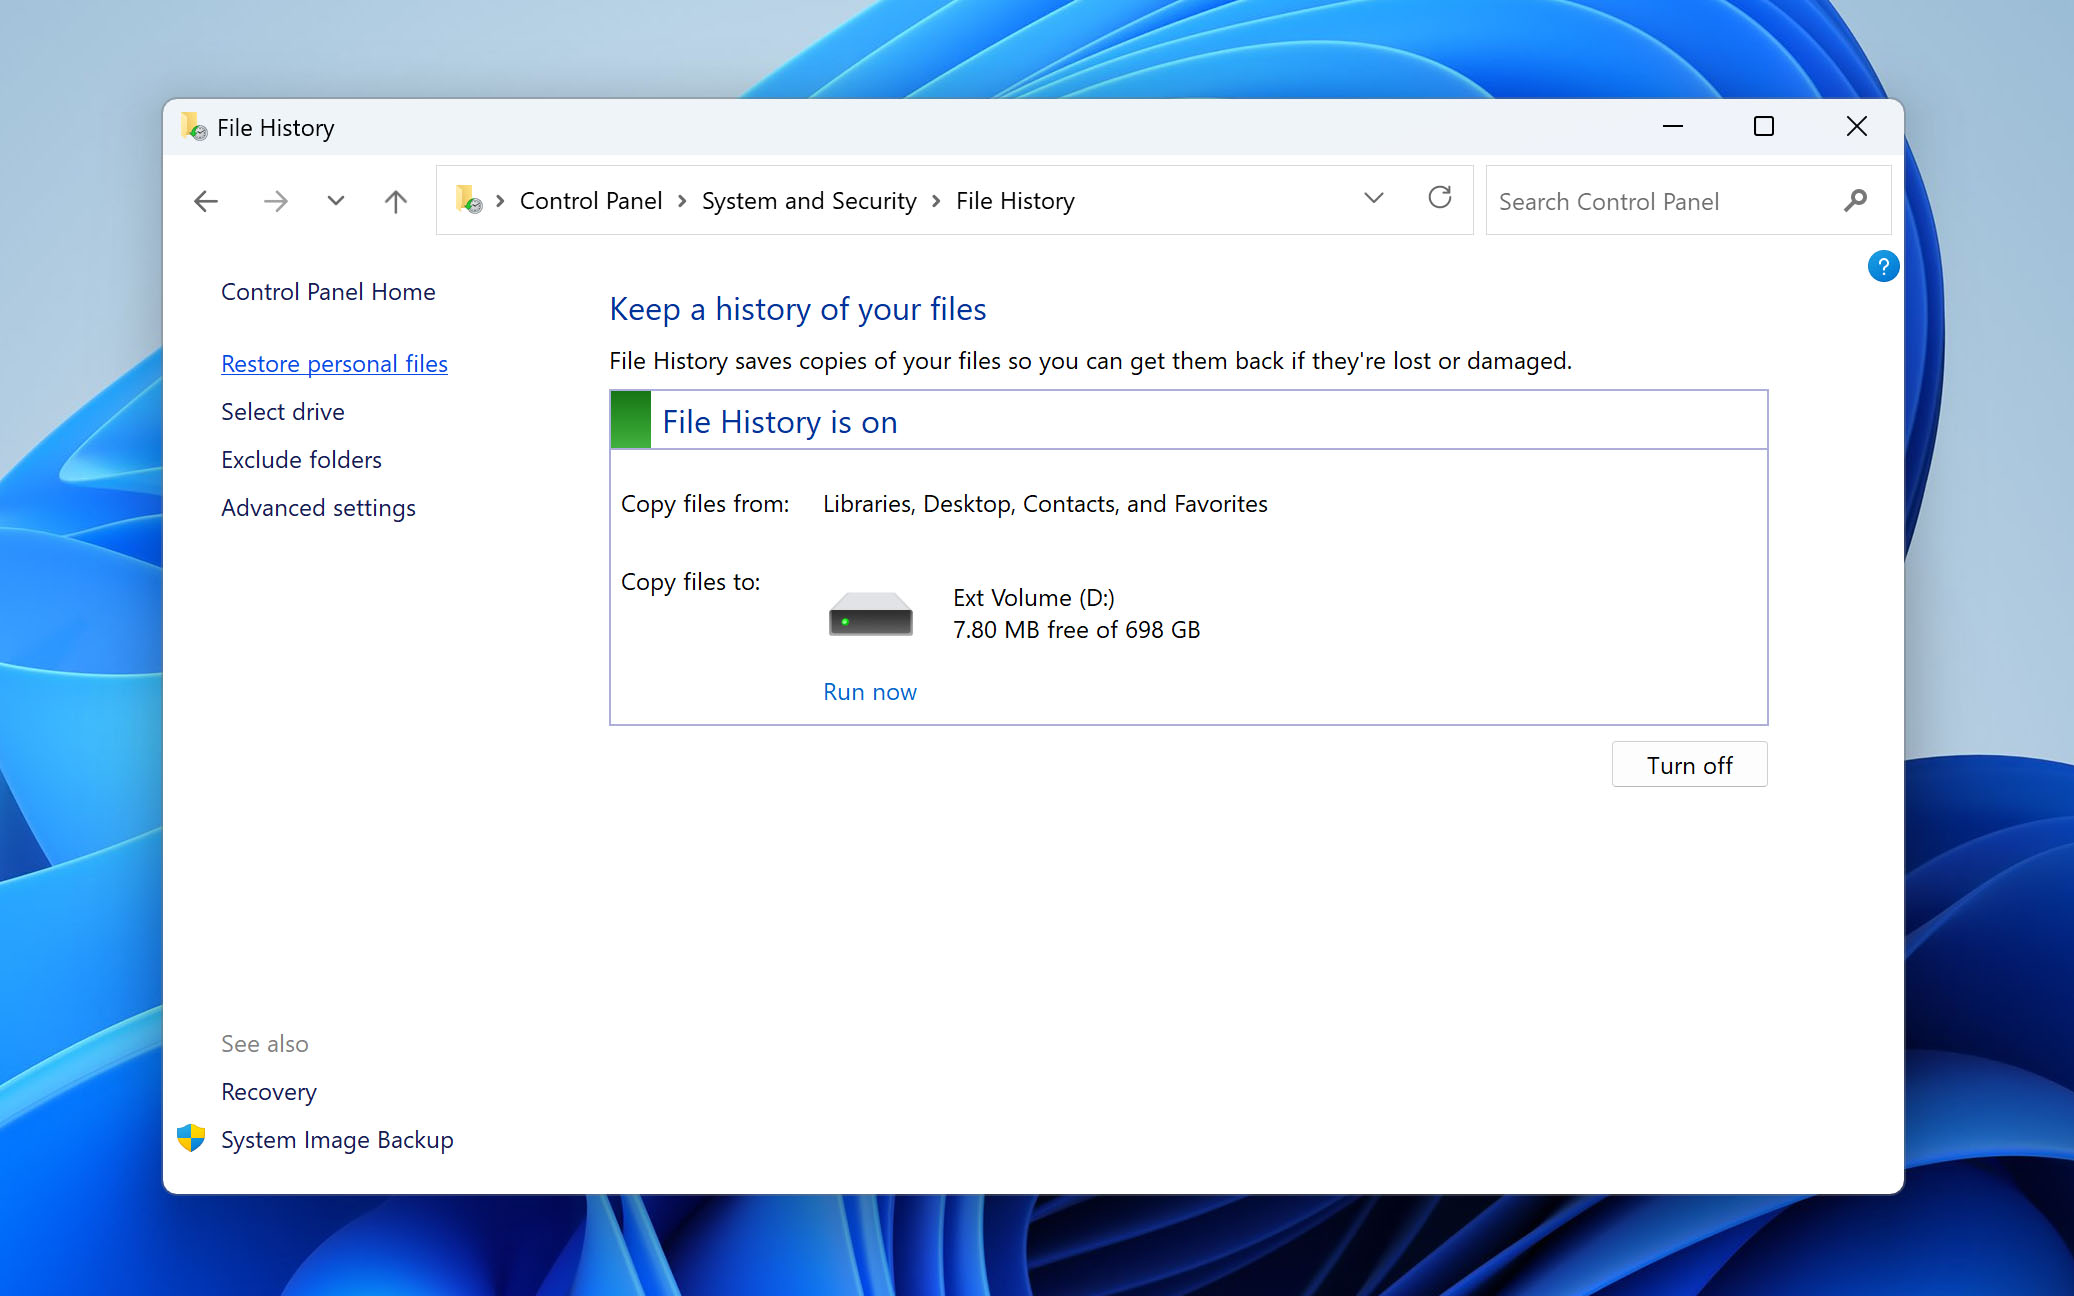
- If File History is turned on, click Restore personal files in the left-hand menu.
- Navigate to C:\Users in the File History browser.
- Look for the deleted profile’s folder. Use the navigation arrows at the bottom to go back in time until you find the version that contains the data.
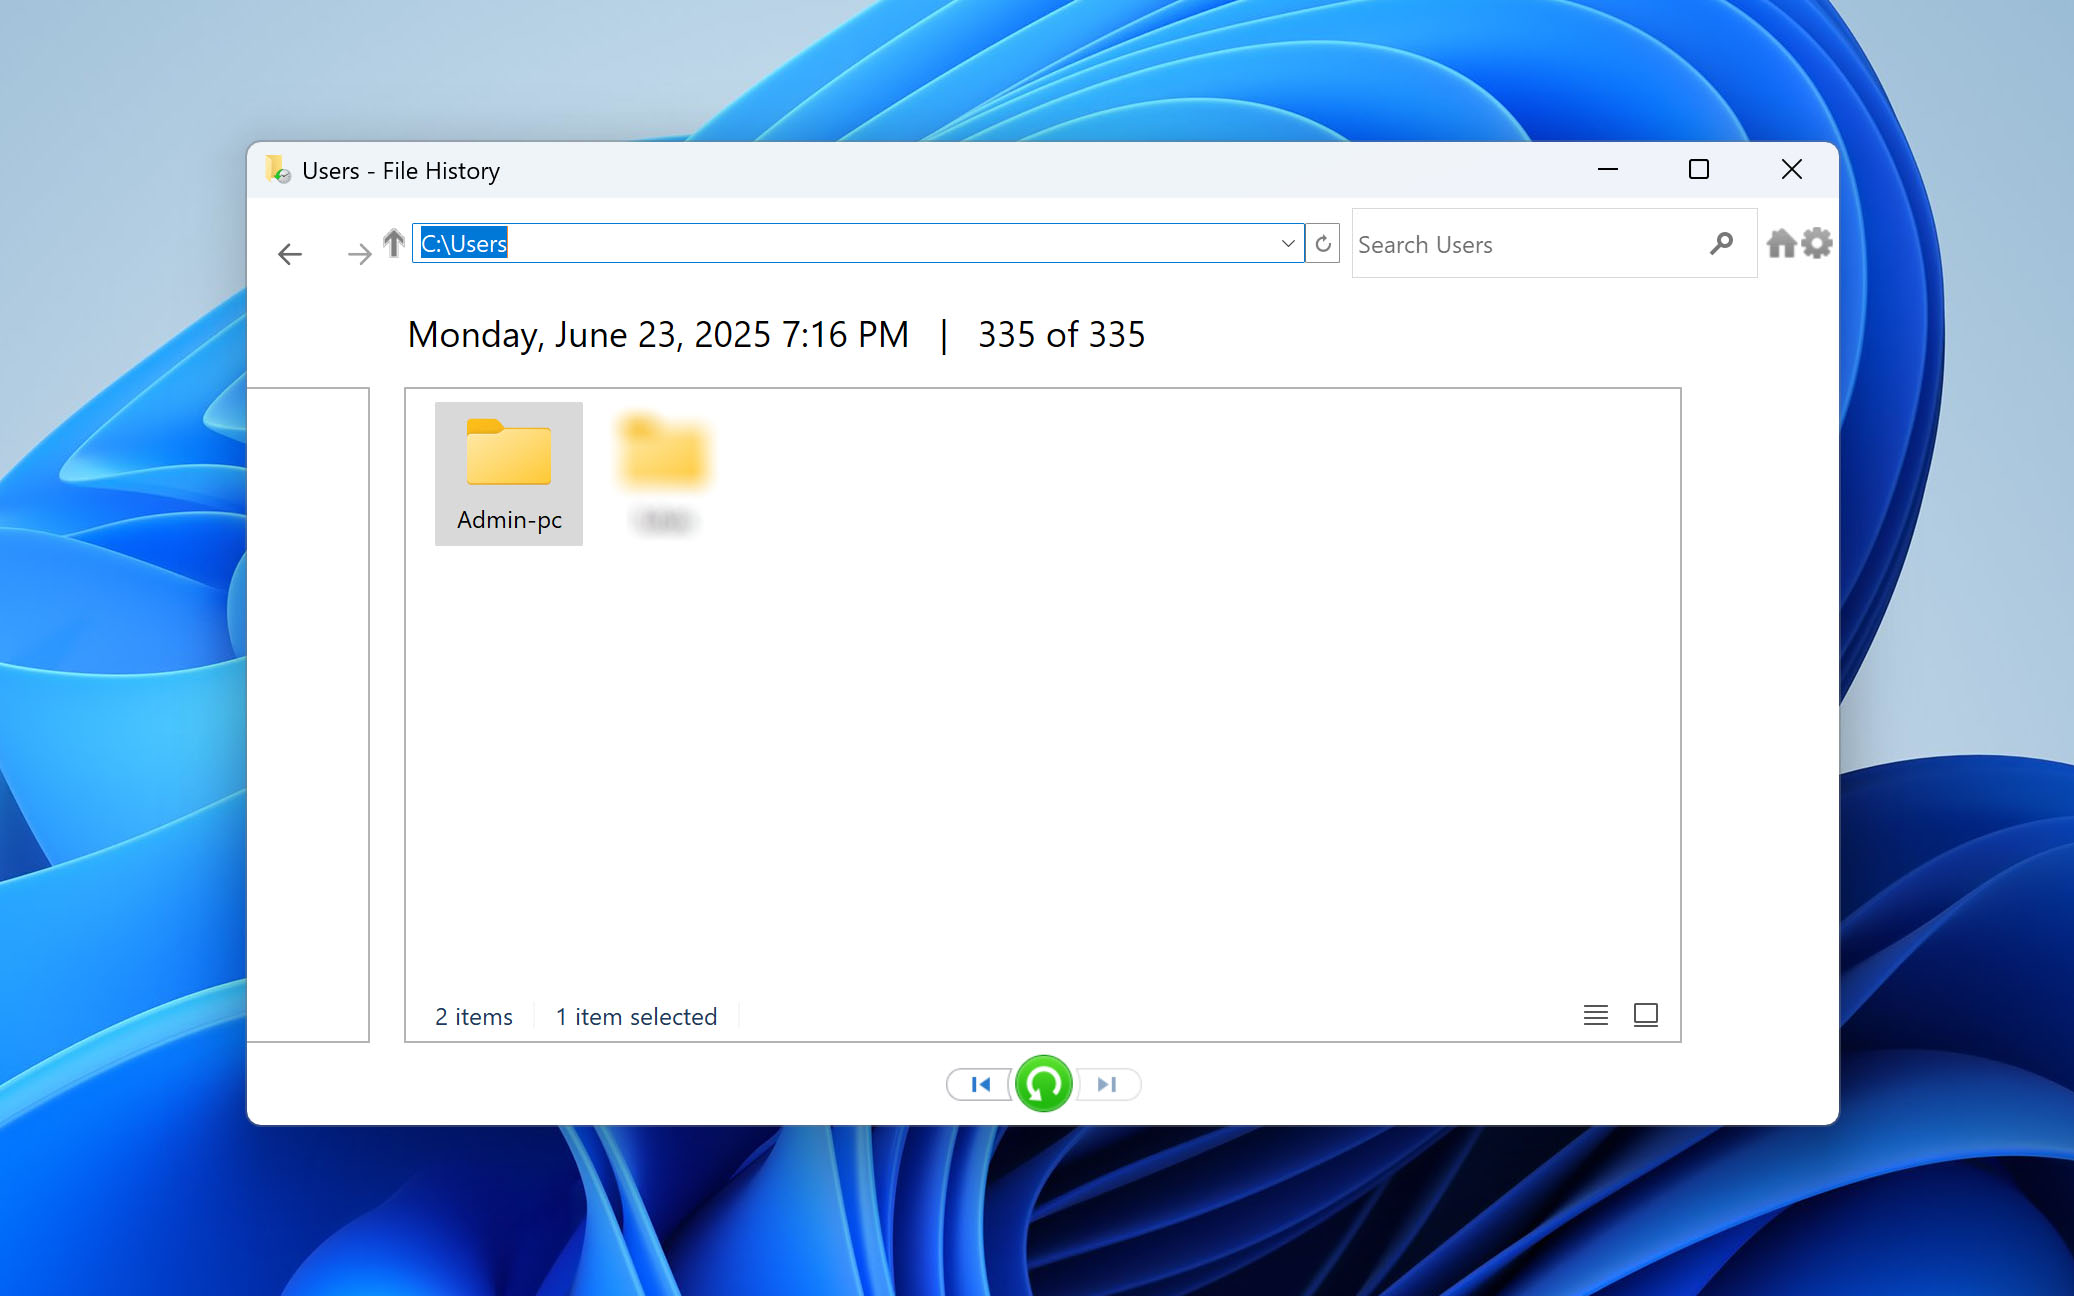
- Select the profile folder and click the green Restore button. You can also right-click and choose Restore to if you want to restore it to a different location.

- Once the restore is complete, confirm that the folder has been recovered with its contents.


You can now proceed to repair the user profile manually with the Registry Editor. Your data has been safely restored and remains ready for connection to a new or repaired profile.
Method 3. Manual User Profile Recovery via Registry Editor
This method is useful in cases where your original profile still exists on disk, but Windows was unable to load it correctly, usually due to a system error or corruption. When this happens, Windows may create a temporary profile or generate a new, empty one, while renaming the original profile’s registry entry with a .bak extension. The result is that you’re logged into a default or temporary environment, and your actual profile folder remains disconnected.
⚠️ If you edit the Registry with precision, you can direct Windows to use your original profile again, provided the folder under C:\Users still exists and holds your data, as explained in the previous method.
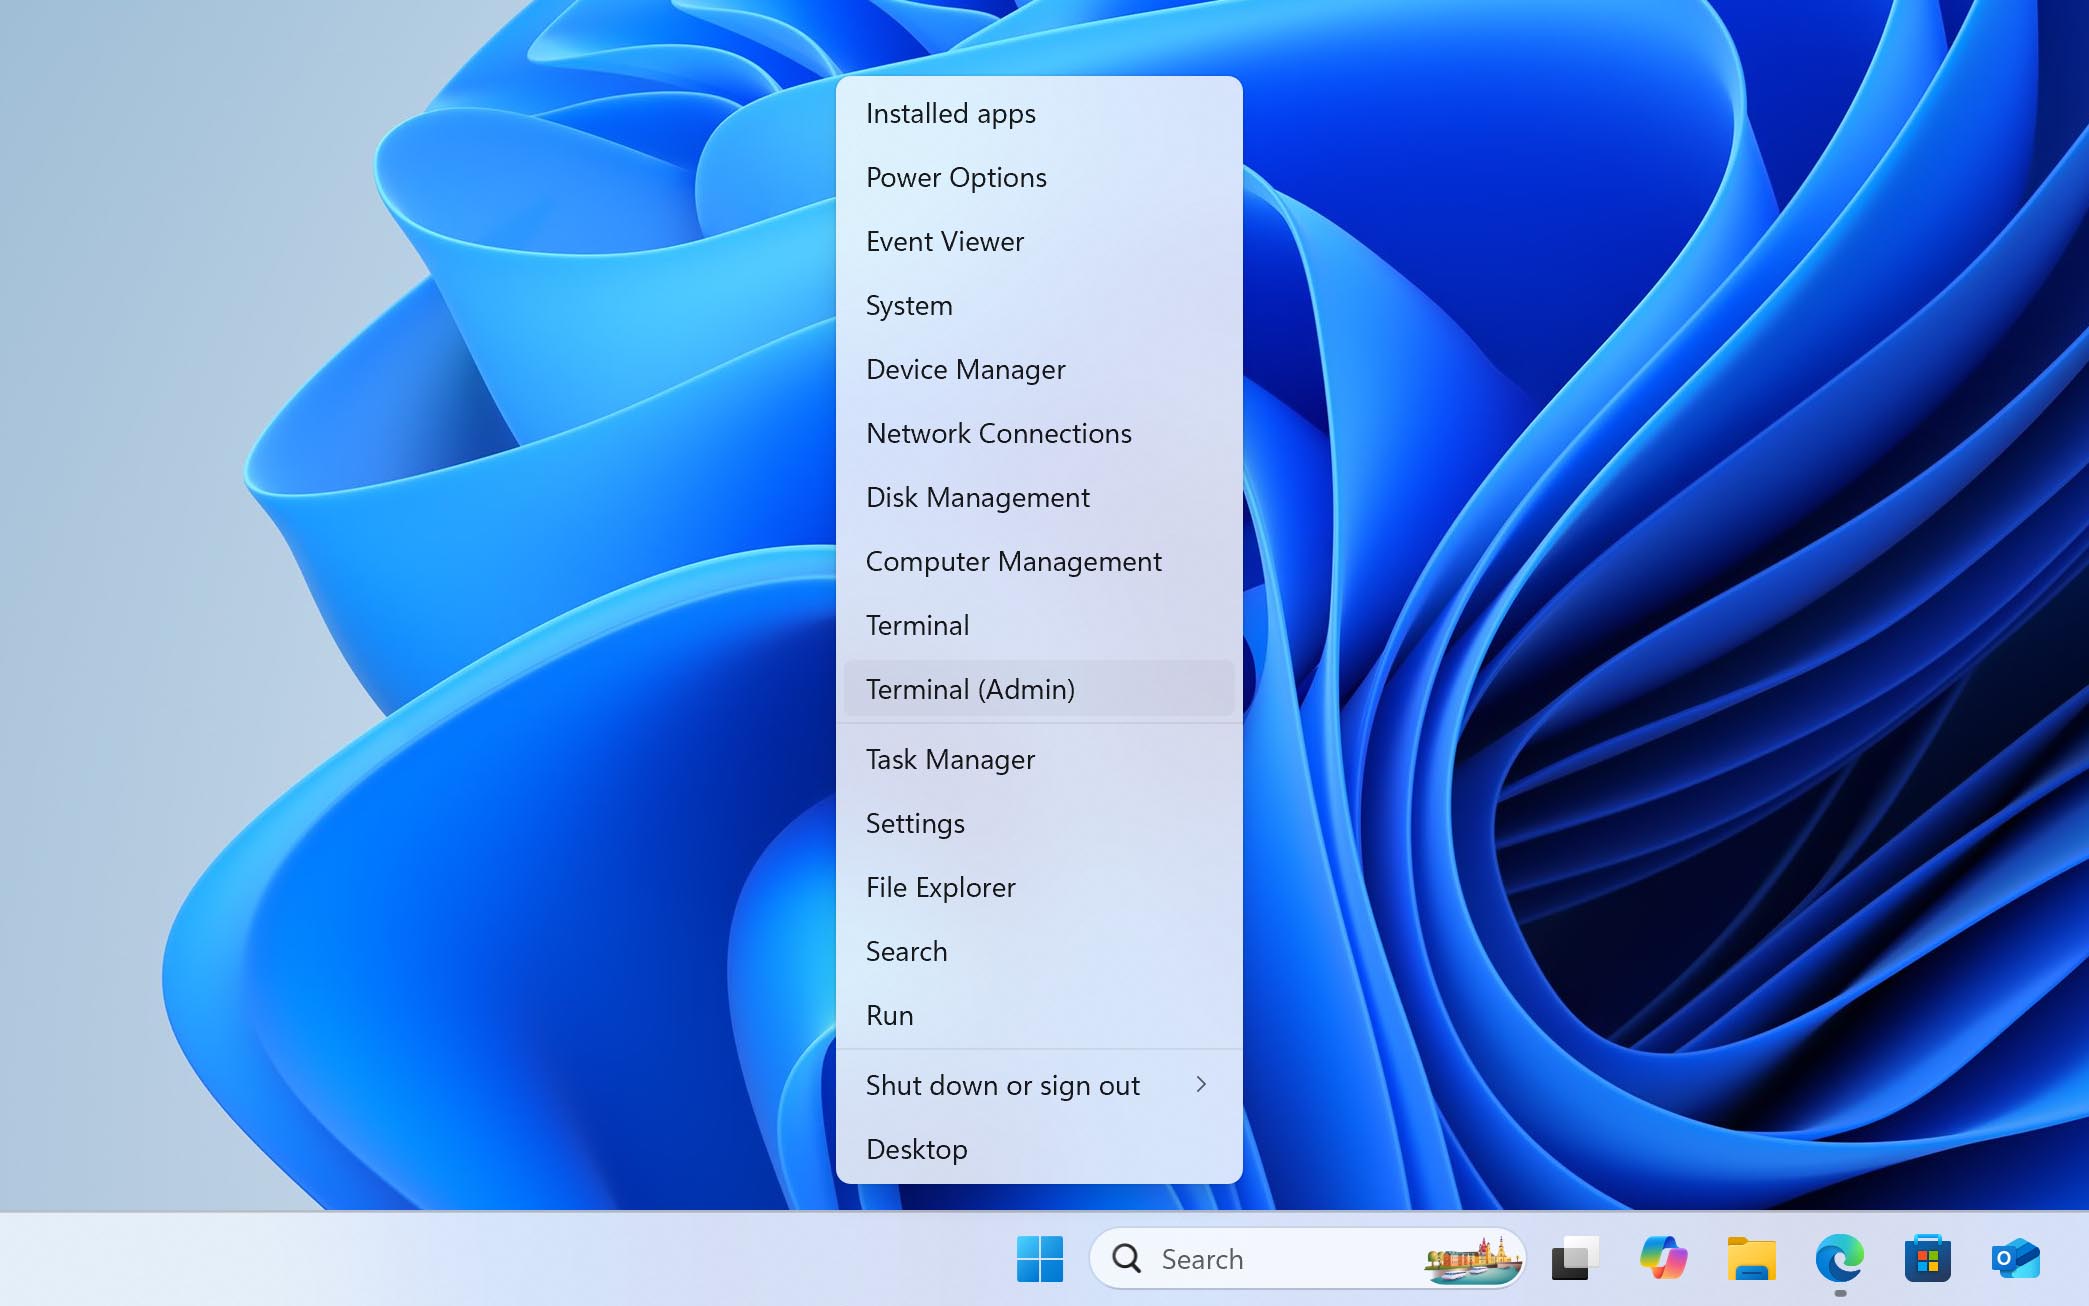
- Press Win + X, then click on the Terminal (Admin) option.
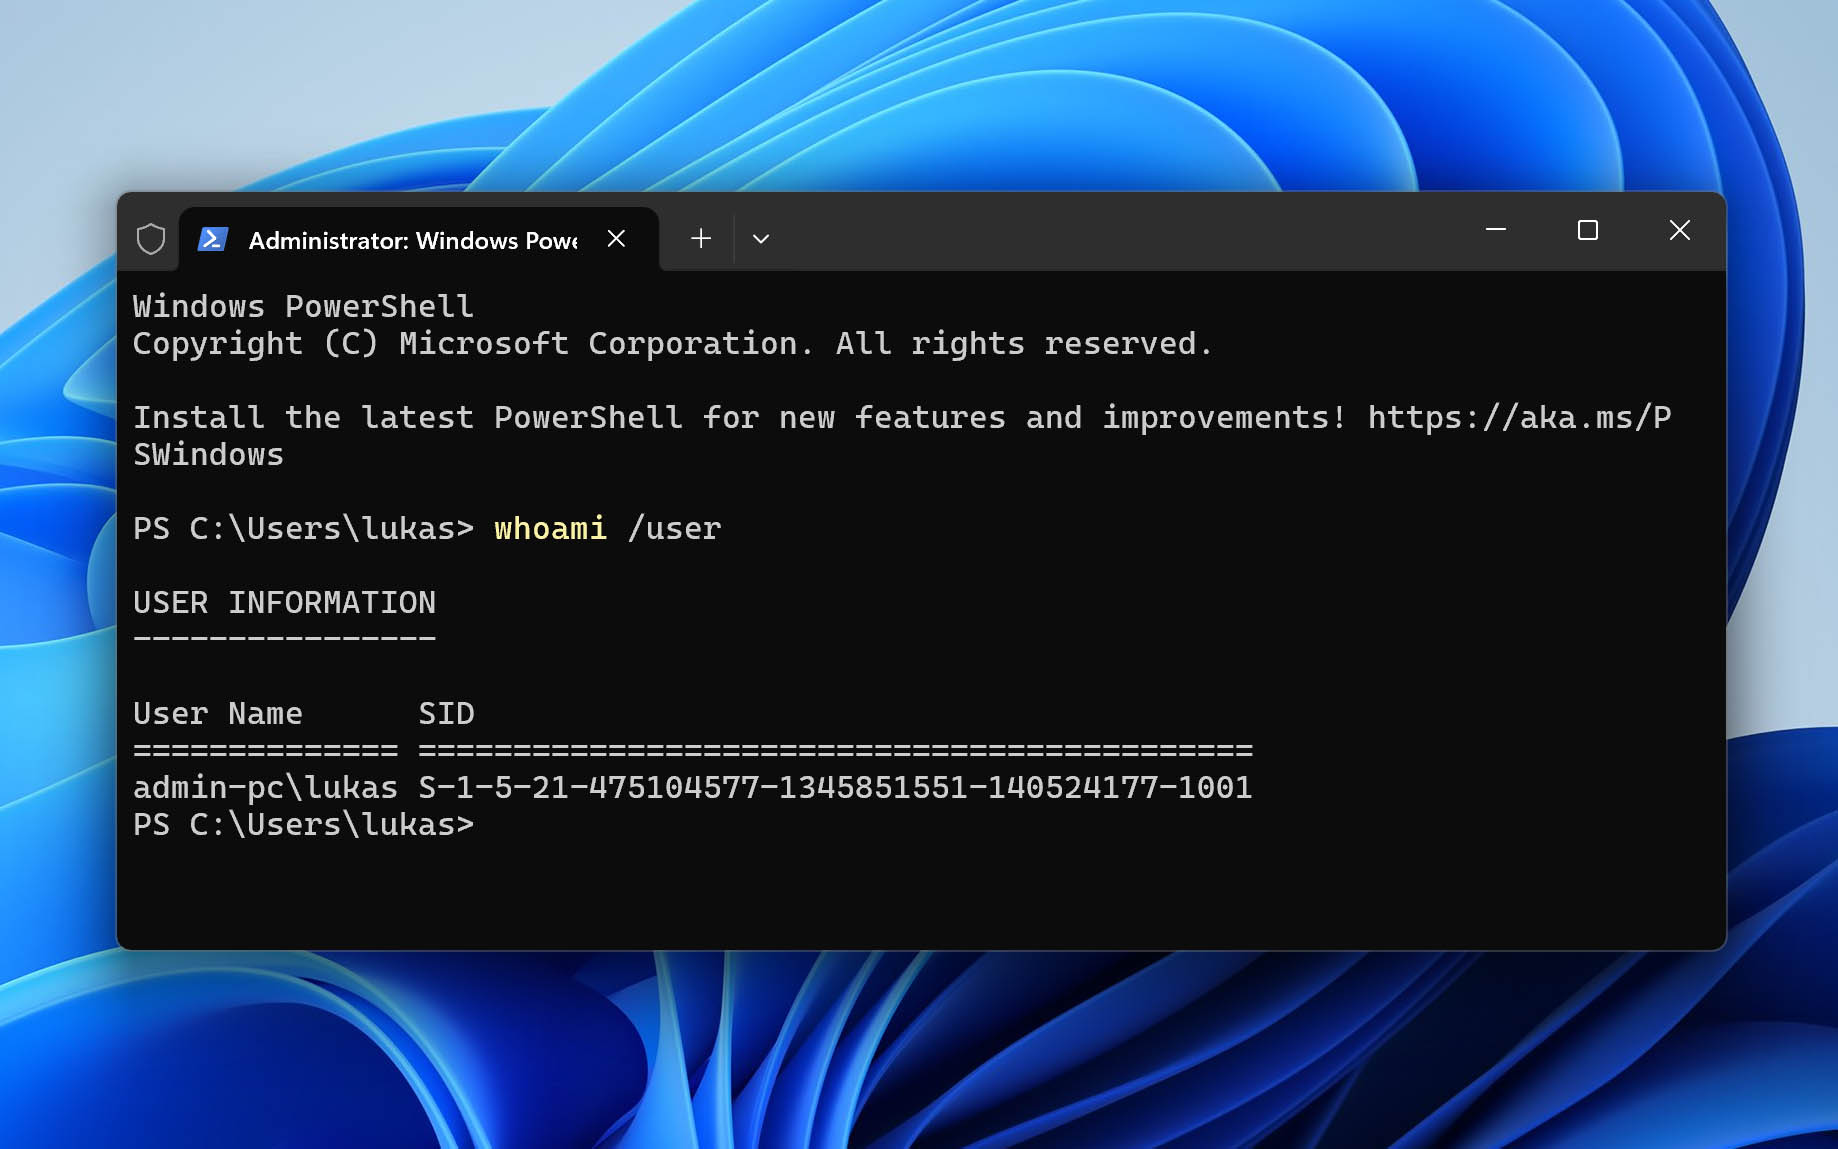
- Type the command whoami /user and press Enter to note the SID (Security Identifier) of your current user account.
- Press Win + R again, type regedit, and hit Enter to open the Registry Editor.
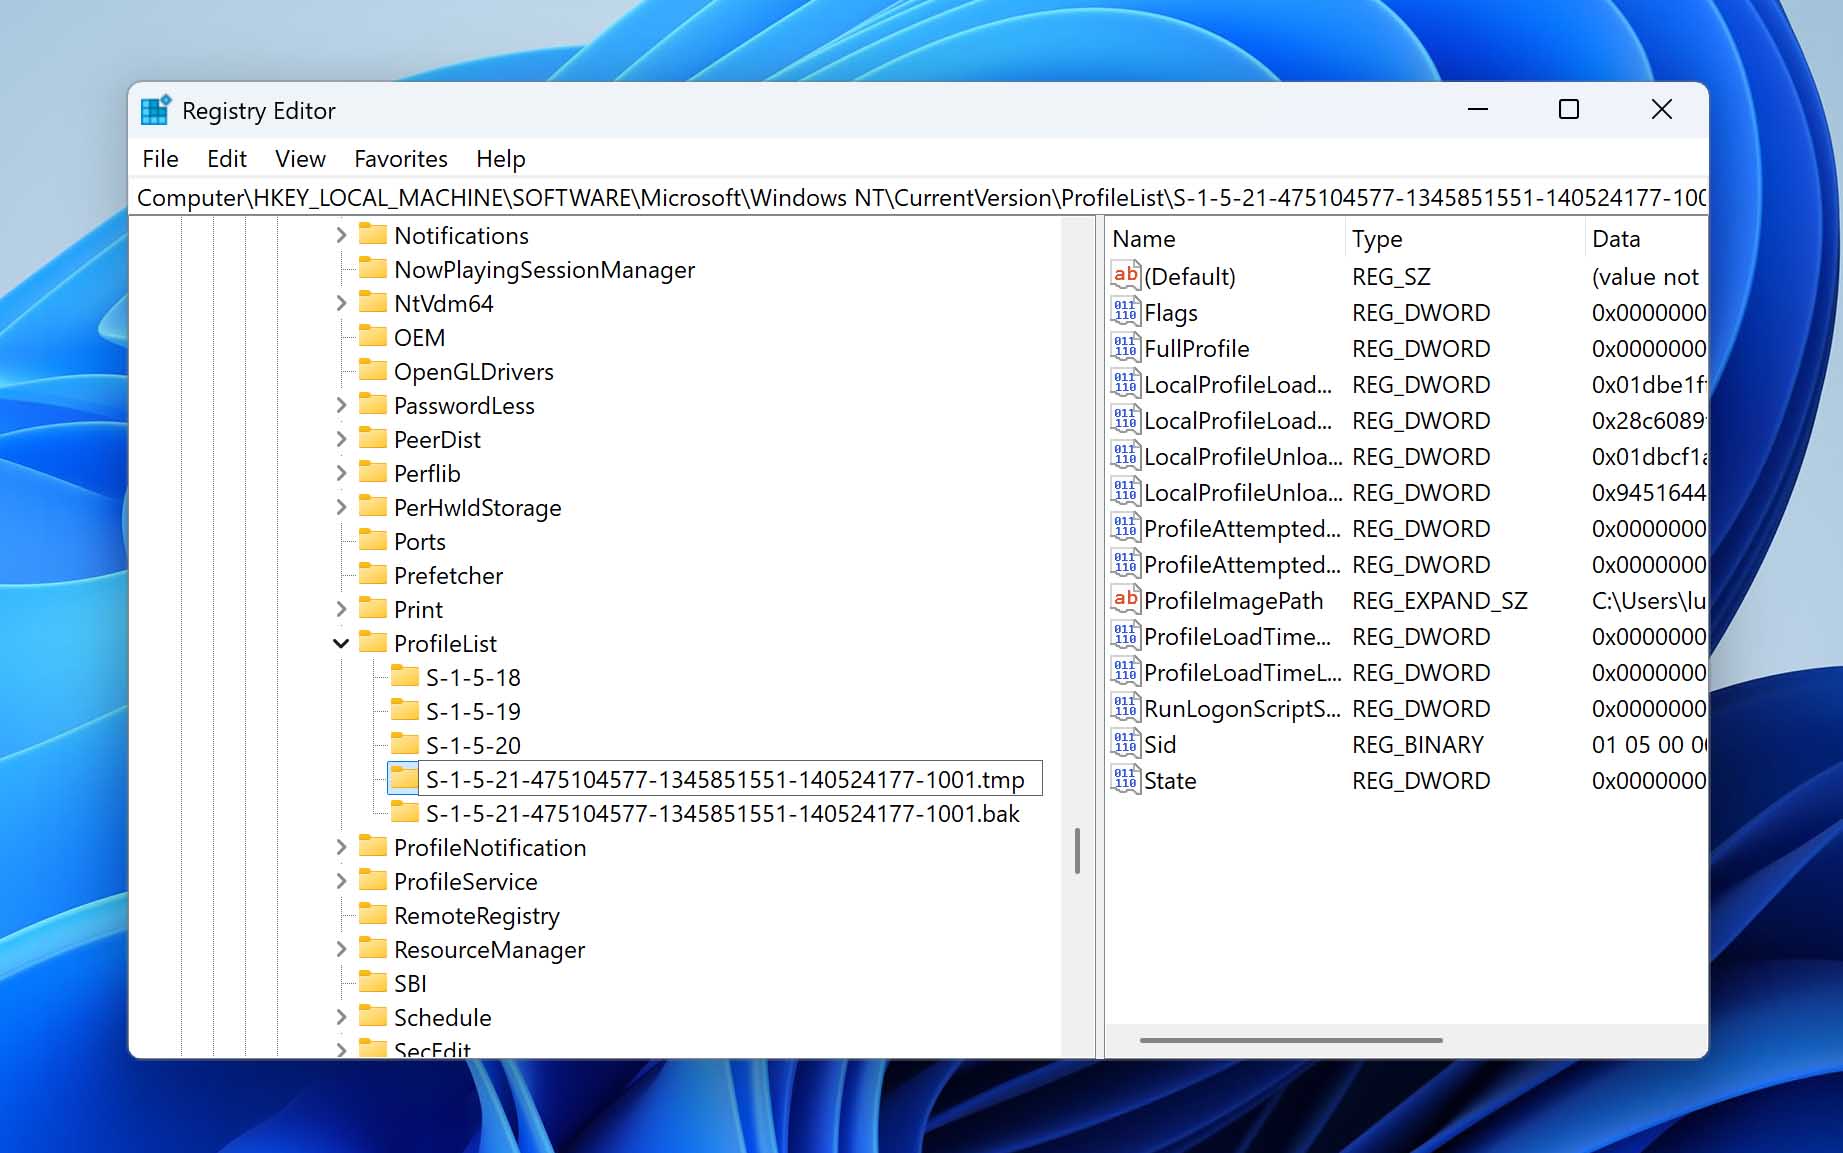
- Navigate to the following path: HKEY_LOCAL_MACHINE\SOFTWARE\Microsoft\Windows NT\CurrentVersion\ProfileList
- In the list of profile entries (they appear as long alphanumeric SIDs), find the ones that match your account’s SID. You’ll likely see two folders with the same SID – one with a .bak extension and one without.
- If there’s an SID with a .bak and another without it: rename the one without .bak (right-click > Rename) and add ‘.tmp’ to it; then rename the one with .bak by removing the ‘.bak’ so it becomes the active profile; Finally, rename the one with .tmp to add back the ‘.bak’ if you want to keep it as a backup.
- If there’s only one SID and it has a .bak, simply rename it to remove ‘.bak’.
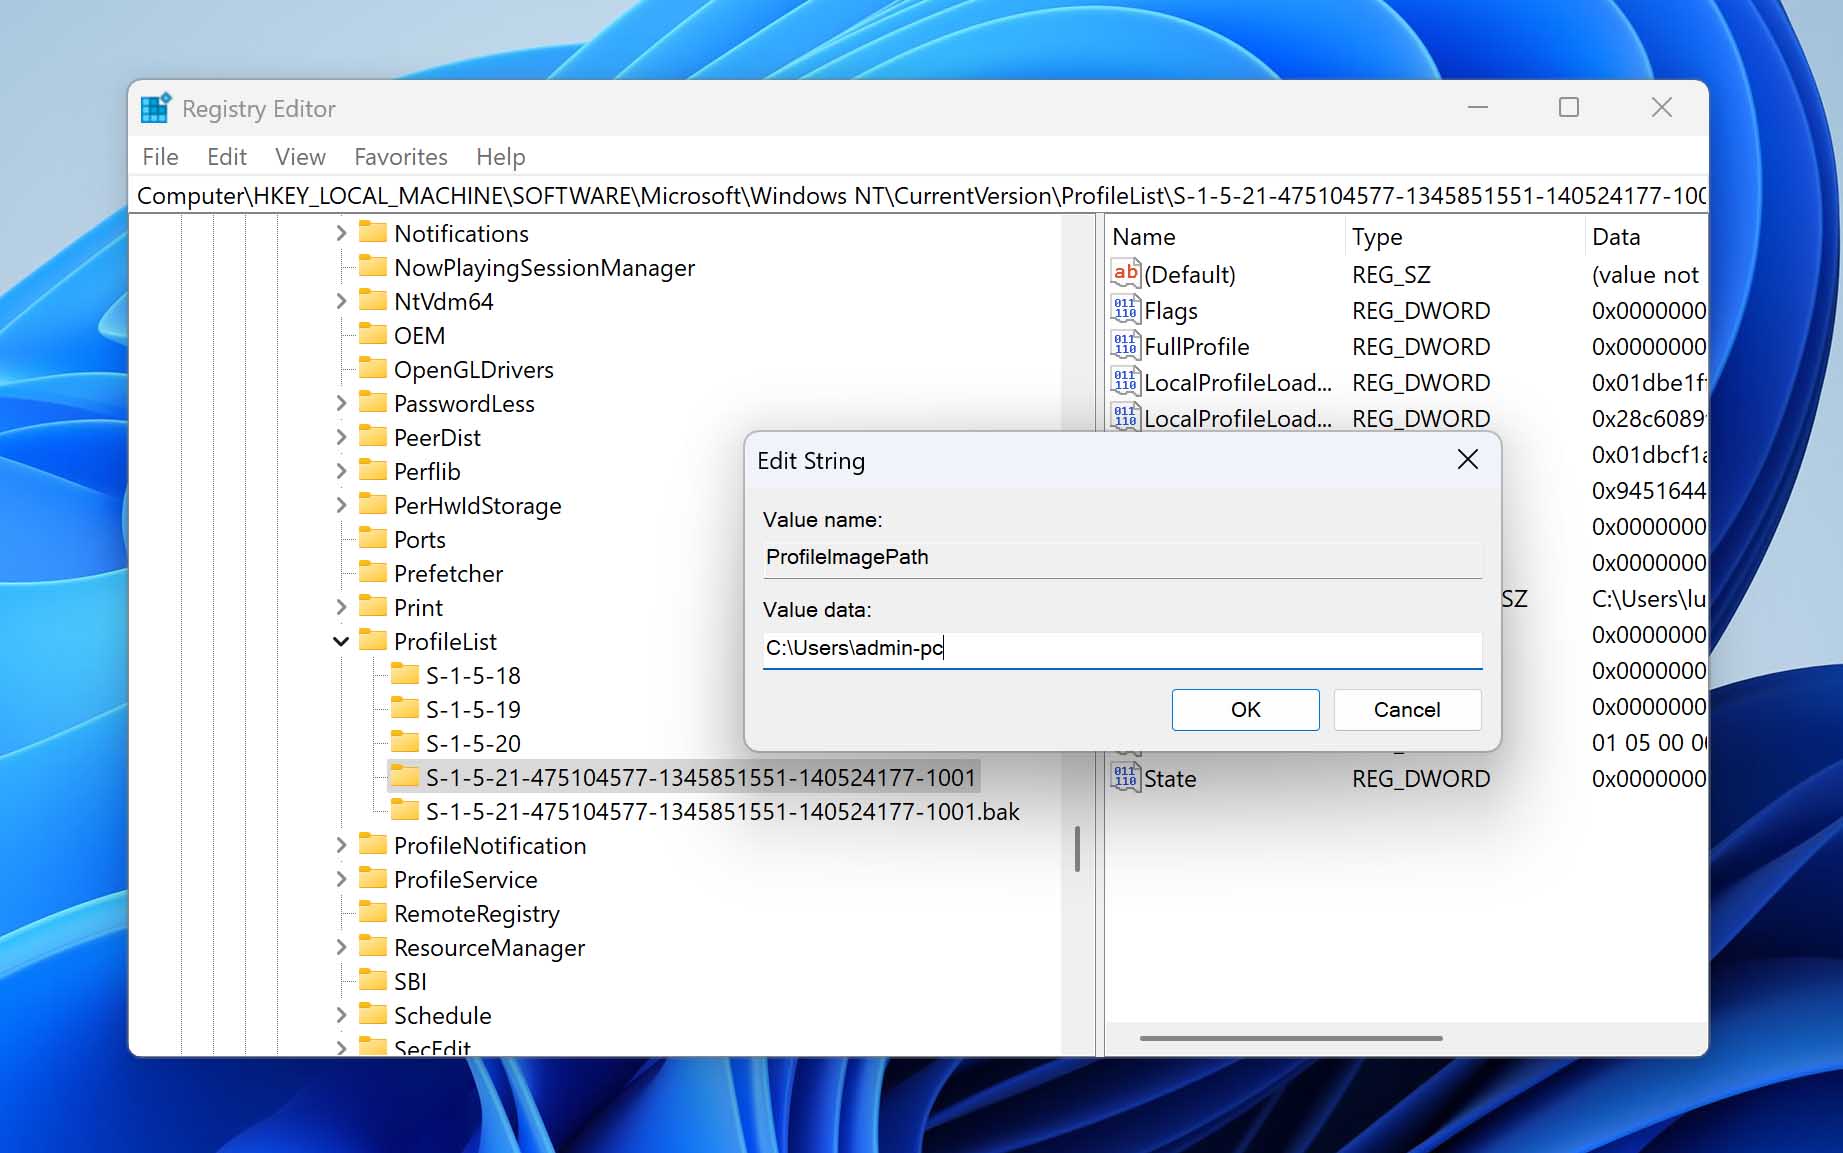
- With the correct SID key selected, double-click ProfileImagePath on the right side and verify it points to your actual profile folder (e.g., C:\Users\YourUsername). Edit it if necessary.
- In the same key, double-click State and set its value to 0.
- Close Registry Editor and restart your computer.


If successful, Windows should now load your original user profile as it existed before the problem occurred. This approach works best when the profile was not deleted, just disconnected due to a glitch or partial corruption.
How to Recover Deleted User Data
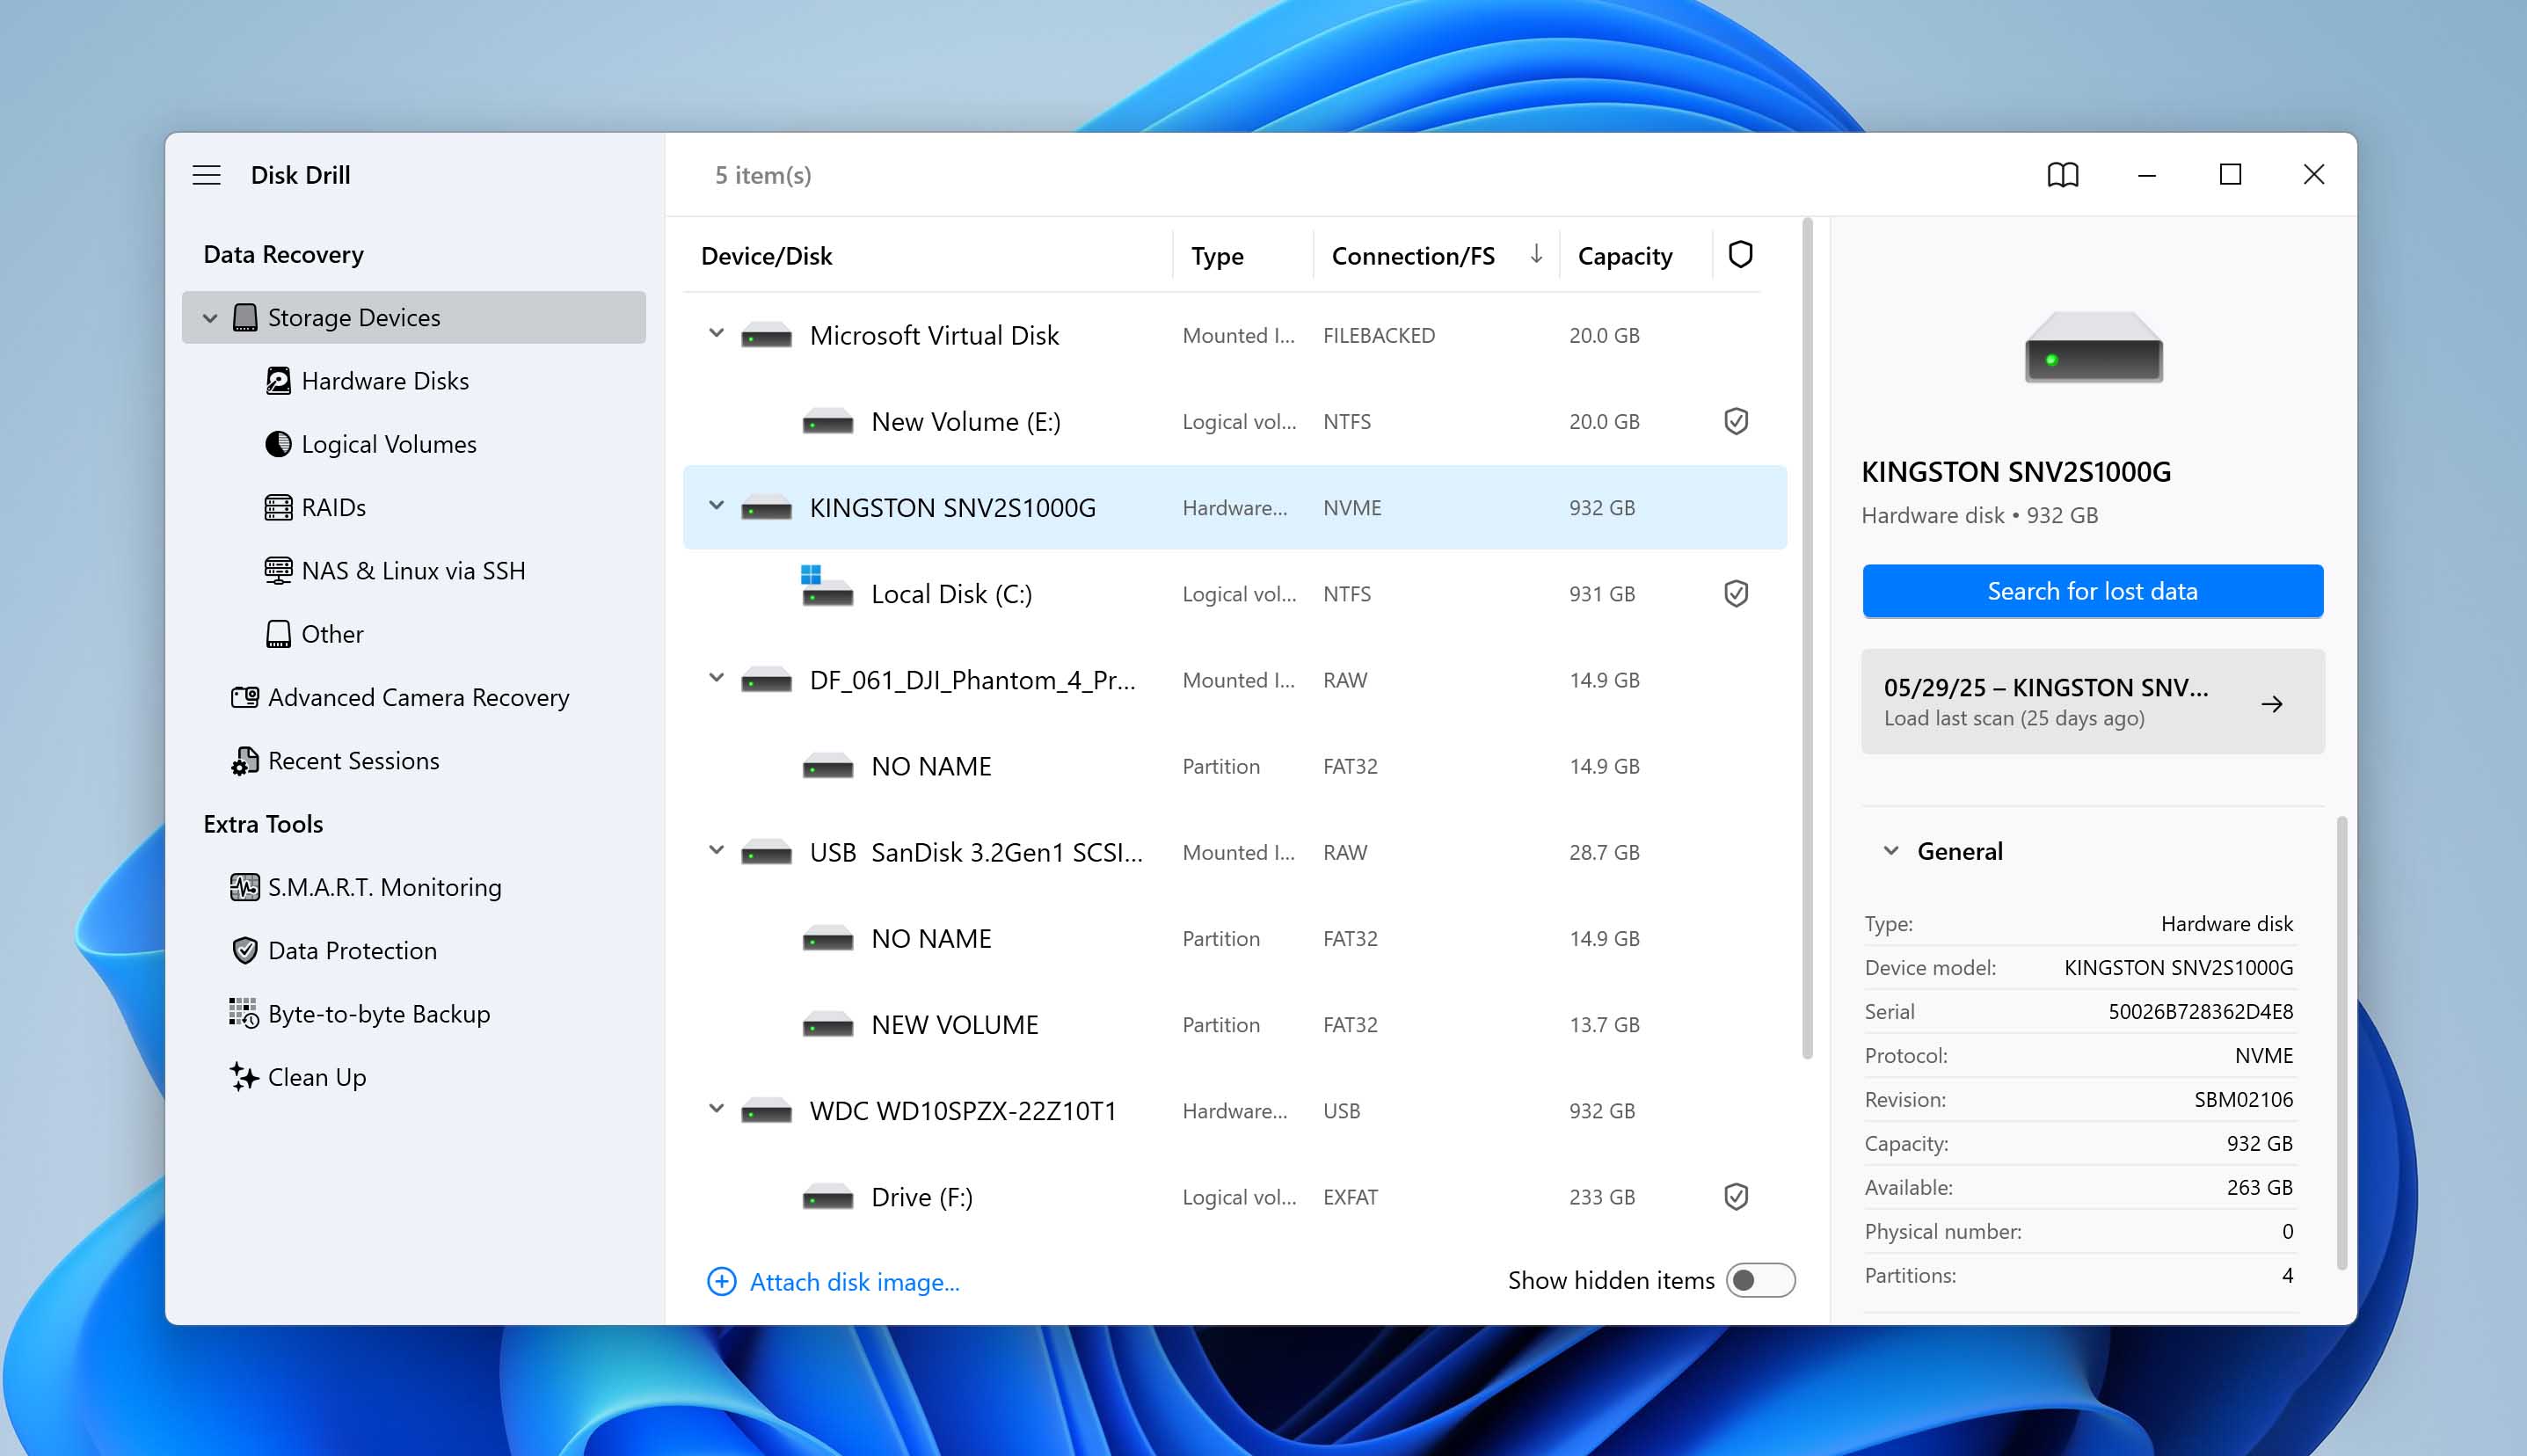
In some situations, you cannot recover the user profile itself, or even if you restore access to the original profile, its contents may still be absent. In these cases, your best option is to use a professional data recovery tool to scan the drive for deleted files. We recommend Disk Drill because it supports deep scans based on file signatures and recovers many types of files with high effectiveness. It can restore documents, images, videos, and other data from NTFS system partitions.
Disk Drill can locate user data that has been deleted or removed from the visible file structure, giving you a chance to recover documents from the user’s Desktop, Downloads, Documents, and other key folders.
💡 Attention: If your system is installed on an SSD, there’s a high chance the TRIM command has already cleared the deleted data at the hardware level, making recovery impossible. On the other hand, if your system drive is an HDD, the deleted files often remain recoverable until they are overwritten by new data, so it’s critical to stop using the system immediately and run the recovery as soon as possible.
- Download and install Disk Drill. Do not install it on the system drive where the deleted profile was stored, as this may overwrite data that you can still recover.
- Launch Disk Drill and select the system drive (usually C:) from the list of available volumes.
- Click Search for lost data to begin the scan. Disk Drill will automatically run all recovery methods in sequence.
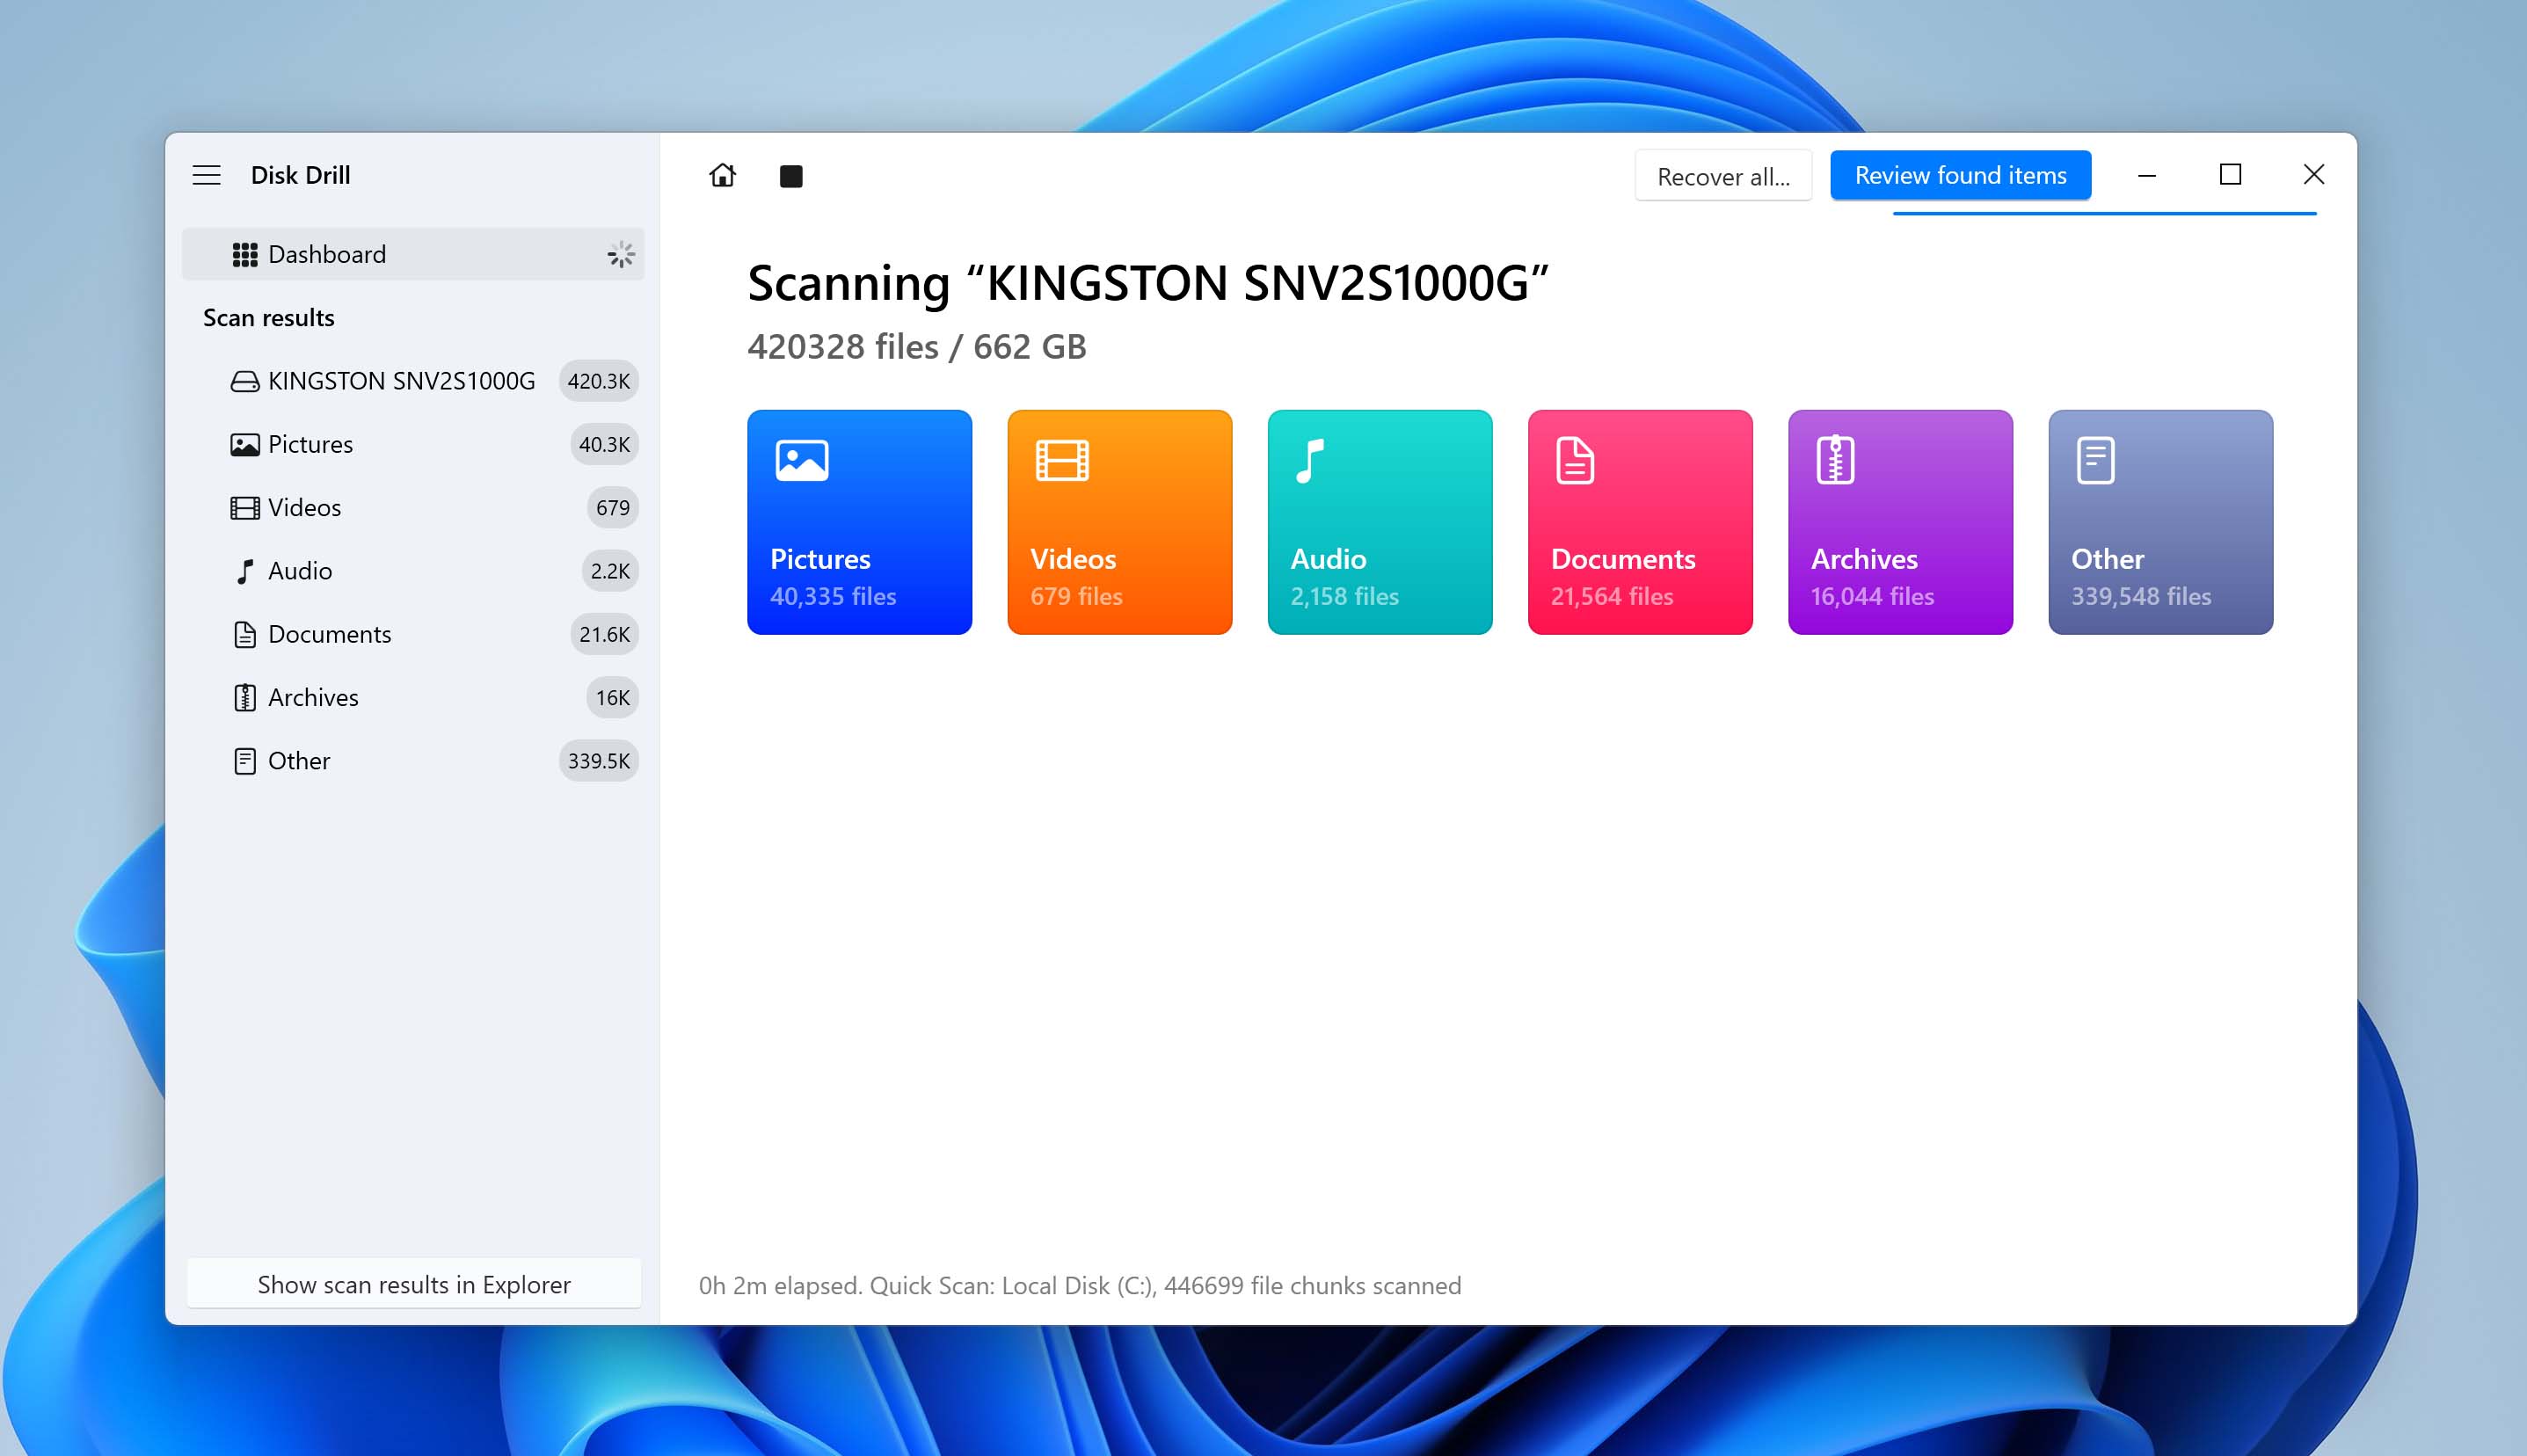
- Once the scan is complete, browse through the results or use the search bar to find specific files. Pay attention to familiar folder names like Desktop, Documents, or Pictures.
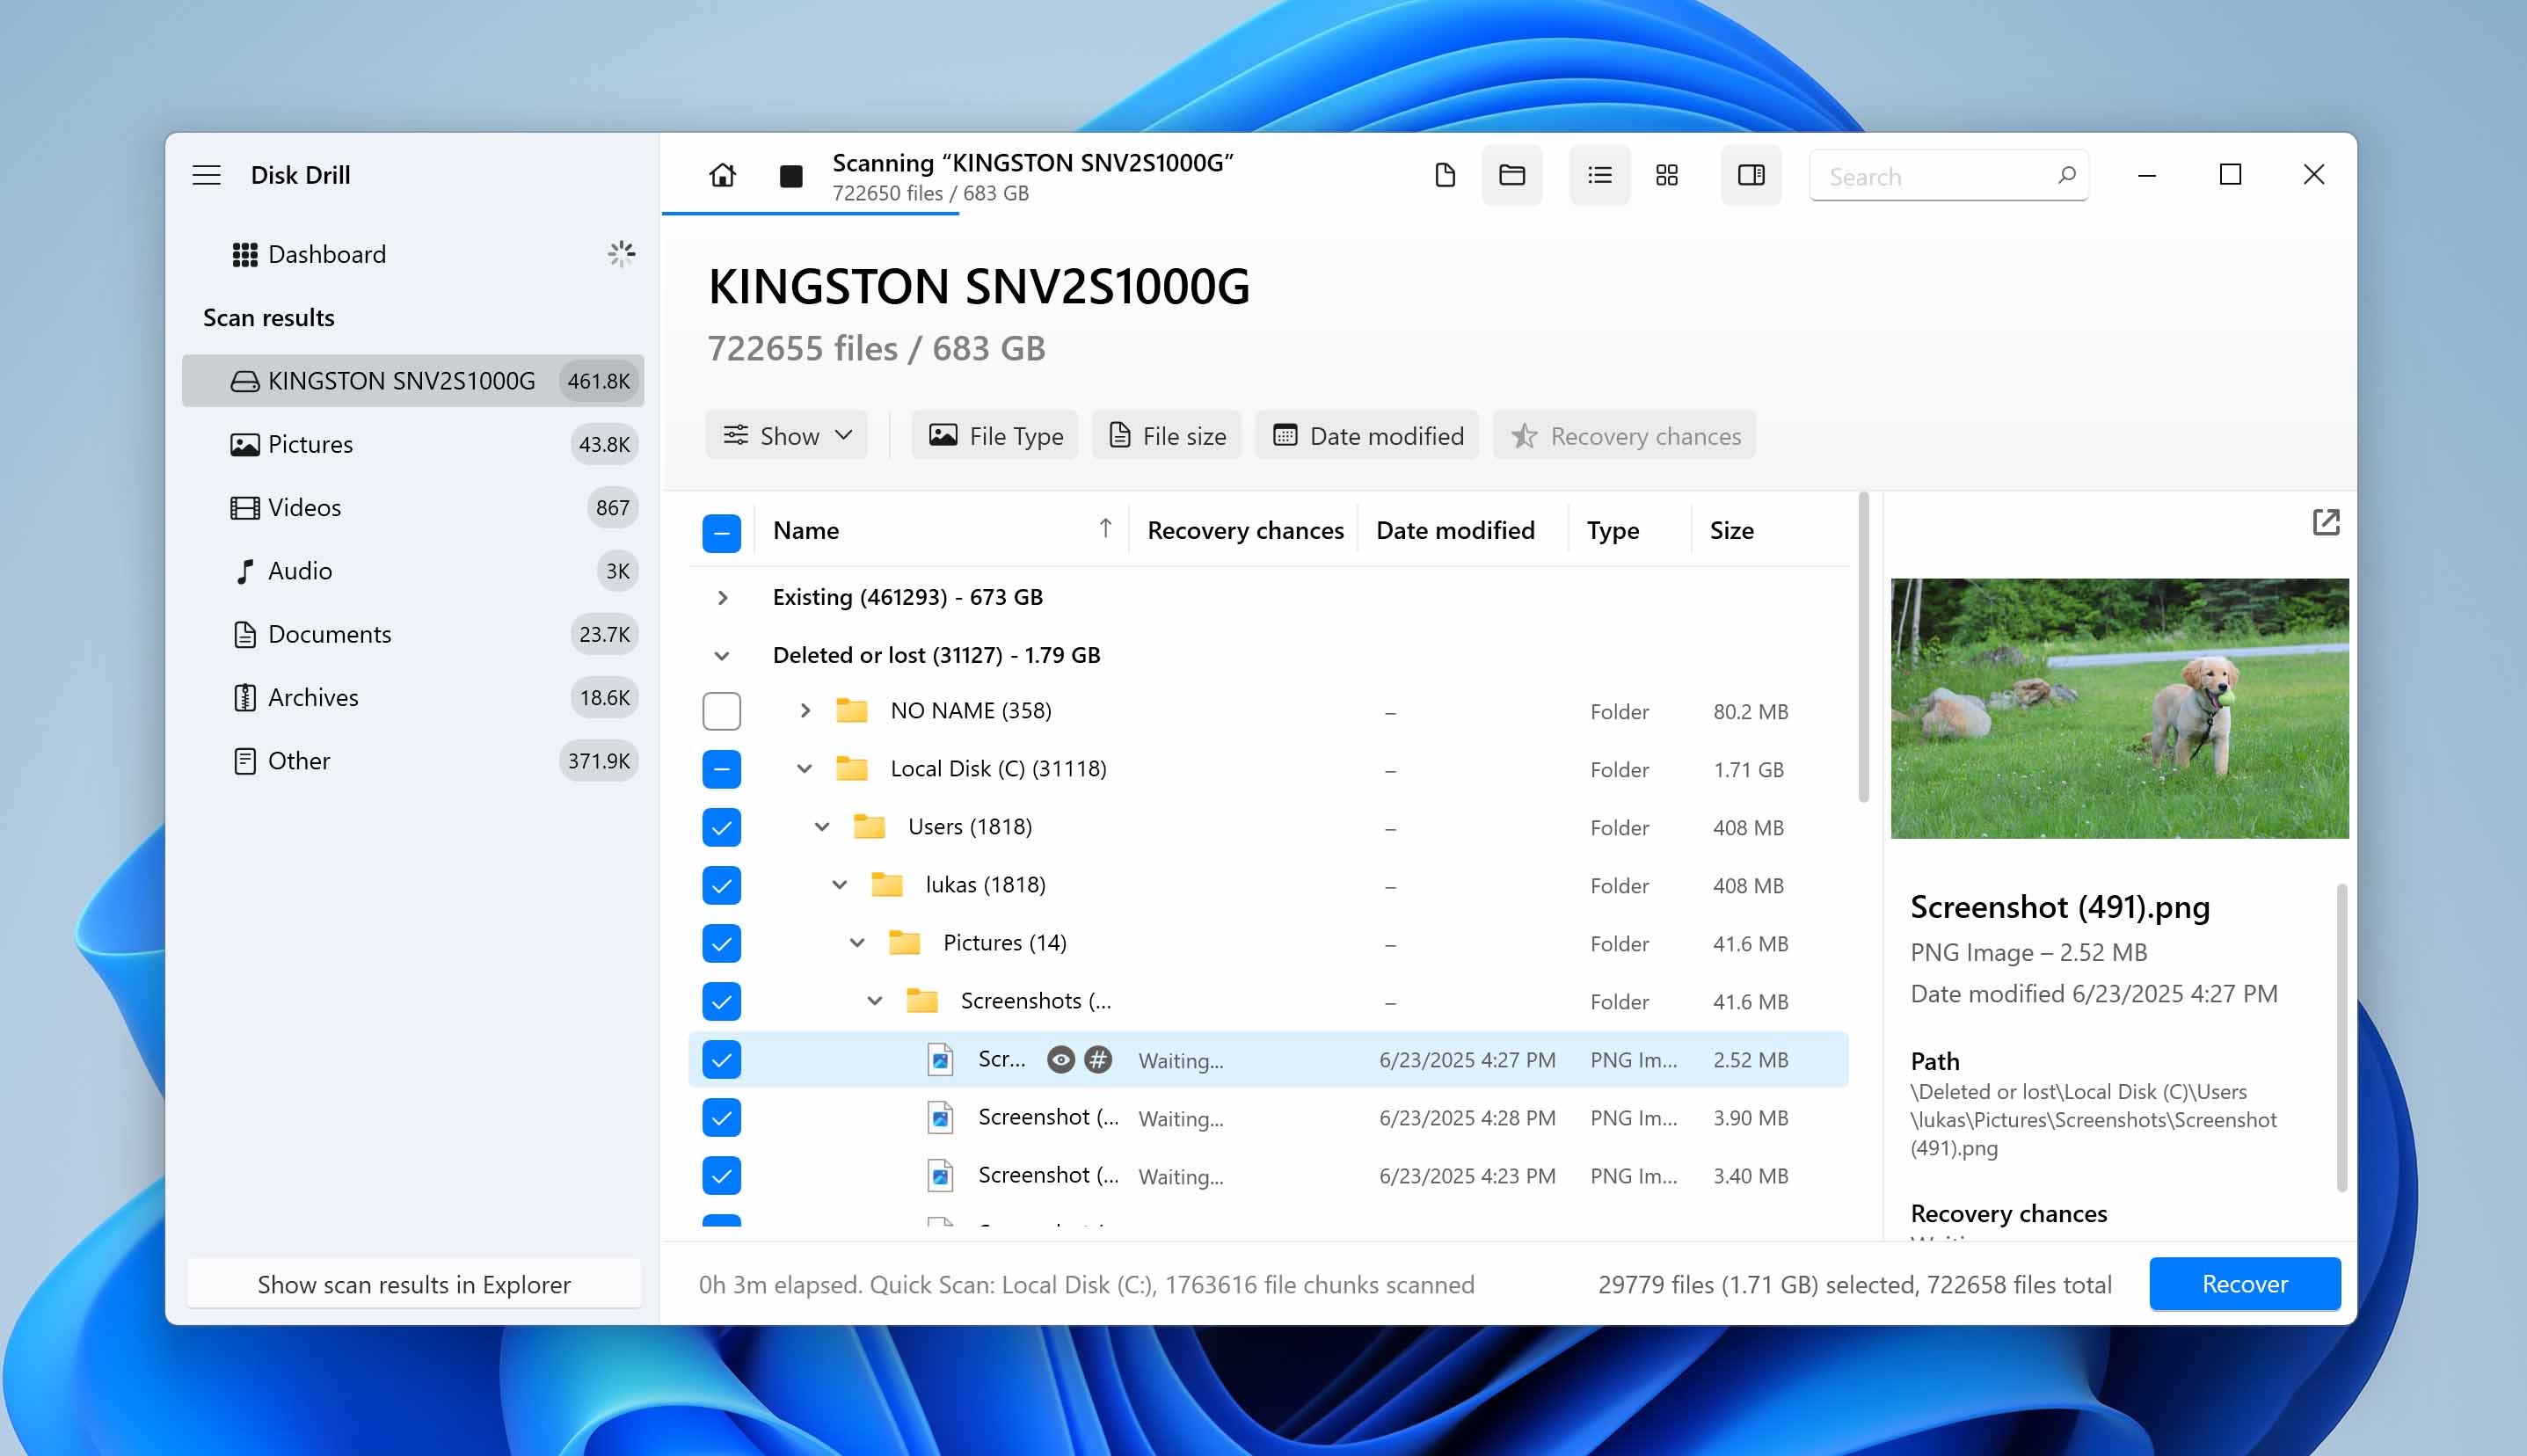
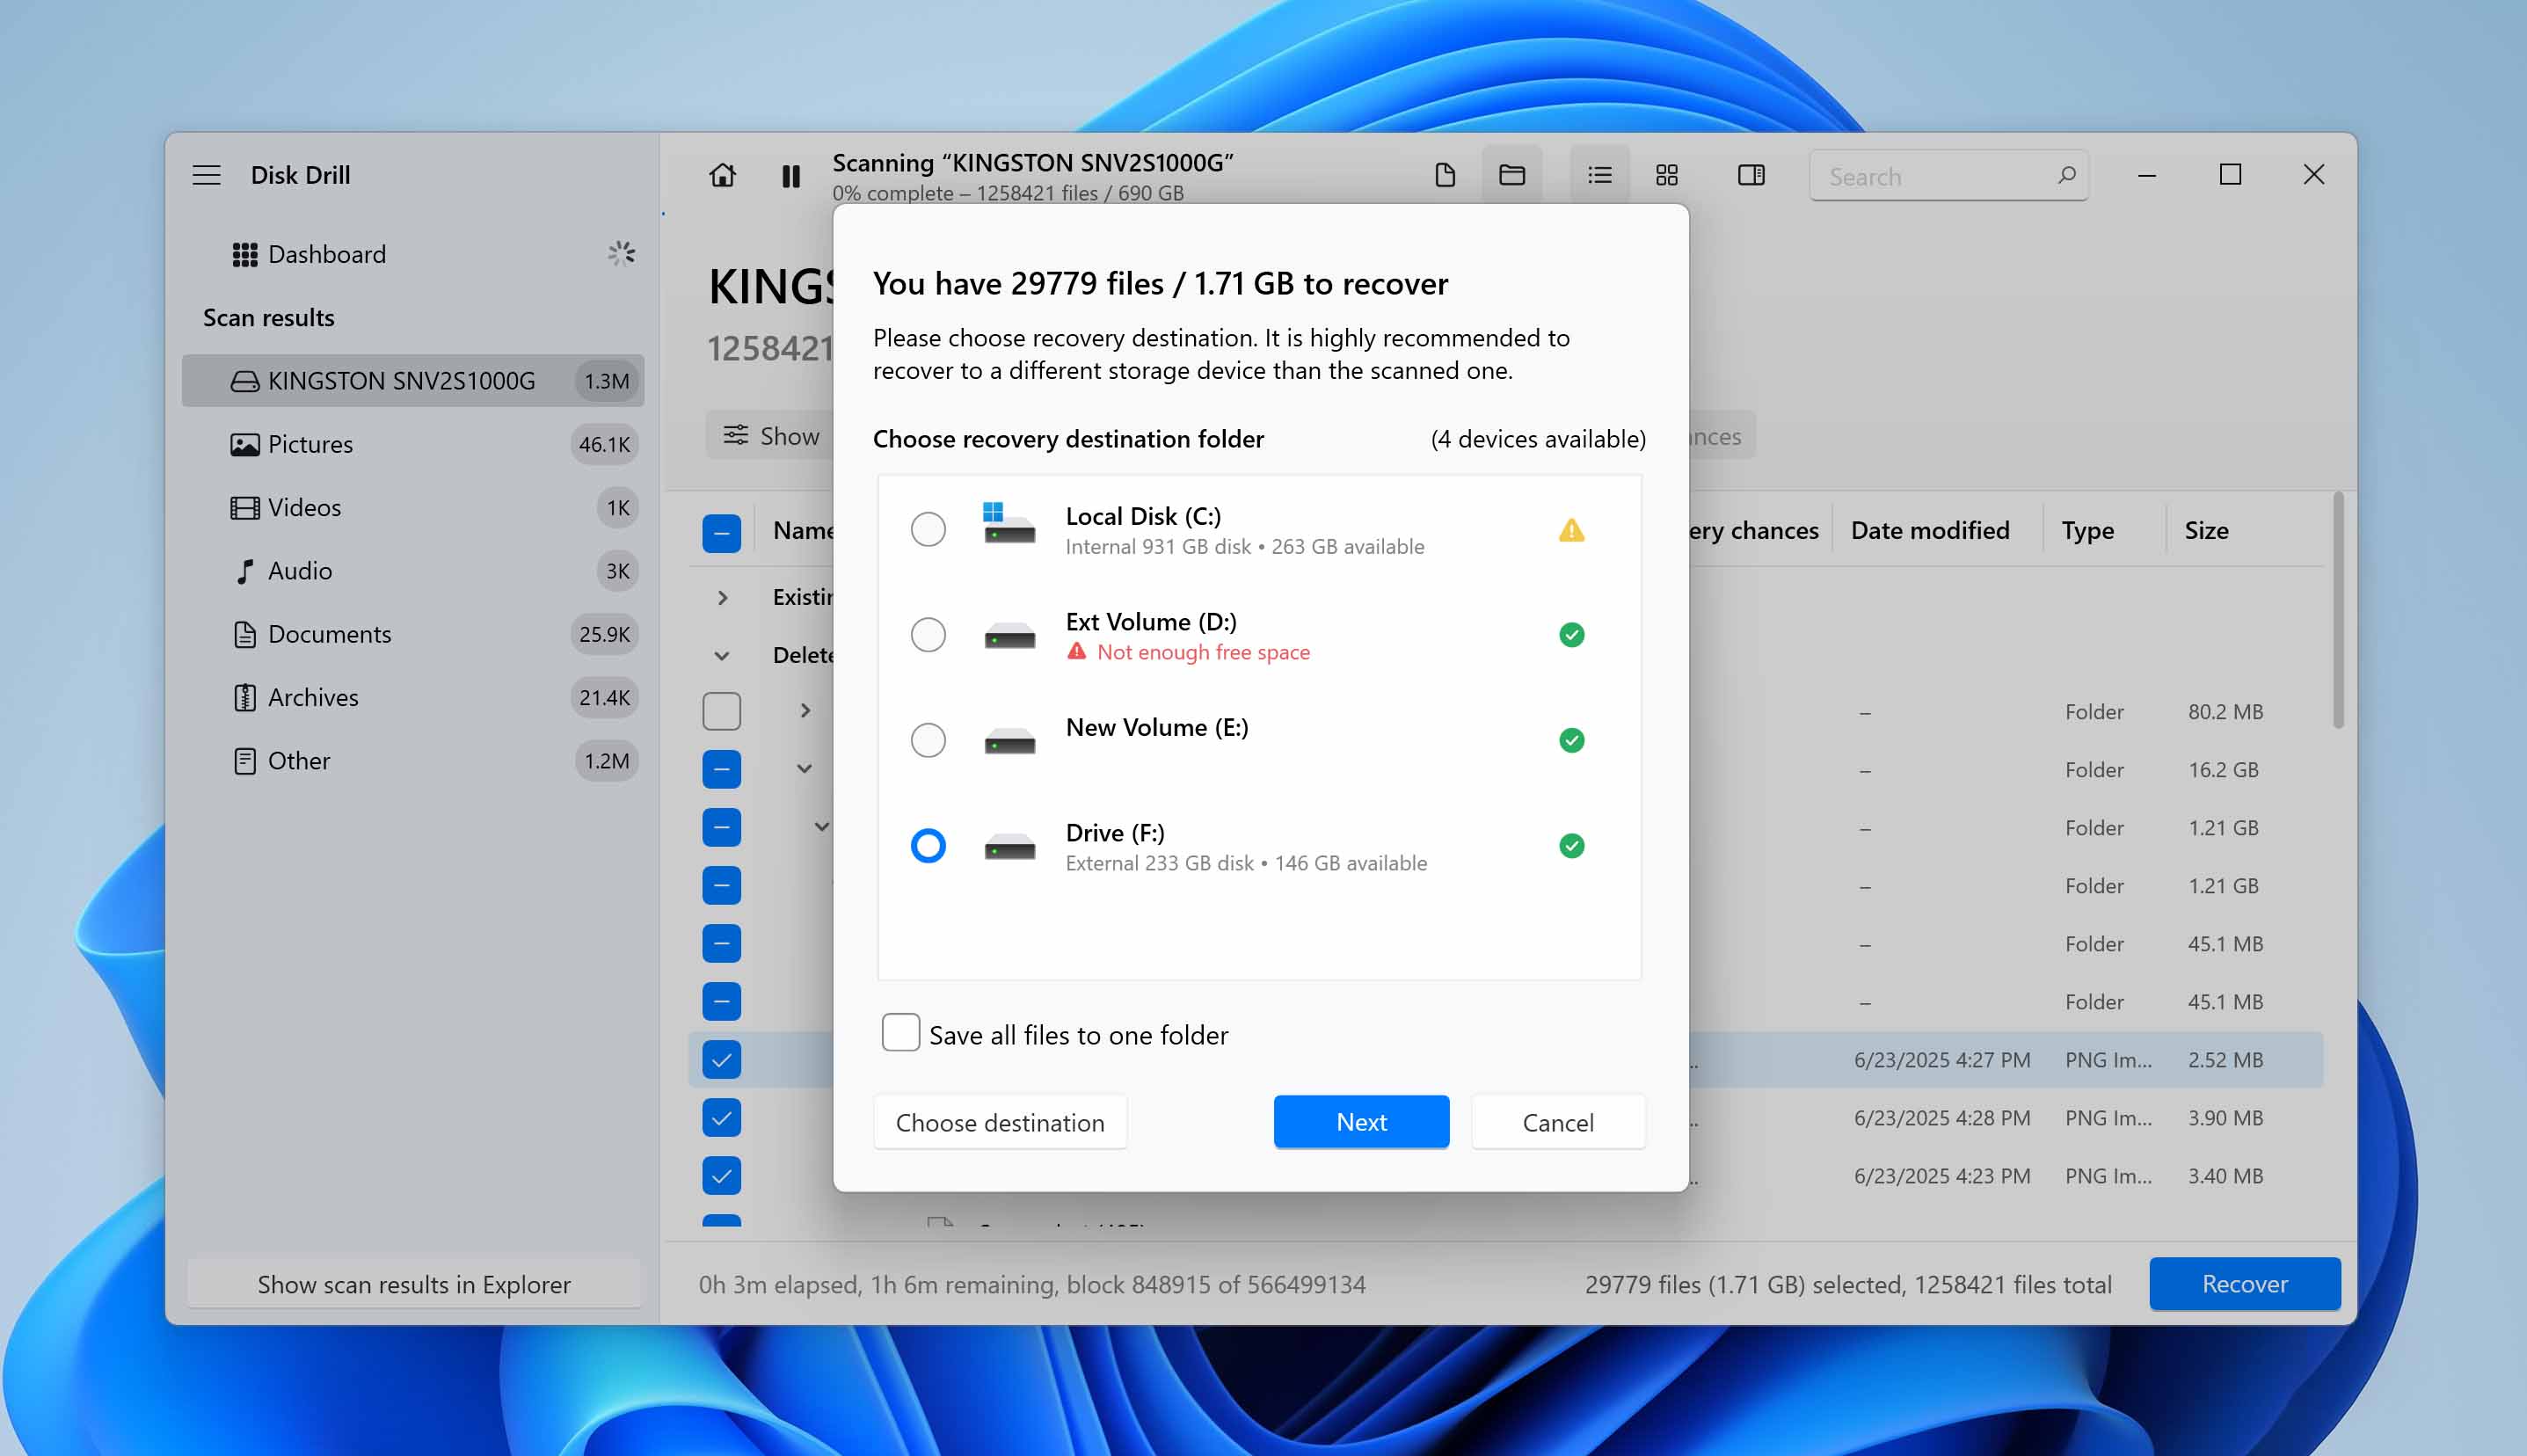
- Select the files you want to recover and click the Recover button. Choose a different destination drive so that the process does not overwrite other data on the original volume.


Disk Drill proves its worth when users need to recover personal data that no longer belongs to an active profile. It serves as a vital tool when the primary goal is to restore individual files rather than accessing the Windows account.
Bonus: How to Create a New User Profile
If you cannot restore your original user profile – or if you have recovered your files but not the user account itself – the best alternative is to create a new profile and move your recovered data into it. This approach lets you use the system in a normal way with a fresh environment, while you still maintain access to your personal files.
- Press Win + I to open Settings, then go to Accounts > Other users.
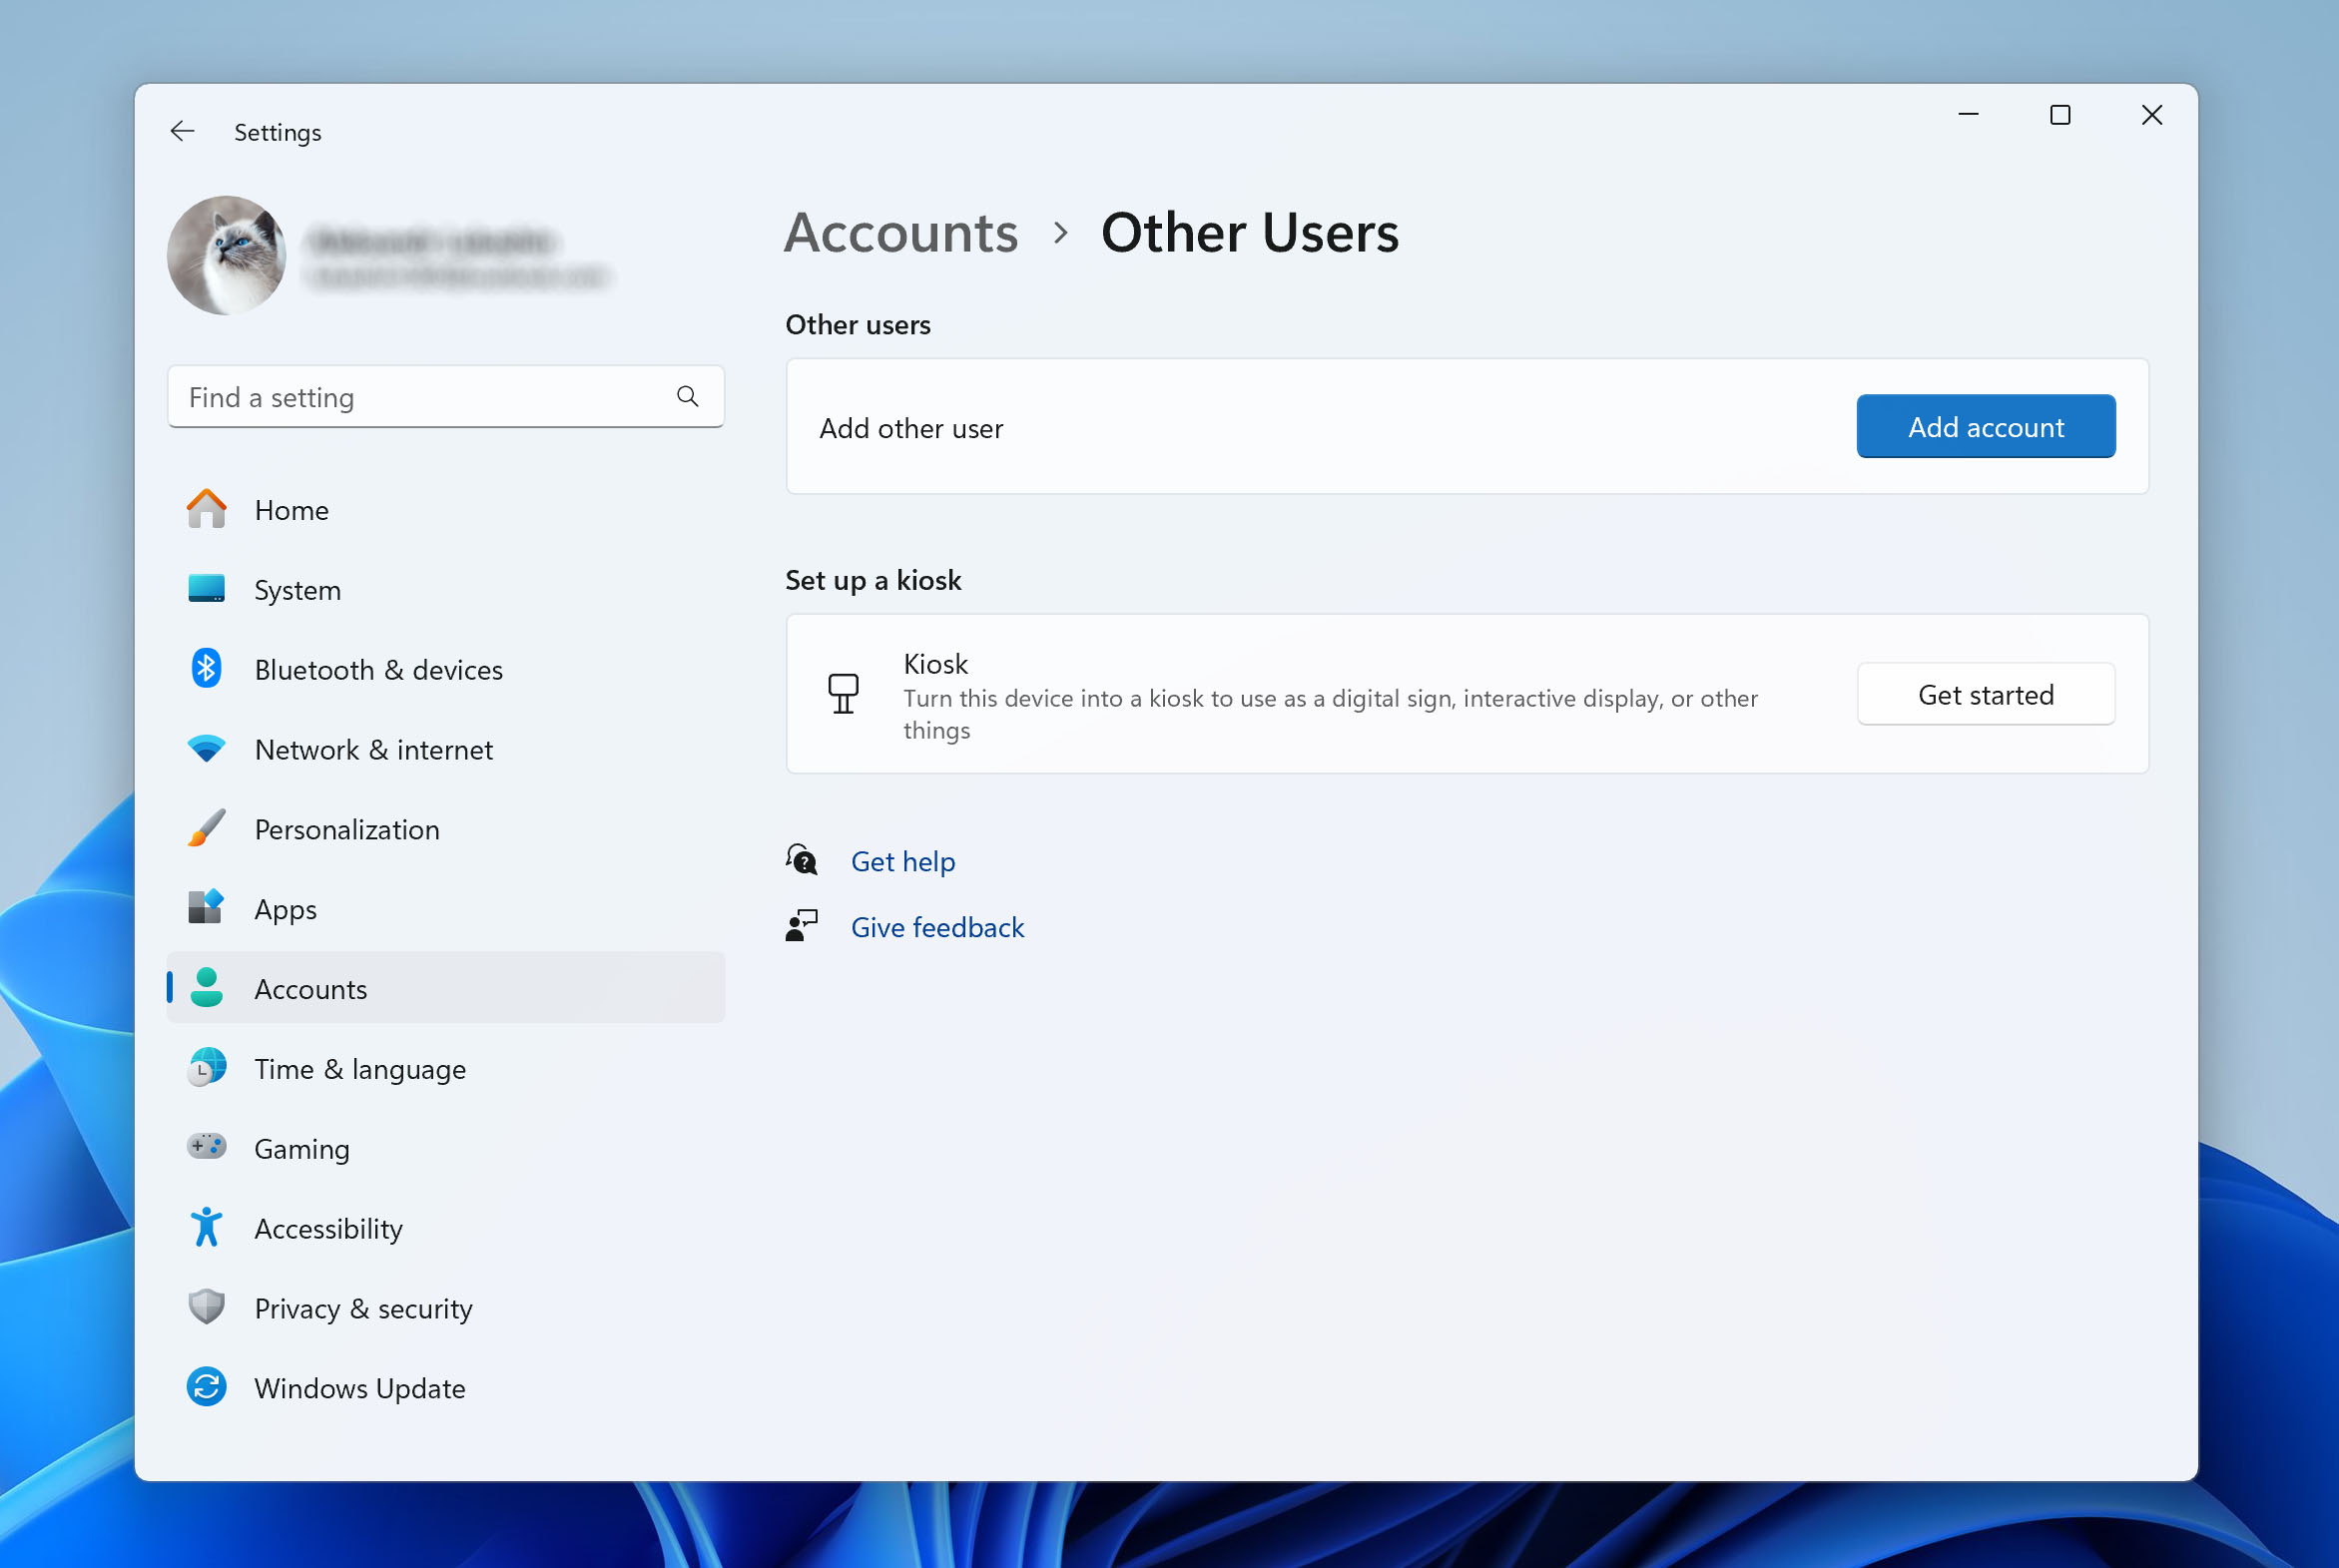
- Under the Other users section, click Add someone else to this PC.
- If you don’t want to link a Microsoft account, select I don’t have this person’s sign-in information, then click Add a user without a Microsoft account.
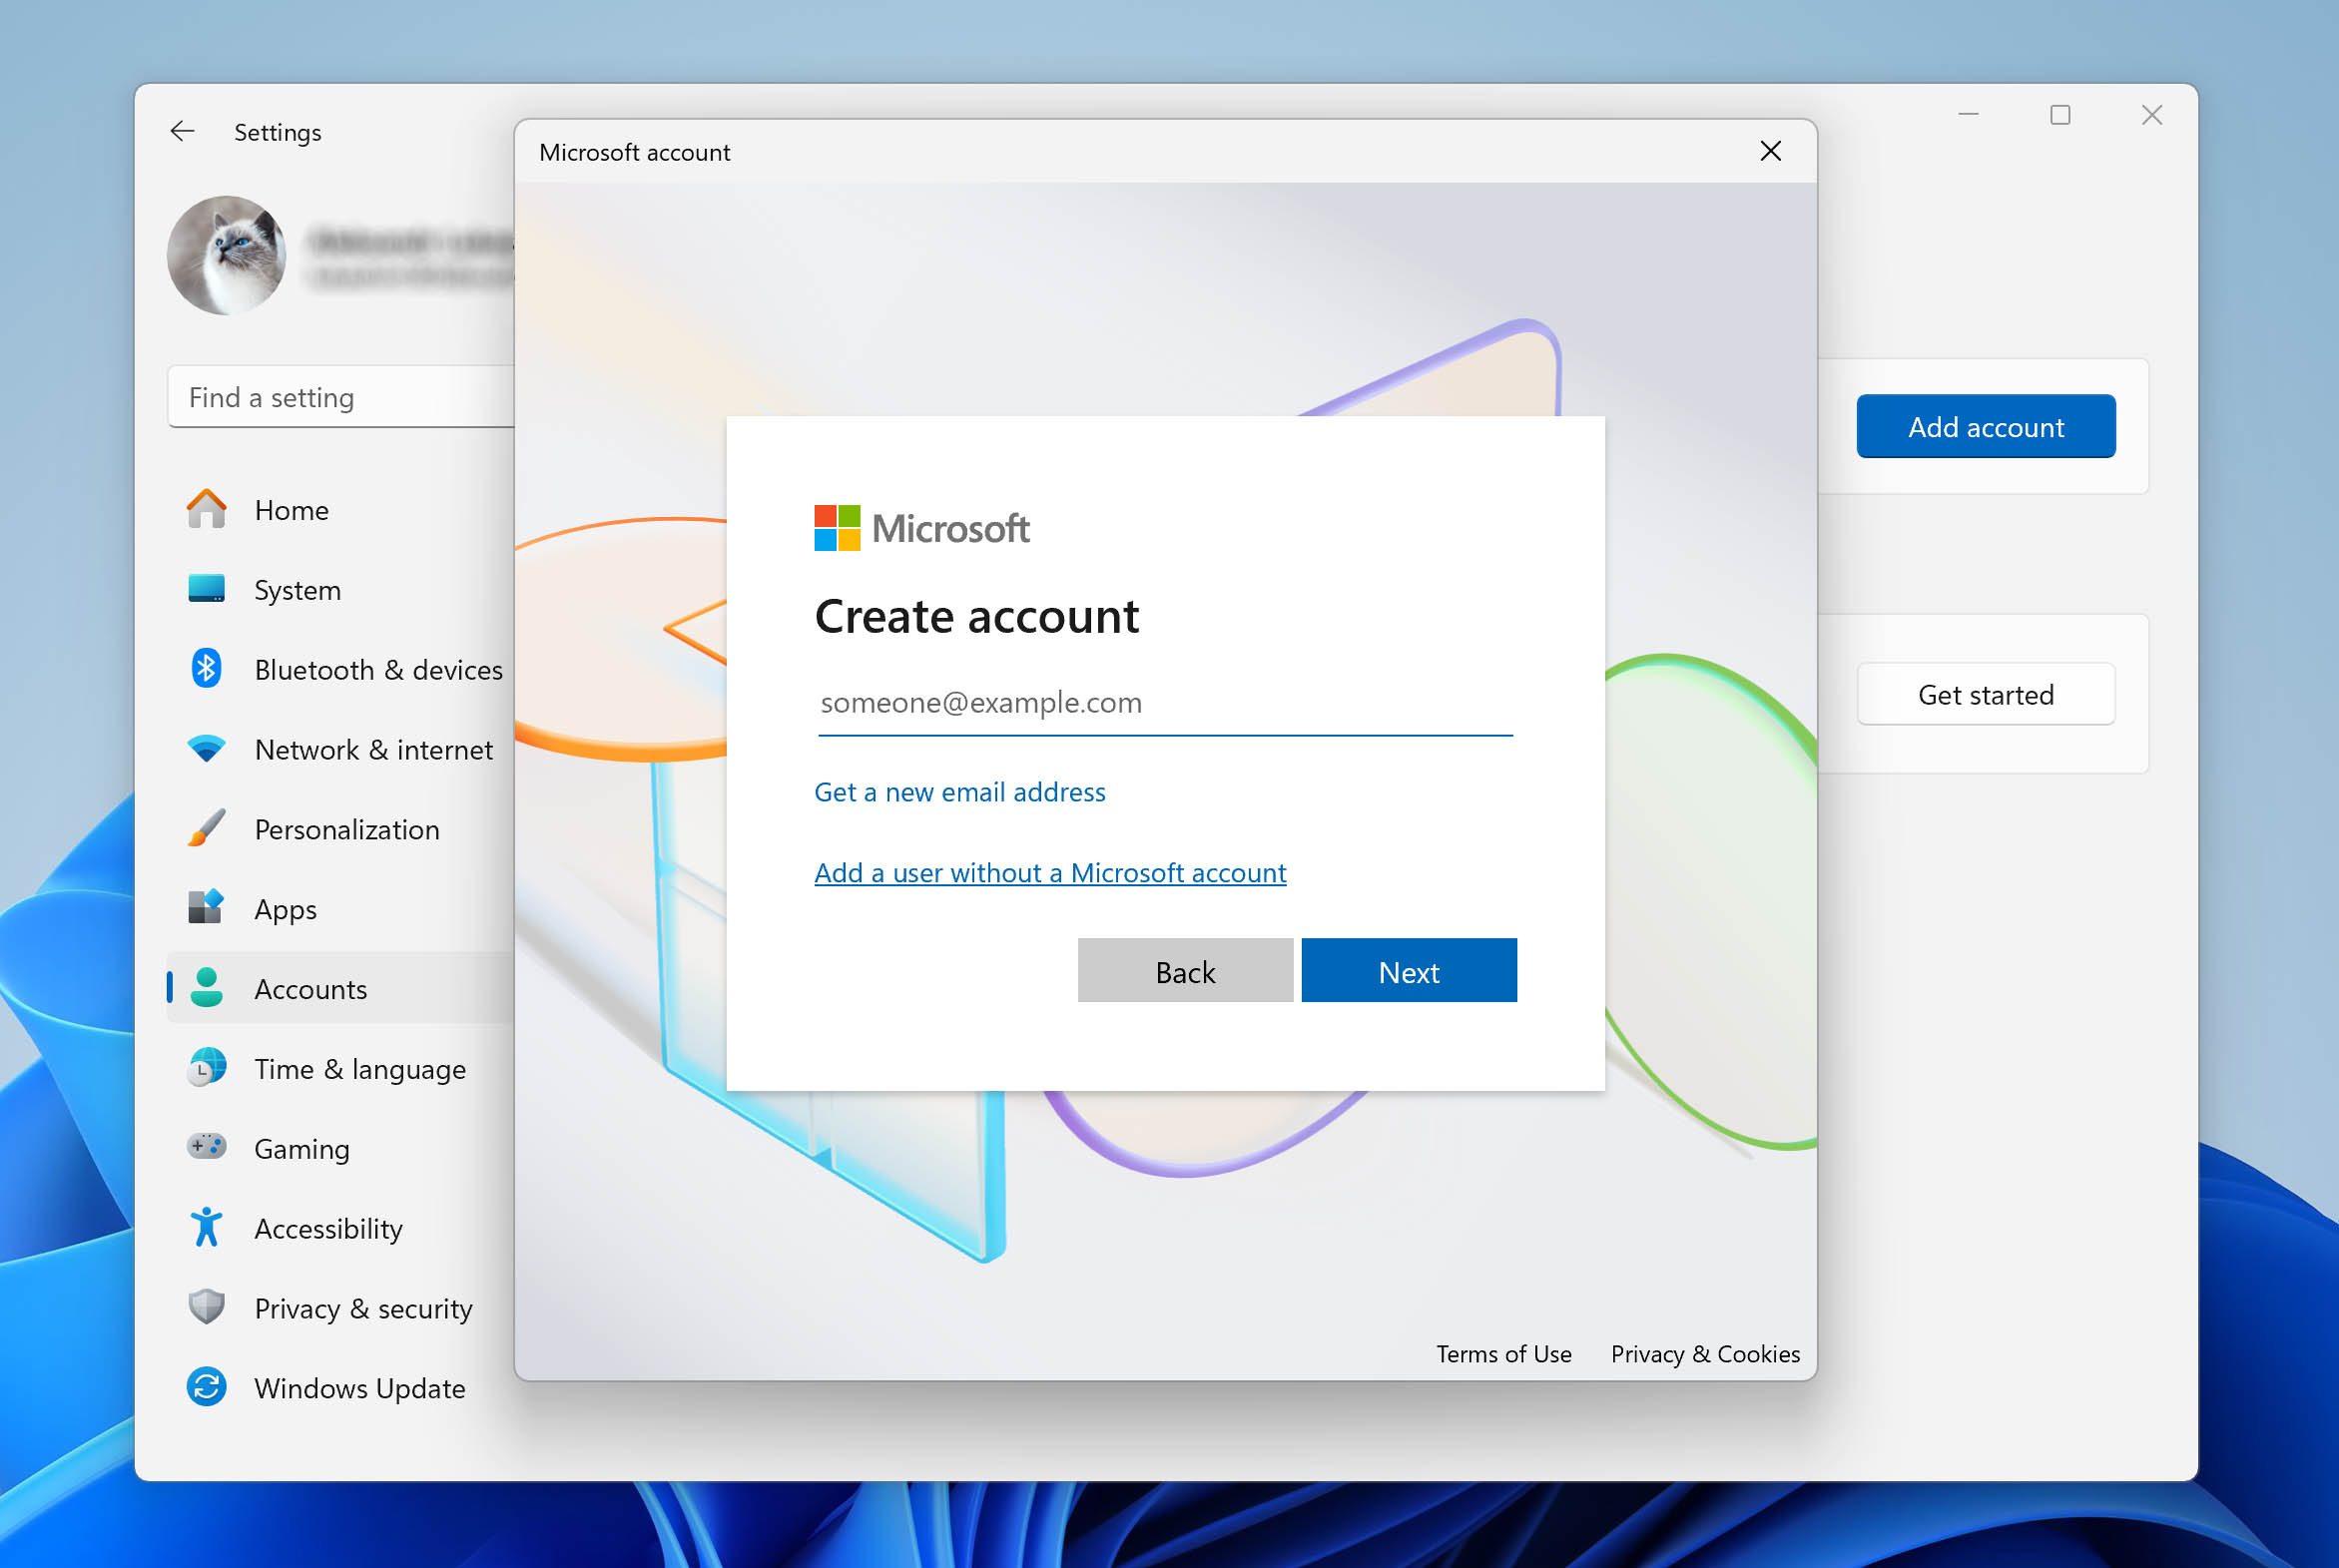
- Enter a name and password for the new account, then click Next.
- After creating the account, return to the Other users section. Click on the new account, then choose Change account type, and set it to Administrator if you need full access.


Once the new profile is created, you can log into it and manually transfer your recovered files. Locate the restored data from your old user account, wherever you saved it during recovery, and copy your personal folders into the folders of the new profile. This does not restore your exact settings or installed programs, but it provides a stable environment where you can continue your work and access your important data.
Bottom Line
Although it is often possible to recover a deleted user profile or at least recover its files, success is not guaranteed, especially with SSD drives or if too much time has passed.
That’s why it’s important to take preventive measures: enable system recovery and file history, and regularly back up important data to external drives or cloud storage. A few minutes spent on backups today can save you hours of recovery tomorrow.