
Reading Time: 8 minutesIf you’re a Lightroom user, you already know how important catalogs are. They store all the edits and adjustments you make to your images. Even though the photos themselves aren’t kept in these catalogs, deleting a catalog means losing hours or even days of editing work. So, what can you do in this situation? Is it possible to recover a deleted Lightroom catalog? Yes, it is. You have more options for recovery than you might think. Keep reading to learn how to recover it safely, right at home, with our guide below.
Where Is Lightroom Catalog Stored?
The default location for Lightroom catalogs on Windows is: C:\Users\<username>\Pictures\Lightroom. However, you can store Lightroom catalogs anywhere on your computer, including external storage devices. If you store your Lightroom catalog on an external storage device, you will have to connect it to your PC each time you use Adobe Lightroom.
You can check your default catalog by opening Lightroom and going to Edit > Preferences > General > Default Catalog.
Remember, your photos are not stored in the Lightroom catalog. They’ll remain in their original locations. The Lightroom catalog stores the edits, metadata, and the reference of the original location of the images.
If you did not find the desired catalog in this folder, consider whether you saved it somewhere else, perhaps even by accident. You can use the search in File Explorer to avoid looking through each folder manually. If this does not yield results, or if you are sure you deleted it, it’s time to review possible ways to restore Lightroom catalogs.
How to Restore a Deleted Lightroom Catalog
We won’t dwell on how you deleted your Lightroom catalog – what matters is it’s gone, you’ve lost hours of edits, and now you need to get it back. Thankfully, most of the time you can. We’ll walk through different recovery methods based on your situation – whether you have backups, just hit Delete versus Shift + Delete, how long it’s been since the loss, and more.
As soon as you notice the loss of the Lightroom catalog, stop using the partition where it was stored. Do not add new files, as this can destroy the chances of recovery with some methods described below.
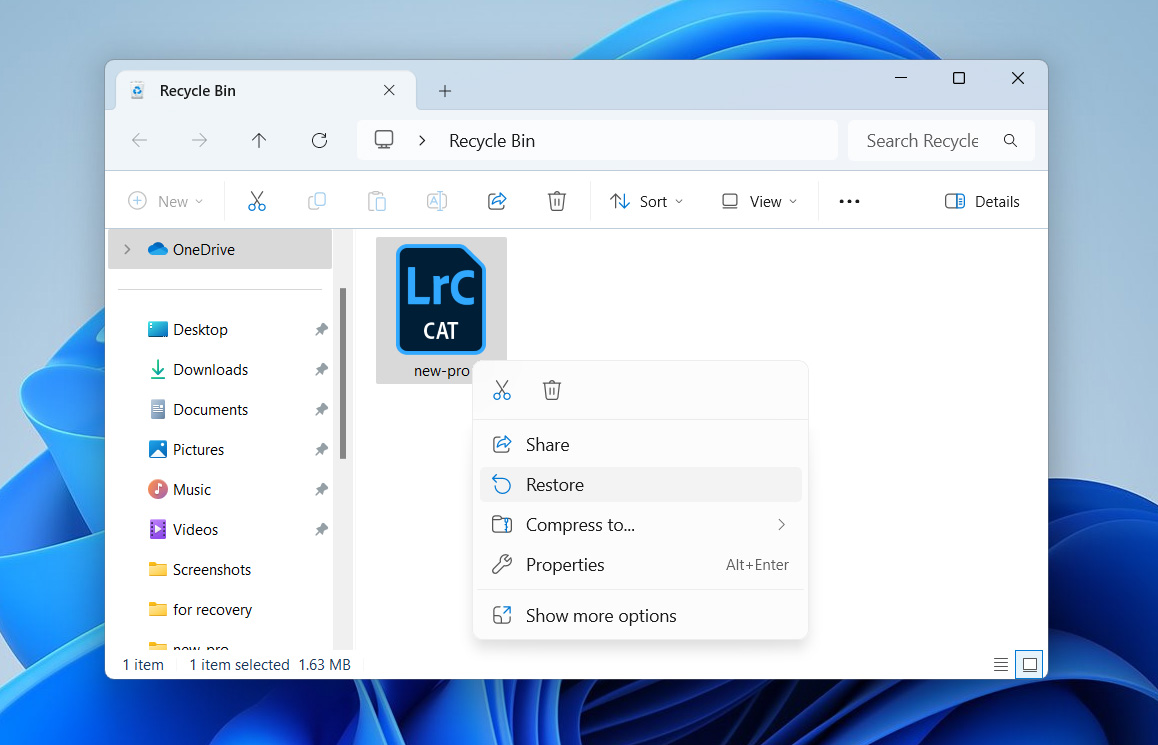
Method 1: Search for Your Lightroom Catalog in the Recycle Bin
If you deleted your Lightroom catalog, the first thing to do is check the Recycle Bin on your PC. Any files you delete are stored there until you empty the bin. If your catalog is in the bin, it’s the easiest way to restore it with just a couple of clicks of the mouse or touchpad.
However, if you used Shift + Delete to delete the Lightroom catalog, it bypassed the Recycle Bin entirely, so don’t waste time looking there. In that case, skip this method and move on to the next one. If you’ve already emptied the Recycle Bin after the deletion, you’ll need to proceed with the next recovery option as well.
- Find the Recycle Bin (the Trash icon) on your desktop or taskbar and double-click to open it.

- If you haven’t emptied the bin in a while, you might see thousands of files. To make your search easier, use the search bar at the top right of the Recycle Bin window. Type the name of your Lightroom catalog or part of it to quickly narrow down the results.
- Once you find your Lightroom catalog, right-click on it and select Restore. This will return the catalog to its original location before it was deleted.


Method 2: Use a Data Recovery Software
Data recovery software is a user-friendly and sometimes the only way to recover your Lightroom catalog (if you don’t have backups, which we will discuss later). However, you have to choose a good data recovery program from the overwhelming number of options available.
We chose Disk Drill because of its simplicity, success rate and support for a wide range of file types. The software can identify and recover .LRCAT (Lightroom catalog files), making it ideal in our case. You can also preview files before recovery, which comes in handy if you also want to recover missing photos and videos. As a Windows user, you can recover up to 500 MB of data as part of Disk Drill’s free trial.
Instructions on how to recover a deleted Lightroom catalog using Disk Drill:
- Download Disk Drill and install it. Don’t download and install it on the drive that contained the Lightroom catalog.
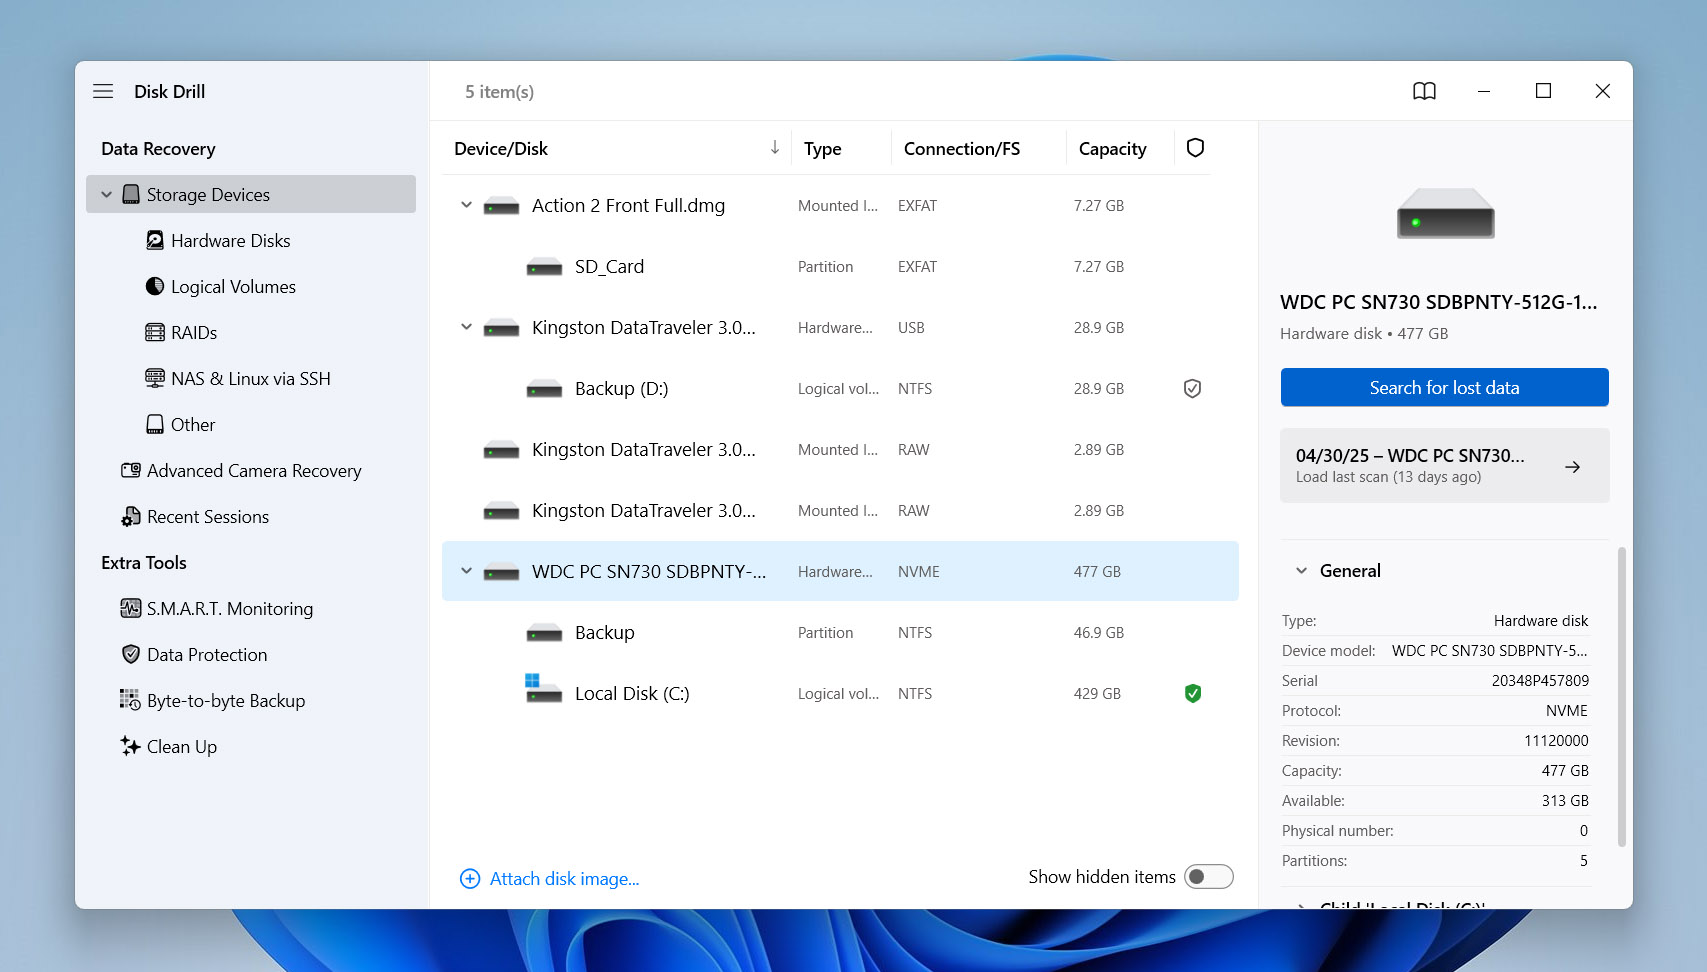
- Open Disk Drill, select the drive that stored the Lightroom catalog, and click Search for lost data.
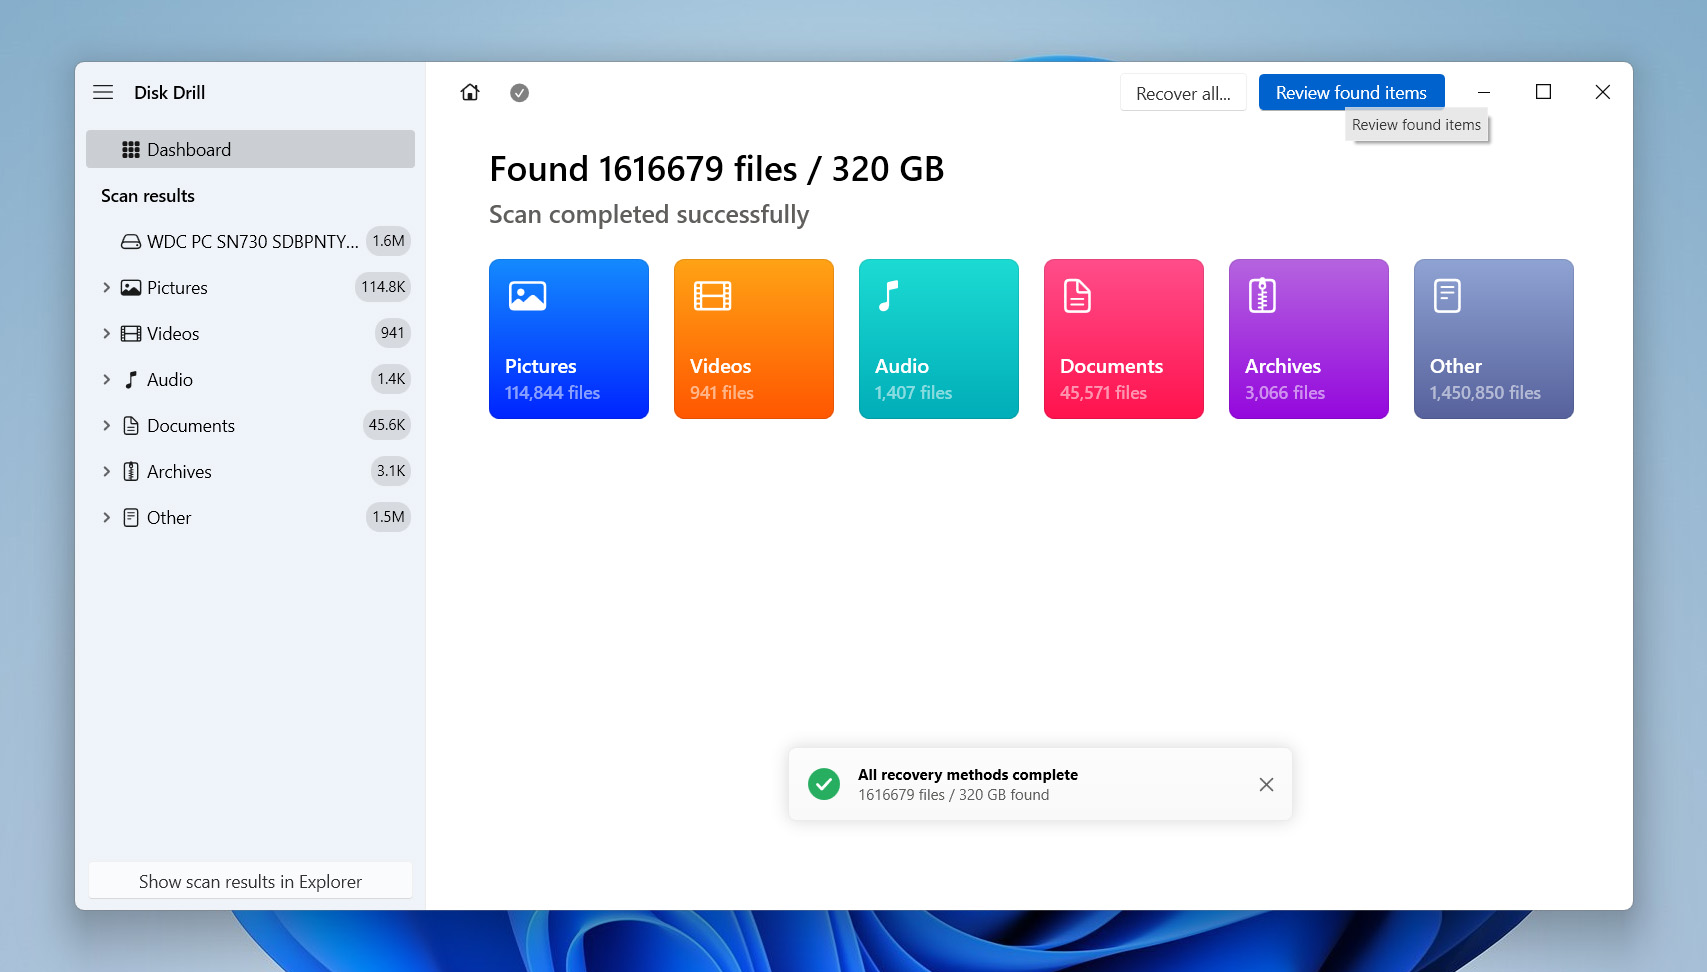
- Click on Review found items to view the recoverable data that Disk Drill discovered. Disk Drill’s scan times are quite fast, so it shouldn’t take long for the scan to be over.
- Look for the deleted Lightroom catalog. You can expand the necessary sections depending on where the catalog was located. Select the required files or folders using the checkbox next to them and click on Recover.
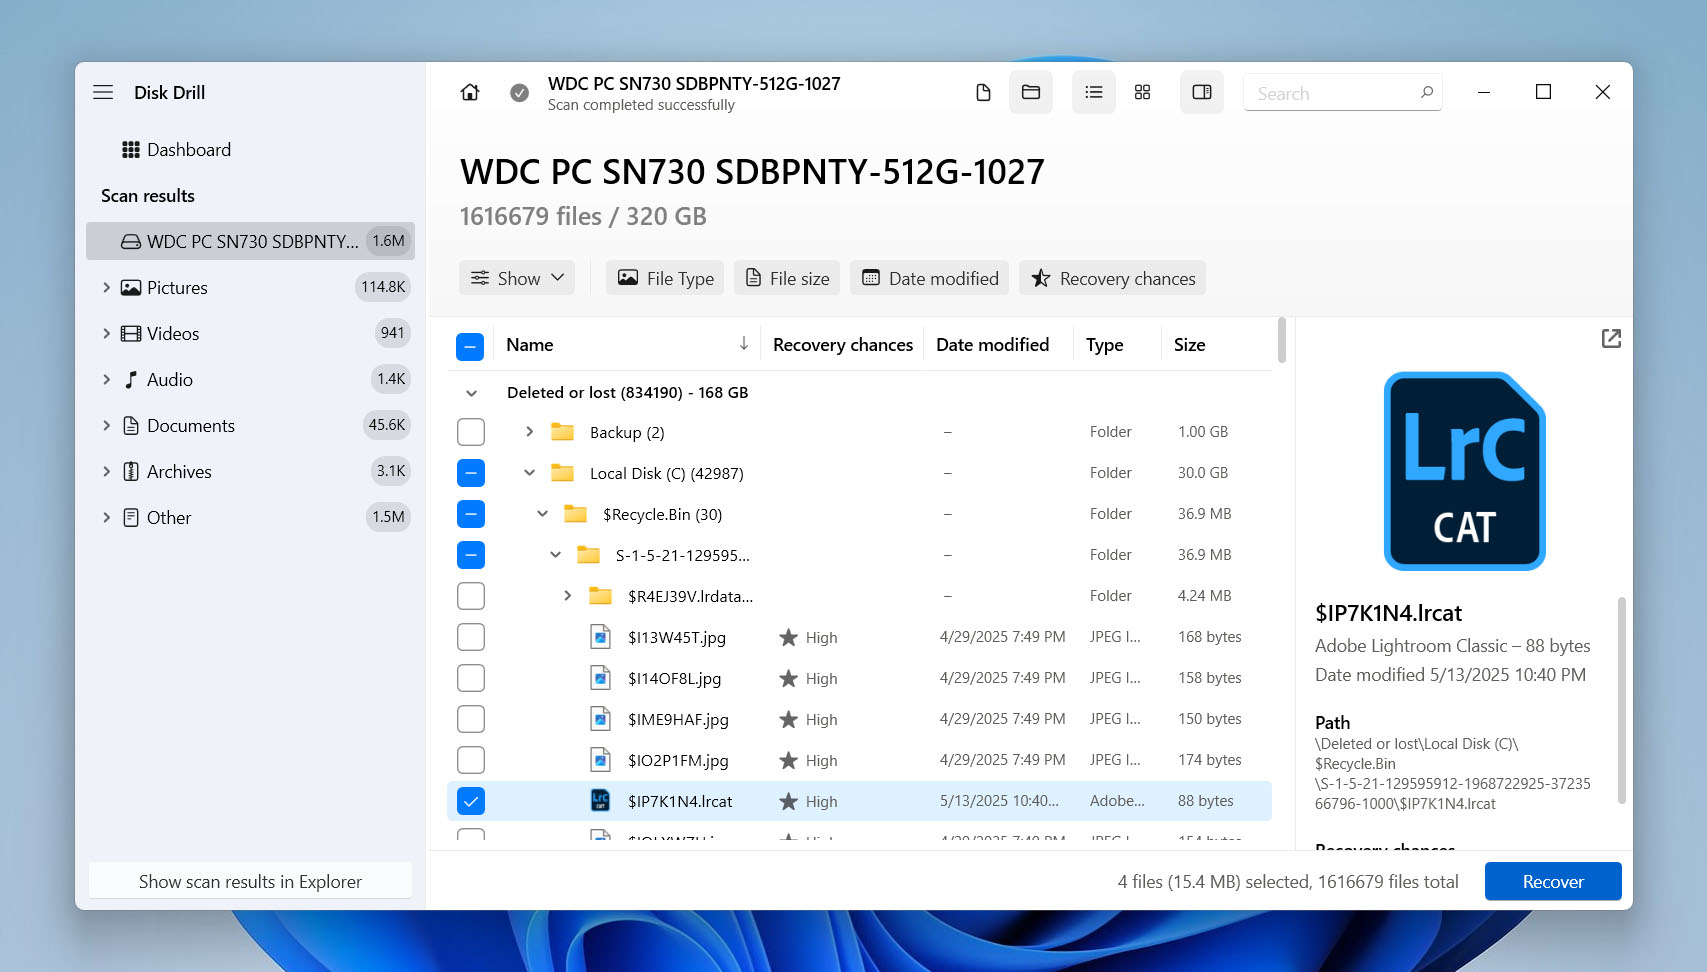
- Choose a recovery destination for the files and click on Next. Don’t save it on the same partition or external drive that it originally went missing from.
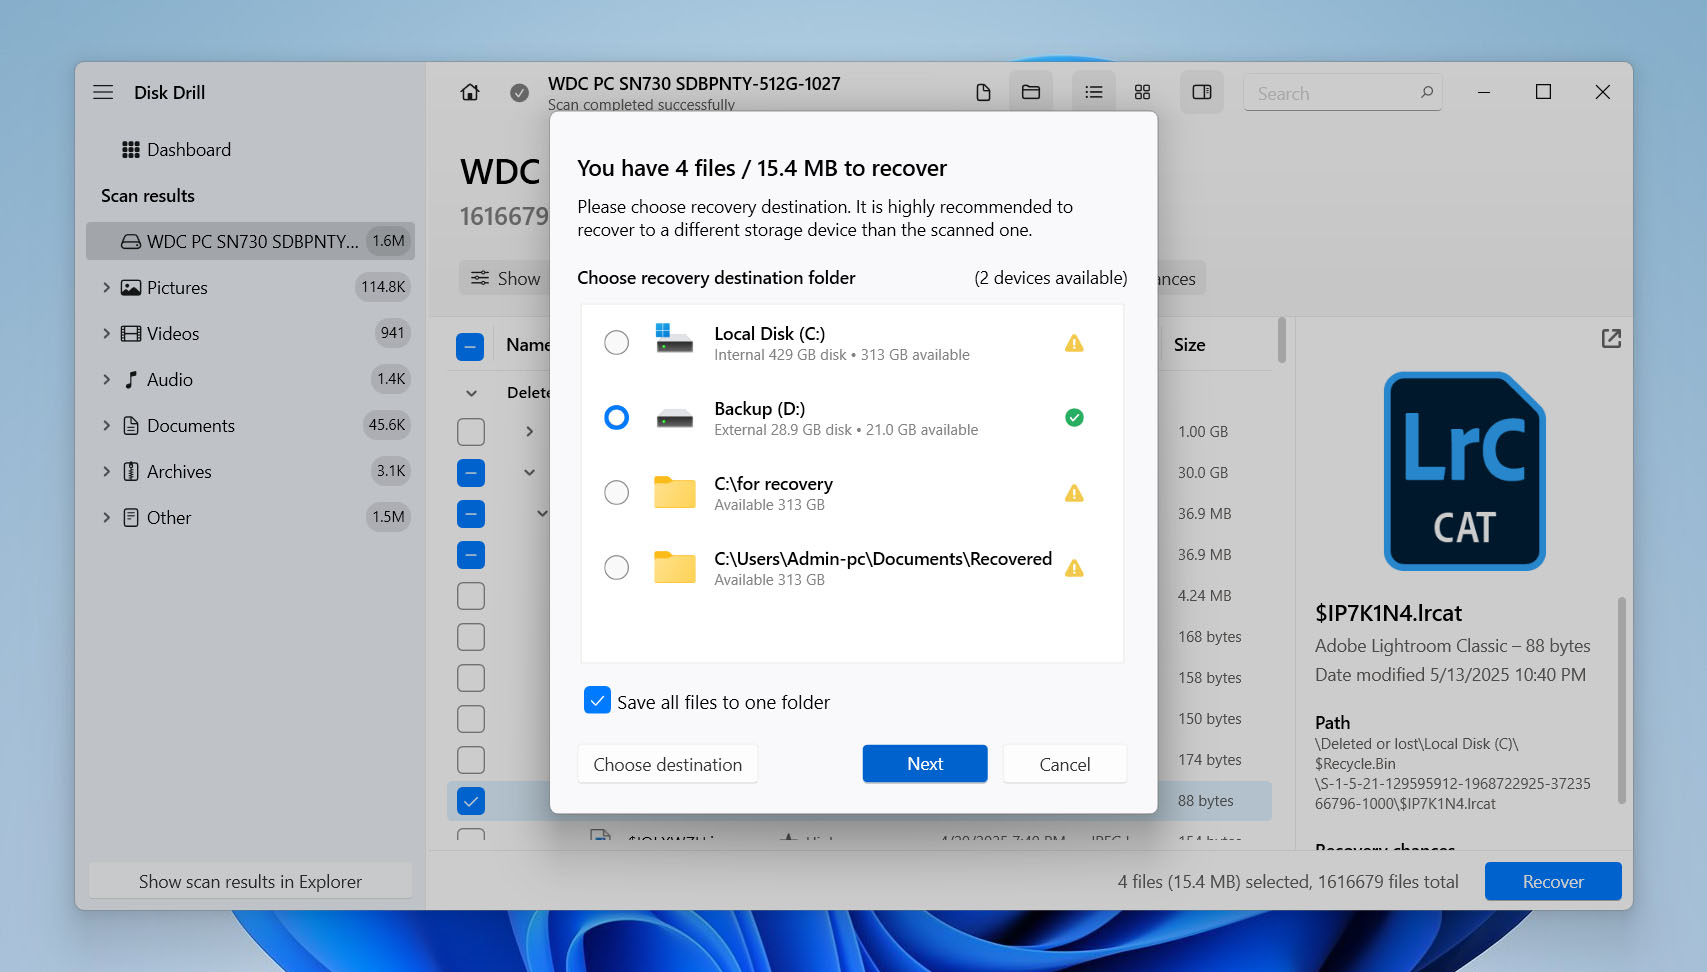
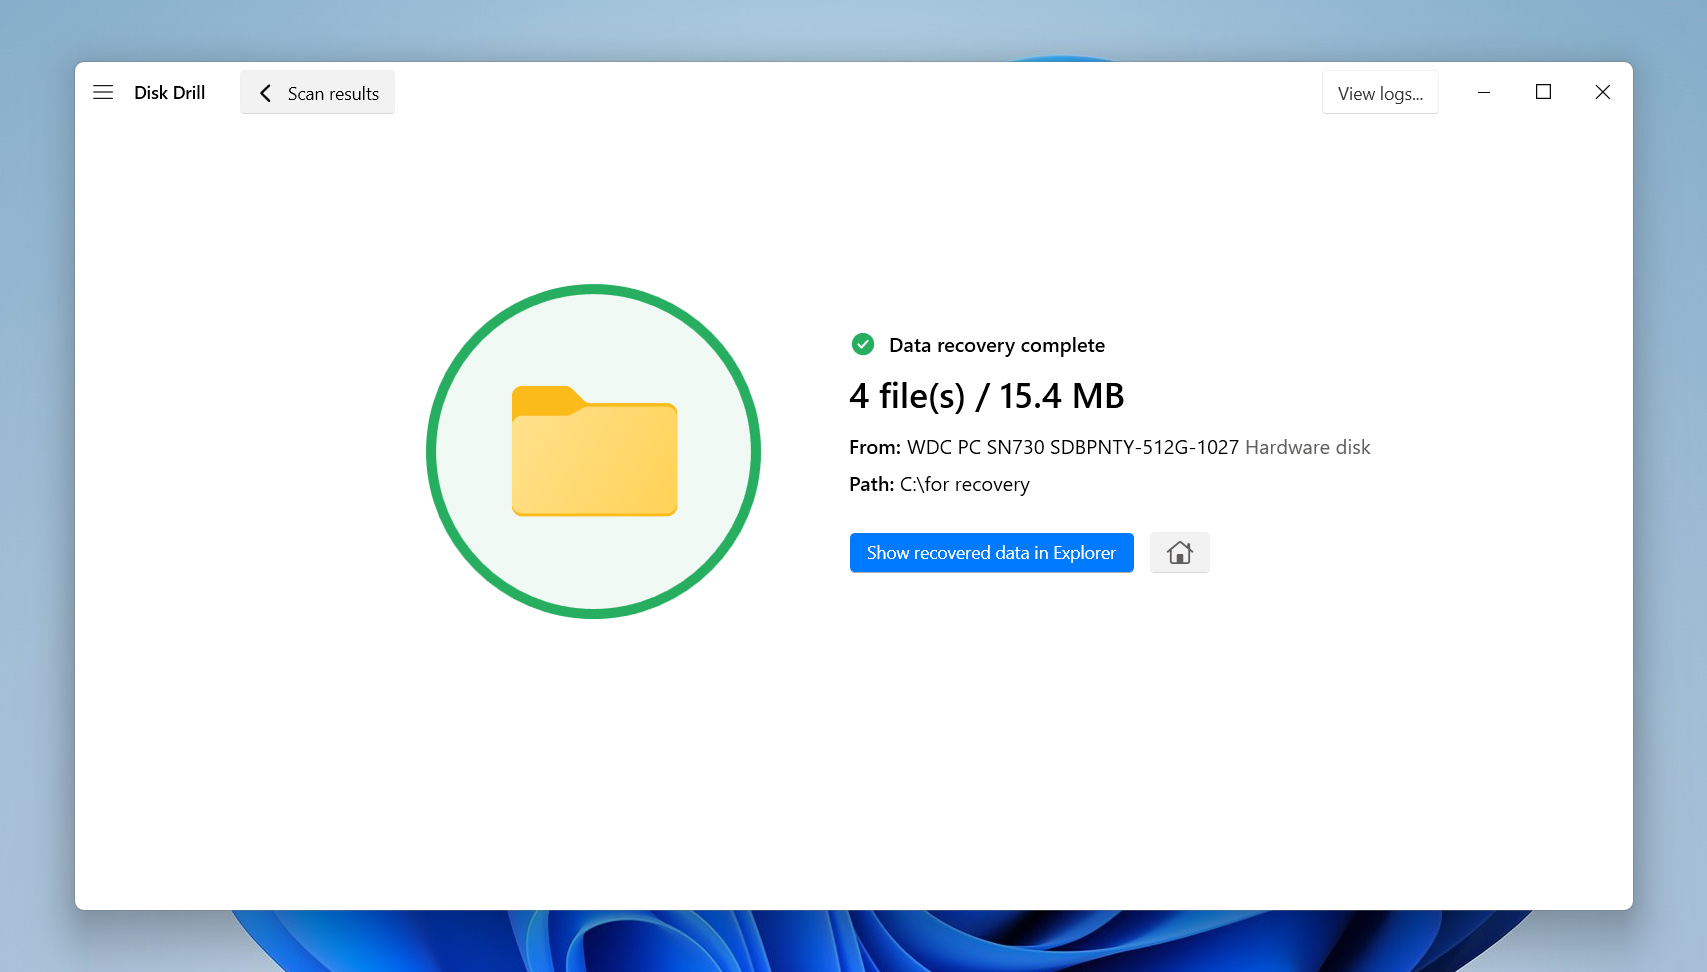
- Disk Drill will recover the files for you.


If you deleted your Lightroom catalog a while ago, data recovery software may be unable to restore it. This is because the original catalog will likely have been overwritten by new files added to the disk after the deletion. In this case, your best bet is to rely on backups.
Method 3: Restore Lightroom Catalog From a Lightroom Backup
Fortunately, Adobe offers a backup feature in Lightroom to protect your work. If you had this feature enabled, check your PC for these backups. By default, Lightroom stores them here: C:\Users<username>\Pictures\Lightroom\Backups. If you changed the backup location, be sure to check there instead.
- Open File Explorer and go to the default backup location (or the custom one if you changed it). Look for the folder that contains your Lightroom catalog backups.
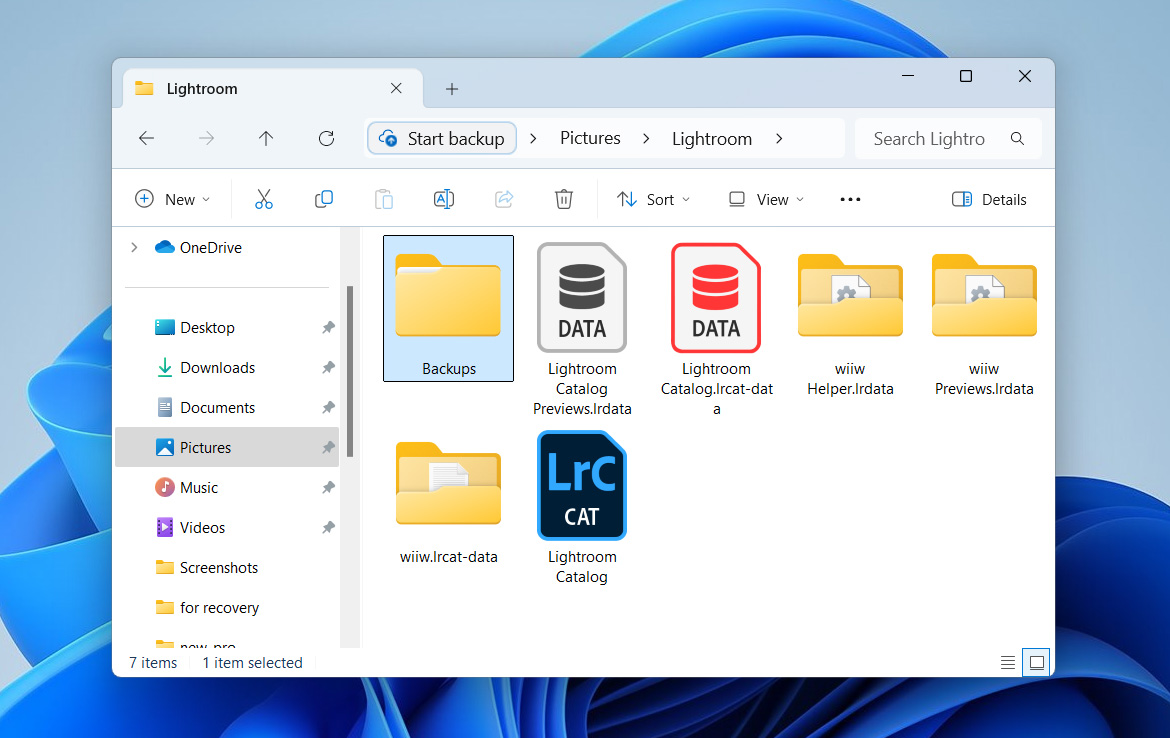
- Inside the backup folder, you should see the .LRCAT and .LRCAT-data files, which make up your Lightroom catalog.
- If you prefer, you can copy these backup files back to the original location where your catalog was stored before it was deleted. This can help keep everything organized.
- Next, open Adobe Lightroom, go to File > Open Catalog, and navigate to the backup folder.
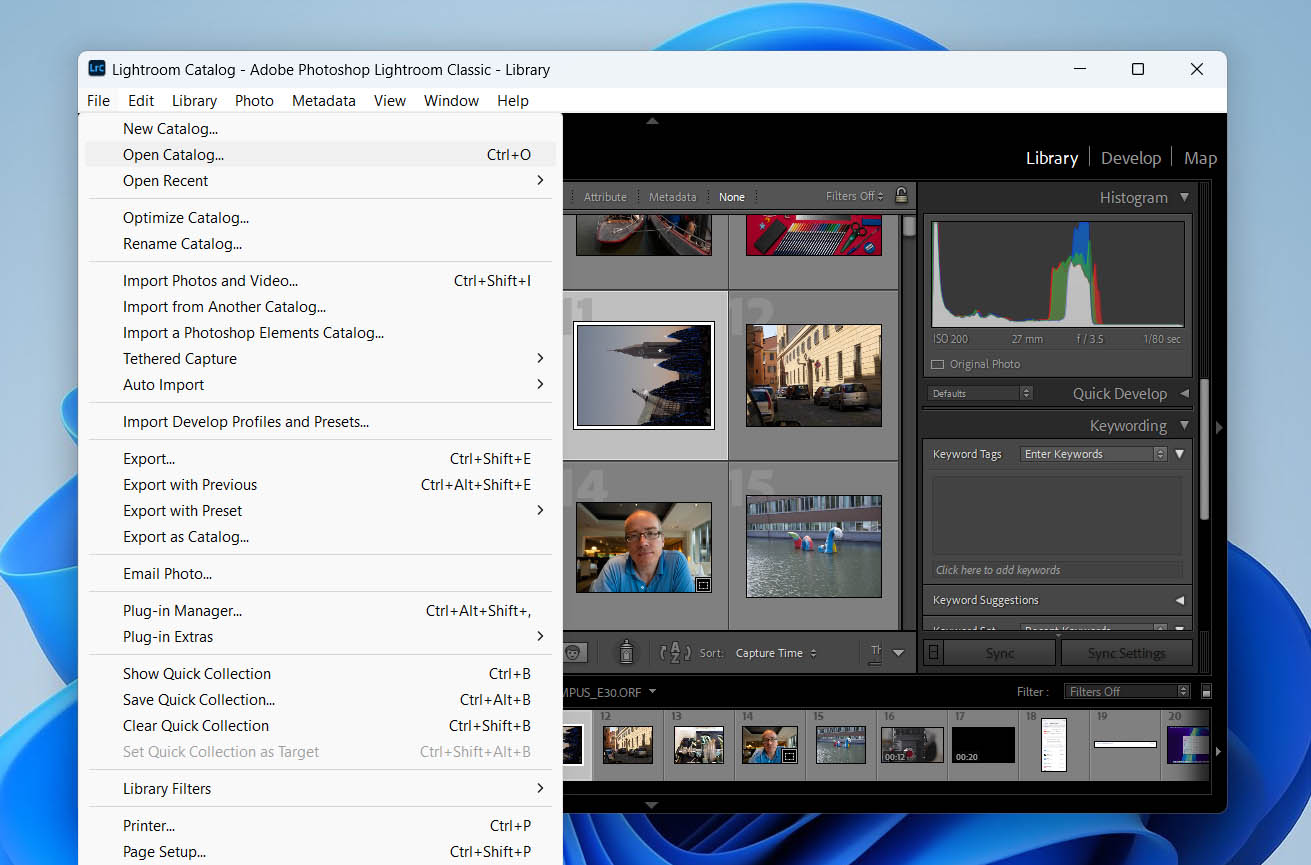
- Select the .LRCAT and .LRCAT-data files and click Open to restore your catalog.


Method 4: Use the History File to Restore a Deleted Lightroom Catalog
If you didn’t use Lightroom’s built-in backup feature, you might still be able to recover a deleted catalog using a Windows tool called File History. If the catalog was stored in the default Pictures folder or other directories included in the backup (like Documents, Libraries, or similar folders), you can easily restore it and keep working.
Just a reminder – File History needs to have been set up before you deleted the Lightroom catalog in order for this method to work.
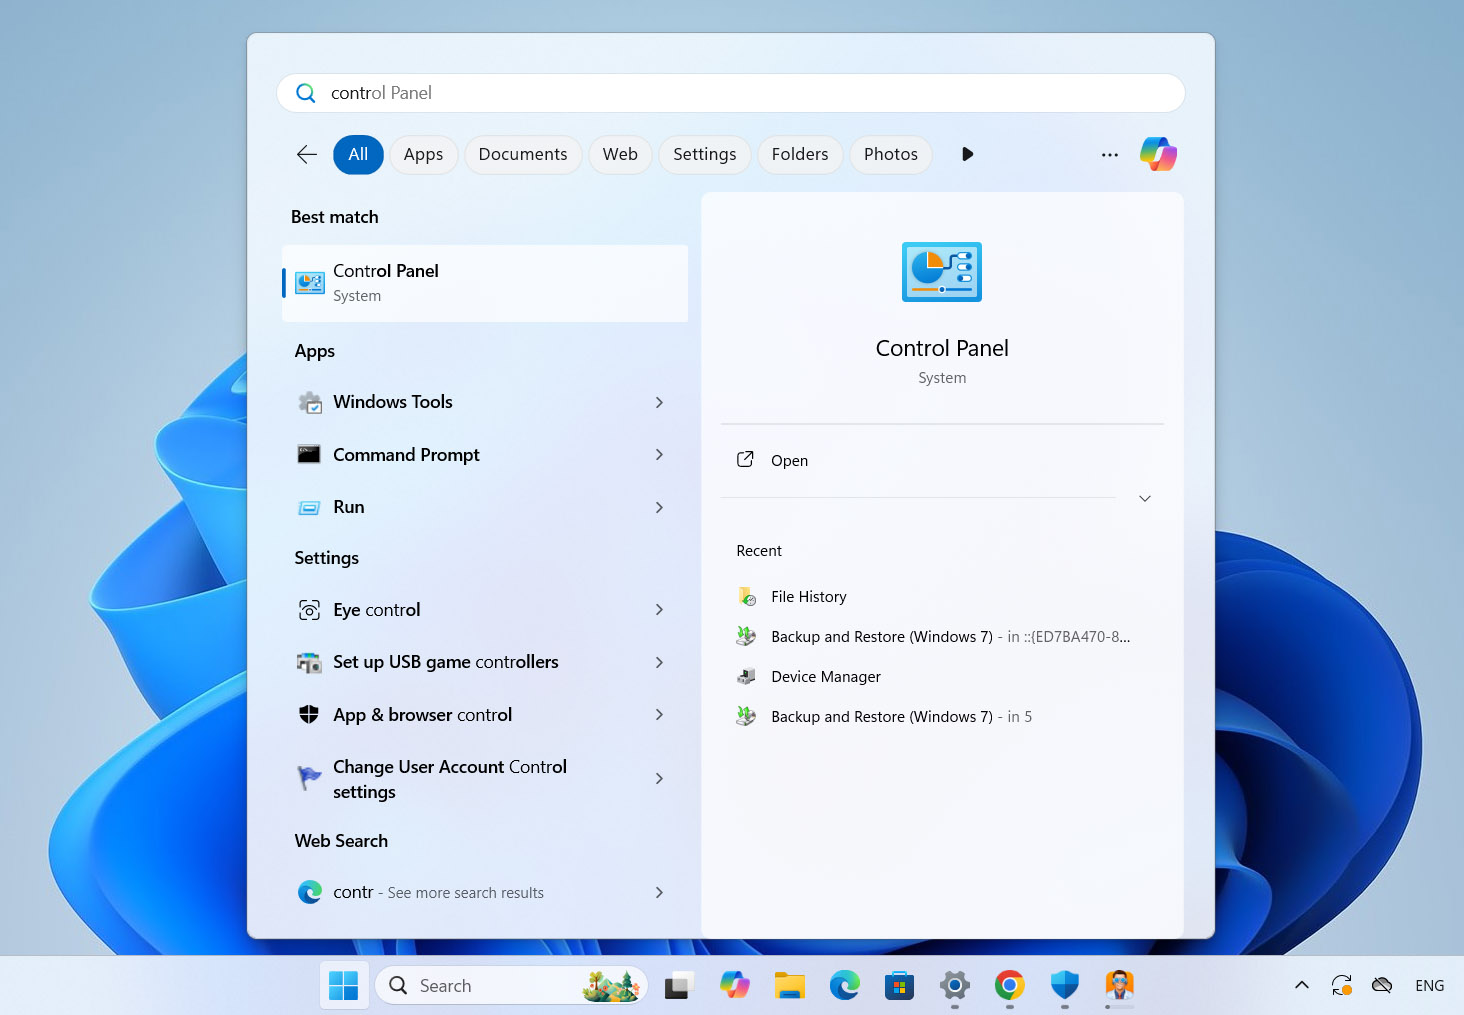
- Click the Start button, type Control Panel in the search bar, and open it.
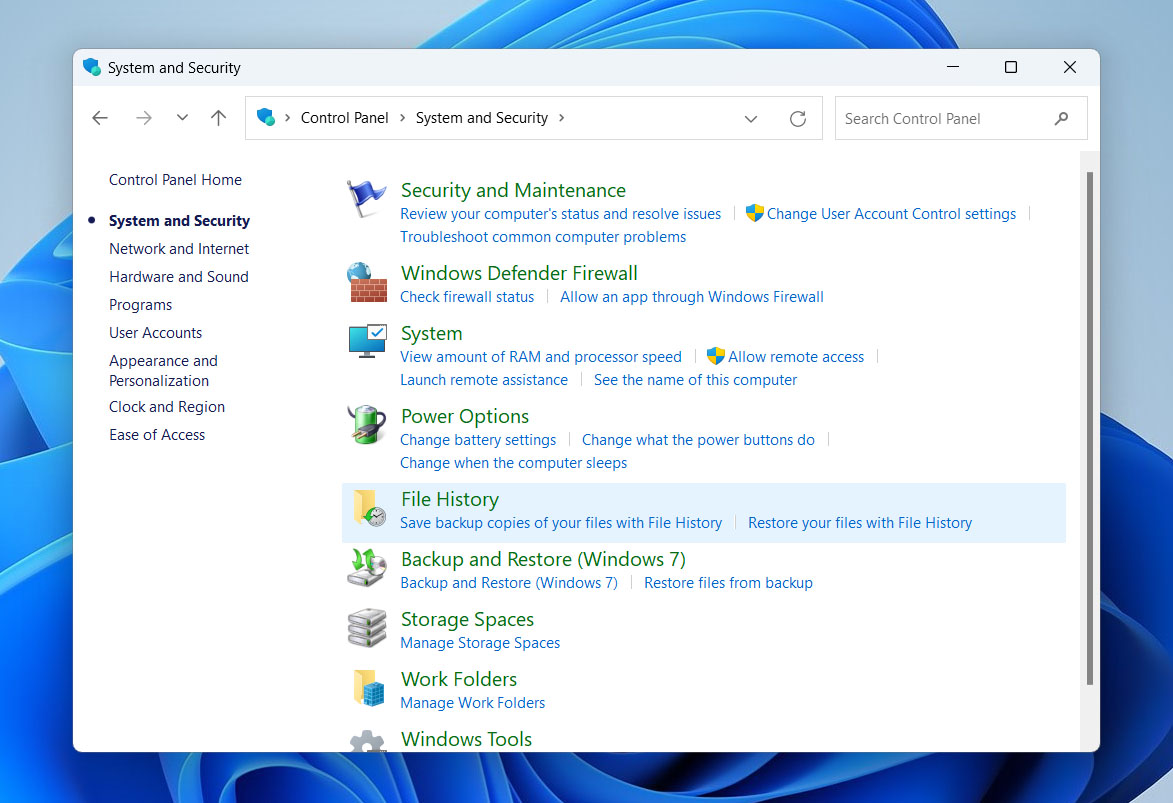
- In the Control Panel, select System and Security, then click on File History, and finally, choose Restore personal files.
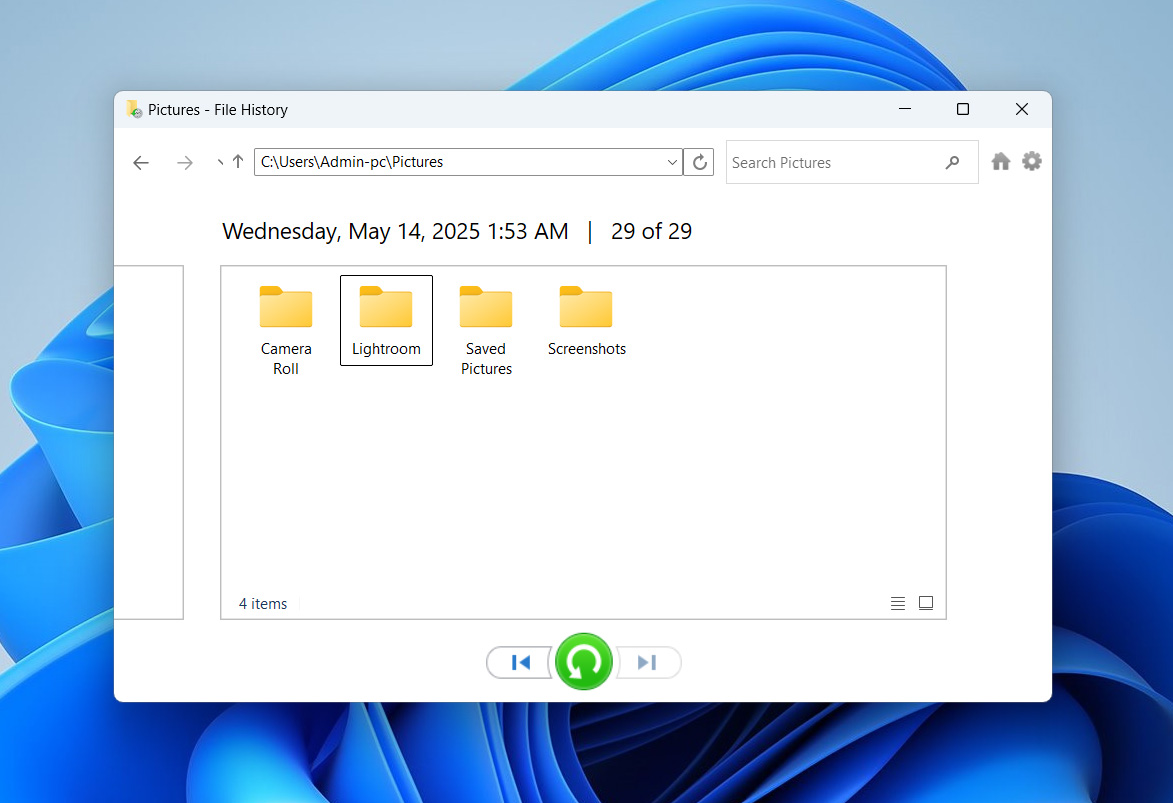
- In the File History window, navigate to the folder where your Lightroom catalog was initially saved (usually Pictures\Lightroom). If you set a custom location, go to that folder instead. Use the arrows to scroll through the previous versions of the folder. Look for the version of the catalog before it was deleted.
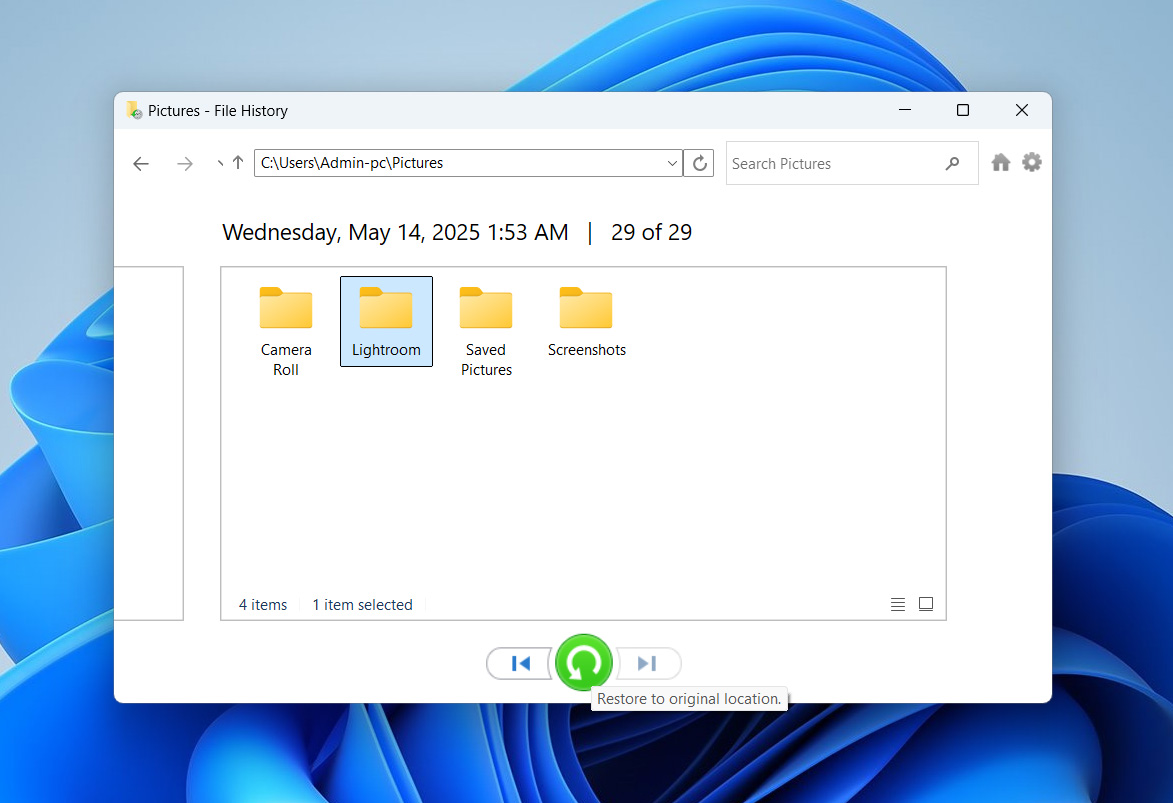
- Once you find the correct version, select it and click the Restore button. This will restore the catalog to its original location.
- After the restoration, open Adobe Lightroom and check to see if the catalog is intact and accessible.


How to Back Up Lightroom Catalog
By now, we hope you’ve successfully restored your deleted Lightroom catalog and are thinking about ways to avoid this situation in the future. One great option is to set up a backup for your catalog directly in Lightroom. It’s an easy and flexible method, which allows you to choose how often you want backups, whether that’s once a week or after each usage session.
- Open Adobe Lightroom on your computer.
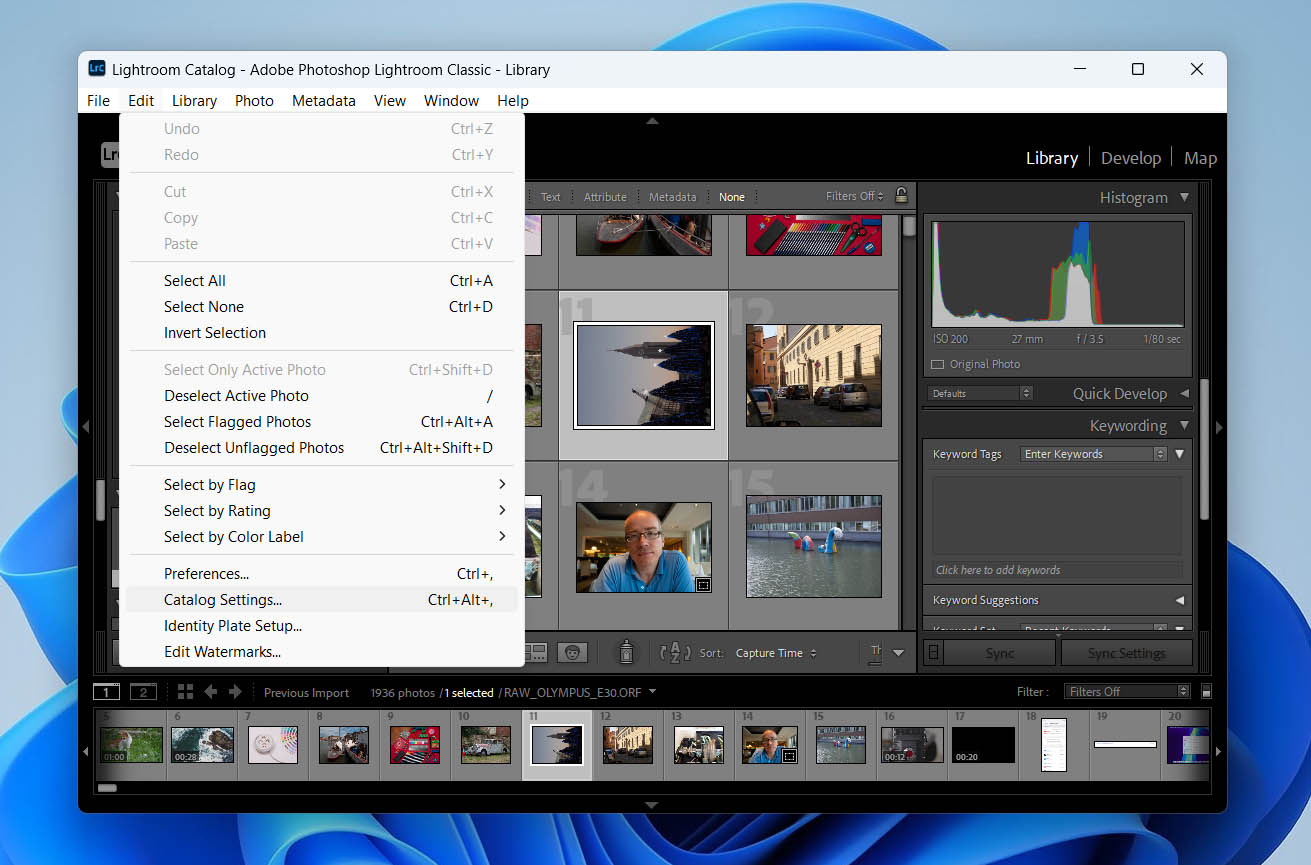
- Click on Edit in the menu bar, then select Catalog Settings.
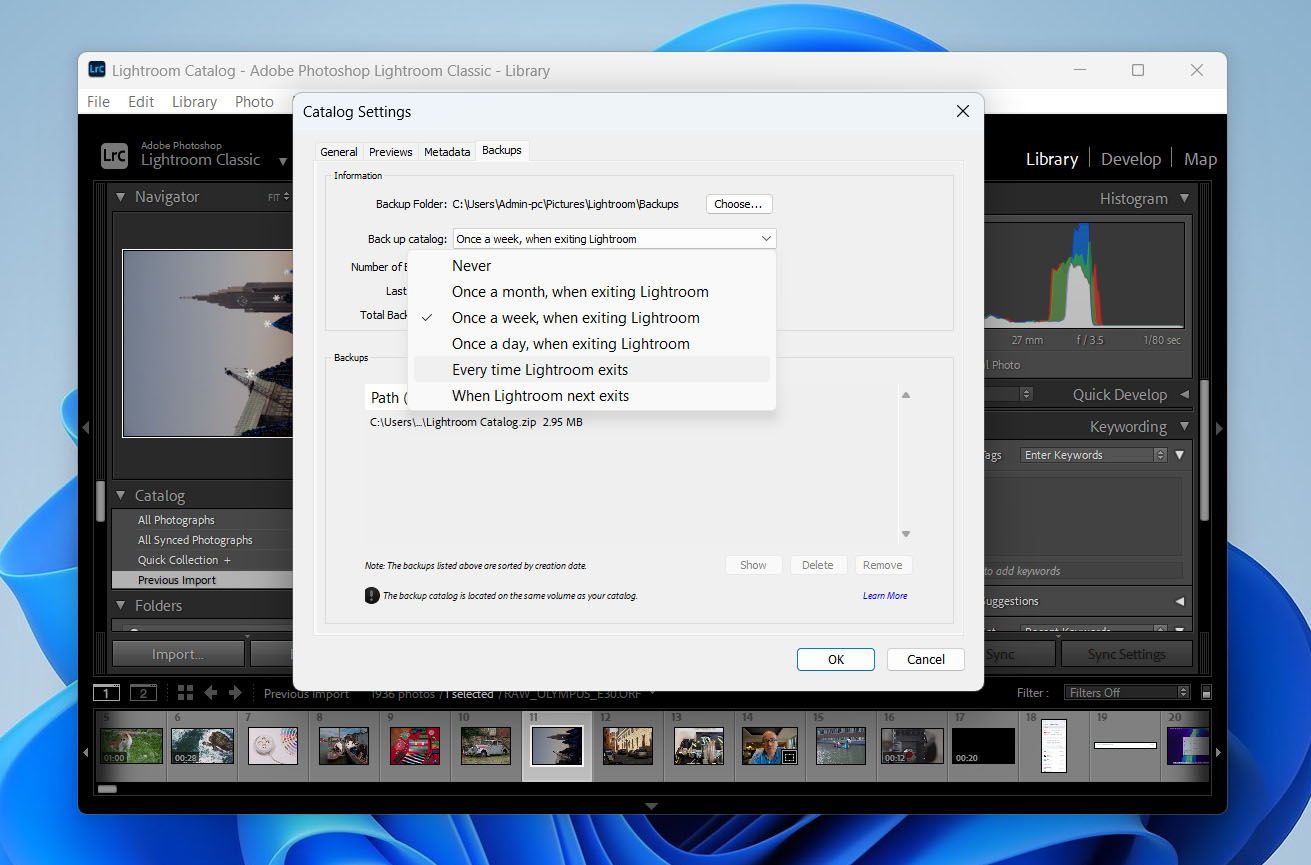
- In the Backups tab, find the Back Up Catalog drop-down menu. You can choose from a few options: once a week, when Lightroom exits, or every time Lightroom exits.
- It’s a good idea to regularly check and confirm your backups right after they’re created to guarantee they’re up to date and easily accessible.


Additionally, consider the following points to provide total backup protection:
- Use the 3-2-1 backup strategy. This strategy involves having three copies of your data, two of which are local but stored on different devices, and one copy offsite (e.g., cloud storage).
- Frequent backup intervals guarantee that you have the latest version of your catalog saved. If you find you have too many backups, it’s better to delete the unnecessary ones (carefully!) rather than recover the needed one.
- Lightroom catalogs don’t store the original photos, so be sure to back them up separately. You can use the File History method we discussed earlier or manually copy them to other devices or locations.
Conclusion
Lightroom catalog recovery doesn’t have to be a complex affair, thanks to programs like Disk Drill. However, the most sure-shot way to ensure you don’t lose any of your progress because of a missing Lightroom catalog is to back up the catalog as frequently as possible. This will also save time in case a Lightroom catalog goes missing because you can simply open the backup using Adobe Lightroom.
FAQ
- You moved the original images to another location.
- You renamed the folder that contained the photos.
- The photos were accidentally deleted by you or due to a virus attack, formatting, etc.
- Press and hold the Alt key when you launch Adobe Lightroom.
- In the Select Catalog window, tick the catalog which is corrupt and check the Test integrity of this catalog option.
- Click on Open. Lightroom will attempt to fix the corrupt catalog.
- Find the location of the catalog by clicking Edit > Catalog Settings. In the Information tab, click on Show to open the location of the catalog in Windows Explorer.
- Close Lightroom.
- In Windows Explorer, go to the catalog location, cut and paste it to the location you want.
- Double-click the .LRCAT file in the new location to open it in Lightroom. The program will now save the catalog in the new location.