Reading Time: 9 minutesHere is every single possible method to undelete files on Windows 11, broken down into super easy-to-follow guides for beginners and experienced users alike.
“Undeleting files” – otherwise known as “data recovery”, is the process of restoring lost files using various approaches.
In this article, we’ll attempt to undo the delete action, recover the files from the trash folder or from different types of backups, and use special tools and services to access the disk directly.
If the methods in this article don’t retrieve your data, nothing will.
Is it Possible to Undelete Files on Windows 11?
Yes! It’s possible to undelete files on Windows 11. However, there are several key factors that affect how successful your attempt will be. Here’s a simple breakdown of those factors along with a few suggestions to improve your recovery rate:
- User behavior – If you deleted the file once from File Explorer, then again from your PC’s Recycle Bin, recovery success chances are reduced but not zero.
- Availability of backups – If you created a backup of your data before you deleted the files, your likelihood of 100% recovery is pretty much guaranteed. Even if you don’t have backups, recovery is often still possible with the right tools – especially when dealing with simple cases like accidental deletion.
- Data overwriting – Deleted files leave residual data behind when you erase them through the operating system. Certain tools (that we’ll cover later in the article) are capable of using that residual data to restore the deleted files. However, that data is also at risk of being overwritten by any new files you save to your PC. For higher chances of successful recovery, immediately power down and disconnect your drive to prevent potential overwriting.
- SSD TRIM – If the drive you want to restore is an SSD, it may have the TRIM feature enabled. TRIM makes it a lot more difficult to recover deleted files because it’s designed to clear up data blocks more efficiently. If you’re using a TRIM-enabled SSD, recovery is only possible if you IMMEDIATELY stopped using your drive after deletion. Once you’re ready to attempt recovery, connect your drive and immediately execute this command in Command Prompt to disable TRIM: fsutil behavior set disabledeletenotify 1.
7 Methods to Undelete Files on Windows 11
Here are 7 methods to undelete files on Windows 11. They are organized by difficulty and intrusiveness, so you can try them out one by one from the beginning. We included absolutely everything you can do to get your data back – if none of these methods work, then your data is permanently lost.
Method 1: Literally Undelete Files With Undo Command
This solution is highly situational and unlikely to work for the majority of users. But if you found this site right after deleting your files and you haven’t closed File Explorer since then, try switching back to File Explorer and hitting the CTRL + Z keys.
You may know this as the “Undo” command and it can undo most actions in File Explorer, including the deletion of files. However, it only works right after the files were deleted and no other action was taken by the user within File Explorer afterwards.
Method 2: Restore Files From the Recycle Bin
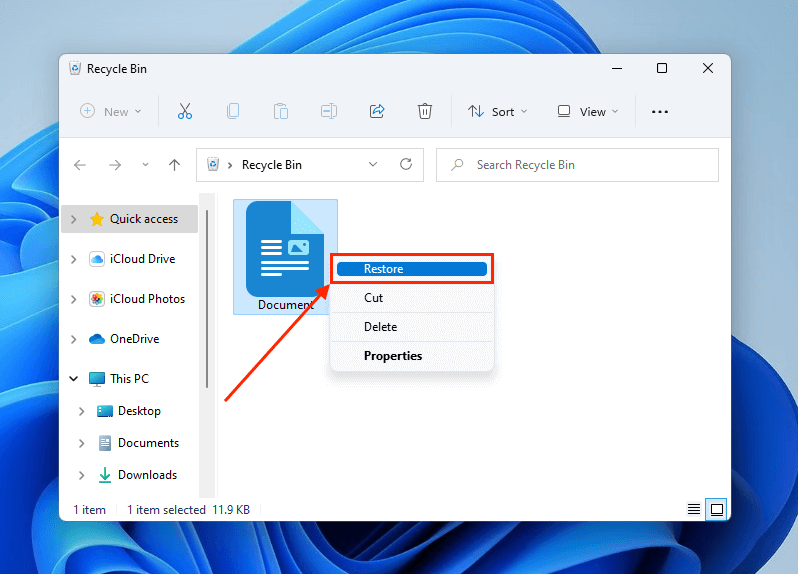
Whenever you delete a file from File Explorer, it isn’t immediately erased from the system. Windows first sends it to the Recycle Bin, where you can restore the file to its original location or erase it permanently.
- Open the Recycle Bin. It’s the trash can icon on your desktop.
- Select the files you want to recover. Then, right-click > Restore.
Method 3: Check Your Cloud Backups
If you installed a cloud storage service on your PC and enabled automatic backups and/or synchronization, there may still be a copy of your deleted files in the server’s “online recycle bin.”
Not all cloud services work the same way, so your mileage will vary. Fortunately, Microsoft OneDrive – which usually comes preinstalled on modern Windows systems – has this feature.
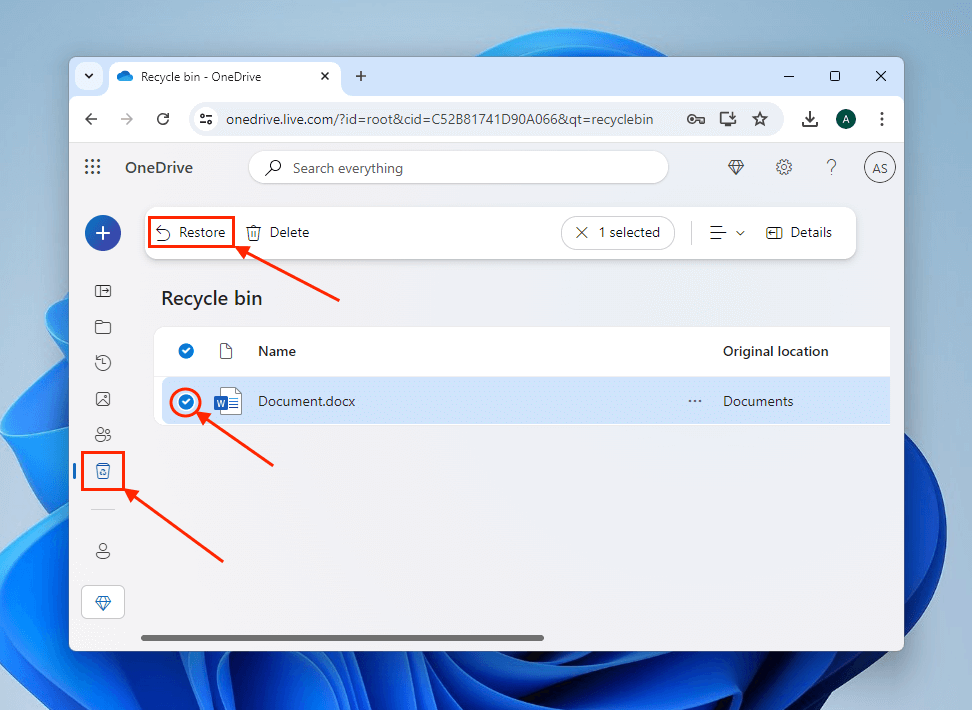
If your deleted files were synchronized with One Drive at the time of deletion or they were online-only (indicated by a blue cloud beside their file names), they may have been sent to One Drive’s online recycle bin. We’ll show you how to restore them.
- Log in to onedrive.live.com on any browser.
- In the left sidebar, click the online recycle bin – it’s represented by an icon of a trash can. Then, select the deleted files you want to recover and click the Restore button in the top-left corner of the window.
Method 4: Restore Files from File History
File History is a backup and recovery feature that comes preinstalled in modern Windows operating systems. When enabled, File History automatically backs up your files every time they get modified, resulting in multiple recoverable versions of your files and folders.
However, File History only backs up the Desktop, Documents, Downloads, Music, Pictures, and Videos folders by default. If the deleted files weren’t saved in those locations, you would have had to add them manually to File History’s inclusions for this to work.
We’ll demonstrate how to perform Windows file recovery via the File History tool.
Warning: Any restored backup data will replace existing files. Make sure you create a backup of those files or copy them to another location before proceeding.
- Connect your backup drive to your PC.
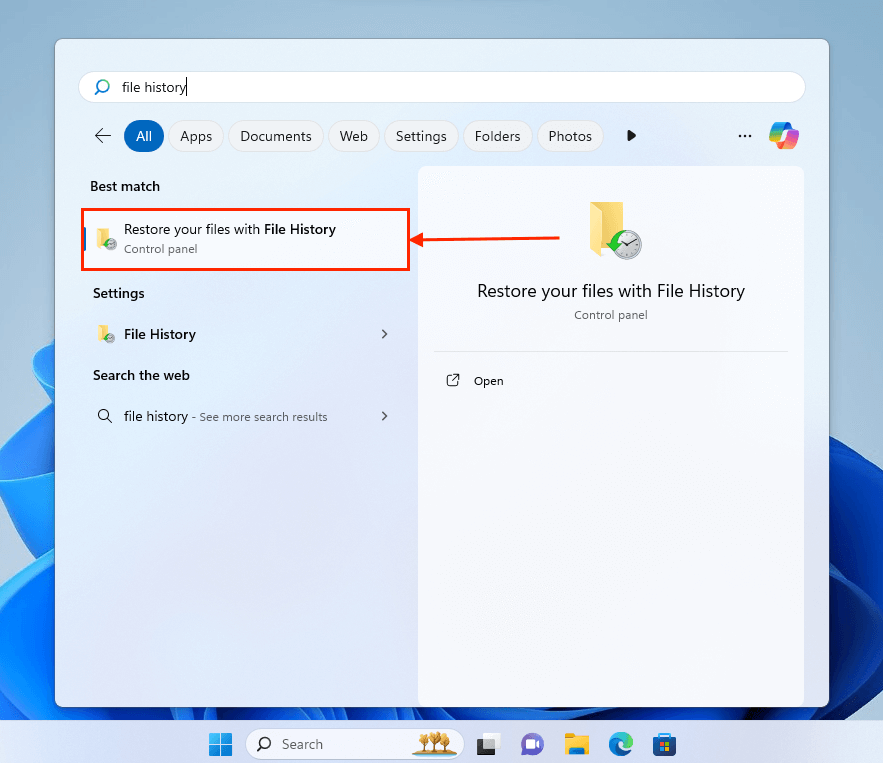
- Using the Start Menu, search for and click Restore your files with File History.
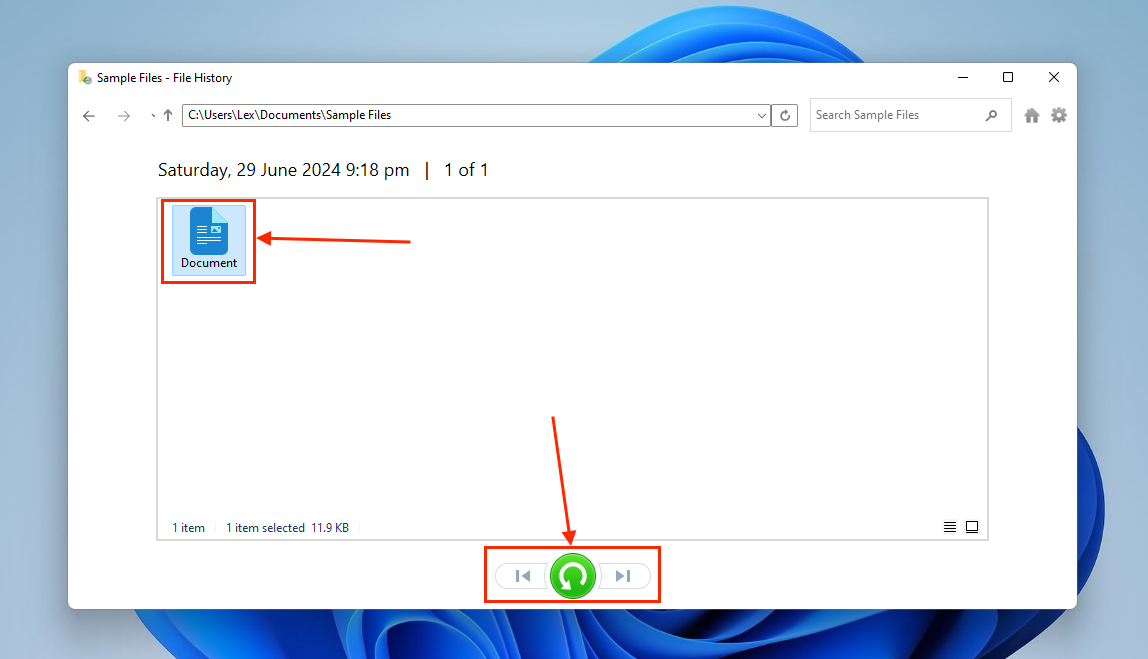
- Navigate to the folder that once contained the deleted files and use the arrows at the bottom of the window to browse through its earlier versions. Once you find the version that contains the deleted files, select them and click the green restore button.
Method 5: Use Backup and Restore (Windows 7)
Despite its name, Backup and Restore (Windows 7) is still functional in Windows 11. If you created a backup with this tool before your files were deleted, you can restore those files directly from the backup you created.
- Connect your backup drive to your PC.
- Open Control Panel via the Start Menu.
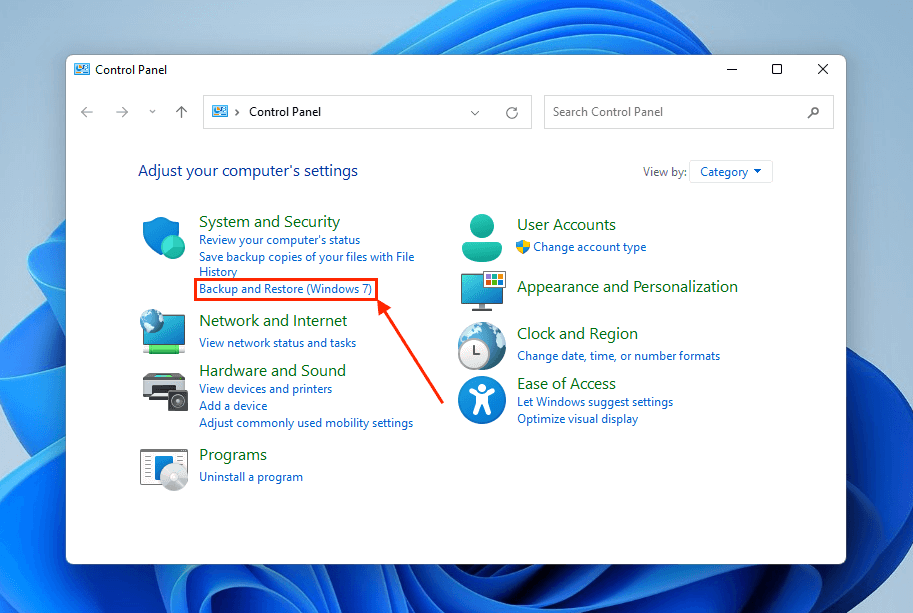
- Under the System and Security section, click Backup and Restore (Windows 7).
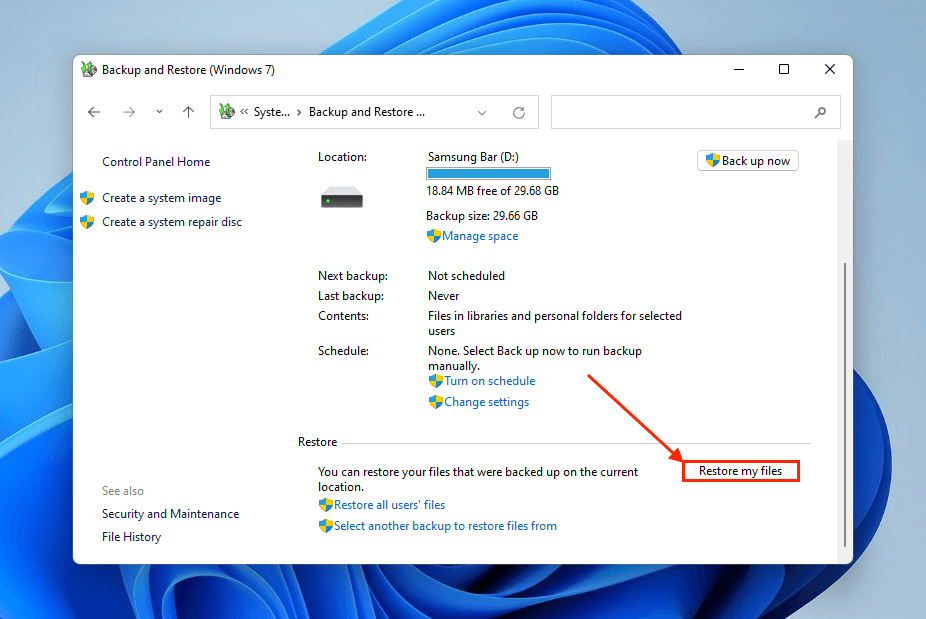
- Under the Restore section click Restore my files.
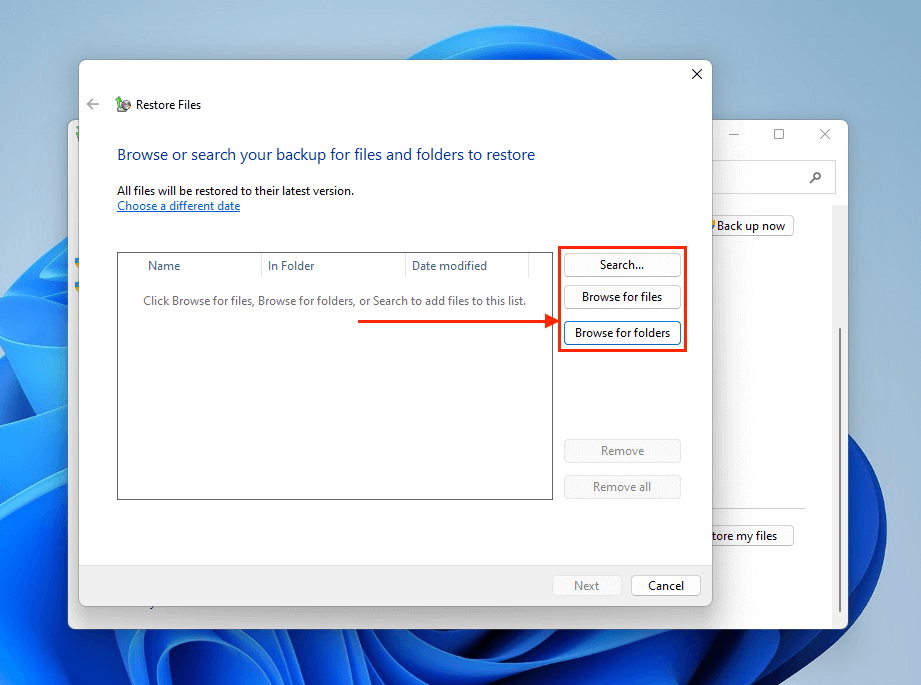
- Use the Search, Browse for files, or Browse for folders options to specify the data you want to restore from the backup file.
- Based on what you clicked in step 5, a dialogue will appear to help you navigate directories and find the specific files or folders you want to restore. As you can see here, we could have restored the entire C folder backup if we wanted to.
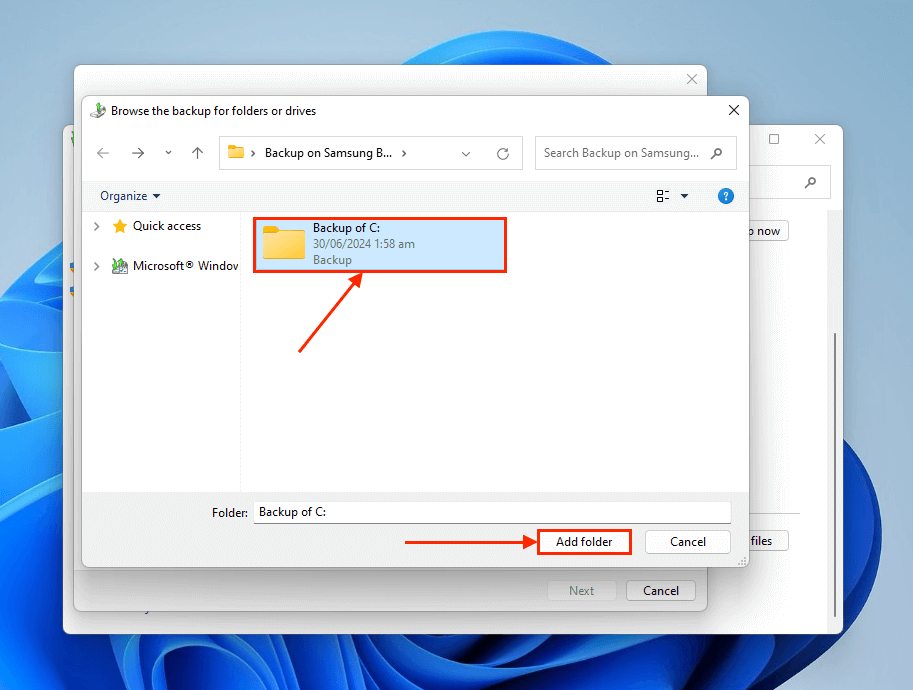
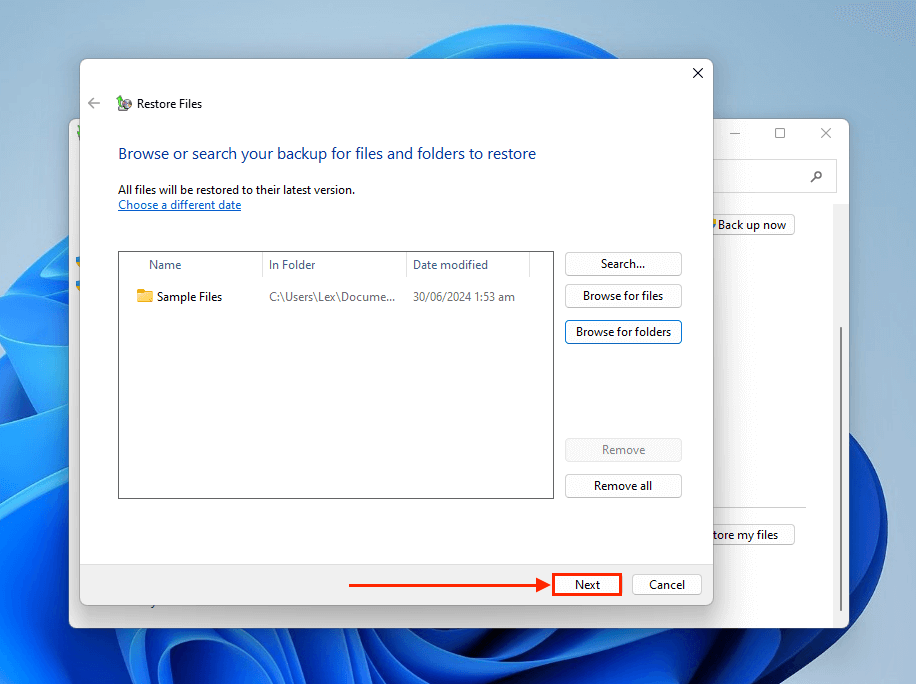
- Once you’re done adding the backup files and folders you want to restore, click Next.
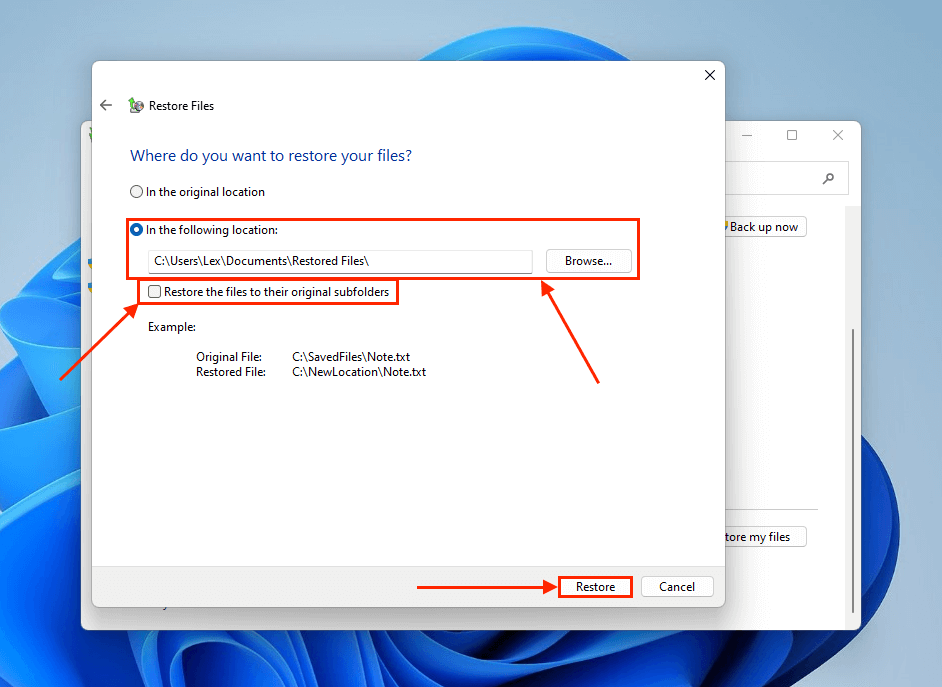
- Set the recovery parameters based on your preferences, but we recommend saving the restored files to a new location without their original subfolders so your data is easier to browse. Then, click Restore.
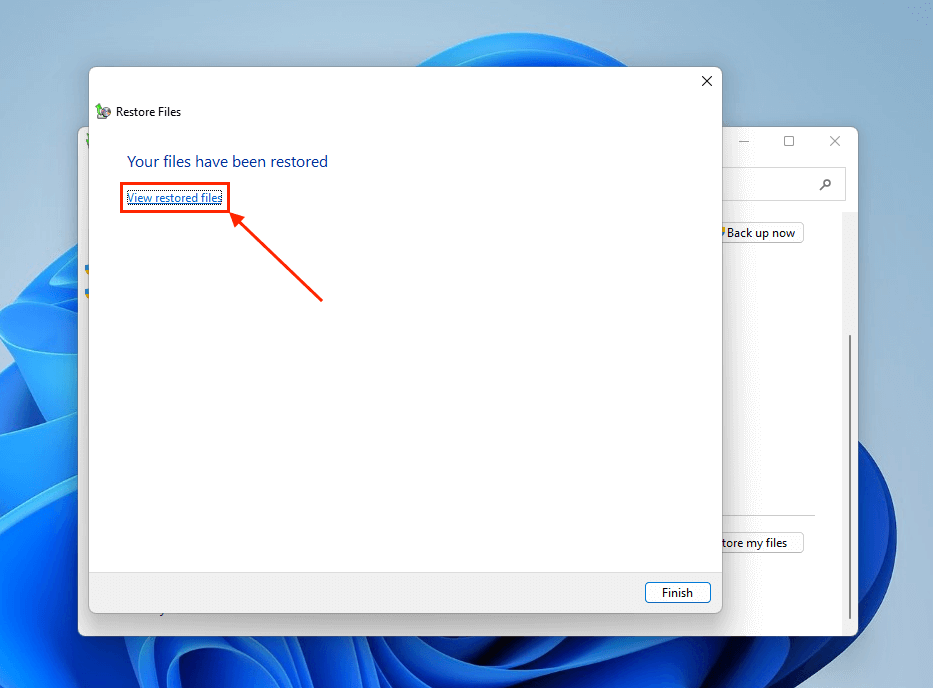
- Windows will let you know if the recovery was successful. From there, you can click View restored files to immediately jump to the save location in File Explorer.
Method 6: Recover Permanently Deleted Files Using Data Recovery Software
If your files are not in the Recycle Bin and you don’t have any backups, you might still be able to restore them yourself by using a tool called data recovery software. Data recovery software can use residual data from deleted files to restore them.
We’ll demonstrate this process using a data recovery software called Disk Drill, which was designed to make data recovery accessible to beginners. It also supports over 400 file extensions, ranging from videos, documents, audio files, and more. Most importantly, the app has been optimized for all versions of Windows 11 and 10.
We can use Disk Drill’s free trial to restore up to 500 MB worth of data for no cost.
There are many other data recovery software you can choose from online – we found Disk Drill to be one of the best for beginners while providing powerful scan capabilities.
- Download Disk Drill on a partition or drive other than the one you’re trying to recover. Alternatively, download it on a completely different computer. This is to avoid overwriting the deleted files.
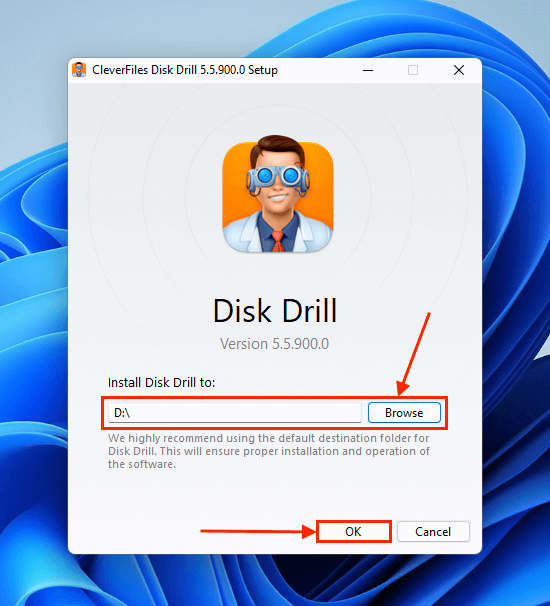
- Install Disk Drill on a partition or drive other than the one you’re trying to recover. To do this, click Options when launching Disk Drill’s installer.
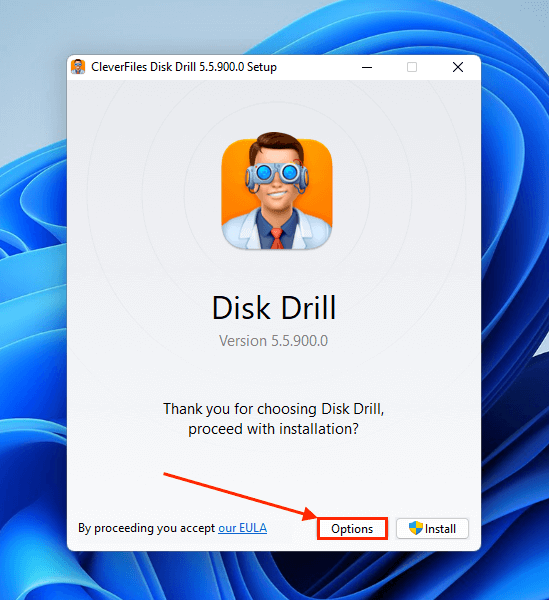
- Click Browse and choose a location on a separate partition or storage device. For example, we’re installing it in D:, which is a flash USB drive we plugged in. Once you click OK, you’ll return to the same window as seen in step 3 – click Install this time.
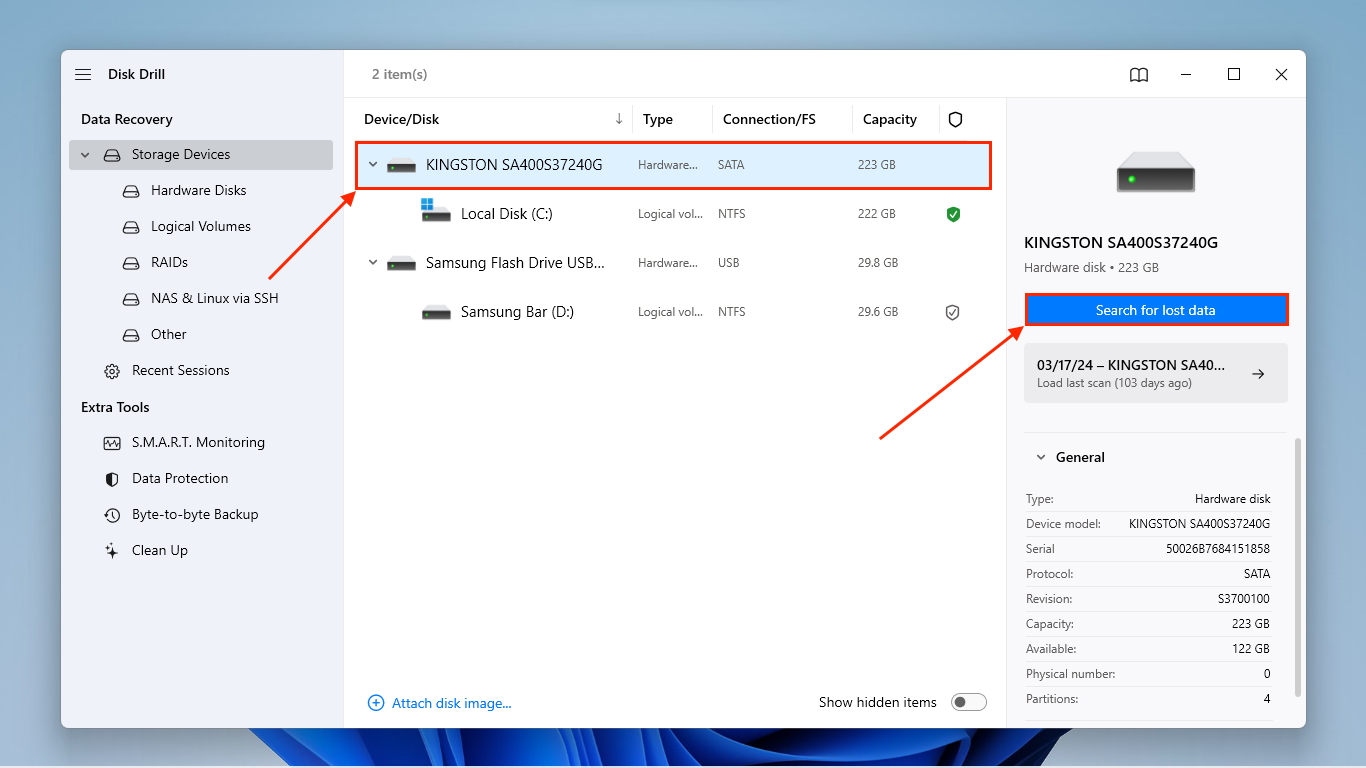
- After installation, launch Disk Drill. Then, select the drive or partition you want to scan and click Search for lost data.
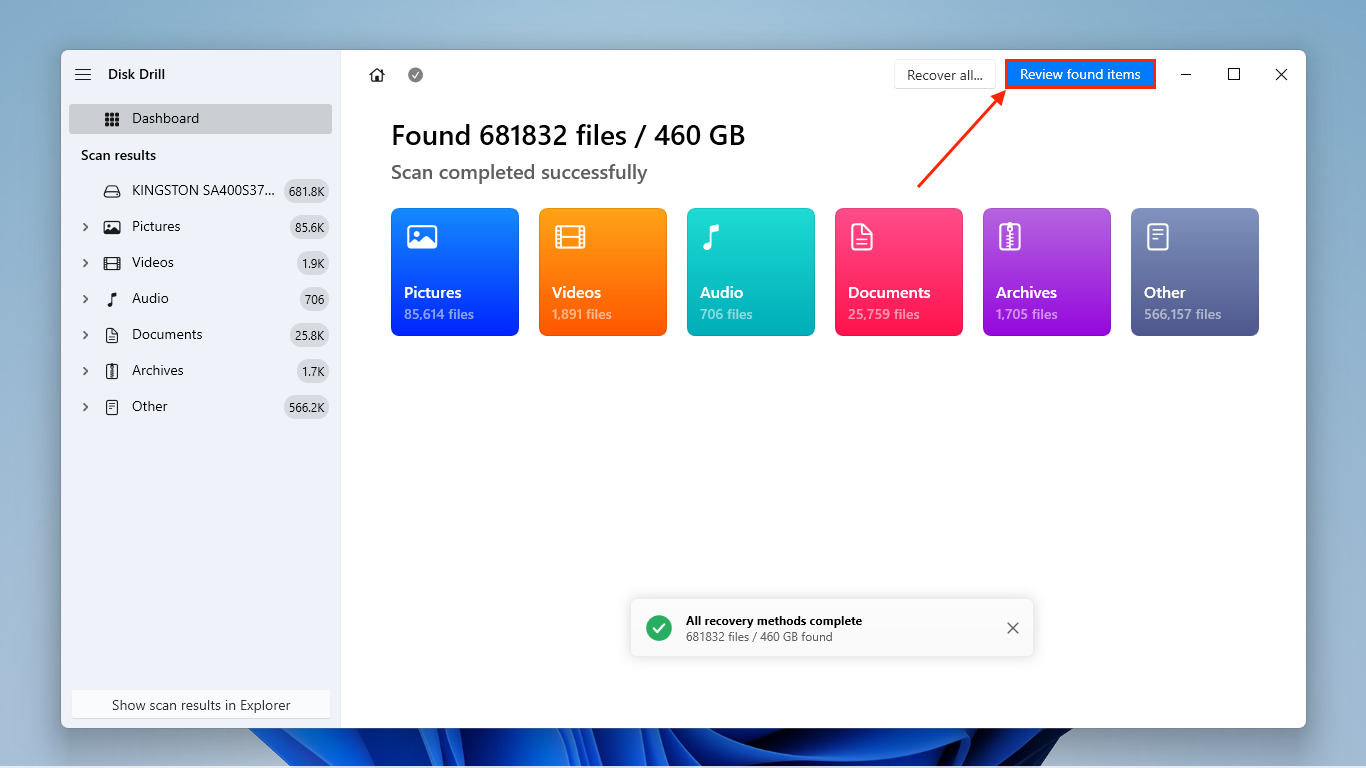
- Wait for Disk Drill to finish the scan. Then, click Review found items.
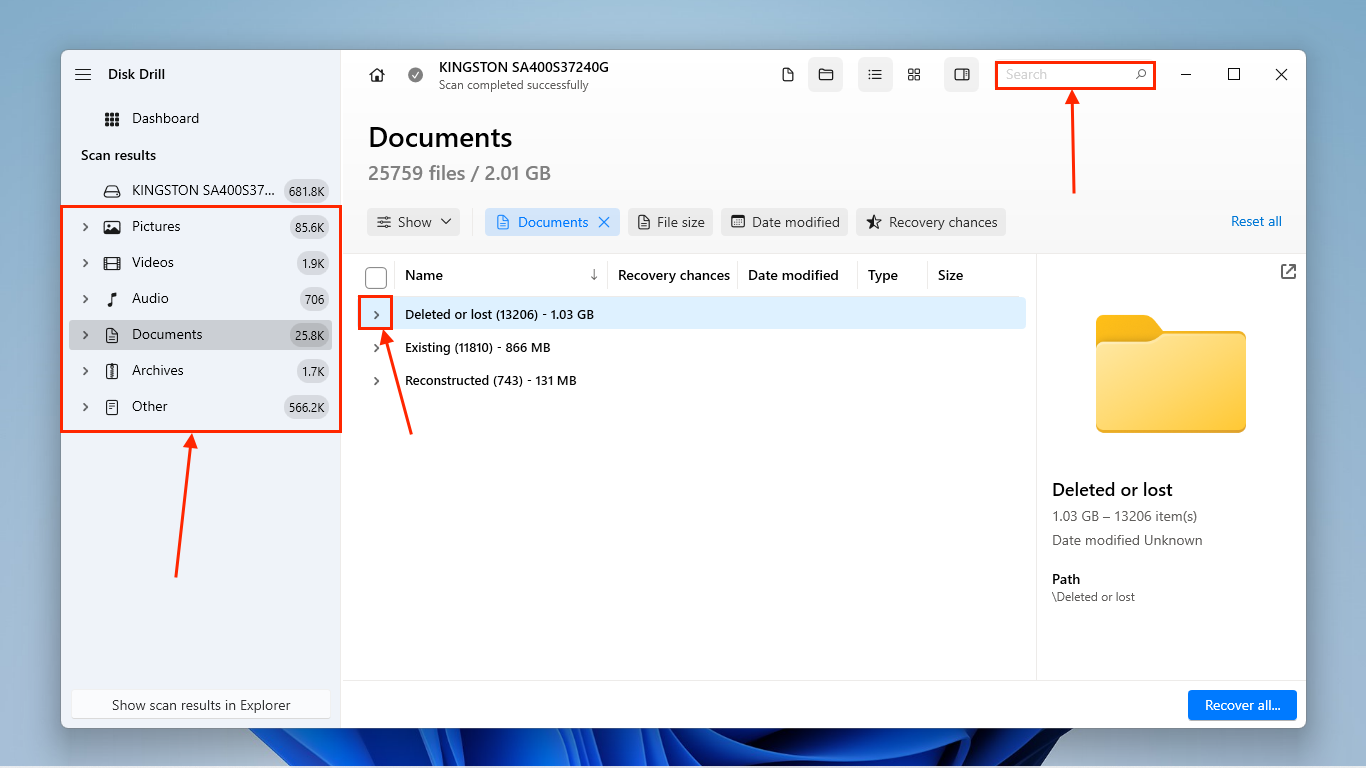
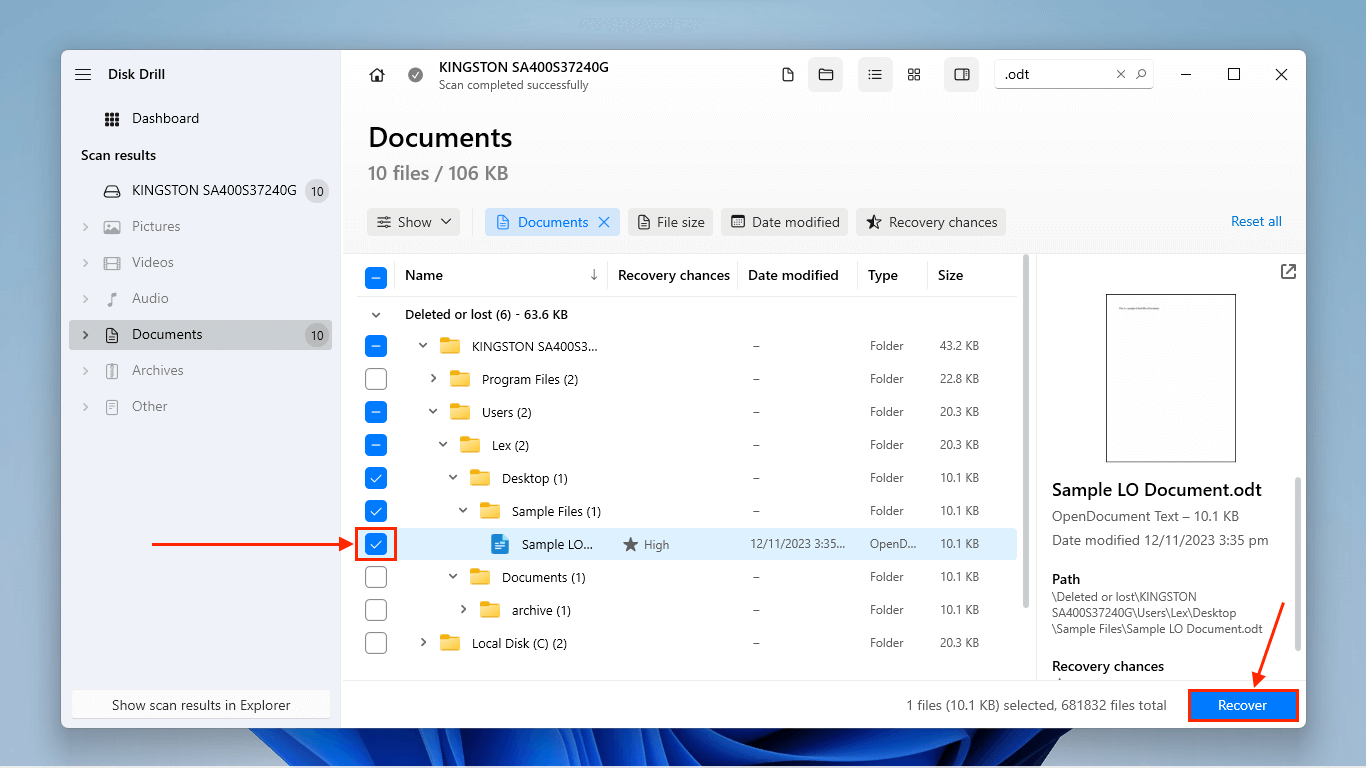
- Expand the Deleted or lost for now (if you don’t find your files here, you can try browsing the Reconstructed section later). Then, use the search bar and filter tools to help you find your files faster.
- Once you’ve located the deleted files, click each of them once to see if Disk Drill can preview them. This is a good way to determine if your files are even recoverable. Then, mark the files you want to restore and click Recover.
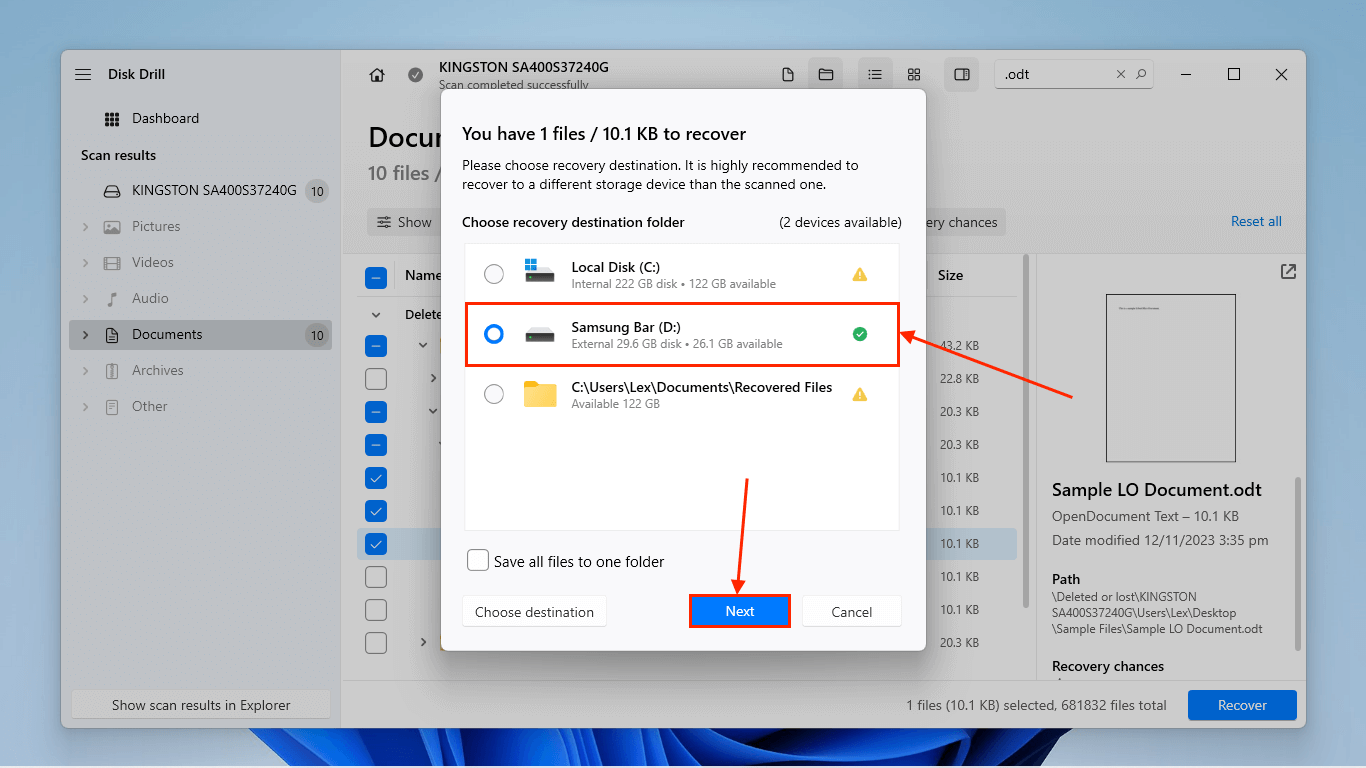
- Select the drive you installed Disk Drill on as the destination for the recovered files. Then, click Next to start the recovery process.
Method 7: Hire Professional Data Recovery Services
If none of the first 6 methods worked or you want to go straight to the professionals, consider sending your storage device to a data recovery lab or professional data recovery service.
As their name suggests, these are companies that provide expert data recovery as a service. They are equipped to handle highly complex data loss cases from almost every storage device in existence.
To be honest, they may seem overkill just for restoring a few deleted files. However, their services may be worth it if you REALLY can’t afford to permanently lose those files.
- No data – no charge – Top data recovery labs will only charge you if they manage to restore the specific data you requested.
- Location & free shipping – When choosing a data recovery service, consider whether they have a lab near you or if they offer free inbound shipping of your drive. Note that return shipping is rarely free, so add that to your budget consideration.
- Free drive evaluation – Many companies offer a free estimate over the phone as well as a free in-lab evaluation of your drive. Most labs guarantee that the initial quote and the final price will be exactly the same, but clarify with them nonetheless.
- Turnaround time – Do you need your data back ASAP? Data recovery services usually offer different options – ranging from 1-2 business days to several weeks – depending on your needs and budget. Almost all data recovery labs offer 24/7 emergency services for a much higher price tag.
- Cleanroom – While a Class 100 Cleanroom isn’t typically required for recovering deleted data, it does indicate that the lab in question has solved more complex data loss cases.
- Pricing – Based on our research, users can expect to pay $300 ~ $1,000 for restoring accidentally deleted files. The final price depends on the lab, its location, turnaround time, shipping costs, and other factors. We’d say $300 is a good price.
Conclusion
Most users can successfully recover permanently deleted files on Windows 11, especially if not much time has passed since the files were deleted. However, 100% recovery is never a guarantee, even with the help of data recovery software and professional data recovery centers.
We recommend utilizing local backups and cloud backups to secure your data against permanent deletion. Even if you don’t accidentally delete your files, all storage devices have finite life cycles. Your drive WILL fail eventually!


