Reading Time: 8 minutesDid you recently run the CHKDSK command and noticed missing data afterwards? Due to how it conducts repairs on the file system, running CHKDSK has the risk of causing data loss – especially if the drive is highly fragmented.
Recovering CHDSK deleted files on Windows 10 is doable but has unique challenges that require a bit of knowledge about how it works. So we wrote this guide, which has everything you need to know to get your files back safely.
Immediately stop using the drive you ran CHKDSK on until you’re done reading this article. Continuously using a drive affected by data loss makes it harder to recover your files later.
Does CHKDSK Delete Files?
Yes, CHKDSK can delete files as part of its repair operations. For example, when CHKDSK comes across bad sectors, it tries to recover or remap the data of those sectors to spare sectors if available. If that process fails for one reason or another (e.g. the data itself is too corrupted), it may cause the loss of that data.
CHKDSK also uses complex algorithms to detect corruption or inconsistency in the disk’s file system structures. The way it carries out repairs includes discarding certain data that is deemed corrupt or inconsistent even if they can still be salvaged by the user.
Where Does CHKDSK Put Recovered Files and What is Found.000?
Depending on the situation, CHKDSK sometimes saves the files it discards in a folder called Found.000, which is located in your drive’s root folder. Using third-party CHK tools, you may be able to restore your missing files by extracting their data from Found.000.
However, Found.000 might not have all or even most of the files you specifically need, especially if they were heavily affected by CHKDSK’s repair operations. You may also be unable to locate Found.000 for one reason or another. Files lost under those conditions are still recoverable in some cases – see the next section for more details.
How to Recover CHKDSK Deleted Files: 5 Methods
In this section, you’ll find comprehensive instructions for 5 working and reliable methods to recover CHKDSK deleted files and folders (whether or not they were relocated to Found.000).
Method 1: Restore a Local Backup
If Windows CHKDSK deleted your files, the most reliable way to get all your data back is to restore a backup of your affected drive. We’ll demonstrate how to recover File History, which is an incremental backup tool for Windows that saves versions of your files and folders every time they get modified.
The backup must have been created before your files were deleted by CHKDSK.
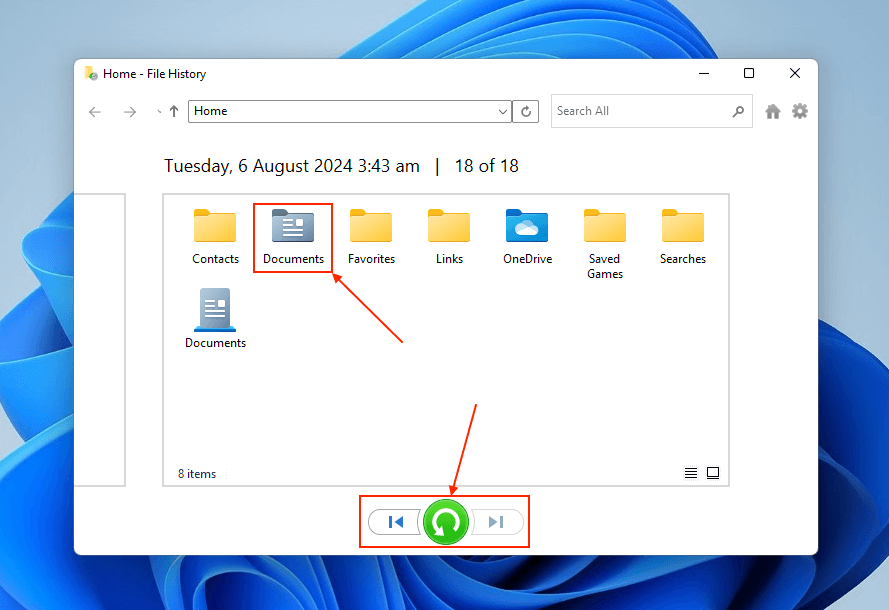
- Open the Start Menu and search for Restore your files with File History. Open it.
- Use the arrows in the bottom of the window to go earlier in the files’ and folders’ timelines. Then, select the files and folders you want to restore and click the green restore button.

Method 2: Restore Cloud Backups
If you don’t have local backups, you may still want to check your system if any cloud storage services are installed. These are apps like OneDrive and Google Drive, which save files on your computer to an online server. This allows you to access those files from any device as long as it’s connected to the internet.
Some apps automatically back up existing directories by default, like your Desktop and Document folders. Others require you to save files and folders manually in a special location.
We’ll show you how to download backed up files from OneDrive using a browser.
- Open any browser and login to onedrive.live.com.
- Mark the boxes beside the files and folders you want to download. Then, click the Download button.
Method 3: Use CHK Recovery Tools on Found.000
Because CHKDSK’s recovery behavior is relatively well-known, various developers designed specialized tools to extract the data from the Found.000 folder and turn it into usable files again.
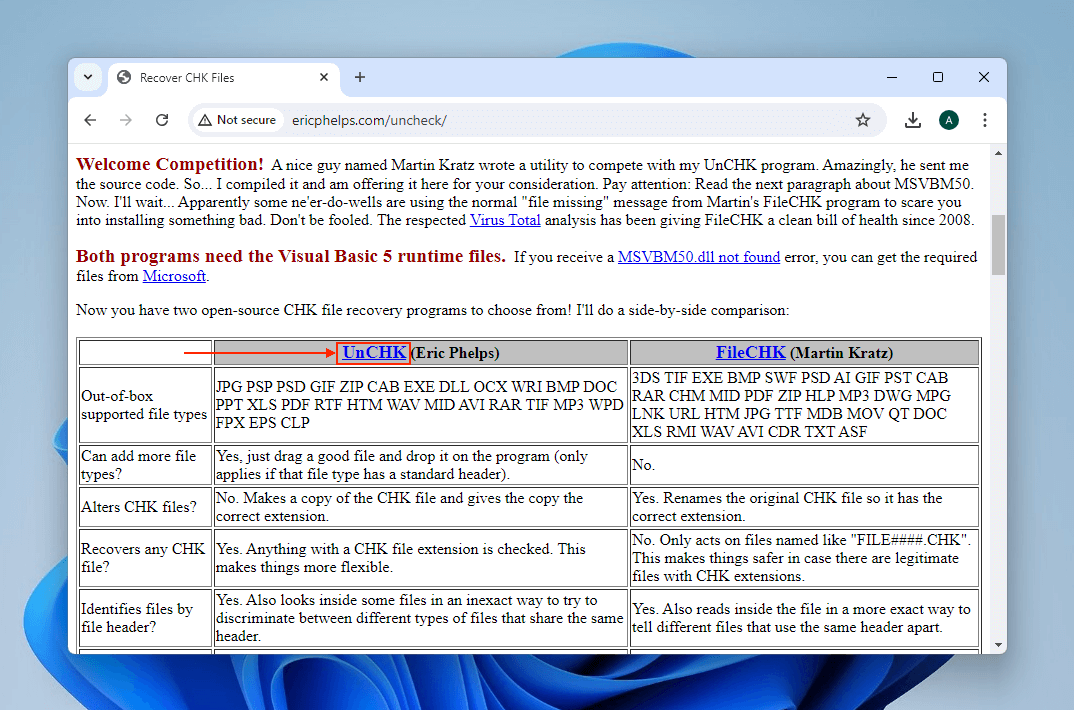
We’ll be using a free tool called UnCHK to demonstrate this process because it supports most common file signatures across various file types (e.g. JPG, PSD, GIF, EXE, BMP, DOC, MP3, etc.).
If Found.000 isn’t on your PC, you can jump to Method 5.
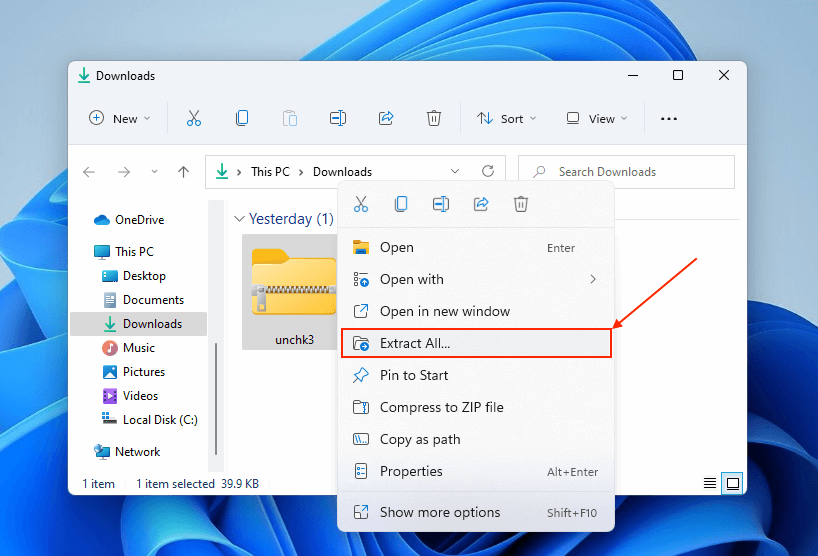
- Download UnCHK to your PC or on an external storage device if you used CHKDSK on an internal drive.
- Extract the folder that was downloaded in step 1.
- Drag your CHK file and drop it literally on top of the unchk.exe icon.
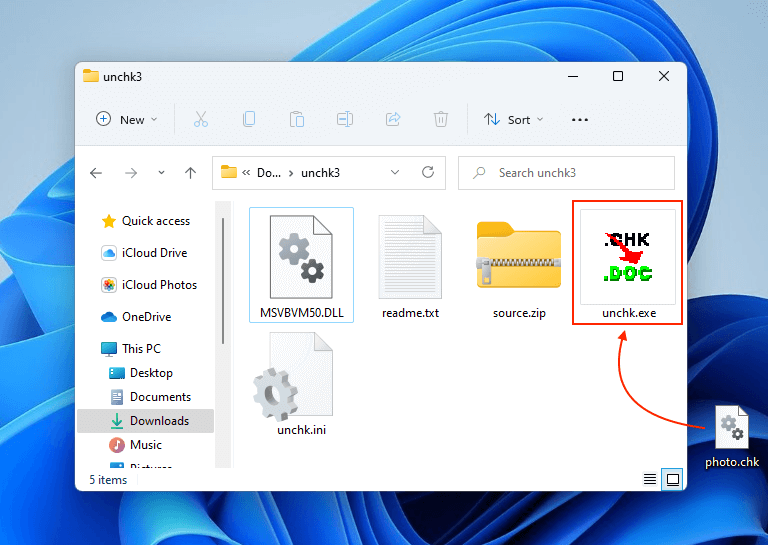
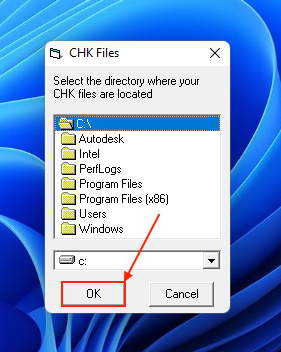
- Choose the location where Found.000 and your CHK files are stored. Then, click OK. Depending on your PC, you may have to download MSVBVM50.dll for this to work (a component of Visual Basic 5, which you can download from the Microsoft website).
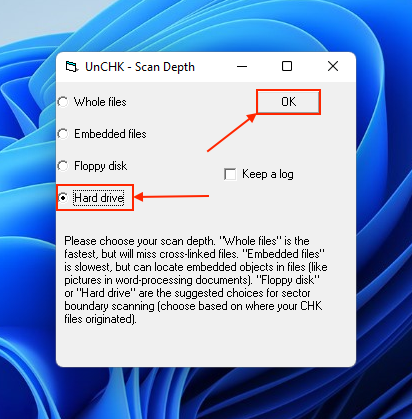
- Select Hard Drive as UnCHK’s Scan Depth and click OK. UnCHK will immediately start processing your CHK files and will close itself once all files have been renamed.


You may want to check out FileCHK (same website as UnCHK) and deCHK, which are also free CHK recovery tools.
Method 4: Rename the Found.000 Files Manually
If you prefer not to use the tools we covered in the last section, you can actually perform their core operations manually. You have 2 options, depending on whether you want to rename the files one by one or by batch (as long as they use the same file extension).
Option A: Rename CHK Files One by One
Files in Found.000 are usually saved with the CHK extension (.chk). You can manually replace those file extensions to their originals (e.g. .jpg) by simply renaming the CHK files.
However, the challenge comes from figuring out their original file extensions in the first place. You will need a hex editor so you can view each file’s raw data. From there, you can view their file headers and discover their file type.
Don’t worry, we’ll show you how to do it step by step. We’ll be using a free hex editor called HxD.
You can also try using TrID to automatically identify file types – whether or not it will work depends on the state of the individual file.
- Download and install HxD or any other hex editor (free tools will suffice).
- Make a copy of the CHK files so the original versions are safe just in case.
- Open HxD and click File > Open.
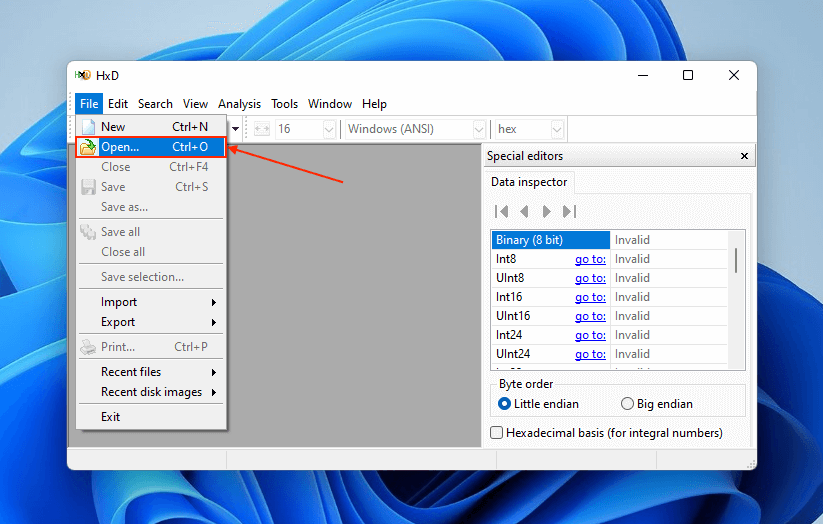
- Select the CHK file you want to inspect and click Open. Then, copy the first 8 digits of the file’s binary code.
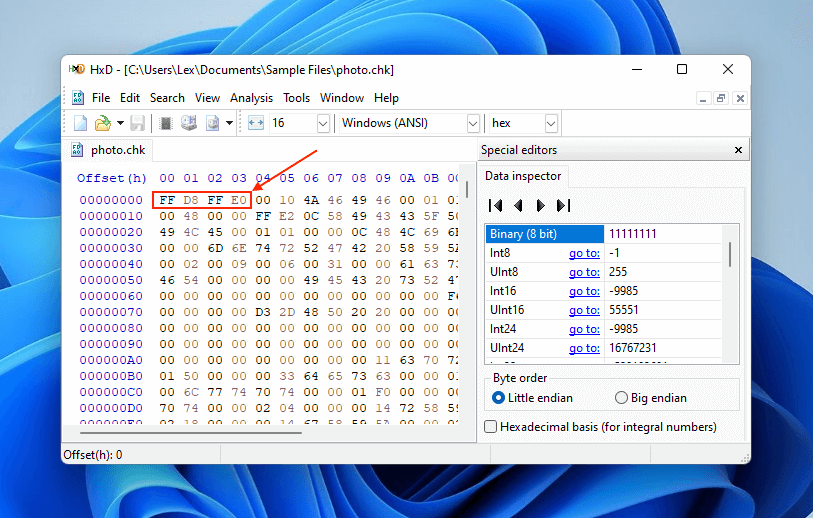
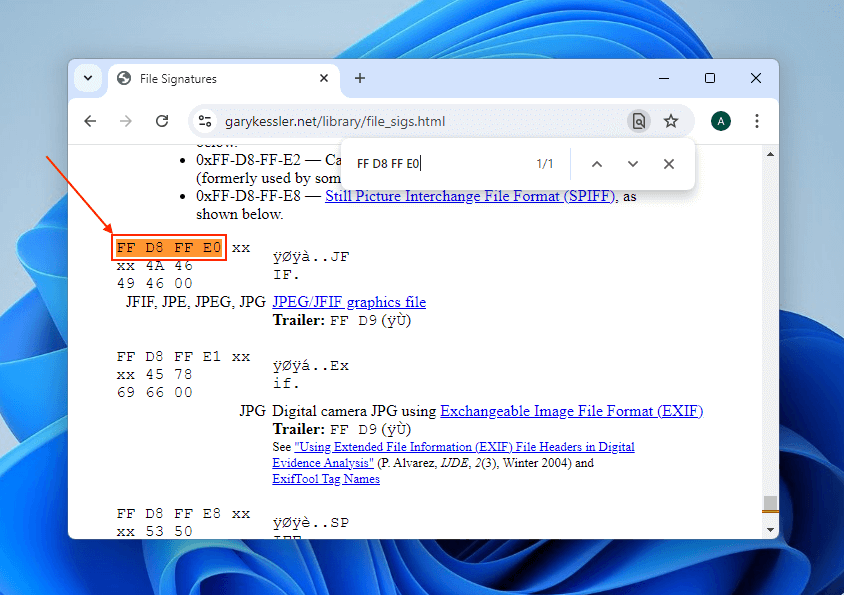
- Using any browser, open Gary Kessler’s File Signatures Table (it’s a web page). Then, press CTRL + F to open the search tool and paste the code from your clipboard to quickly jump to the correct file extension. In our case, the binary code FF D8 FF E0 indicates a JPEG file.


Once you’ve confirmed the file’s original extension, go back into File Explorer. Click View > Show > File Extensions. Then, right-click the file (make sure it’s the copy – not the original) and click Rename. Enter its new file name with the correct extension (e.g. filename0.chk → filename0.jpg).
Option B: Rename Multiple CHK Files With Only One File Type
You can use Command Prompt to automatically replace all .chk extensions in Found.000 to whatever you want. This is useful if you (a) know that all the files in Found.000 have the same file extension or (b) you only need files with a specific extension (e.g. only JPEG images).
Don’t worry if you’ve never used Command Prompt before. This task only uses two commands!
- Make a copy of the Found.000 folder and rename it to “CHKFiles”.
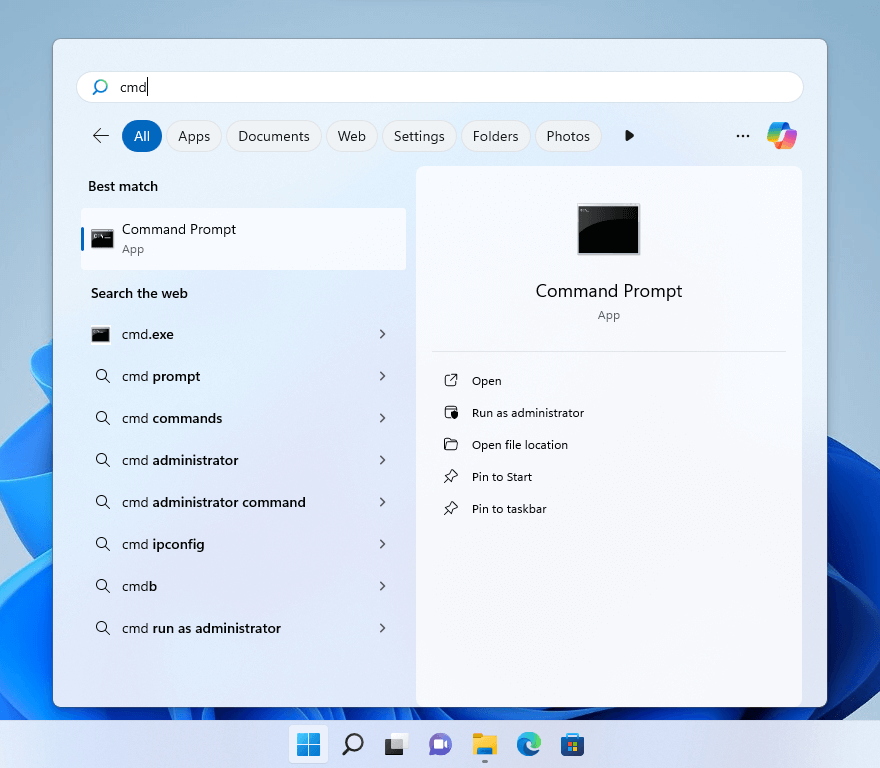
- Open Command Prompt via the Start Menu.
- Type the following command and hit Enter:
cd C:\CHKFiles
Replace C with the disk letter of the affected drive.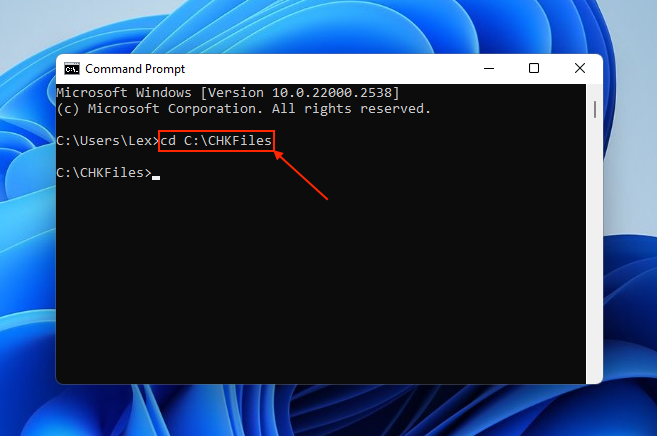
- Type the following command and hit Enter:
for %f in (*.chk) do ren “%f” “%~nf.jpg”
Replace .jpg with the file extension you want to output (e.g. .mov, .docx, .pdf., etc.). This command retains the current file name and only replaces the extension.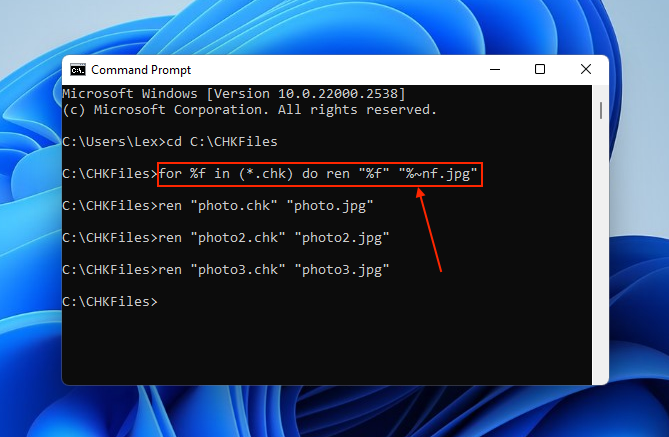


Method 5: Use Data Recovery Software to Restore Files Deleted by CHKDSK
If Found.000 didn’t appear or didn’t have the files you need, you can still rely on data recovery software to locate the physical data on your drive’s disk. While you can find dozens of them online, advanced tools have a better chance to restore more files due to how much CHKDSK can alter the file system structure.
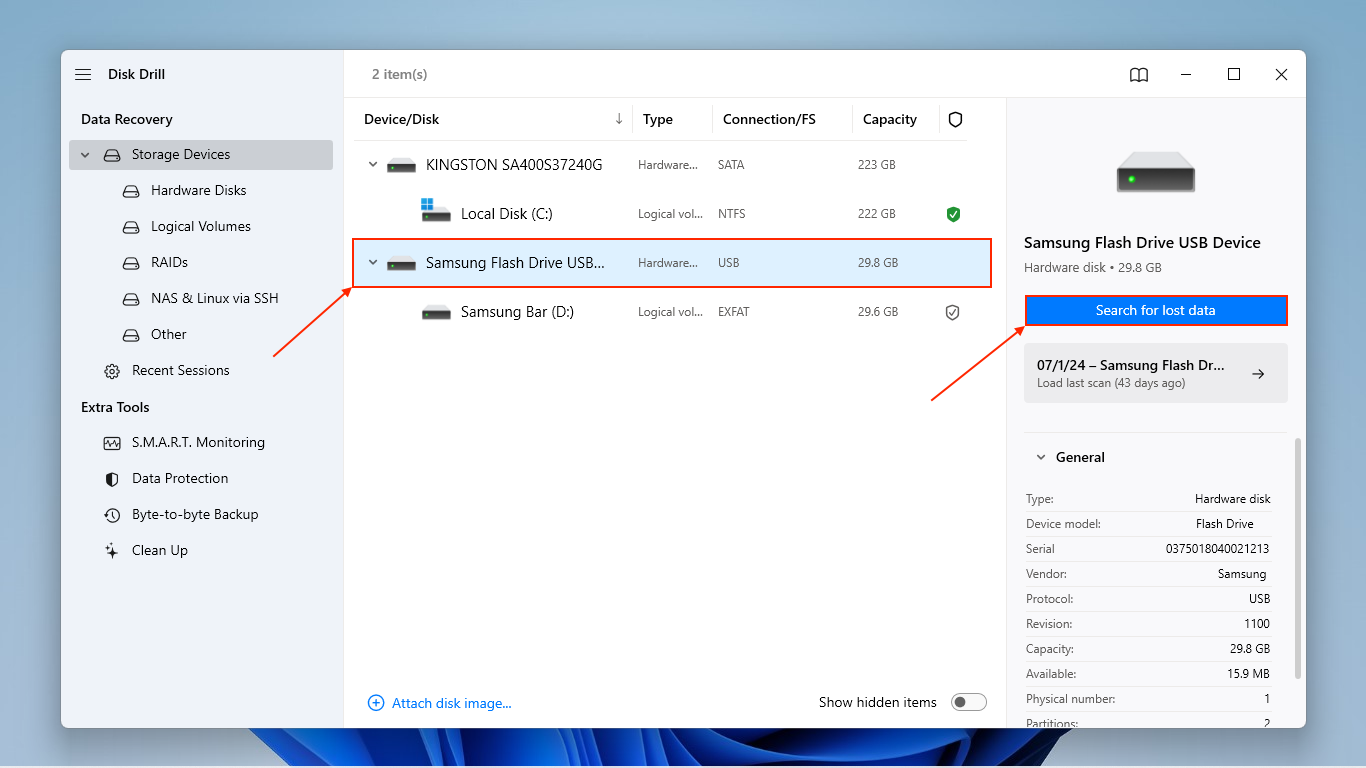
For this demonstration, we’ll be using an app called Disk Drill. It runs 3 scan types at once (Deep Scan, Quick Scan, Signature Scan), which makes it optimal for recovering drives that are corrupted or highly fragmented.
Disk Drill also has one of the largest file signature databases among its competitors, supporting over 400 file extensions across documents, videos, images, and many more. This tool is critical in case the file system is in disrepair.
We can use Disk Drill’s free trial to restore up to 500 MB of data for no cost.
Disk Drill also lets you scan your drive and preview your files as many times as you want for free. This is useful for finding out which files are recoverable.
- Download and install Disk Drill.
- Open Disk Drill and select the affected drive. Then, click Search for lost data.
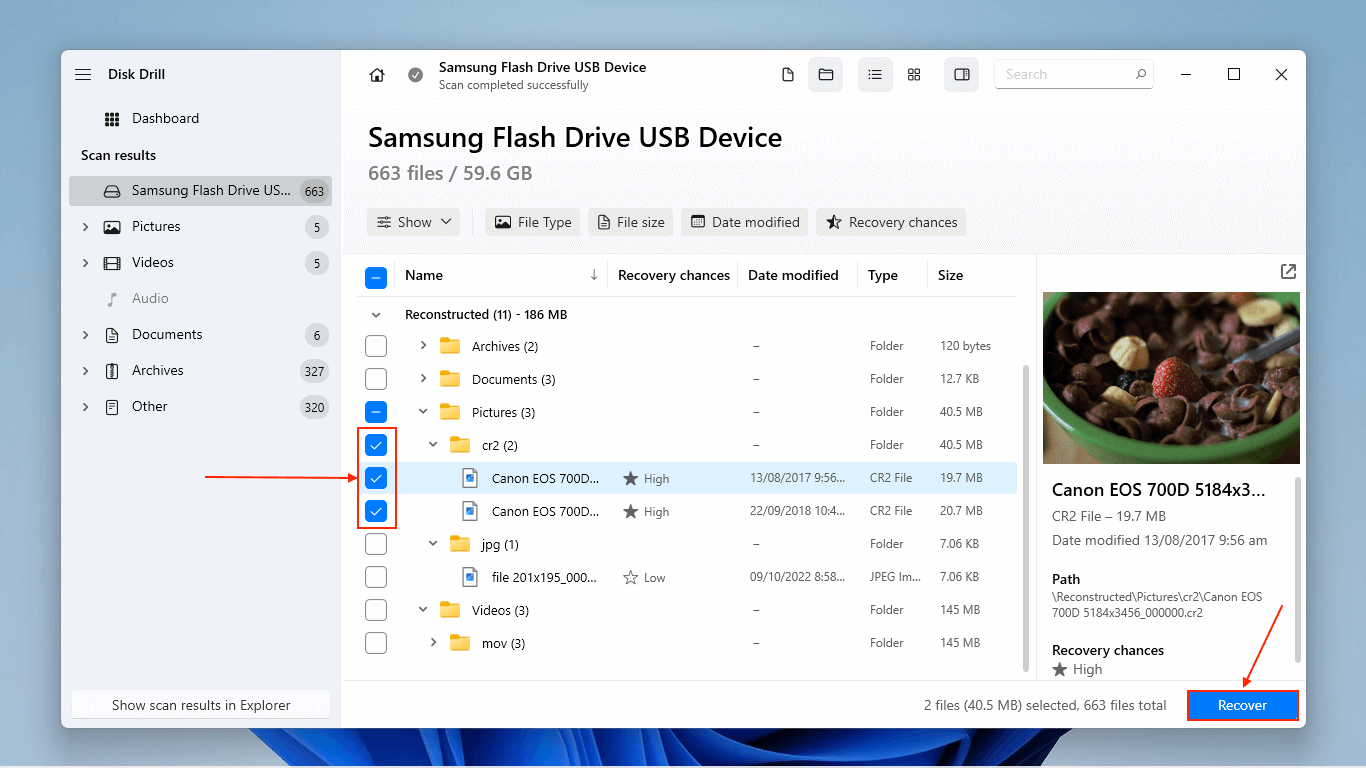
- Once Disk Drill is done scanning your drive, click Review found items.

- Use the filters in the left sidebar as well as the search tool if you want to browse specific file types only. Clicking on a file once will display its preview. Then, mark the boxes beside the files and folders you want to restore and click Recover.
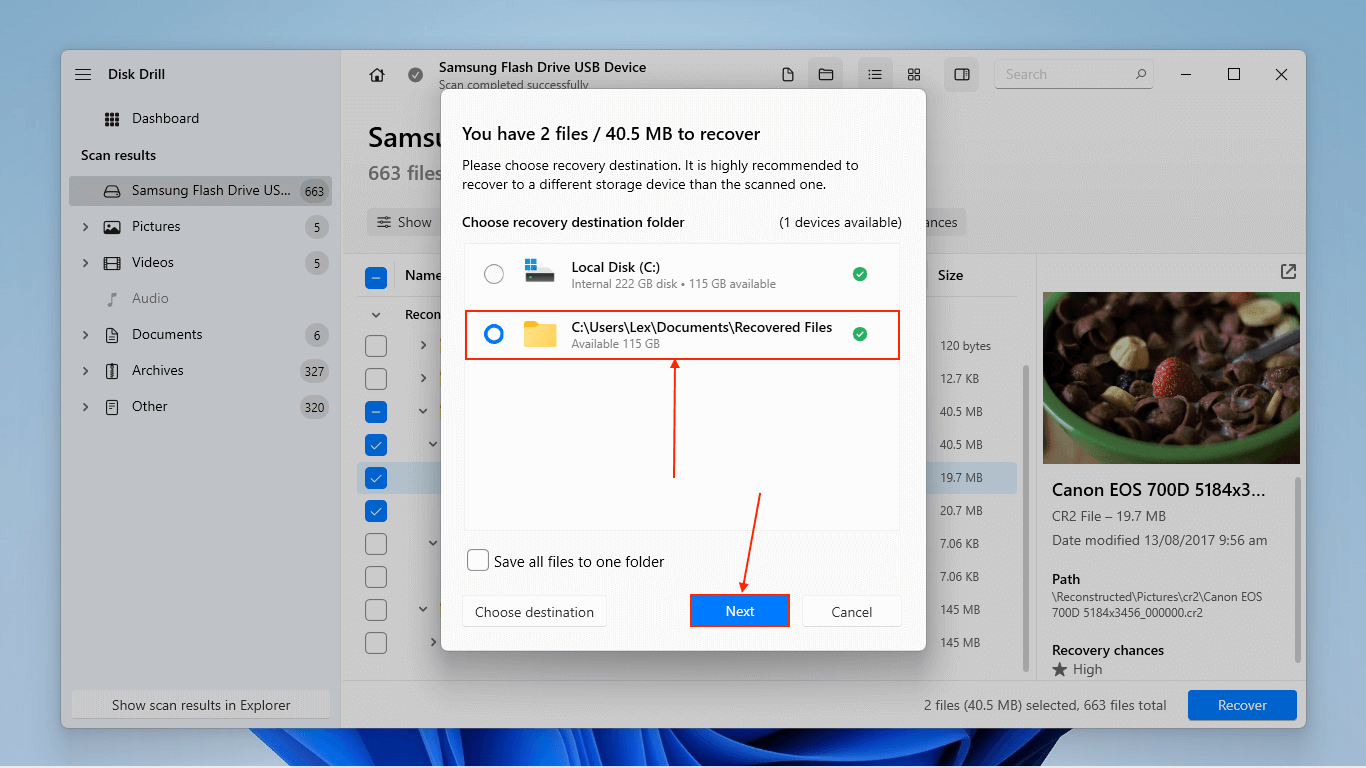
- Choose a location for the recovered files (make sure you don’t select the affected drive). Then, click Next.


Wait! Just in case you need to run CHKDSK in the future…
Even though it has the potential to cause data loss, CHKDSK is stil very useful tool for repairing drive errors – especially since you don’t need technical knowledge to use it.
You can still use CHKDSK without losing files, even on a malfunctioning drive. The key is to recover the data from your corrupted drive before running CHKDSK. Once your data is secure, it won’t matter if the CHKDSK command deletes files. You can even format your drive and start fresh!